To avoid these ads, REGISTER NOW!

The thread of Dimple!! Finally.

Stooge

Well-known member
Joined
Mar 24, 2013
Messages
3,533
Location
South Shore, MA
Ooomph! I remember you posting those 'grimples' on a jeep running board on IG, great idea!

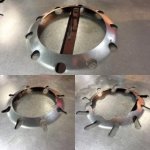
Ive been getting worse at remembering to take pictures of stuff, but atleast here is the finished washer fluid tank cover


And some quicky exhaust hangers , 1/8"


20160704_140623_zpsacypng7a.jpg


To avoid these ads, REGISTER NOW!

rwcarnut

New member
Joined
Sep 27, 2009
Messages
4
Location
Platte City , MO
When will pipe size dimples be ready, need to order a set. Can't wait to put these bad boys into action!

Sent from my HTC Desire 626 using Tapatalk
 
OP
N

NASTYZEN

Well-known member
Joined
Jun 11, 2010
Messages
2,823
Location
St-Colomban,Que. Canada
When will pipe size dimples be ready, need to order a set. Can't wait to put these bad boys into action!

Sent from my HTC Desire 626 using Tapatalk

There is hope. In fact I'm getting the latest batch of dies back from the platers this week! I made lots.:pimpflash
Stand by for more of an update real soon.

Thanks for posting your dimple related stuff guys.Some real nice work right there. I like those grimples. Pretty cool Motobilt, a bit aggressive but looks great. Maybe leaving something like a 1/16'' rad might be more practical though.
 

az45

Well-known member
Joined
Mar 19, 2014
Messages
298
Location
Tucson
I restore and race vintage off road cars/trucks one of the trucks I'm working on now is the earliest I've seen dimple dies used. The truck was built in 87 and raced until 91 by Larry Ragland. It was designed and built by Brian Kudella who owned a company called Light Racing. Light Racing was mostly an engineering company, but sold some odd tools and suspension parts. One of the products were dimple die sets, which are now what Specialty Products is selling.

The truck was very well engineered and they used dimple dies so they could use lighter material. The truck won over half the races(no DNF's) entered as an Unlimited Class 7 when Ford, Toyota, Nissan, Dodge and Chevy were pouring piles of money into desert racing to showcase their mid sized trucks.

Whats amazing about this truck is how perfectly straight it still is and I've yet to find a stress crack.

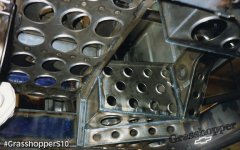
Here's a couple images, pic with the raw steel is from 87 when it was being built. The others are as it is now while being restored.
 

Attachments

  • 88 vegas grasshopper watermarked 5_8.jpg
    88 vegas grasshopper watermarked 5_8.jpg
    34.7 KB · Views: 188
  • dimple die original build 1 water marked.jpg
    dimple die original build 1 water marked.jpg
    121.7 KB · Views: 235
  • bottom pre build 1 5_8 web witermarked.jpg
    bottom pre build 1 5_8 web witermarked.jpg
    122 KB · Views: 236
  • rear end pre build stripped 5_8 web watermarked.jpg
    rear end pre build stripped 5_8 web watermarked.jpg
    128.2 KB · Views: 240

bggrnchvy

Well-known member
Joined
Nov 14, 2011
Messages
590
Location
Pleasant Hill, CA
I restore and race vintage off road cars/trucks one of the trucks I'm working on now is the earliest I've seen dimple dies used. The truck was built in 87 and raced until 91 by Larry Ragland. It was designed and built by Brian Kudella who owned a company called Light Racing. Light Racing was mostly an engineering company, but sold some odd tools and suspension parts. One of the products were dimple die sets, which are now what Specialty Products is selling.

The truck was very well engineered and they used dimple dies so they could use lighter material. The truck won over half the races(no DNF's) entered as an Unlimited Class 7 when Ford, Toyota, Nissan, Dodge and Chevy were pouring piles of money into desert racing to showcase their mid sized trucks.

Whats amazing about this truck is how perfectly straight it still is and I've yet to find a stress crack.

Here's a couple images, pic with the raw steel is from 87 when it was being built. The others are as it is now while being restored.

That's really neat. Any other pictures you would care to share I'd love to see! We ran a few BITD races, amazing eye candy on tech days.

The dimple set I have is an SPC Light Racing set in fact.
 

az45

Well-known member
Joined
Mar 19, 2014
Messages
298
Location
Tucson
So. Many. Shocks!

The original design had a single custom shocks, but it added another 200k to the price of the project, so they had to work with off the shelf Bilstein race shocks that were modified to work. You can see 2 hoses to each reservoir instead of the common single hose. The double hose would circulate the oil instead of push and pull it into the reservoir.
 

bggrnchvy

Well-known member
Joined
Nov 14, 2011
Messages
590
Location
Pleasant Hill, CA
So is that a cantilever shock arm with integral sway bar? Back in 87, wow, that's pretty cool.

I really like the milled leaf spring plates with mounts for all 3 shocks in a staggered orientation.

While I totally understand the theory of actually recirculating the shock oil, the results must be functionally very signficant to risk that many more hoses and fittings as possible failures.
 

az45

Well-known member
Joined
Mar 19, 2014
Messages
298
Location
Tucson
I'll start by saying I didn't mean to jack the thread, I'll keep responding until it bugs someone. I also will say that the fab shown in this thread is great and I live in the off road fab world as part of my business. That said, I'm not great at it but have people around me that are.

The extra hose allowed the oil to circulate which made the shock run cooler(one side is a check valve) which is always the fight in desert racing, especially back then. Today's shocks are huge with totally different designs that run substantially cooler. In the old days, you could cook the paint off of a standard twin tube Rough Country. So yes, the additional hoses are well worth it.

The mill work on the lower shock mount is bad a$$, all done on a mill without CAD.
 

370

Well-known member
Joined
Jan 26, 2012
Messages
130
Ok so I read this whole thread. I want a set but I see on the site that nasty's dies will gall a bit when used on steel. How thick of steel can they be used on safely?
 

Stooge

Well-known member
Joined
Mar 24, 2013
Messages
3,533
Location
South Shore, MA
Ok so I read this whole thread. I want a set but I see on the site that nasty's dies will gall a bit when used on steel. How thick of steel can they be used on safely?

I cant speak for Nastyzen's dies as I haven't had any hands on with them, but I have the set that DV8 posted about half way up this page, and have used them on 1/8" steel with no problem and I remember when he was developing them, he had used them on 3/16" seemingly without issue
 

bggrnchvy

Well-known member
Joined
Nov 14, 2011
Messages
590
Location
Pleasant Hill, CA
I'll start by saying I didn't mean to jack the thread, I'll keep responding until it bugs someone. I also will say that the fab shown in this thread is great and I live in the off road fab world as part of my business. That said, I'm not great at it but have people around me that are.

The extra hose allowed the oil to circulate which made the shock run cooler(one side is a check valve) which is always the fight in desert racing, especially back then. Today's shocks are huge with totally different designs that run substantially cooler. In the old days, you could cook the paint off of a standard twin tube Rough Country. So yes, the additional hoses are well worth it.

The mill work on the lower shock mount is bad a$$, all done on a mill without CAD.

I've got a pick somewhere of a couple of 3 or 3.5" Fox 4 tube bypasses with the clear Fox stickers on the reservoir tubes darned near torched off after a BITD lap race. They're just blackened and bubbling. Nutty how hot they will get.
 

370

Well-known member
Joined
Jan 26, 2012
Messages
130
I cant speak for Nastyzen's dies as I haven't had any hands on with them, but I have the set that DV8 posted about half way up this page, and have used them on 1/8" steel with no problem and I remember when he was developing them, he had used them on 3/16" seemingly without issue

Yes but at that price point there are a bunch of places to buy them. Swag off-road offers them as well around the same orice range.
 
To avoid these ads, REGISTER NOW!
OP
N

NASTYZEN

Well-known member
Joined
Jun 11, 2010
Messages
2,823
Location
St-Colomban,Que. Canada
Actually got them all boxed and ready to go a while back but got swamped with work again... Last item to get sorted is the Paypal billing stuff. My son is going through exams this week but should be free next week . Unless I get a breather and fix it myself.

Please stand by.


dv8customs

Well-known member
Joined
Dec 29, 2007
Messages
162
Location
East Texas
Yes but at that price point there are a bunch of places to buy them. Swag off-road offers them as well around the same orice range.

They are $550 at swag and $390 at AVS.

I believe one of the reasons that Nastyzen is able to offer such an attractive price is that his dies are not hardened. Which is why he recommends them for thin gage aluminum and they obviously do a great job at what they are designed for.

If you want to do repeated work on steel you will need a set of hardened dies. As stooge said, the dies at AVS can handle 3/16" steel no problem.
 

bbcc

Active member
Joined
Aug 1, 2012
Messages
39
Location
Edmonton
Some great lookin work guys! Here's my latest dimple project. Brackets to hold electric fans on a 64 Pontiac rad. Sorry nastyzen, not made with your die's but I gotta say yours look like a wicked option for the hobbyist!
 

Attachments

  • IMG_20161009_023730667_HDR[1].jpg
    IMG_20161009_023730667_HDR[1].jpg
    142.8 KB · Views: 135
  • IMG_20161008_212123941_HDR[1].jpg
    IMG_20161008_212123941_HDR[1].jpg
    157.4 KB · Views: 145
  • IMG_20161009_024743186_HDR[1].jpg
    IMG_20161009_024743186_HDR[1].jpg
    154.5 KB · Views: 148

iajonesy

Well-known member
Joined
Feb 8, 2009
Messages
2,468
Location
Iowa
What are the dies priced at now? I know I've asked in the past, but my memory is getting bad. Thanks.

Mike
 
OP
N

NASTYZEN

Well-known member
Joined
Jun 11, 2010
Messages
2,823
Location
St-Colomban,Que. Canada
Well it's all up and running guys. What should of happened in May ended up taking all this time and here we are in October...please accept my apologies to all of the members who have been left hanging and perhaps postponing there projects.

So I thought maybe we could have a little fun by having a contest.
If it's OK with the Mods and I'm not breaking any rules here.

Submit a photo of a dimple or dimple project you have accomplished in a Macgiver fashion with a small description of how you did it. In this case, without proper dies but rather something you came up with using bits in the shop. There are already a few examples in prior posts in this thread.
The contest starts now.
The contest ends at the stroke of new years eve.
The submission must be something YOU accomplished. Not a cut n past from the web. To make it fair for the others.
The winner will be chosen by vote from the crew over here.
The prize is a 6 piece Dimple Die kit shipped free to the deserving members door.

Here's an example.
I made this door kick plate out of 1/8'' plate using mismatched punching dies on my iron worker. Makes it easy to open the door with your arms full.


I believe one of the reasons that Nastyzen is able to offer such an attractive price is that his dies are not hardened. Which is why he recommends them for thin gage aluminum and they obviously do a great job at what they are designed for.

If you want to do repeated work on steel you will need a set of hardened dies. As stooge said, the dies at AVS can handle 3/16" steel no problem.

Exactly, besides with 3/16'' thick the dies have to be re gaped.

Some great lookin work guys! Here's my latest dimple project. Brackets to hold electric fans on a 64 Pontiac rad. Sorry nastyzen, not made with your die's but I gotta say yours look like a wicked option for the hobbyist!

This thread is meant to be about everything dimple. Thanks for sharing.

What are the dies priced at now? I know I've asked in the past, but my memory is getting bad. Thanks.

Mike

Just go over to my web site. All the info is there. Out of respect to this site. I'd rather not talk pricing here.


Good luck to all of you. Now off to your garages!
 
OP
N

NASTYZEN

Well-known member
Joined
Jun 11, 2010
Messages
2,823
Location
St-Colomban,Que. Canada
Hmmm. My free giveaway is off to a slow start..

Maybe you need some motivation.
Here's another example of an unconventional dimple tool. I only needed it to dimple 4 parts. So I used easy to carve MDF wood.


Tight fitting blank.


I used my 10 ton shop press.


The finished part.

 
OP
N

NASTYZEN

Well-known member
Joined
Jun 11, 2010
Messages
2,823
Location
St-Colomban,Que. Canada
Hey guys, time for another unconventional Dimple. I made this for the same race car tub. This panel being the top of the foot well.

Again I only had a few parts to produce so I used MDF as a mold material.

Top of die.


Bottom die.


Part held in place with good ol duct tape to the bottom die.

10Tons is plenty for .035 material. Even this big of a dimple.


Bottom die off.


The freshly dimpled part.:rocker:


fergus

Well-known member
Joined
Oct 4, 2009
Messages
1,620
Location
Yolo County CA
I restore and race vintage off road cars/trucks one of the trucks I'm working on now is the earliest I've seen dimple dies used. The truck was built in 87 and raced until 91 by Larry Ragland. It was designed and built by Brian Kudella who owned a company called Light Racing. Light Racing was mostly an engineering company, but sold some odd tools and suspension parts. One of the products were dimple die sets, which are now what Specialty Products is selling.

The truck was very well engineered and they used dimple dies so they could use lighter material. The truck won over half the races(no DNF's) entered as an Unlimited Class 7 when Ford, Toyota, Nissan, Dodge and Chevy were pouring piles of money into desert racing to showcase their mid sized trucks.

Whats amazing about this truck is how perfectly straight it still is and I've yet to find a stress crack.

Here's a couple images, pic with the raw steel is from 87 when it was being built. The others are as it is now while being restored.

This is FREAKIN AWESOME. I remember seeing Larry Ragland race when I was a kid.
 
OP
N

NASTYZEN

Well-known member
Joined
Jun 11, 2010
Messages
2,823
Location
St-Colomban,Que. Canada
How big can you dimple? BIG!


Actually, I made this to form Stainless Steel plates for the juice carts for the Montreal casino. I made the entire cart but can't find the old pictures just yet.. Note the hole in the bottom die to eject the pressed part. They are made of Alu. yet can form S/S.

Found an old reject one that slipped when being pressed.


Peace and health to all!


Reddittj

New member
Joined
Dec 8, 2016
Messages
4
This will be my first post on this forum, I usually just lurk around. I'm usually on offroad forums but the idea of dimpling led me here a few weeks ago. I'm building a 46 CJ2a and wanted to build some side steps with a few dimples. I've looked all over at some creative dimple techniques. I tried this a few days ago with a ball from the inside of a ball valve and a small cylinder liner. They didn't stay centered, but I'm still learning.
 
Last edited:

Tinsmith

Member
Joined
Dec 5, 2013
Messages
11
Location
Fort St John B.C.
HAPPY NEW YEAR! to all. Hear is my contribution to the Forum. I have wanted to build a adult sized GT snow racer for a while now, So the parents can partake in some of the action as well. :3gears: I was originally going to try a tapered chisel over a pipe technique. But came up with this idea instead, using some copper plumbing fittings. I used a 1’’x1/2 reducing coupling as the flare pressed into
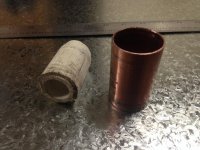
1-1/4 copper pipe. Tried it a few times but was difficult to get perfectly centred. The factory coupling end of 3/4 PVC pipe fits snug inside the 1-1/4 copper pipe, but still needed a short piece of PVC in the coupling to centre the flare correctly. I made the box frame to lift the seat up 5’’. Drilled the holes for the layout, and Flared:rocker:The Metal was 22ga (.64mm) which is fairly thin but it flared it with little effort and disortion in the vise. Going to see if I can find some heavier metal, and report back. Cheers
 

Attachments

  • IMG_0777.jpg
    IMG_0777.jpg
    137.9 KB · Views: 116
  • IMG_0782.jpg
    IMG_0782.jpg
    134.5 KB · Views: 127
  • IMG_0786.jpg
    IMG_0786.jpg
    139.7 KB · Views: 143
  • IMG_0781.jpg
    IMG_0781.jpg
    134.5 KB · Views: 121
  • IMG_0784.jpg
    IMG_0784.jpg
    138 KB · Views: 121
OP
N

NASTYZEN

Well-known member
Joined
Jun 11, 2010
Messages
2,823
Location
St-Colomban,Que. Canada
Things are heating up nearing the deadline for the FREE dimple die set!!
Great posts guys. :rocker:keep them coming.
You still have 8 hrs to get a chance to get a set of these.
All you have to do is submit a photo of a dimple or dimple project you have accomplished in a Macgiver fashion with a small description of how you did it. In this case, without proper dies but rather something you came up with using bits in the shop. There are already a few examples in prior posts in this thread.
The contest ends at the stroke of new years eve.
The submission must be something YOU accomplished. Not a cut n past from the web. To make it fair for the others.
The winner will be chosen by vote from the crew over here.
The prize is a 6 piece Dimple Die kit shipped free to the deserving members door.


Who's going to win??

Happy New Year to everybody. May health, happiness and prosperity be a daily thing to all in the new year. peace every one.
 

machine_punk

Well-known member
Joined
May 14, 2011
Messages
2,540
Location
Napa Valley, California
This isn't for the competition. It IS my own work, but I used the SWAG dimple die set.

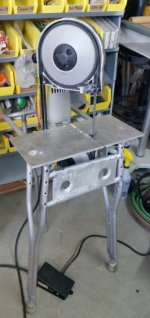
This is the stand I built, for the Milwaukee portable band saw. I put a plate on the front to stamp some identifying information and decided there was enough room in there for a couple of dimples.

Here is my setup. The SWAG dimple dies, with the HF knockout set, with a foot-controlled air-over-hydraulic pump. About $800 USD for everything you see here, for 5 hole sizes.

Kev
 

Attachments

  • AeroCrutch Bandsaw Stand.jpg
    AeroCrutch Bandsaw Stand.jpg
    68.2 KB · Views: 190
  • Hydraulic Punch and Dimple Dies.jpg
    Hydraulic Punch and Dimple Dies.jpg
    92.4 KB · Views: 172
Last edited:

Reddittj

New member
Joined
Dec 8, 2016
Messages
4
Tinsmith, it didn't look like you have any issues with distortion?
I was messing with ideas and most of the other ideas we had distorted the sheet too much.
We work in natural gas so and there is always random stuff to use. That was the best we have came up with. We are not sheet metal workers by far. The welded ball hitch wasn't as good I thought it would be.

I like seeing these ideas. At least we can show them and not get flamed like most forums.

I assume that if we had a bolt running through it it would keep it straighter.

I really like the wood form. It gives me an idea for a brace I need to make for the body.


Tinsmith

Member
Joined
Dec 5, 2013
Messages
11
Location
Fort St John B.C.
Hi Reddittj. I think that the trailer hitch, pulled down it that cylinder liner would work well if you could keep the ball centred in the cylinder. Would you be able to use the threads and nut on the hitch, and screw it down to flare the hole?
 
OP
N

NASTYZEN

Well-known member
Joined
Jun 11, 2010
Messages
2,823
Location
St-Colomban,Que. Canada
Happy New Year guys!:beer:

Thank you guys for posting up your projects.:thumbup: I will show the 2 eligible submissions to my crew when there all available and let them decide on the winner.

I like how Machine_punk used crutches for his saw stand. Very creative.

Reddittj as Tinsmith mentioned, if you had a bolt going through both dies and part. It would help greatly to keep everything aligned. I had a hard time keeping all the dies and part lined up with my casino plate project for that reason. Sometimes, even when everything is good when you start to bend, the part may be drawn to one side as you apply pressure and end up way off by the time you bottom out the dies.
 

Reddittj

New member
Joined
Dec 8, 2016
Messages
4


I'm assuming I'm putting too much pressure with the press to get the deformation.


The middle one I didn't press as far, I went till the sheet deflected back flat. I used a bolt on the middle and it was mostly straight.

I have some knock out punches that I am tempted to try to create a larger hole. Is the larger hole with just the rim flared just for aesthetics? It does look better.
 
OP
N

NASTYZEN

Well-known member
Joined
Jun 11, 2010
Messages
2,823
Location
St-Colomban,Que. Canada
Hello guys!
Brutal first week back from holidays... But it's all good, and we have a winner!

Tinsmith, you are the victor of the challenge. Congratulations! PM me your coordinates so I can send you a set.

Reddittj thank you for your contribution, but in this challenge, there can only be one.:rocker:

( I'm assuming I'm putting too much pressure with the press to get the deformation. )
Actually what is happening is that you are drawing the material into the die, in effect shrinking the sheet in that spot and creating warpage. That's why we use a larger hole with matching dies.

( Is the larger hole with just the rim flared just for aesthetics? It does look better.)

It stems from aviation. It reduces weight and once dimpled gets a whole lot stiffer. It also just so happens to look pleasing to the eye.
 
To avoid these ads, REGISTER NOW!
Top Bottom