To avoid these ads, REGISTER NOW!

Between 705 & 1200 SQ/FT The Time Machine Garage - 32x24 with loft

Workspaces between 705 and 1200 squarefeet.
OP
G

Gerald O

Well-known member
Joined
Mar 5, 2013
Messages
1,884
Location
NC
Sean, let me guess... you're a Buick fan?!

Lets see, I've owned (counting on fingers)
Ten, in this order:
61 Special wagon
62 Special wagon
63 Special sedan
63 Wildcat sedan
63 Wildcat coupe
69 Riviera GS
62 Skylark convertible
82 Century coupe
84 Skyhawk
Currently 49 Super Sedanet
 
To avoid these ads, REGISTER NOW!

Super Sport

Well-known member
Joined
Jun 30, 2011
Messages
4,081
Location
West Michigan
Gerald, I've just caught up on your build. Very cool! With the houses my wife and I are looking at, I might need to do something like this due to setbacks, etc. You have done a great job so far, and I can't wait to see it all finished!
 
OP
G

Gerald O

Well-known member
Joined
Mar 5, 2013
Messages
1,884
Location
NC
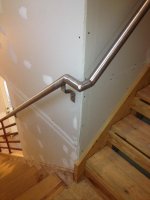
Finished up the lower stair guard railing. My welder started malfunctioning halfway through the job, and I had to fight it all the way to get halfway decent welds.
I think maybe the cheap argon regulator it came with is going bad. I really should replace it with a good flow-meter.

So it's just painted with red oxide primer. I actually kind of like this finish and might leave it this way.

Next I need to build the handrail for the upper stairs, which is just a railing -- not a guard.

attachment.php
 

Attachments

  • IMG_3855.jpg
    IMG_3855.jpg
    134.6 KB · Views: 1,724
Last edited:
OP
G

Gerald O

Well-known member
Joined
Mar 5, 2013
Messages
1,884
Location
NC
Gerald, I've just caught up on your build. Very cool! With the houses my wife and I are looking at, I might need to do something like this due to setbacks, etc. You have done a great job so far, and I can't wait to see it all finished!
Thanks SS!
Dealing with constrained lot lines really is a hassle. Good luck!
 
OP
G

Gerald O

Well-known member
Joined
Mar 5, 2013
Messages
1,884
Location
NC
Love this build and that handrail is a work of art! Well done, sir.

Praise not deserved, but thanks krc.

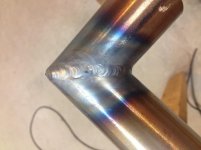
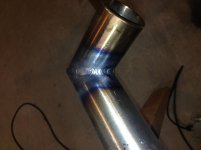
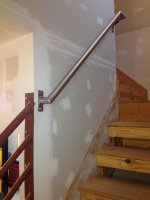
Well, I got started on the upper railing and couldn't weld a damn thing with the TIG. It was acting like no shield gas was present but there was definitely flow through the cup. Every attempt to weld just resulted in a dirty spongy mess of boiled burnt steel. So I resorted to stick welding for a while. That worked ok but was ugly as hell. Since this was where you slide your hand along, every weld needed a lot of grinding to smooth it up and to clean up the stick weld spatter.

I still wanted to get the TIG working. I thought maybe I had contaminated argon and changed the bottle out, but the problem still persisted. This time I noticed a peculiar pattern in the staining around the weld that suggested uneven flow. I took the torch apart one more time, looking very carefully, and noticed that the tungsten collet was fitting poorly. Changed the collet over to a different one that fit better and that instantly fixed the problem! So last night I was able to finish everything up with the TIG. Sooo much easier!

attachment.php


attachment.php


attachment.php
 

Attachments

  • IMG_3869.jpg
    IMG_3869.jpg
    64.8 KB · Views: 114
  • IMG_3872.jpg
    IMG_3872.jpg
    52.9 KB · Views: 114
  • IMG_3897.jpg
    IMG_3897.jpg
    110.3 KB · Views: 1,589
  • IMG_3898.jpg
    IMG_3898.jpg
    116.1 KB · Views: 1,576
  • IMG_3904.jpg
    IMG_3904.jpg
    54.6 KB · Views: 1,580
OP
G

Gerald O

Well-known member
Joined
Mar 5, 2013
Messages
1,884
Location
NC
Time for some color in the shop!
I finally got the stairwell drywall finished and painted. I had been dreading this task because of the difficulty working in this tight and tall space. Had to assemble/disassemble/reassemble the scaffold about a dozen times through the process. Now on to more enjoyable tasks.
 

Attachments

  • IMG_3926.jpg
    IMG_3926.jpg
    142.3 KB · Views: 138
  • IMG_3923.jpg
    IMG_3923.jpg
    147.3 KB · Views: 135
  • IMG_3921.jpg
    IMG_3921.jpg
    136.7 KB · Views: 136
OP
G

Gerald O

Well-known member
Joined
Mar 5, 2013
Messages
1,884
Location
NC
You know you've been waiting a long time for service when...

I was working out in the shop last night for a while before noticing this scene in my old Buick!


attachment.php


Seems my wife has quite a sense of humor!
 

Attachments

  • IMG_3909.jpg
    IMG_3909.jpg
    139.1 KB · Views: 72
  • IMG_3916.jpg
    IMG_3916.jpg
    141.7 KB · Views: 1,402

shortykorte

Well-known member
Joined
Sep 1, 2014
Messages
8,039
Location
Tallahassee, Fl
Just browsing and came across your build. I really like the vintage bathroom. That first (second) year GL1000 is sweet. Looks like you will have a very nice place to work and hang out.
 
OP
G

Gerald O

Well-known member
Joined
Mar 5, 2013
Messages
1,884
Location
NC
Railings came out very classy.
Thanks! I don't know about classy but they are sturdy. I actually got the inspiration for them from the place where I work which is an old repurposed cigarette factory; "The American Tobacco Campus." The campus has acres of metal railings in this style. I want to continue with a mid-century industrial style theme and get a lot of ideas from this place.

Just browsing and came across your build. I really like the vintage bathroom. That first (second) year GL1000 is sweet. Looks like you will have a very nice place to work and hang out.
Thanks shorty. This may be my one and only shop build, so I'm in it for the long run.
I've had the Wing for about 18 years. It only had 8K miles on it when I bought it. Still only has about 25K. I'm pretty much a fair-weather rider but I do manage to get out several times each year. I find myself lusting after something new, but the old GL1100 just seem to keep going.

Glad to hear about the widely ranging TEN Buicks you have enjoyed, you are a good man!

Keep us posted I love the updates.
If you ever get over to the AACA forum I've got a thread on the '49 in the Buick section.
http://forums.aaca.org/topic/227121-49-super-sedanette-survivor/?page=1
I believe your wife thinks you haven't taken her for a drive in the Buick in a while. LOL Good sense of humor. Love the rails on the stairs. Tig welding is a work of art. Thanks for the updates.
You may be right! Though I think she wants to me get her Mustang going so she can drive it.
I only showed some of my better TIG welds. There are some REAL artists on this board that humble me. I'm still quite the beginner with it. Seems that when everything is working right it's a joy to weld with. But when things go wrong it's horrible.
 
To avoid these ads, REGISTER NOW!
OP
G

Gerald O

Well-known member
Joined
Mar 5, 2013
Messages
1,884
Location
NC
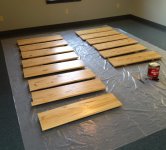
Progress update. Just about finished with the stairs. I had been planning to keep the original solid pine treads that have been in place since the beginning, but construction work has taken a toll on them and they've also gotten warped from being left unsealed and loosely fastened. So I cut all new treads and have them just about ready for installation.

I put the climate controlled loft to use as a finishing area for applying the oil-based polyurethane to the stair treads. They get sanded downstairs, and then finished upstairs in a clean, dust-free environment where the temperature can be set to the ideal level. This is after the second coat on top. I'll sand them one more time and put the final top coat on tonight. The end grain and bottoms were also sealed to reduce chances for future warping and splitting.

attachment.php


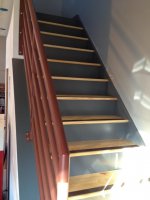
Stair risers were cut from 1x8 pine and finished with two coats of Sherwin Williams ProClassic oil-based alkyd enamel.
Lots of time to watch paint dry...

attachment.php
 

Attachments

  • IMG_3938.jpg
    IMG_3938.jpg
    105.5 KB · Views: 1,688
  • IMG_3933.jpg
    IMG_3933.jpg
    89.1 KB · Views: 1,680
OP
G

Gerald O

Well-known member
Joined
Mar 5, 2013
Messages
1,884
Location
NC
Stair treads are done. Hopefully the 3 coats of polyurethane will be tough enough to keep that pine looking good for a while. It made them rather slick though, so I added some 3M anti-slip strips.
attachment.php


It's hard to get a good picture with the lighting in here and sunlight streaming in through the windows. I messed up the paint on the wall after the so-called "paint safe" masking tape ripped off the paint and even some of the drywall paper. Tape was only on the wall for a few hours.

attachment.php
 

Attachments

  • IMG_3941.jpg
    IMG_3941.jpg
    103.2 KB · Views: 1,623
  • IMG_3946.jpg
    IMG_3946.jpg
    81.5 KB · Views: 1,620
OP
G

Gerald O

Well-known member
Joined
Mar 5, 2013
Messages
1,884
Location
NC
Reached a milestone

Reached a major milestone today on the build. Passed final inspection on the permits!
Inspector was happy with everything, and didn't find any defects that needed correction.
This is a big stress reliever. Signed off and CO received!
 

Attachments

  • IMG_3958.JPG
    IMG_3958.JPG
    107.4 KB · Views: 122

GLTHFJ60

Well-known member
Joined
Oct 31, 2013
Messages
821
Location
Durham, NC
Congrats!!! That's about three years from start of project to final sign off or were there other final sign-offs?
 
OP
G

Gerald O

Well-known member
Joined
Mar 5, 2013
Messages
1,884
Location
NC
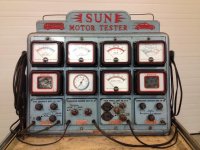
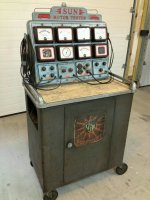
Just got this"new" tool.
It's an antique Sun automotive "Master" engine tester.
This one was made in the late 1940s. Has all the original manuals and is said to be working.

attachment.php
 

Attachments

  • IMG_3954.jpg
    IMG_3954.jpg
    142.9 KB · Views: 610
  • IMG_3955~2~2.jpg
    IMG_3955~2~2.jpg
    141.9 KB · Views: 2,466
Last edited:
OP
G

Gerald O

Well-known member
Joined
Mar 5, 2013
Messages
1,884
Location
NC
Congrats!!! That's about three years from start of project to final sign off or were there other final sign-offs?
Thanks! Previously I had gotten a "conditional" CO from the county when the shell was completed for the benefit of the contractor. Not sure what that meant but it had notes stating that they were expecting me to finish the inside. So this is the final final. I'm done with the county and permits.
 

GLTHFJ60

Well-known member
Joined
Oct 31, 2013
Messages
821
Location
Durham, NC
Thanks! Previously I had gotten a "conditional" CO from the county when the shell was completed for the benefit of the contractor. Not sure what that meant but it had notes stating that they were expecting me to finish the inside. So this is the final final. I'm done with the county and permits.

Awesome :) I bet it feels good and definitely worthy of celebration!
 
OP
G

Gerald O

Well-known member
Joined
Mar 5, 2013
Messages
1,884
Location
NC
Made a Coca Cola bottle cap clock and added a couple mini LED spotlights.

attachment.php


attachment.php
 

Attachments

  • clock_01.jpg
    clock_01.jpg
    55 KB · Views: 1,432
  • clock_02.jpg
    clock_02.jpg
    51.7 KB · Views: 1,425

camarosrus69

Well-known member
Joined
Aug 7, 2013
Messages
243
Location
South central Kansas
I'm envious of both your pop machine and clock. I do, however, think the hands should be white, or you'll have a hard time reading it when the hands are over the bottle.
 
OP
G

Gerald O

Well-known member
Joined
Mar 5, 2013
Messages
1,884
Location
NC
I'm envious of both your pop machine and clock. I do, however, think the hands should be white, or you'll have a hard time reading it when the hands are over the bottle.
Thanks for the suggestion. You got me worried, so I checked. Turns out it is easily visible in-person. Just my poor photography makes it look worse.
 
OP
G

Gerald O

Well-known member
Joined
Mar 5, 2013
Messages
1,884
Location
NC
Congratulations on getting it all done. It looks fantastic, hope to see updates to continue.

Will do. I think my next task will be finishing the drywall mud in the garage and then at least getting it primered. I've already got most of the mudding done -- just needs final touchup and sanding. I'll probably paint the ceiling in a satin white for lighting reflectivity, but continue with the steel gray-blue on the walls.
 
OP
G

Gerald O

Well-known member
Joined
Mar 5, 2013
Messages
1,884
Location
NC
Starting to move in to the loft.
I'm going to be having so many guests stay for the holidays that it looks like I'll need to use the loft as a temporary 'bunkhouse'. We have a bonus room over the other original garage that I promised the wife I'd turn into a theater room. I've been storing my junk and hobby stuff in there since we moved in. Most of what's in there is going to be moved into my new garage loft, but these pinball machines were the first big items to get moved.

Luckily they both fit nicely into the dormer area. And I've still got room for a big desk/workbench in between.

attachment.php
 

Attachments

  • pinballs_05.jpg
    pinballs_05.jpg
    146.3 KB · Views: 84
  • pinballs_04.jpg
    pinballs_04.jpg
    146.2 KB · Views: 87
  • pinballs_06.jpg
    pinballs_06.jpg
    144.7 KB · Views: 89
  • pinballs_02.jpg
    pinballs_02.jpg
    142.6 KB · Views: 94
  • pinballs_01.jpg
    pinballs_01.jpg
    62.7 KB · Views: 1,324

-Brent-

Well-known member
Joined
Dec 23, 2009
Messages
4,709
Location
Utah
Wow, what a place. Excellent work! Anyone that uses the terms like "in situ" will always turn my ears up. Your fit and finish is exemplary!
 
OP
G

Gerald O

Well-known member
Joined
Mar 5, 2013
Messages
1,884
Location
NC
Hi Brent, thanks for stopping by. I visited your garage thread and saw what you are doing there. I like your creativity in making the most out of an existing building.
As for mine, all my problems are self-inflicted. It will be nice to actually begin using this space instead of just building it, but I think I can see the light at the end of the tunnel...
 
OP
G

Gerald O

Well-known member
Joined
Mar 5, 2013
Messages
1,884
Location
NC
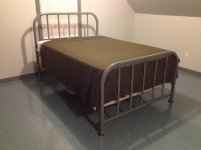
With Christmas coming up I had to make accommodations for all the family that is going to be staying over. We were one bedroom short, so the garage loft is going to serve as a temporary bunkhouse.

My daughter had spare double mattress set so we borrowed that. But it didn't have a frame. So I picked up an old (really old) bedframe at the flea market. It was pretty crusty with rust and 3 or 4 partial layers of flaking paint.

I used an air powered needle scaler to chip away all the loose stuff and got it to this stage.
bed_01.jpg

Then I stripped the remaining paint and rust with an angle grinder fitted with various heavy wire brush wheels. Since there's a good chance the old paint had lead in it, I wore full protective gear and did it outside in the driveway. Looked like a hazmat operation, and the dog barked at me the whole time.

Before painting I treated it with phosphoric acid metal prep to convert any remaining rust and give a good surface for paint adhesion. Painting was done in the warm, clean loft using Sherwin Williams oil-based enamel leftover from my trim painting, and left to dry for several days.
bed_05.jpg

bed_08.jpg

With the paint dry I tested out the fit of the assembled bed in the loft. This thing takes up too much room so it's going to go away after the holidays. But just to be sure, I fitted it out with some nice and itchy army-grade wool blankets -- just to make sure that the guests are not too cozy and reluctant to leave. ;)

bed_09.jpg
 
Last edited:

redman333

Well-known member
Joined
Oct 26, 2011
Messages
175
With Christmas coming up I had to make accommodations for all the family that is going to be staying over. We were one bedroom short, so the garage loft is going to serve as a temporary bunkhouse.


My daughter had spare double mattress set so we borrowed that. But it didn't have a frame. So I picked up an old (really old) bedframe at the flea market. It was pretty crusty with rust and 3 or 4 partial layers of flaking paint.


I used an air powered needle scaler to chip away all the loose stuff and got it to this stage.

bed_01.jpg


Then I stripped the remaining paint and rust with an angle grinder fitted with various heavy wire brush wheels. Since there's a good chance the old paint had lead in it, I wore full protective gear and did it outside in the driveway. Looked like a hazmat operation, and the dog barked at me the whole time.


Before painting I treated it with phosphoric acid metal prep to convert any remaining rust and give a good surface for paint adhesion. Painting was done in the warm, clean loft using Sherwin Williams oil-based enamel leftover from my trim painting, and left to dry for several days.

bed_05.jpg


bed_08.jpg


With the paint dry I tested out the fit of the assembled bed in the loft. This thing take up too much room so it's going to go away after the holidays. But just to be sure, I fitted it out with some nice and itchy army-grade wool blankets -- just to make sure that the guests are not too cozy and reluctant to leave. ;)


bed_09.jpg


Ha that bed brings back some memories from boot camp.


Sent from my iPhone using Tapatalk
 

BoilermakerFan

Well-known member
Joined
Apr 17, 2006
Messages
2,188
Location
Indianapolis, Indiana
Great build Gerald! So... how's the brick veneer wall coming along?

What year is your GL1100? '80? I have an '81 that is my major project motorcycle. Spending the most time and money on it. Building it in phases. Right now I'm rewiring the bike using a MotoGadget m-Unit and m-Button to keep it really clean. I'm about to pull the frame off the engine this summer too.

The early GL1100s made in Japan are great bikes. The only new touring bike I would want is a Goldwing F6B Deluxe, but $23K is just way too much. I can rebuild all of my other bikes for less than that.
 
To avoid these ads, REGISTER NOW!
Top Bottom