
You are using an out of date browser. It may not display this or other websites correctly.
You should upgrade or use an alternative browser.
You should upgrade or use an alternative browser.
Above 1200 Sq/FT The Warthog Hidey Hole
- Thread starter jbmatth
- Start date
Wokspaces above 1200 squarefeet.
I have seen nothing to lead me to believe this machine has ever had a coolant pump. I know some did but this one doesn't seem to have ever had one. It also doesn't have the cam thing to prevent the blade from dragging on the backstroke. Thanks for the color information. The rust on the bottom is mostly surface, but I won't know how rough it is until it is blasted.
Sent from my bag phone.
Sent from my bag phone.
Mike.ASC
Well-known member
Mike.ASC,
Do you happen to remember what color it was? I'm starting to wonder if I should go with a different color than I have planned. The only color I've found on the entire thing was black on some of the parts. I've cleaned up some more on it and only have a couple hours more of media blasting left before I take it to the powder coating shop.
Sorry I don't remember for sure but I think it was some dull grey color , it's been a long time .
Bib Overalls
Well-known member
Very cool. Ryan, put me down for five stars.
Lately between working on my '67 Comet (yes I still have it, story to follow.) and the CMB I've been cleaning up the HaSPHS (Heavy as Sin Powered Hack Saw).
Here are some pictures oh what it looked like before cleaning:


I was going after this thing with a scraper and wire brush for about a weeks worth of mornings and afternoons to create this much mess, wow that was a lot of gunk and grime built up.

This is how it was a couple of days ago, I've started using a wire wheel on a drill and it has made this go WAY faster. Some of the metal shavings had combined with grease to make a concoction that was nearly impossible to remove and looked a lot like the cast finish:

I'm still working on it, and will have most of it back together by the end of the week, I'm dropping the motor off to have it checked out this week and will test run it before I pull it all apart to finish it off. What are ya'll thoughts on how I should finish it, paint, POR 15, or something different? I still haven't messed with the base yet so don't worry it will get cleaned up more before I'm done.
Now for a quick story on the Comet. I've been trying to sell it and haven't had much luck, it hasn't been running right since the cold weather hit and I couldn't figure it out until yesterday. The choke wasn't activating and was causing it to run choked until I was giving it a lot of gas. I was able to fix that only to find a leak on the power valve that I'll have to get fixed before driving it again. That valve leaks gas onto the exhaust manifold which isn't good!
I was telling my wife about the troubles with it and she said well if you sell it and paint the inside of the house I'll let you get another car. Another car??!!! Yeah buddy, the only stipulation is it had to be complete and running so I wouldn't have to work on it all the time. So I'm on the hunt for a fun car that I can drive year round. I'm thinking anything from an old beetle to an M35A3 to a Nova to a turbo LS swapped car. I don't know what the budget will be yet as the Comet has to sell, and the old house has to sell as well.
I could see ya in a old VW bus, other than you probably prefer something you don't have to tinker with ALL the time?
I didn't realize you were in a old Quonset building? those old round tops are so cool, I always wanted a old one.
ZZ Top was great like the last time they were there, too bad you didn't have the time, this time.
The old wooden table looks like it could of came off a old wooden sailboat, with pirates, arhhh

Very cool. Ryan, put me down for five stars.
Thank you Bib, I don't know if I truly deserve 5 stars with this little shack, but I'll take what I can get. By the way thanks for stopping by and keep checking in I assure you I have some interesting stuff coming down the line.
JB
Last edited:
I could see ya in a old VW bus, other than you probably prefer something you don't have to tinker with ALL the time?
I didn't realize you were in a old Quonset building? those old round tops are so cool, I always wanted a old one.
ZZ Top was great like the last time they were there, too bad you didn't have the time, this time.
The old wooden table looks like it could of came off a old wooden sailboat, with pirates, arhhh
Bus... na I'd rather have a beetle chopped, lowered, and a giant v8 up front or maybe a turbo on the old flat 4! I would love something to tinker on all of the time, but I have a lot of that going on right now. I like the building but hate it at the same time! Those curved walls are giving me fits on how to best utilize the space, insulate, and cover them all while keeping it water tight with that old tin roof. I'd love to see ZZ Top as I want to grow a beard like that when I retire, (Can't have facial hair in my current job.) but they are not my wife's style of music.
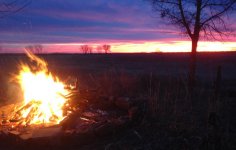
I have a little bit of an update that I'm sure some of you will love. This past weekend it was wonderful outside so I decided to do a little yard work. I asked my 3 year old daughter if she would like to help and she suprisingly said yes. We first decided to make a fire pit using some of the rock and old concrete from around the property then burn some of the old fence posts and limbs that have accumulated. The timing worked out and I was able to get a few cool pictures.
The fire pit right at dusk:


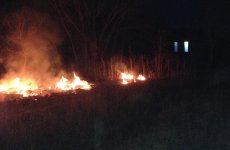
This was another stack that I didn't want to move so I started another fire, I had the lights on in the Warhog Hidey Hole and I thought it made a pretty cool photo.


I also got a call from my Grandfather who has been a farmer outside of Kansas City for his entire life. The farm has been in their family for almost 120 years and is still going strong. He has seen some of the work I've done on the Bolens Handy Ho (In my Garden Shed build in my sig line.) and on the HaSPHS and thought I might be able to work some magic on his fathers old tractor. They have been bleeding green from their first tractor so of course it was it is a John Deere. It is a 1947 John Deere Model B and he wanted to make me a screaming deal on it if I wanted to use it then restore it sometime down the road. So I have to make a trip at some point to go pick it up. I don't know much about tractors other than how to use one, but know some of the history on this one. His father, my great grandfather bought it new in 1947 to replace their old steel wheeled tractor. It is a 2 cylinder gasoline engine and it runs great, but needs a cosmetic restoration. So I'll get to add that to my to do list as well. I'll have more shortly that may earn me the coveted "You ****" award. Stay tuned...
The fire pit right at dusk:
This was another stack that I didn't want to move so I started another fire, I had the lights on in the Warhog Hidey Hole and I thought it made a pretty cool photo.
I also got a call from my Grandfather who has been a farmer outside of Kansas City for his entire life. The farm has been in their family for almost 120 years and is still going strong. He has seen some of the work I've done on the Bolens Handy Ho (In my Garden Shed build in my sig line.) and on the HaSPHS and thought I might be able to work some magic on his fathers old tractor. They have been bleeding green from their first tractor so of course it was it is a John Deere. It is a 1947 John Deere Model B and he wanted to make me a screaming deal on it if I wanted to use it then restore it sometime down the road. So I have to make a trip at some point to go pick it up. I don't know much about tractors other than how to use one, but know some of the history on this one. His father, my great grandfather bought it new in 1947 to replace their old steel wheeled tractor. It is a 2 cylinder gasoline engine and it runs great, but needs a cosmetic restoration. So I'll get to add that to my to do list as well. I'll have more shortly that may earn me the coveted "You ****" award. Stay tuned...
Attachments


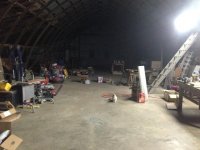
What do you see wrong with these two photos besides the huge mess that I have to work around?


If you answered there are lots of dark areas you would be the winner. I want more light in the Warthog Hidey Hole and have been doing a little research on the matter and came to the conclusion I need a total of 36-4' (1.3m) 4 bulb T-8 fixtures to give me the quality and quantity of light I want. Well I already had 4 T-12 fixtures but only two were hanging in the Warthog Hidey Hole when I purchased it. I converted them to T-8 fixtures with the daylight 6500k bulbs. That made a big difference, but as you can see in the above photos was still way too dark. I decided to do a quick craigslist search and found a guy selling T-12 fixtures from a commercial building that we going to be thrown away. I picked up 34 in decent shape with ballasts and bulbs and 5 more that were going to need some work. How much you ask, oh just $175 for 39 freaking fixtures!!!!! Yeah not even $4.50 each and most of them even work.

Well next I needed to find bulbs and ballasts to make them into T-8 fixtures. I found another guy selling 40 cases of 6500k bulbs with 25 bulbs in each case. 1,000 bulbs for $1 each. I'm only picking up 150 because I don't need that many and didn't want to spend that much on lights right now but I had to just go for it. Now the hunt is on for some cheap new ballasts and wire. If anyone has suggestions let me know. The best I know for ballasts are on ebay I can get the kind I want for around $13 each, and a 1,000' (330m) reel of 12/2 wire is $300 at lowes. My to do list just got huge in the past few months.")
If you answered there are lots of dark areas you would be the winner. I want more light in the Warthog Hidey Hole and have been doing a little research on the matter and came to the conclusion I need a total of 36-4' (1.3m) 4 bulb T-8 fixtures to give me the quality and quantity of light I want. Well I already had 4 T-12 fixtures but only two were hanging in the Warthog Hidey Hole when I purchased it. I converted them to T-8 fixtures with the daylight 6500k bulbs. That made a big difference, but as you can see in the above photos was still way too dark. I decided to do a quick craigslist search and found a guy selling T-12 fixtures from a commercial building that we going to be thrown away. I picked up 34 in decent shape with ballasts and bulbs and 5 more that were going to need some work. How much you ask, oh just $175 for 39 freaking fixtures!!!!! Yeah not even $4.50 each and most of them even work.
Well next I needed to find bulbs and ballasts to make them into T-8 fixtures. I found another guy selling 40 cases of 6500k bulbs with 25 bulbs in each case. 1,000 bulbs for $1 each. I'm only picking up 150 because I don't need that many and didn't want to spend that much on lights right now but I had to just go for it. Now the hunt is on for some cheap new ballasts and wire. If anyone has suggestions let me know. The best I know for ballasts are on ebay I can get the kind I want for around $13 each, and a 1,000' (330m) reel of 12/2 wire is $300 at lowes. My to do list just got huge in the past few months.
Attachments


Another quick update, I dropped off all of the parts to the HaSPHS at the powder coating facility today. He gave me a better estimate on how much it will cost for all of the parts to be pre-baked, final blasting on some of the surface rust, high temp tape, and coating.  For the price I probably could have gotten my own equipment and done it myself and bought an oven to do it in. Oh well lesson learned I'll do that next time, I want this to look professional.
These were parked out in the parking lot at work today:
This is one of our clerks, she just had it repainted and it looks amazing!

This is one of our mechanics:

That is a warmed over LSA with around 625 hp in an air boat. That engine would be much nicer in my cobra or Comet.
That is all for now have a great weekend ya'll.
JB
For the price I probably could have gotten my own equipment and done it myself and bought an oven to do it in. Oh well lesson learned I'll do that next time, I want this to look professional.These were parked out in the parking lot at work today:
This is one of our clerks, she just had it repainted and it looks amazing!
This is one of our mechanics:
That is a warmed over LSA with around 625 hp in an air boat. That engine would be much nicer in my cobra or Comet.
That is all for now have a great weekend ya'll.
JB
Attachments


madoc1
Well-known member
bummer on the powder coating. you should look on craigs list or elsewhere and get a cheap/free oven. heck, I have one just so you will drag it off. then get kit from eastwood and do your own! way cheaper., and you can keep doing things only for the cost of materials and electric.
jim
jim
If I'd have known before I would have gone that route, however it is what it is. I'll know better next time. Now I'm researching how to build the controls for an oven that is bigger than a standard oven and building a blast cabinet. Oh the things I get myself into.
Sent from my bag phone.
Sent from my bag phone.
I like how people say " well they are just junk, or in my way, and I'm gonna throw them away anyway"". then it cost you a couple hundred dollars.
OH well I've bought plenty of I'm just gonna throw them away things in my life. Good find on the lights.
I just bought some LED lights from Amazon and they cost me around $20.00 each delivered. They are 30w, but are outdoor landscape from LE, you can look under the lighting part and see some info on them. look under lighting for new shop by wildcard.
I would run some angle iron across the top of your A frame about 14 to 16 feet high for your new lights, should be bright enough to read warning labels on paint cans
so what color is the ole band saw going to be??
Last edited:
Nice score on the lights! You've got a great space there...
Love the old Bronco
Thank you roadhouse, your place isn't so shabby either though. It is a work in progress and there is a ton of work to do. I love the volume of space but that means I need more of everything insulation, wiring, and lights. Luckily the lights have been pretty cheap so far. Keep watching, there will always be more coming.
Bugthug, I've still got some planning on the lights as I don't have enough T-8 ballasts yet, but eBay is slowly helping with that. As for the color on the HaSPHS you'll just have to wait and see.
If it works I'll show you, if it doesn't look good I'll just show you a blurry picture. LOLSent from my bag phone.
Last edited:
Not another blurry picture
Yeah yeah I know, my pictures are terrible most of the time, and aren't great the rest of the time. With better lighting and this newer phone hopefully they will improve. I purchased 7 T-8 ballasts from ebay this weekend for $7.54 each, now I only have 26 more to buy. Also I was able to get a better deal on the bulbs, I paid $.83 each for them. I have lots to do, keep yourself entertained while I try to tackle some of the projects and actually get something completed rather than just starting 15 different things at once.
Maybe you say somewhere on here, but where in OK do you live? from the pictures it looks like around Pryor to Tulsa area? just curious
I used to live in Ponca City, but moved up almost to Kansas. It is really quiet there, I maybe have 5 vehicles come by the house every day and one of those is the mail truck.
Last edited:
well hell you live closer to me than I thought, I'm probably about 25 - 30 miles from you. I'm here in Winfield. Wife goes down to the 7 clans about every other week, I waste my money on garage and car stuff. Maybe we can meet up sometime, I like to go for Sunday drives, could swing by and check out your round top.
Maybe we can meet up sometime, I like to go for Sunday drives, could swing by and check out your round top.well hell you live closer to me than I thought, I'm probably about 25 - 30 miles from you. I'm here in Winfield. Wife goes down to the 7 clans about every other week, I waste my money on garage and car stuff.
I figured you were close, but didn't know how close you really were. If you want to come check it out anytime just send me a PM and we can make it work out. I'll just warn you that this place is a mess as you can see in the photos, but is a major work in progress. So many things to do and so little time, oh and little money of course.
While I'm waiting on paint to dry er uh I meant to say waiting on powder coating to dry I've been working on a valentines day present for my wife. Typically when in the living room things just get set on the couch and then lost...
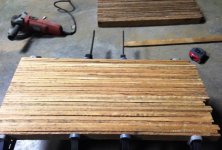
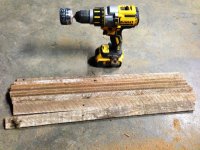
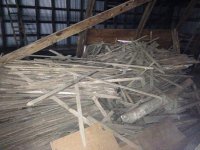
So I introduce you to the LET (Lathe End Table). I decided to take this stack of wood lathe that was saved from when the previous owner put drywall in the house. There are 3 more piles about this size so I can make lots of mistakes.

Cut them to the approximate length:

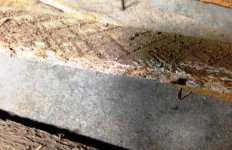
Some of these are really rough and still have plaster on them:

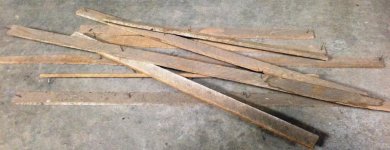
To keep from sanding for hours I used the wire wheel to take the majority of the nasty stuff off of them:

And all cleaned up:

Line them up and make sure I have enough when they are all pressed together. I'm aiming for a 12" x 24" (.3048m x .6096m) table:

I'm still working on it and don't have enough clamps to do it all at once. Hopefully it'll be mostly done this weekend then I'll just have to put the finish on. I'll let ya'll know how it works out.
So I introduce you to the LET (Lathe End Table). I decided to take this stack of wood lathe that was saved from when the previous owner put drywall in the house. There are 3 more piles about this size so I can make lots of mistakes.
Cut them to the approximate length:
Some of these are really rough and still have plaster on them:
To keep from sanding for hours I used the wire wheel to take the majority of the nasty stuff off of them:
And all cleaned up:
Line them up and make sure I have enough when they are all pressed together. I'm aiming for a 12" x 24" (.3048m x .6096m) table:
I'm still working on it and don't have enough clamps to do it all at once. Hopefully it'll be mostly done this weekend then I'll just have to put the finish on. I'll let ya'll know how it works out.
Attachments


That looked like a bunch of **** wood, until you got it cleaned. That has a lot of nice character to it. Is all that pile 2 X 4's? At least you have 2 weeks until Valentines day.
Never mind I just realized that stuff is lathe, when you said lathe I was thinking lathe like a Bridgeport turning machine. Silly me?
Never mind I just realized that stuff is lathe, when you said lathe I was thinking lathe like a Bridgeport turning machine. Silly me?
Last edited:
Correct they average just over .25" thick and are about 1.5" wide (6.35mm x 38.1mm). It took me 36 for the top shelf and 36 for the bottom then 4 more for each leg. I made a lot of dust cleaning each of these, I'll post the finished pictures soon.
I was all kinds of excited to install the light I converted and told ya'll about and even made it work. However, as it turns out I should have verified the color on the new bulbs. They aren't the bright white like the last set they are just "white" but appear to have a lot of red in them. You win some you loose some I guess.
Sent from my bag phone.
Last edited:
sean Buick 76
Well-known member
Really cool! I love the re-using of the old wood!

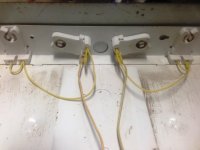
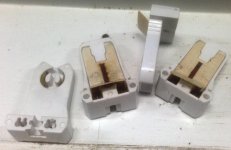
I'm going to give a quick little overview for Madoc1 on how I converted T-12 lights to T-8 lights. I only have thirty some odd of these to do so why not just show how I've handled it.
Here is what I've started with:

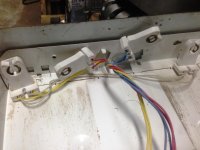
A pretty typical fixture from what I've seen. This is the wiring on one end, the old T-12 ballasts could only power 2 lights each. The new T-8 ballasts I have can power all 4 lights and are much smaller than the old ones. Here is how one set of plugs were wired:

Then the other side after removing the clips:

The whole unit:

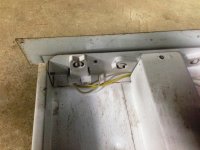
Here are the little clips, you can either stick a paperclip in above the wire to take the pressure off of them so they can be removed, or like I had to do pull back the backs of them to release the wires:

Then I used the wiring diagram on the ballast. (Note: Not all T-8 ballasts are wired the same, I'm using instant start ballasts and so far they are all the same, but I think rapid start ballasts are different.)

I cut little pigtails from the old ballasts and wired them according to the diagram:

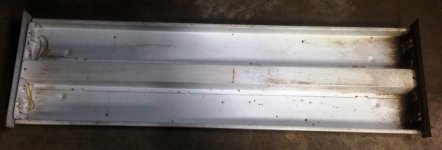
There you have it, all that is left is to wire them in, black to black, white to white, then ground the other wire to somewhere on the fixture.
Here is what I've started with:
A pretty typical fixture from what I've seen. This is the wiring on one end, the old T-12 ballasts could only power 2 lights each. The new T-8 ballasts I have can power all 4 lights and are much smaller than the old ones. Here is how one set of plugs were wired:
Then the other side after removing the clips:
The whole unit:
Here are the little clips, you can either stick a paperclip in above the wire to take the pressure off of them so they can be removed, or like I had to do pull back the backs of them to release the wires:
Then I used the wiring diagram on the ballast. (Note: Not all T-8 ballasts are wired the same, I'm using instant start ballasts and so far they are all the same, but I think rapid start ballasts are different.)
I cut little pigtails from the old ballasts and wired them according to the diagram:
There you have it, all that is left is to wire them in, black to black, white to white, then ground the other wire to somewhere on the fixture.
Attachments


Last edited:
madoc1
Well-known member
thx. for the conversion info, but all I can see are black exs. for the pics. I just need to read a little better and will figure it out. I only need to do two, not 30!
Madoc1,
I've sent you a PM, and updated the photos above pertaining to the lights.
I was able to pick up the parts to the HaSPHS yesterday and have everything back home. I was putting it together this morning and it was just too cold for me to take my gloves off to take photos. The parts look great and seem to be all coated quite well. I'll update this with more information when it is all back together. So everyone will just have to wait another day or two to see the color I picked.
Just as a heads up the total bill was $390, $150 each for two racks of powder coating, $45 for an hour of taping, and $45 for an hour of blasting the base and coating it. I'll have every bit of $500 in this saw by the time it is back in working order and perhaps closer to $550.
One last item, I have to table assembled and sanded. I'm waiting for a warm day to apply the finishes. It isn't perfect and I know what to do different next time but will pass for my first try. Have a great day all,
JB
madoc1
Well-known member
thx. for update. can see them now. got the pm
jim
got the pmjim
I'll start off by saying a big thank you to Thomas and Chris from the Restored 1930's Auto Shop. I am basically done with the HaSPHS, it is all together sporting a new powder coating finish that I love, and it even works, which I also love. This isn't quite the final chapter for the HaSPHS, but the rest of the story will have to wait for quite some time. The only remaining thing on the to do list is to find a more fitting motor, or at least make a cover for the new motor I was forced to use as the original it came with was shot. But that will have to wait...
Here is the color I went with:


It is pretty close to a hammered finish and is pretty gray even though it looks darker in some of the photos.
Here is how the inside turned out:

It is spectacular compared to how rough and rusty it was when I picked it up.
I love the way it turned out, have I said that before?


I knew it should work but I didn't know if it would in fact work. How do you prove it would work? Why you put in a piece of scrap and let her rip tator chip:

So that brings to a close this project at least for the time being.
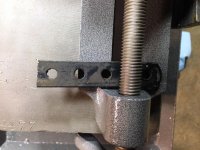
I went for a run this weekend on some of our land and saw a few things that excited me. First there were probably 30 pheasants out there, and I saw 9 deer including two nice bucks. The other thing that would be imedeatly useful was this:

It is a screw for a tail vise, not only that, but it is exactly the same as the one on the CMB (Cabinet Makers Bench). It was just there on the ground waiting to be picked up. I did just that and am now working to break the who knows how many years of rust off of it so I can get it to work again. It is in surprisingly good shape for being in the dirt all this time. Until next time, keep moving forward.
JB
Here is the color I went with:
It is pretty close to a hammered finish and is pretty gray even though it looks darker in some of the photos.
Here is how the inside turned out:
It is spectacular compared to how rough and rusty it was when I picked it up.
I love the way it turned out, have I said that before?
I knew it should work but I didn't know if it would in fact work. How do you prove it would work? Why you put in a piece of scrap and let her rip tator chip:
So that brings to a close this project at least for the time being.
I went for a run this weekend on some of our land and saw a few things that excited me. First there were probably 30 pheasants out there, and I saw 9 deer including two nice bucks. The other thing that would be imedeatly useful was this:
It is a screw for a tail vise, not only that, but it is exactly the same as the one on the CMB (Cabinet Makers Bench). It was just there on the ground waiting to be picked up. I did just that and am now working to break the who knows how many years of rust off of it so I can get it to work again. It is in surprisingly good shape for being in the dirt all this time. Until next time, keep moving forward.
JB
Attachments


That looks great, should be the last paint job it will ever need. The color looks different in the pictures, but I like the hammered look. In fact any color would probably look good. Its even nice that it works.
I would get some bright red paint and do all the letters, maybe find a pin stripper
You might need a metal detector and go hunting for some real treasure. Who knows what you might find?
I would get some bright red paint and do all the letters, maybe find a pin stripper
You might need a metal detector and go hunting for some real treasure. Who knows what you might find?
Last edited:
I took a little video of the HaSPHS this morning and am trying to upload it to Youtube, hopefully this works for you. Warning I sound like a major redneck, but in reality I'm just a minor redneck. 
Hopefully you get some enjoyment out of that.
Bugthug,
Thank you for the kind words, I hadn't thought about a having the letters painted red, that would look sharp. I do need to run a metal detector around this place, it has been here for 90 years now as a house and the land was settled a few years before that.
80WTI_55_CHEV
Well-known member
The saw came out sweet jbmatth,it does move around a bit on the video, are you going to put some lock in wheels on it to limit the movement or just leave it as it is? also waiting for pics of that table you are making mate. Lee
I'm sure with the landrush back a couple hundred years ago, its probably had covered wagons and drunk cowboys leaving the bottles behind.
I'm sure there are some buried items, but I don't know what all there will be. My father says he will bring his metal detector out next time he comes for a visit so who knows what we might find. Maybe I'll find oil.
The saw came out sweet jbmatth,it does move around a bit on the video, are you going to put some lock in wheels on it to limit the movement or just leave it as it is? also waiting for pics of that table you are making mate. Lee
55 Chev,
The saw does move around a lot, and I don't plan on keeping it on the dolly it is on now. It is only there to make it easier to move around as it is really heavy and is powder coated on the bottom as well. I'll eventually find a permanent location for it an set it on the floor.
Funny you should mention the table. It is now done, I gave it to my wife a little early and she loved it. She liked it so much she wants me to make two more, one for the other side of the couch, and one for beside the chair. Enough of the talk here are the pictures.
What I started with:
Just a giant pile of firewood to the untrained eye.
Cleaned up with the wire brush:
Table top glued and ready to sand further:
Sadly I didn't take any pictures between the last one and this one, I was working lots of hours to get it done before Valentines Day:
Set in place:
I don't know why there is so much white showing, but in person you can't see it.
My oldest daughter has claimed it, she now wants to eat at it every night with here little chair:
To wrap up this project I'll say I don't have a lot of money in this, probably only $30 or so, but I do have around 30-40 hours in it. So if you take my hourly rate for the quality of work I do that means my wife has a $20 table.
If you have any questions let me know. (I promise I'll eventually get a better camera, but until then you'll just have to learn to love them. I mean why would I get a better camera when I could spend that money on the Warthog Hidey Hole.)On the project list next... Well I'm working on lighting, lots and lots of work on lighting. I have all of the fixtures and bulbs. I have ordered the last of the ballasts I will need on order, I have a total of 40 ballasts now and only need 36 so I'll have a few extra if I let any of the smoke out of them.
I picked up the last of the wiring I'll need last night and sadly couldn't get any better price than buying from a big box store. I still need to pick up a new breaker box and wire nuts because I don't have the right size for what I need. I'll try to post progress photos as I get things accomplished. Stay tuned...Attachments


madoc1
Well-known member
wow! that saw turned beautifully. nice work man.
jim
jim
Its amazing how much texture that old lath has, I guess you don't think of it as anything more than holding the plaster to the walls.
It looks just the right size for the daughter, you will have to brand the date on the bottom so she can keep it to hand down to her kids one day. Too bad you can't find some different nuts , or maybe changed them out for the acorn style?
It looks just the right size for the daughter, you will have to brand the date on the bottom so she can keep it to hand down to her kids one day. Too bad you can't find some different nuts , or maybe changed them out for the acorn style?