shortykorte
Well-known member
I have a 750ml bottle that I am constantly having to refill
1.5 last longer and is cheaper. lol
Sent from my iPhone using The Garage Journal mobile app

I have a 750ml bottle that I am constantly having to refill
Pure argon won't work on MIG. 80/20 at best is what Greg Weld replied to me a few years ago, and with that name, who's going to argue?
Sent from my SM-J320V using Tapatalk
You are correct, Bob. I should have said for mild steel. The CO2 allows better penetration and metal transfer on reg steel.Ric, I have one of my MIG machines set up for stainless and use 98% Argon/2% Carbon Dioxide.
I own three 40CF tanks and my 75/25 needs to be refilled. I'll let you know on refill price.
JB, I ponied up about 7-8 years ago and bought an M sized bottle, 125cf I believe. Current exchange at my place is $78.20 w/tax. Initial purchase was in the $140-160 range. This all relates to C25.
I've got 2 330cu ft bottles I own, 1 for C25 and 1 for Argon. C25 refill is $78 and Argon was $117. I have a 125cu ft for C25 that is aluminum so I can take the MIG to other locations easier. Refills for it are $58. I never use my 40cu ft as it always seemed to run out halfway through an important mission, lol. It cost $48 for a refill. This is ONE time when BIGGER is definitely BETTER! I only had to pay for the alum 125 bottle and it was$205. I obviously got them before you could only lease the big bottles. No one asks if I have a lease; they just exchange them. I always take a regulator to make sure the new one is full. They only guarantee 1800 psi, but they average 2050 to 2150psi. Airgas is more expensive than Phoenix Welding Supply by about 15%.
Sent from my SM-J320V using Tapatalk
Pure argon won't work on MIG. 80/20 at best is what Greg Weld replied to me a few years ago, and with that name, who's going to argue?
Sent from my SM-J320V using Tapatalk

Ric, I have one of my MIG machines set up for stainless and use 98% Argon/2% Carbon Dioxide.
I own three 40CF tanks and my 75/25 needs to be refilled. I'll let you know on refill price.
I have a 750ml bottle that I am constantly having to refill
You need argon for aluminum MIG.
And steel TIG.

You are correct, Bob. I should have said for mild steel. The CO2 allows better penetration and metal transfer on reg steel.
I want to get a transfer hose so I can cascade the smaller tanks. That way I can save $$$ by only refilling the big tank. While the big tank lasts forever, it's a pain to move the MIG welder around with a 150# bottle on the cart. I do that with my pellet gun tank and haven't had to have the big tank (4500psi) charged for 5 years. Sorry for the hijack.
Sent from my SM-J320V using Tapatalk


Well done JB
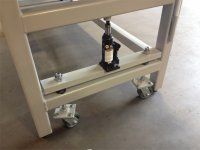
Neat idea for the adjustable casters. I get my tungsten from Midwest Tungsten Service and Amazon. Seems they have good pricing and no shipping charges with Amazon Prime.I like the 2%lanthanated as it works well with any metal. Has anyone tried using a flux on the inside of stainless tubing in lieu of backpurging? I saw a youtube video, but forgot the product name, and I haven't welded any stainless yet.
Sent from my SM-J320V using Tapatalk
So if I send you the Jeep head I pulled that is cracked in half you will have it welded up good as new? I will send it COD


Great progress on the TIG!
I'm still using Thoriated tungsten. I'm too old to worry about it.
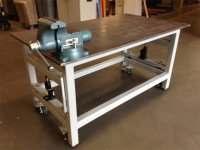
Nice job making the behemoth table portable!
Like that caster idea, JB! Looks a little tippy but I'm sure if you're careful it will get the job done. So interesting to see all the ways people are solving this particular problem.
Shorty,
Sure I can get it welded up war wagon, but COD is a sure fire way to get it returned to sender. Also note it'll be warped enough it'll need machined and most of the water jackets will probably be welded solid.
JB
Don't weld in California.
Do you happen to have a photo of it, that is crazy to think one could crack that bad? Luckily I've never destroyed a head, I've bent a few valves and rolled a bearing once but knock on wood no major failures that I caused.
JB
Don't weld in California.
My sentiments exactly.
No I didn't think about it until it was too late. I am not digging through the scrap yard to find it now.
WHATTTTT??? You never know what other cool treasures you could find out there though.


I have too many "treasures" here. And a Lithium mining company found lithium on my land, and bought my place, so I have to move. Less stuff makes an easier move.
JB: great idea on the casters and screw/bolt to raise and lower. I was going to build a bench with casters that raised and lowered with a little hydraulic jack, but now that i'm closing down my shop I'll have to find some space again to have a spot for it.
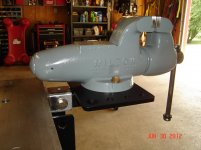
here's a few pictures. also with your welding skills have you seen the vise and grinders stands thread I started a few years ago cause hitch mounts seem to be the way to go to mount these to a working bench in my opinion.
here's the link:
https://www.garagejournal.com/forum/showthread.php?t=252799
also did you see what Andy's been cooking up on his thread?
cheers
I have a full argon bottle I'd sell ya
Thanks for the offer but I'm good for now...I think, I do go through a lot of Argon compared to mix when I'm welding though.
I have the same and am worried if I don't stay on top of things I'll have more than I can deal with. Good luck with the move, have you found a new place yet?
JB
Just kidding I assume you meant 2019, but good luck finding the house with shop, if you are lucky it'll even be insulated and have climate control.
JB
 hvac is!
 True! I have done more than a little outside, gravel drive, hot as a MuTHa car work. I’ve spoiled myself with this hvac. But I’m worth it...LoL.
Sent from my iPhone using Tapatalk
I feel like a little self torture is good for mental toughness. That is what I tell myself when I can't feel my fingers in winter and when I drive my DD without AC in the summer. It makes being comfortable that much more enjoyable. JB, good idea trimming the mount. I assume you already replaced the bushings on the upper control arms (or they don't need replacing).


![IMG_8178[1].jpg](/forum/data/attachments/750/750547-28e11fcc4d400605dc4e1bc0ccbc2f80.jpg)
![IMG_8182[1].jpg](/forum/data/attachments/750/750575-ee4f41b6bb8121fbef68c636f953f299.jpg)
![IMG_8183[1].jpg](/forum/data/attachments/750/750608-e1c2349b8d5a06e4912f691c1456fd32.jpg)