To avoid these ads, REGISTER NOW!

The Wife's She Shed

gutted72

Well-known member
Joined
Nov 22, 2012
Messages
266
Location
Jennings, OK
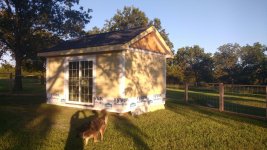
I know this isn't a garage, shop, barn, or man cave but it is something I have been working on all summer and I'm very close to the end of this project. I guess you could almost classify it as a tiny house with out a bathroom :)

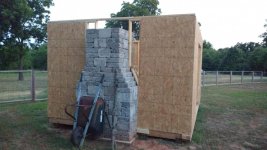
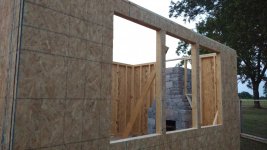
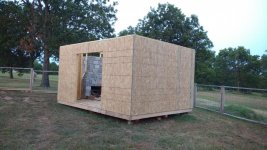
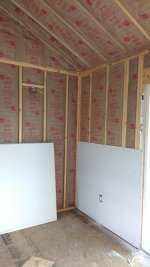
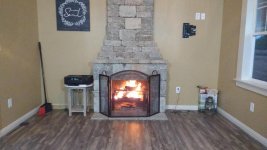
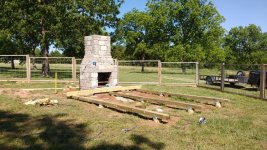
So here we go, I put up a fireplace a few years ago and I was going to just put up some kind of cover to sit under while I was outside having a beer and sitting by the fire.


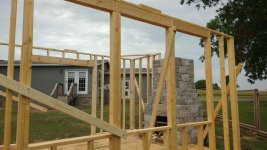
But as any married man knows, when the wife watches to many of those HGTV or DIY shows she gets too many ideas :shocking:

So with a lot of arguing and saying no, I started on her she shed :headscrat


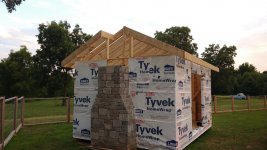
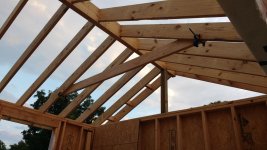
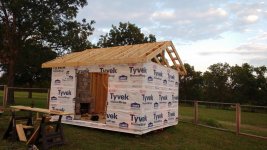
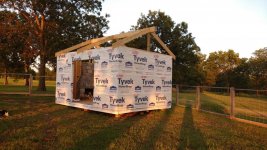
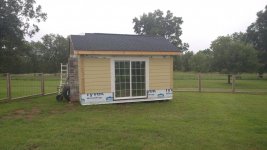
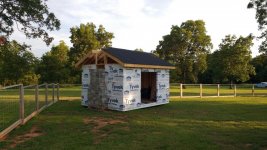
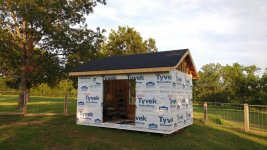
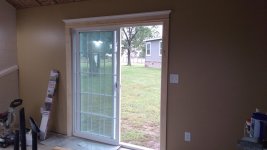
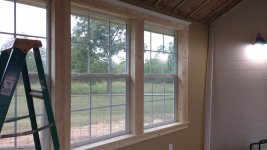
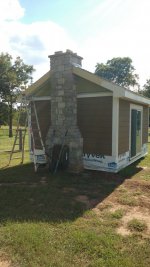
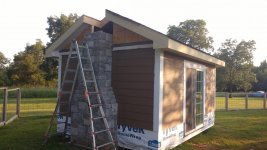
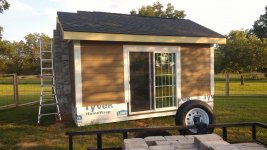
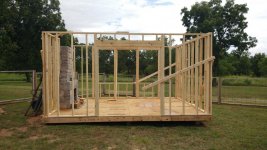
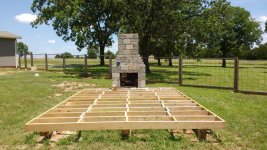
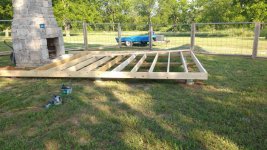
The Shed is 12' x 16'. sitting on 13 8"dia concrete piers 30" deep. 2"x6", 16" OC floor joists and 3/4" T&G decking.

Standard 2"x4" wall studs, 1 8' sliding glass door and 3 36"x60" windows.
 

Attachments

  • IMG_20180519_195945424.jpg
    IMG_20180519_195945424.jpg
    152.1 KB · Views: 920
  • IMG_20180526_161043362.jpg
    IMG_20180526_161043362.jpg
    148.2 KB · Views: 846
  • IMG_20180714_160909197.jpg
    IMG_20180714_160909197.jpg
    151.3 KB · Views: 728
  • IMG_20180714_160824542.jpg
    IMG_20180714_160824542.jpg
    151.1 KB · Views: 769
  • IMG_20180708_155701970.jpg
    IMG_20180708_155701970.jpg
    153.1 KB · Views: 767
  • IMG_20180617_132438929.jpg
    IMG_20180617_132438929.jpg
    150.1 KB · Views: 789
  • IMG_20180605_181633812.jpg
    IMG_20180605_181633812.jpg
    148.3 KB · Views: 773
To avoid these ads, REGISTER NOW!
OP
G

gutted72

Well-known member
Joined
Nov 22, 2012
Messages
266
Location
Jennings, OK
Once the walls were up I put some OSB on them and started on the roof :(

Of course the wife wanted a 10/12 roof pitch and I of course to her no way I'm putting that steep of a roof on a shed, she had to settle for a 6/12 pitch. Guess I won that battle :wtf:

A little over kill on the roof but it won't be coming down on my head :bounce:

I used 2 2"x10"s glued and screwed for the header and then I used 2"x8"s for the stringers. everything is screwed together with 3" deck screws set on 16" centers.
 

Attachments

  • IMG_20180804_201105199.jpg
    IMG_20180804_201105199.jpg
    151.3 KB · Views: 694
  • IMG_20180804_201618473.jpg
    IMG_20180804_201618473.jpg
    143.1 KB · Views: 2,157
  • IMG_20180804_201040237.jpg
    IMG_20180804_201040237.jpg
    153.2 KB · Views: 635
  • IMG_20180731_200935246.jpg
    IMG_20180731_200935246.jpg
    151 KB · Views: 625
  • IMG_20180728_204749750.jpg
    IMG_20180728_204749750.jpg
    149.5 KB · Views: 624
  • IMG_20180728_204729127.jpg
    IMG_20180728_204729127.jpg
    148.4 KB · Views: 592
  • IMG_20180728_204703029.jpg
    IMG_20180728_204703029.jpg
    152.4 KB · Views: 611
Last edited:

LXCam

ALLIANCE MEMBER
Joined
Apr 23, 2013
Messages
19,104
Location
AZ
Looking good. It sounds like you're already finished and just getting your posts in order so I'm sure my question will be answered shortly. But what did you do or will do about extending the chimney.
 
OP
G

gutted72

Well-known member
Joined
Nov 22, 2012
Messages
266
Location
Jennings, OK
Next up was the roof, joy...

I hate roofing :mad:

Once the roof was done, I moved onto installing the siding, windows, door, electrical, cable, insulation and that dang chimney.

Each one of those dang blocks weight 30lbs. I takes 16 blocks per row and I had to go up 7 more rows than what I already had. What a pain in the back...
 

Attachments

  • IMG_20180914_165054375.jpg
    IMG_20180914_165054375.jpg
    152 KB · Views: 665
  • IMG_20180903_165412748.jpg
    IMG_20180903_165412748.jpg
    66.6 KB · Views: 687
  • IMG_20180909_185607080.jpg
    IMG_20180909_185607080.jpg
    143.2 KB · Views: 683
  • IMG_20180909_185526530.jpg
    IMG_20180909_185526530.jpg
    151.7 KB · Views: 1,973
  • IMG_20180907_071739248.jpg
    IMG_20180907_071739248.jpg
    146.9 KB · Views: 686
  • IMG_20180808_192537055.jpg
    IMG_20180808_192537055.jpg
    149.4 KB · Views: 677
  • IMG_20180808_192424420.jpg
    IMG_20180808_192424420.jpg
    151.7 KB · Views: 686
OP
G

gutted72

Well-known member
Joined
Nov 22, 2012
Messages
266
Location
Jennings, OK
The extension of the fireplace was probably the biggest pain in the ****, just the shear weight of all those blocks.


But the hardest part isn't even done yet, I have to figure out how to get the 200lb cap put on the chimney without any equipment. my baby tractor bucket won't reach the roof :headscrat.

Of course the wife couldn't wait for me to finish so she could start painting, so she had to paint around what I was doing.

Got the inside windows and door trimmed out.
 

Attachments

  • IMG_20181013_104041506.jpg
    IMG_20181013_104041506.jpg
    118.1 KB · Views: 736
  • IMG_20181013_104021774.jpg
    IMG_20181013_104021774.jpg
    140.7 KB · Views: 789
  • IMG_20180926_155332134.jpg
    IMG_20180926_155332134.jpg
    61 KB · Views: 812
  • IMG_20180926_155316685.jpg
    IMG_20180926_155316685.jpg
    77.1 KB · Views: 992
  • IMG_20181005_153608621.jpg
    IMG_20181005_153608621.jpg
    99.7 KB · Views: 826
  • IMG_20180917_182306859.jpg
    IMG_20180917_182306859.jpg
    149.8 KB · Views: 815
  • IMG_20180917_182252728.jpg
    IMG_20180917_182252728.jpg
    151.3 KB · Views: 835
OP
G

gutted72

Well-known member
Joined
Nov 22, 2012
Messages
266
Location
Jennings, OK
Finally found some material that the wife found suitable to put on the ceiling..

The ceiling material I found at Home Depot, it's pre stained fence boards and the color was exactly what the wife wanted, so it saved me from having to do anything except cut and install :thumbup:

The last picture is where I am currently at. I got half of the floor installed last night and I will finish that up today, that only leaves the base boards and the exterior brick, which I can't do until next summer.
 

Attachments

  • IMG_20181018_175236306.jpg
    IMG_20181018_175236306.jpg
    72 KB · Views: 858
  • IMG_20181016_202836720.jpg
    IMG_20181016_202836720.jpg
    131.2 KB · Views: 770
  • IMG_20181016_181106284.jpg
    IMG_20181016_181106284.jpg
    134.1 KB · Views: 754
  • IMG_20181016_181044993.jpg
    IMG_20181016_181044993.jpg
    119.5 KB · Views: 779
  • IMG_20181014_201539211.jpg
    IMG_20181014_201539211.jpg
    121.8 KB · Views: 810

Mr. Roboto

Well-known member
Joined
Dec 11, 2012
Messages
2,160
Location
New Hampshire
Very cool! Good work. Just wondering, as I'm still learning about roof framing myself... without any collar ties or rafter joists, what keeps the walls from buckling outwards when there is a load on the roof? Or is that just not a concern down there if you do not get much snow?
 

Joe_K

Well-known member
Joined
Jan 12, 2018
Messages
202
That looks pretty awesome. Don't send this thread to my wife.
 

Joe_K

Well-known member
Joined
Jan 12, 2018
Messages
202
Did you pull a shed permit or was it unnecessary at that sq ft?
 
OP
G

gutted72

Well-known member
Joined
Nov 22, 2012
Messages
266
Location
Jennings, OK
Mr. Roboto,

I used some metal plates on the stringers and attached them to the outside walls to keep them from moving. Plus I talked with my brother who used to build houses and he said that is how they would do a cathedral ceiling so that's how I did it.

LXcam,

Thanks

Joe K.

Just wait she will see some DIY show and your turn will come...

Movover,

Nope, no in-laws. Only because they live about 800 ft. to the north of us. So they can just go home when they want to :)
 
OP
G

gutted72

Well-known member
Joined
Nov 22, 2012
Messages
266
Location
Jennings, OK
Richard,

All my buildings on the property are insured, I just have to increase the amount now :(

Joe K.

No permits needed, I live in the county and they could care less what I build out here.
 
OP
G

gutted72

Well-known member
Joined
Nov 22, 2012
Messages
266
Location
Jennings, OK
Velocipede,

It is actually a kit from roman stone called the Fremont. The Standard kit comes in at 52" w x 48" d x 91" h. But I added an additional 144"s to the chimney.

Each block weights in at 30lbs and it is all stacked and held together with concrete block adhesive.
 
OP
G

gutted72

Well-known member
Joined
Nov 22, 2012
Messages
266
Location
Jennings, OK
redhead,

Thank you and trust me, you have nothing to worry about, this is a one and done situation.

Curious, what does a 12 x 16 shed retail for ? Delivered and set.
 
Last edited:
To avoid these ads, REGISTER NOW!

protegeV

Well-known member
Joined
Apr 18, 2018
Messages
13,363
Location
DFW
Damn, I'll second the comment about not letting my wife see this/ :D

nice work :thumbup:
 
OP
G

gutted72

Well-known member
Joined
Nov 22, 2012
Messages
266
Location
Jennings, OK
Spoonsports86,

Honestly, when I was done with the drywall she came in and asked me why I put so many drywall screws in the drywall (I had 6 screws per stud, per 4 ft. section) because it looked like ****. I told her to turn around and leave and don't come back until she could say something nice.


2 days later she came back out to the shed, after I put mud on "all those screws" and said "wow, that looks much better". She has no clue on how things get put together, she just see the finished products.
 
OP
G

gutted72

Well-known member
Joined
Nov 22, 2012
Messages
266
Location
Jennings, OK
Thanks for the compliments. I'll post up more pics when it's all done on the inside and I get a chance to clean up and remove all the tools.
 

larry_g

Well-known member
Joined
Apr 28, 2007
Messages
16,874
Location
oregon
What a wonderful place. Where are you now going to put your outdoor fire place? It seems that you lost this one....

lg
no neat sig line
 

el monte slim

Well-known member
Joined
Apr 4, 2018
Messages
243
Location
Midwest USA
You're doing an awesome job on that building! However, you and your lovely bride need to consider recording any and all disputes that might arise over it. You don't want things coming down to a case of "He Shed, She Shed!" ;)
 
OP
G

gutted72

Well-known member
Joined
Nov 22, 2012
Messages
266
Location
Jennings, OK
Redhead,
Thanks for the cost, think I'm coming out ahead so far, just based off what I've seen around here and how they are built.

Larry_g,
Don't think for a minute I won't be out there on a Friday or Saturday night with the fire blazing have a few beers and listening to the stereo

El Monte slim,
Thanks, good catch on that cancelled tv show.

Dreaming muscle,
Thank you

Captain14,
Believe it or not, she did not ask me that one time. I have done many projects for her and she knows not to ask me that question, cause I'll stop in mid project and come back to it 2 weeks later.

Unfortunately I wasn't able to finish the floor tonight but it will be finished tomorrow and I'll have the baseboards on also.
 
OP
G

gutted72

Well-known member
Joined
Nov 22, 2012
Messages
266
Location
Jennings, OK
Hotfr8,
Thanks, I'm hopeing to get some good use out of this winter. Guess that means I need to get outside and chop some firewood.
 
OP
G

gutted72

Well-known member
Joined
Nov 22, 2012
Messages
266
Location
Jennings, OK
Got the floor and the base boards finished and all caulked up, now it's up to the wife to get the paint touched up on the inside and the trim painted on the outside.

Had to take a picture of the wife's pallet art ( that she made me put together) and ceiling fan, then the fireplace without a fire and with a fire.

Next up is to build a few cabinets to go on both sides of the fireplace, one side will have the stereo and a beer fridge and the other side will hold the firewood.
 

Attachments

  • IMG_20181020_142129513.jpg
    IMG_20181020_142129513.jpg
    123.9 KB · Views: 756
  • IMG_20181020_142937058.jpg
    IMG_20181020_142937058.jpg
    78.6 KB · Views: 749
  • IMG_20181020_142340280.jpg
    IMG_20181020_142340280.jpg
    59.2 KB · Views: 710
  • IMG_20181020_142137509.jpg
    IMG_20181020_142137509.jpg
    69.7 KB · Views: 698
  • IMG_20181020_190032007.jpg
    IMG_20181020_190032007.jpg
    124.1 KB · Views: 758
  • IMG_20181020_142247974.jpg
    IMG_20181020_142247974.jpg
    121.8 KB · Views: 672
  • IMG_20181020_142159212.jpg
    IMG_20181020_142159212.jpg
    117.3 KB · Views: 647
Last edited:

Rock knocker

Well-known member
Joined
Aug 14, 2014
Messages
704
Very cool! Good work. Just wondering, as I'm still learning about roof framing myself... without any collar ties or rafter joists, what keeps the walls from buckling outwards when there is a load on the roof? Or is that just not a concern down there if you do not get much snow?

If you look at the photo that the OP supplied, you'll see that there is a doubled 2x ridge beam. Correctly done, that should support the load and no spreading should occur.
attachment.php
 
OP
G

gutted72

Well-known member
Joined
Nov 22, 2012
Messages
266
Location
Jennings, OK
Rock knocker,

Thanks for letting me know I did something correct. :bounce:

That picture doesn't show it but after I snapped that pic I put a double 2x4 under where that 4x4 is that's holding up the ridge beam.
 
OP
G

gutted72

Well-known member
Joined
Nov 22, 2012
Messages
266
Location
Jennings, OK
Hotfr8,

I like it, especially the way you hid the water tank. I also like the light wood on the inside.

Velocipede,

True but she could show me some love by not giving me any more projects to do...
 
To avoid these ads, REGISTER NOW!
Top Bottom