To avoid these ads, REGISTER NOW!

Between 485 & 705 SQ/FT Tinkering Tony's Workshop

Workspaces between 485 and 705 squarefeet.
To avoid these ads, REGISTER NOW!
OP
B

B3D3G1

Well-known member
Joined
Apr 8, 2015
Messages
140
Location
Lakewood, CO
Your GC should looking into using an Alternative Mounting Kit.

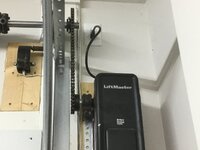
Didn't know that existed. That looks perfect. I'll see if I can get the GC to add this. Looks like it retails for about $140. The cable spool/wheel is also intruding into the ceiling space a little too. I'll post a picture on my next update in a few minutes.

Nice welder pickup! How much does your half day lesson cost? I recently did an intro class at my local CC that went over all 3 processes, 4 hours a week for 15 weeks, and based on the amount of material I used I made out on the deal. Not to mention the amount of anguish I saved myself
It cost $65 for the half day. The welding supply shop offering these classes has half days for each of the MIG, TIG, Stick, and Flux Core on the weekends of 8 people each. They also have full day classes but my local location only offers those on Fridays and I'm not ready to take off work for that. I've seen some maker type places offer classes as well.
I'm guessing the CC route is more centered around certification than hobby work. I took a class back in college but it was more about how and when to use welds and give some impression on what you need to consider when adding a weld to a mechanical design. The welding lab was much more stick welding I-Beams than anything else as I recall.

I’ve been thinking about the CC route, but a half day crash course sounds appealing.
Ask around or do some googling. I've seen some tool rental or maker spots offering classes in other cities. I've also seen some more artistic centered facilities offer learning opportunities. The CC classes might be more complete but I would probably not need the majority of the info they are teaching.
 
OP
B

B3D3G1

Well-known member
Joined
Apr 8, 2015
Messages
140
Location
Lakewood, CO
Day 62 (Sunday) - Drywall

I went snowboarding today and, as I was pulling out of the driveway, the drywall crew was pulling up. We I got back it, it was all completed. I think they were fairly motivated to get it done quickly because it's Super Bowl Sunday.
drywall1.jpg
drywall2.jpg

And here's the close up of the work around the motor and cable spool. I will look into that extension listed by nmk to move the motor down.
opener.jpg

Should get the screw inspection on Monday, tape and mud Tuesday, final drywall inspection Wednesday along with electrical finishing work on Wednesday. Then just final electrical inspection Thursday and final building inspection Friday. It's getting close.

After signing up for the welding class, I also bought a nice welding helmet from CyberWeld: Lincoln Viking 3350. The two that came with my welder might work ok but they don't look very high quality. Probably a promo type of item with the welder.
 

zc15

Well-known member
Joined
Dec 22, 2020
Messages
433
Location
SE Michigan
Can't beat $65 for a half day class. MIG should only take the few hours to really get the hang of.
 
OP
B

B3D3G1

Well-known member
Joined
Apr 8, 2015
Messages
140
Location
Lakewood, CO
Day 63 (Monday) - Drywall Taping

Drywall screw inspection was completed pretty early so the tape and mud crew got to work around noon. They look mostly done to my eye and it's been fairly warmish so I'm hoping they are finishing and sanding today.
mud.png

The framer also came by and replaced the service door with one that hinges on the right side. He just threw the old door in the garbage pile which I thought was kind of funny.
door.png

I also got an automated message that the Pioneer Mini-Split was back in stock. I'm going with the Pioneer 18k BTU 21 SEER unit. I dove down that rabbit hole a bit and tried to figure out everything I need for the install and placed the order. They also sell through Home Depot, but I went direct to their website and was able to save some money. Chose a shorter installation kit (saved $40), found a coupon code (saved $100), and I think only charged state tax (saved $60). Also bought the gauge hose set, wall bracket, and decorative line cover. $1420 shipped. All I need is a cheap vacuum pump, a short run of wiring, and some strut channels to properly mount this to the back side of the workshop and get it up and running. It's been an expensive month already.
mini.png

Looking forward, the electrical guys can't get back here until Thursday to do the finishing work so I'm on track for final building inspection on Tuesday next week. I might start priming and painting this weekend.
 

grant00

Well-known member
Joined
Feb 12, 2011
Messages
205
Location
Littleton, CO
I've got a portable vacuum pump and gauge set for doing A/C systems on cars. Basically what you would get from Amazon but has worked well for me. Would it work for doing the mini-split?
 
OP
B

B3D3G1

Well-known member
Joined
Apr 8, 2015
Messages
140
Location
Lakewood, CO
I've got a portable vacuum pump and gauge set for doing A/C systems on cars. Basically what you would get from Amazon but has worked well for me. Would it work for doing the mini-split?
It probably would. The gauge hose set I ordered from Pioneer has a 5/15" connector for the mini-split and a 1/4" connector for a vacuum pump or refrigerant tank. I actually just bought a pump this morning from Amazon for $70 so I should be good to go if you were implying you were willing to lend it out. Maybe it will come in useful on some other project.
 
OP
B

B3D3G1

Well-known member
Joined
Apr 8, 2015
Messages
140
Location
Lakewood, CO
Day 67 (Friday) - Drywall Tape/Mud

It's been a little too quiet around here. The drywall crew finally came out again today and were here for most of the day. They did most of the remaining work but there is still a few seams that need to be finished up. There is a heater setup to run overnight and the GC said they have to be done by 11 am tomorrow because he has them on a different job. Hopefully they get the last few seams and remaining screw locations.
drywall3.jpg
drywall4.jpg

The roofer also came out to remove and patch the holes from the old electrical mast and satellite dish bracket. Looks good from the ground level and so much better without those pieces up there. I'm probably going to paint the boxes and this patch on the wall.
roof.jpg It's going to be real cold next week but final inspection is lining up to be Thursday.
 
Last edited:
OP
B

B3D3G1

Well-known member
Joined
Apr 8, 2015
Messages
140
Location
Lakewood, CO
Day 69 (Sunday)

Drywall tape and mud guy came back on Saturday morning and finished the job. I was little surprised that the bottom row of screws on the back wall weren't covered up. I'm planning to install a 4" vinyl baseboard after the floor goes in so it will be covered regardless but I'm not certain it wasn't an oversight. You can kind of see it in this image below. the other walls had a 1 or 2 inch strip of drywall at the base so those definitely had to be mudded.
drywallbottom.png

I also took advantage of the nice weather we had this weekend to do some painting. I put a 2nd coat on our studio building and painted the new service door. I just painted with a brush so and the 2nd coat helped out a lot. I'm no pro. I wasn't sure if I should paint just the front face of the trim the grey trim color or also the sides as it blends into the actual siding. I had to touch up the wall color too and I tried painting in the caulked seem and didn't like the look so I decided to paint the edges of the trim the same color as the wall. Not sure what the typical solution is here but It think it looks good enough and any shadow hides the transition. Also installed my own locks. Handle matches the rest of the house doors and I upgraded our front door's keypad and put the old one here. I never carry keys around with me and both my wife and I love the code access.
door.png

I also spent a good amount of effort leveling the dirt mount and filling in the electrical trench. It was pretty muddy in some spots so I know I'll have to go back at it again when the weather warms up for more than a few days but it's a decent start and got rid of the tripping hazard.
dirt.png

Electrical work is scheduled for tomorrow (Tuesday) which is forecast to be snowing with a high of 7 and low of 2. That's got to be testing the limits of most people to show up for work.
 

Klokwerk

Well-known member
Joined
Jan 1, 2010
Messages
205
Location
Spokane, WA.
Been following a long for a bit now. Looking great! Finish line in view.
Did you ever find out what was up with the cracking of the slab? No other incidents right?
How did the mudders finish around the door opener? Tricky bit there.
 

jbrentd

Well-known member
Joined
Jul 8, 2015
Messages
1,039
Location
Northeast Oklahoma
Looking good, like klokwerk said...won't be long now. I like the idea of a keypad dead bolt on the man door. I need to look in to one of those. What color(s) are you planning on the inside?
 
OP
B

B3D3G1

Well-known member
Joined
Apr 8, 2015
Messages
140
Location
Lakewood, CO
Been following a long for a bit now. Looking great! Finish line in view.
Did you ever find out what was up with the cracking of the slab? No other incidents right?
How did the mudders finish around the door opener? Tricky bit there.
I didn't grab a good picture but I zoomed in on another. It's basically just an opening in the drywall. At least the portion above it is the spray in insulation so it wasn't droop down or spread fiberglass into the interior constantly. The garage door contractor is coming back after electrical is all finished. I don't believe he has fine tuned the limiters and safety features of the garage door yet. I sent my GC the Lift Master extension details that would drop the motor down a few inches, and he said the contractor would fix it on that final visit. I'm not totally sure what that means. That would probably solve the motor side but that cable reel still sticks into the ceiling so I'll probably just have to live with it. Maybe I can do a little trim work and make an interior drywall box with clearance for it. It's not the end of the world but I don't like the look of it.
motor.png
Looking good, like klokwerk said...won't be long now. I like the idea of a keypad dead bolt on the man door. I need to look in to one of those. What color(s) are you planning on the inside?
I love the keypad access. Don't have to fish keys out of your pocket or take them with you on a dog walk/bike ride/run. It's also great when the family visits or when your smoke alarms start randomly going off when you are out of town. The upgraded one on the front door is connected to the wifi and I can manage the entry codes remotely and get notifications of when it is locked/unlocked.

I got some color samples I've been staring at on my coffee table for a week now. I want an off white for the ceiling and most of the walls, and a dark grey for the lower 3 or 4 feet. I'm also considering a 4 - 6 inch red stripe at the transition between the 2 colors. The picture below is the layout I'm thinking of with the flooring sample I'm going with. Plus, Sebring White is way better of a color name to go with than Horizon or White Wisp. Lift and all the tool boxes will be red. I'm planning to attempt to build my own upper and lower cabinets and I could even color match those.
colors.png

Here's the current state of the model.model.png
I added the mini split location, electric cord reels, tire racks, wire shelves, cabinet concept, and a few other items.
I'm thinking of building a bigger workbench them what I have shown here and I'll eventually have more floor tools on the left side. I already have the wire shelves and I'll need whatever is in that location to roll away for when I want to put my truck on the lift. I'm a big believer in plastic flip top totes and those work perfectly on these wire shelves.
The cabinets are 12' long as shown, but I might shorten that to 8' for continuous material and a little more floor space along the back wall to maybe move the main tool box there. I wish I would have gone into a little more detail design before building to make my electrical layout better. It's fine but it could be better and I will probably make changes down the road regardless.
 
Last edited:

wasfast

Well-known member
Joined
Apr 10, 2014
Messages
874
Location
San Diego CA
The bottom row of screws is not mudded because usually there's base molding to cover it. I still would have preferred to have it done, it's not a big thing to do.
 
OP
B

B3D3G1

Well-known member
Joined
Apr 8, 2015
Messages
140
Location
Lakewood, CO
Day 71 (Tuesday) - Electrical

Today it is lightly snowing but also in the low single digits. I wasn't sure the electricians would show but they did! Took them about half a day's work to get all the outlets, switches and lights installed. I think it looks pretty good.
Ceiling lights are in a good spot and only 1 row is blocked by the open garage door.
interiorlights.png
During the bright snow day, this service door looks pretty weak but we'll see at night.
servicelight.png

Not the happiest about the way this fixture sticks out from the wall. I'll see if the GC will address that or I might do something at a later date. That box should be inside the wall with the lip of the fixture flush against the siding. It also looks pretty weak during the bright snow day so I'll have to wait until night for the full effect.
garagedoorlight.png

There is some new code requirement about GFCI breakers needed on the 240 V circuits. Apparently those are hard to come by and twice as expensive as they should be right now. The electricians put blanking plates on the these outlets and junction boxes and left the breakers out. Post inspection, they are going to come back and add the non-GFCI breakers and I'll be good to go. It's a believable story but I might do a little digging to see what I come up with. They might just be trying to save a few bucks on their end.

Electrical final inspection should be tomorrow and then building final inspection on Thursday.
 

jbrentd

Well-known member
Joined
Jul 8, 2015
Messages
1,039
Location
Northeast Oklahoma
Nice progress on the electrical! Overhead lighting is something that will need supplementing on my build, sometime down the road. It looks like you have a good number of fixtures. As for the 240v GFCI, maybe it's a local code? Mine weren't GFCI. I do need to swap the plug styles, but that's a different story.
 
OP
B

B3D3G1

Well-known member
Joined
Apr 8, 2015
Messages
140
Location
Lakewood, CO
My wife got me a slightly delayed valentine's day gift that arrived last night. It's pretty cool. It's probably about 16x10 inches in size.
I'm thinking I'll put it above either the service or overhead door but I need to test it out before I decide. Might need a backing plate to offset the color and make mounting a little easier on the siding if I choose the exterior route.
sign.png
 
OP
B

B3D3G1

Well-known member
Joined
Apr 8, 2015
Messages
140
Location
Lakewood, CO
Day 72 (Wednesday) - Electrical Inspection #1

Electrical inspector came by and failed a few things. They are all minor things like loose neutral wire, something about neutral bonded to service panel instead of ground, and not properly terminating the neutral at the service drop. The electrician is coming tomorrow to make the fixes before the inspector arrives.

This means I loose another day on my schedule but hopefully still on track for final inspection on Friday. I don't want to loose another weekend, but I do have Monday and Tuesday as buffers before the flooring work is scheduled to start.
 

jbrentd

Well-known member
Joined
Jul 8, 2015
Messages
1,039
Location
Northeast Oklahoma
I'm digging the new sign and think above the man door would look good. Or under the light next to the man door if it's not so wide that it won't be centered under the light.
 
OP
B

B3D3G1

Well-known member
Joined
Apr 8, 2015
Messages
140
Location
Lakewood, CO
Day 73 (Thursday) - Electrical Inspection #2

Electricians were out fairly early this morning to handle the minor fixes needed. It took them maybe 15 minutes with me talking to them while they were working. Inspector was here mid day everything passed. Electrical is done-ish. Electricians will be back early next week with the 240V breakers, assuming final building inspection passes.

My mini-split was also delivered today without issue. Looking forward to getting this installed. Might even be able to mount it up this weekend.
minisplit.png

Final inspection is called in for tomorrow. 🤞🙏
 
OP
B

B3D3G1

Well-known member
Joined
Apr 8, 2015
Messages
140
Location
Lakewood, CO
Day 74 (Friday) - Final Inspection

Final building inspection happened this morning and passed!!!!!!! 🏆🏆🏆🏆🏆🏆🏆

Just in time for the weekend so I can get started on my long to do list. Thinking of doing some drywall sanding, mount the minisplit condenser, trim windows, and hang my sign. Maybe priming if I have time. Epoxy flooring is going in Wed/Thur and will have to cure over the weekend. Then Lift install early the next week.

The garage door contractor is coming on Monday to lower the opener and tune the limiters, and still working out schedule for the electricians to come back and install the 240V breakers.

outside.png
 
Last edited:
To avoid these ads, REGISTER NOW!

zc15

Well-known member
Joined
Dec 22, 2020
Messages
433
Location
SE Michigan
Congratulations on the pass!

I meant to ask earlier, but did they end up spray foaming the entire ceiling or did they only foam the vaulted portion and go back to batts in the center portion of the ceiling?
 
OP
B

B3D3G1

Well-known member
Joined
Apr 8, 2015
Messages
140
Location
Lakewood, CO
Congratulations on the pass!

I meant to ask earlier, but did they end up spray foaming the entire ceiling or did they only foam the vaulted portion and go back to batts in the center portion of the ceiling?
Thank you, I'm super excited to get started.

If you look back and post #73 you can see a picture. They just sprayed in foam on the angled parts and installed batts on the horizonal and vertical portions.
 

zc15

Well-known member
Joined
Dec 22, 2020
Messages
433
Location
SE Michigan
Thank you, I'm super excited to get started.

If you look back and post #73 you can see a picture. They just sprayed in foam on the angled parts and installed batts on the horizonal and vertical portions.
Doh! I looked right at that one and for some reason wasn't thinking that it was unfaced batts + vapor barrier.

What are you doing for attic ventilation? I'm working on a similar insulation project, however this is in an existing structure so it's getting R21 in the vaulted section. The payoff for thicker insulation in the vaulted portion was up around 20+ years once additional materials were accounted for
 
OP
B

B3D3G1

Well-known member
Joined
Apr 8, 2015
Messages
140
Location
Lakewood, CO
Doh! I looked right at that one and for some reason wasn't thinking that it was unfaced batts + vapor barrier.

What are you doing for attic ventilation? I'm working on a similar insulation project, however this is in an existing structure so it's getting R21 in the vaulted section. The payoff for thicker insulation in the vaulted portion was up around 20+ years once additional materials were accounted for

It's a very small volume of air above the bats in the center section. There are vents on the roof that looks something like this if I remember correctly. I really don't know much about venting beyond that.
vent.png
 

kwyjibo

Well-known member
Joined
Apr 8, 2008
Messages
736
Congrats on the final!
One thing I would add is now that I've had my flooring for a few projects, I should have cut down or deleted the black chips and gone with a lighter mix. I think the black flakes are mostly to blame for the camouflaging of dropped items.
 
OP
B

B3D3G1

Well-known member
Joined
Apr 8, 2015
Messages
140
Location
Lakewood, CO
Congrats on the final!
One thing I would add is now that I've had my flooring for a few projects, I should have cut down or deleted the black chips and gone with a lighter mix. I think the black flakes are mostly to blame for the camouflaging of dropped items.
I thought about that a little bit. I was considering going with a simple commercial style single color but decided just to go with flakes instead. I guess the up side is that dirt is hidden.
 
OP
B

B3D3G1

Well-known member
Joined
Apr 8, 2015
Messages
140
Location
Lakewood, CO
Weekend update

Clean up:
I spent a good amount of time on Saturday cleaning up the inside and getting to a fresh starting state. Threw away all the boxes and blew out all the dust and debris with my garden blower. I had big intentions of putting in the window trim and hanging the mini-split condensor but painting happened.

Painting:
I spent most of the weekend painting. Totally underestimated the amount of time it would take to paint. Taping around the lights was right at the limit of my comfort zone on my latter so I had to work on my 1 hand taping technique for the 3 lights at the full 14' height and it took quite a while. I waited until Sunday to start painting because the temperature was finally going to be above 50. Hand painted the corners which involved lots of ladder movement and then got to rolling. The color went on so much faster than the primer. I think it was a combination of the better roller and higher quality paint. Due to time, I stopped short of priming the ceiling so I could finish up the walls. The garage door contractor is supposed to come back today so I wanted to be done with tape removed from that wall at the minimum. I got all 4 walls painted just in time for dinner.
painting.png

At first, the color looked a little too brown next to the primer, but, once it covered the majority of the wall, it looks pretty good. Not as sterile as the primer white. I went with Sebring White from Benjamin Moore. Here's the best picture I got of the colors. The LED lights seem to mess with my camera when they are in the picture.
colors.png
I'm hoping to get the priming completed before the flooring contractor comes so I don't have to be too careful with drips. The Acrylic color paint should wipe up fairly easily.
 
OP
B

B3D3G1

Well-known member
Joined
Apr 8, 2015
Messages
140
Location
Lakewood, CO
Day 77 (Monday) - More electrical and painting

Electricians came by and connected the 240 outlets. I have 2x 50 amp plugs at opposite corners, a 20 amp junction box for the lift in the ceiling, and a 20 amp disconnect on the exterior for the minisplit. I had spec'd out 6-50r outlets for the 50 amp outlets but they put in 14-50r. Looks like the difference is the inclusion of a neutral wire on the 14-50r outlet. I'll either need to adapt the welder plug or change the outlet and cap off the neutral wire. Another issue for another day.
plug.png

After work, I got to painting. I'm trying to get the ceiling done before the floor goes in. I was able to prime the entire ceiling and do the trim work around the lights and overhead door mounts with the color. I should be able to get out there tonight and finish it up. the 5 gallon bucket of PVA primer was about 0.5 gallon short of completing the job so I had to make an emergency run to the paint shop. Starting tomorrow, I won't be able to walk in the shop until Sunday because of the flooring work.
ceiling.png

I had to run to Home Depot during the day for some work things and decided to buy myself a present. I'm going to be trimming the door and windows and eventually building cabinets so I figured I would get a nailer. I picked up a Milwaukee 18 gauge brad nailer that should hopefully cover most of my needs. I've never used one but it sure looks handy in the wood working youtube videos.
nailer.png

The garage door contractor was supposed to show up yesterday but he never came. Hopefully he comes today to lower the opener and adjust the settings so it actually opens and closes properly.
 

jbrentd

Well-known member
Joined
Jul 8, 2015
Messages
1,039
Location
Northeast Oklahoma
Looking nice and bright in there. I am having to swap 240v receptacles too. My electrician guessed wrong on what style plug my welder has. He offered to come back, but it's a pretty easy task.
 
OP
B

B3D3G1

Well-known member
Joined
Apr 8, 2015
Messages
140
Location
Lakewood, CO
I've been trying to figure out what the long term solution is for the garage door opener. Here is how it currently sits.
opener.png
It has pulled a little bit of insulation out of the vertical wall. The insulation above it is spray in foam and should be fine. I think the insulation is the main problem, not the intrusion into the drywall. I can put a little bit of trim work around it to clean up the edges for appearance sake but it's also up in the ceiling so that part is less of a concern.

The garage door contractor came out and said they can't lower it using that LiftMaster chain/sprocket part. The GC said something about power limited I didn't quite catch, but who knows what the real reason is. The recommendation was to put a commercial grade opener in there and the GC was going to cover the cost. I told him as long as the current opener is functional and there are no impacts from it being partially above the drywall, I'm ok with it as is, but there needs to be a solution which separates the insulation from the spinning parts. I think they are going to enlarge the opening in the drywall and make some type of barrier in the wall. I'm tempted to nail in a sheet of black ABS plastic I've used for air dam material on my car and be done with it. This is the last thing on the contractor's list so he is motivated to resolve it for the final check. I've told him he doesn't have access for the rest of this week due to the flooring installation and now I'm tempted just to say he is done.
 

grant00

Well-known member
Joined
Feb 12, 2011
Messages
205
Location
Littleton, CO
That's pretty unfortunate about the extension. Strange that it shows it's compatible with your opener but the contractor didn't want to do it. I would call Liftmaster just to confirm it would work. There's quite a few Youtube videos I found showing it installed and working.

The sprocket that goes on the opener side is a little larger than the shaft side, so the opener would lose a little mechanical advantage but I don't think Liftmaster would put that product out if it didn't work. I'm sure your opener has some extra capacity it will sacrifice but still operate just fine.
 
OP
B

B3D3G1

Well-known member
Joined
Apr 8, 2015
Messages
140
Location
Lakewood, CO
That's pretty unfortunate about the extension. Strange that it shows it's compatible with your opener but the contractor didn't want to do it. I would call Liftmaster just to confirm it would work. There's quite a few Youtube videos I found showing it installed and working.

The sprocket that goes on the opener side is a little larger than the shaft side, so the opener would lose a little mechanical advantage but I don't think Liftmaster would put that product out if it didn't work. I'm sure your opener has some extra capacity it will sacrifice but still operate just fine.
My guess is the door weight is a factor. The door is 18x10 insulated so It's probably relatively heavy. The spring should compensate for the weight but there is probably some other factors like inertia.

I also realized the automatic lock and battery backup are not installed. They come standard with this 8500W model so I expect them to be there.

I've been thinking about insulation/drywall situation more and I think there is a simple solution. The opener leans out at least an inch or so from the wall. I think I should be able to put a piece of drywall up behind it to block the loose insulation batts. It will only be anchored at the bottom but it's probably only a 6" x 6" piece needed. Maybe even half the width of the opener. Here's my extremely crude drawing of what I might try to make out of cardboard tonight to test:
drywallpiece.png
 
OP
B

B3D3G1

Well-known member
Joined
Apr 8, 2015
Messages
140
Location
Lakewood, CO
I was able to finish up the main painting last night. I'm so happy to be done with painting 14' ceilings. My neck is even a little sore.
paint.png

This morning the flooring guys started putting in the epoxy flooring. It probably only took them about an hour to prep the floor and an hour to laydown the base coat and flakes. I took a peek from the service door and it looks pretty good. I think the camera picks up more of the dark flakes than they eye. They come back tomorrow morning for the clear coat.
floor.png
 

mkholmes3

Active member
Joined
Dec 8, 2013
Messages
30
My guess is the door weight is a factor. The door is 18x10 insulated so It's probably relatively heavy. The spring should compensate for the weight but there is probably some other factors like inertia.

I also realized the automatic lock and battery backup are not installed. They come standard with this 8500W model so I expect them to be there.

I've been thinking about insulation/drywall situation more and I think there is a simple solution. The opener leans out at least an inch or so from the wall. I think I should be able to put a piece of drywall up behind it to block the loose insulation batts. It will only be anchored at the bottom but it's probably only a 6" x 6" piece needed. Maybe even half the width of the opener. Here's my extremely crude drawing of what I might try to make out of cardboard tonight to test:
drywallpiece.png
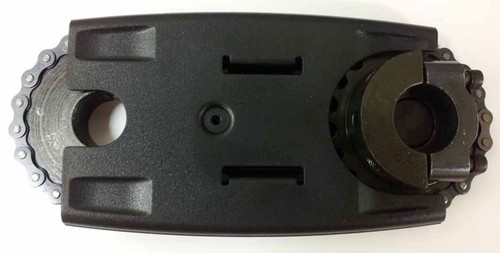
Had something similar on my build. The reel wasn’t into the sheetrock but the opener couldnt be attached in the normal manner. Here is what we ended up with.
 

Attachments

  • BABF8D5B-94A8-47A7-8886-2B86AE58161B.jpeg
    BABF8D5B-94A8-47A7-8886-2B86AE58161B.jpeg
    190.9 KB · Views: 60
  • 7D34900E-EE0E-486C-9E61-AD77EE2B5075.jpeg
    7D34900E-EE0E-486C-9E61-AD77EE2B5075.jpeg
    187.9 KB · Views: 55
OP
B

B3D3G1

Well-known member
Joined
Apr 8, 2015
Messages
140
Location
Lakewood, CO
The floor install is done and I think it looks great! There's a pretty strong chemical smell so I'm supposed to leave the door open as long as possible. Weather is good until tomorrow night and I should be able to walk on it by then to open a window.
floor1.png

Bee for reference
floor2.png
 

grant00

Well-known member
Joined
Feb 12, 2011
Messages
205
Location
Littleton, CO
Paint does look great as well as the floors. The flake or something looks like it added some texture to it in the last picture which will be nice to have in the wet weather here.
 
To avoid these ads, REGISTER NOW!
Top Bottom