To avoid these ads, REGISTER NOW!

Below 265 SQ/FT Tiny Tokyo Shop

All workspaces below 265 squarefeet.

Bakafish

Well-known member
Joined
Feb 7, 2017
Messages
477
Location
Tokyo
I've been a longtime lurker here and decided that rather than document this on my own site (which I will probably never get around to) I would start posting my progress here.

The Basics:
I don't have an actual garage. The way zoning laws work in the Tokyo region may be of interest, so I will try and summarize it. A plot of land is zoned with a ratio of two basic percentages like, 50/100, 50/150 or in rare cases and commercial area's 60/200 or 75/300. The first figure is the percentage of footprint that your home is allowed to take up, and the second is the total floorspace that your home can have in relation to that plot. So if you have 70m2 plot of land within a 50/150 zone, you can build a house with a 35m2 footprint and no more than 105m2 of usable floor space. A garage does not apply to this floorspace ratio, but does apply to the footprint (which is the far greater constraint) and so other than seriously wealthy people who can afford massive amounts of land, you will find most parking in Tokyo (if you are lucky enough to even have it) is fully exposed.

I will add that there are a few more interesting building constraints due to the density and traditions here. This has to do with access to light and the street setback profile. If you ever come and visit Tokyo you will see a lot of very odd angles to the rooflines of homes and buildings. This is not (well mostly not) due to different architectural tastes, but the fact that there are 3 dimensional constraints that encroach your parcel. From the far side of any street you border on, an 80% slope plane angles towards your parcel. The smaller the street (4m wide is still common) the more this cuts into your airspace. Additionally, all your neighbors have a similar setback, but this starts at a point 20 meters vertically from the property line. Keep in mind, it is really uncommon to have a regularly shaped parcel, you are almost always dealing with crazy polygons.

Lastly, shadow projections have to be considered. Even after you have chopped your building area into some multifaceted crystal like space, you have to do projections calculated on the winter solstice to see where the shadow of your home is cast on your neighbor's property. You are not allowed to keep their windows in shade for more than 3-5 hours, or cover too much of their property.

Because of this, you can't just easily build on top of a first floor garage since you will hit all the other vertical constraints and not be able to use the limited (and most valuable) living space you have been allocated. Due to these constraints it is unusual to get all of the floorspace percentage you are allowed even without a garage.

New Construction:
For very cultural reasons, the Japanese tend to rebuild their homes very often. A 20 year old home will actually depress the cost of a property because the removal costs are factored in. There is basically a no value to an existing structure beyond a certain age, and anything over 20-25 years is typically destroyed prior to putting land up for sale. New building over here is extremely modularized and a very highly interesting digression of itself. But I will refrain from that subject for now. I just want to say that they build things very strong over here, but there is little incentive to build them to last. It is understandable why in this context, but it changes the way everything is done, and it impacts all aspects of DIY and 'home improvement' projects.

I'm lucky:
Because I was well prepared to recognise the zoning laws and location factors, I was able to recognize our luck when the perfect house became available. Having an inexplicable 60%/200% zoning where every other plot is 50/150 and with the street on the northern border where shadow casting isn't a factor, the actual building area was really optimized. The train line still clearly marked on the maps which depressed interest in it had actually been relocated underground a few weeks prior. They are replacing the old tracks with a long park, leading to a major train station 3 minutes away on foot. And a 23 year old building still existed on the property, which was an annoyance to the majority of people (who could afford the plot) as they would most certainly destroy in order to replace it with modern house.

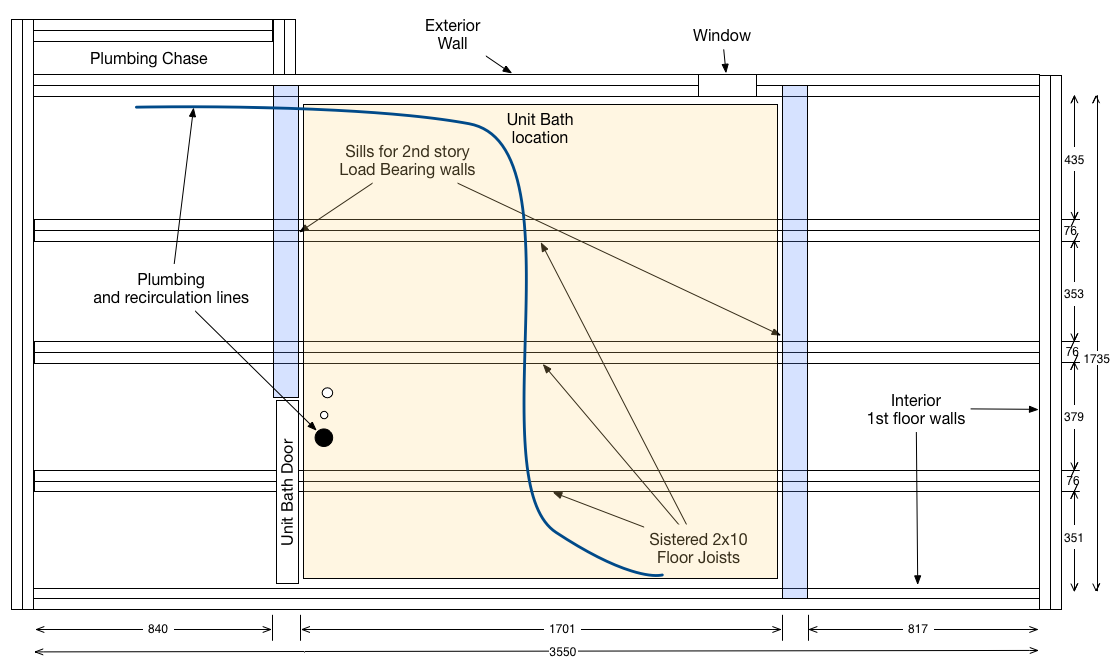
But the building was the best point to me, as it was very unusual here in Japan. Built by Mitsui (part of the Mitsubishi Group) it used western "2x4" construction using imported Canadian and US SFP wood and sheetrock walls. This is a very different method than typically used here, and offers many advantages over traditional Japanese construction when it comes to remodeling and improvements.

It was way over our budget, I don't even want to get into how much it cost, but the numbers worked out and I think it will be something we will be proud of taking the chance on.

What this will be about:
So now you have some of the scope, I want to share some of the improvements I have already made, and my struggles building a functional 'shop' despite the lack of an actual garage, extreme space limitations and other constraints that will be hard to believe and make any westerner cry.
 
To avoid these ads, REGISTER NOW!
OP
B

Bakafish

Well-known member
Joined
Feb 7, 2017
Messages
477
Location
Tokyo
Space Toilets

One of the first things I replaced were the toilets. Now I know a lot of you are somewhat familiar with crazy Japanese toilets and may think that they are ridiculously over engineered and silly, but I want to tell you, if you haven’t had one you have no idea what you are missing. Sorry, that’s my position and I’m sticking to it. :)

So what do they do, and how do they differ from US toilets?

Well, there are a number of good brands, most of them very competitively featured, Panasonic, Toto, Lixil and such. They offer wireless controls that are informative and easy to reach. Heated seating (which is what most people think of and is really something you will never again want to go without.) Proximity sensors, which will automatically raise and lower both seats depending on your needs (1 or 2) eliminating one of the age old battles between the sexes. Then there are the features that are more ‘European’ in nature, that I’m sure will encounter more skepticism. But basically you have a number of finely tuned and precisely locatable heated water jets that cover the gamut of cleaning needs. There is an integrated blow dryer and auto-flush mechanisms as well as full gentile LED night illumination (including the floor area in front) and cleaning modes that lift the entire seating unit (and light it) to easily clean the whole bowl.

Satis_Light.jpg

I didn’t get the optional MP3 player, because I felt I could provide a better BGM system if I really want such a thing, and I didn’t get the built in room heater or Blutooth phone options either, but they are available...

I ended up choosing Lixil as the seat was designed as a single sealed unit, which I feel is far more sanitary and safer than the other brands. I bought two different models with the same basic feature set as one of the toilet locations is extremely small and a more compact design was called for. You can choose the type of remote control, the bigger bathroom got the one with an integrated toilet paper dispenser.

toilet_remote.jpg

Dispensor.jpg

Don't worry, there are more buttons:

Dispensor_Open.jpg

So how about installation? Obviously you need electricity. I will get into the significant deviations of Japanese electrical systems compared to the US in another post, but basically the bathroom is one of the few places that has a grounded outlet and it is GFI protected at the panel and on the toilet plug. Despite this I believe there are still several toilet related electrocution deaths a year in Japan, but you know how stupid people are, I think a properly maintained and installed toilet is very safe. The plumbing deviates quite a bit from the US as there is no real standard here for the flange and offset. You have to basically see where the drain is located and make sure your toilet has the correct offset (they all make different models) or be willing and able to do some relocation work on the drain. Typically 75mm or 100mm PVC is used, very little cast iron or ABS over here. They also do not use primer on their PVC, just solvent, which spooked me a bit, so I stocked up on good American stuff when I vacationed in Hawaii. Each toilet has its own mounting system with brackets and a rubber flange seal that mates with a specific adaptor mounted at a precise distance above the floor to the drain. No bees wax, no toilet flange, no carriage bolts.

The other challenge over here is what the hell do you do with the old toilets. In Japan, anything over 30cm in length or is non-burnable is ‘oversized’ and requires you to call the county to arrange pickup. You must attach special stamps that come in various monetary increments with your name and address, and they do not take a ton of things that you would commonly want to dispose of. Electronics and appliances must be sent to private recycling facilities, and things like a toilet are not something that any Japanese actually replaces by themselves. Taking the old toilet is done by the installers who presumably have some arraignment with an industrial recycling facility, our local county trash facility took a great deal of convincing and pleading before they would agree to pick the old ones up. I was seriously considering reducing them to small pieces with a sledge and sprinkling them into the once per month un-burnable trash pickup over time (something I do with many things these days…)

The toilets were a great start, and made moving into an old house feel much more like it was ours. But the bathroom (shower and tub) needed serious help, that will be my next update…
 
Last edited:
OP
B

Bakafish

Well-known member
Joined
Feb 7, 2017
Messages
477
Location
Tokyo
Super interested in this thread - I love Tokyo and have been there twice. Looking forward to seeing what cars you work on!

Thanks! I'm hoping to do a thread in the spirit of the amaizing sakurama-san who has been a great inspiration for me. We haven't bought a car yet, but you can imagine the crazy options available over here. Not just domestic, there are crazy imports we never got in the US. But my priority is getting the house and shop into working order before anything like that.
 
OP
B

Bakafish

Well-known member
Joined
Feb 7, 2017
Messages
477
Location
Tokyo
welcome to to group, i look forward to reading all about your build and hopefully some pictures to go along with the story

Thanks for the welcome! I'll be posting more pictures. Still getting the feel of this forums limits and capabilities.
 

wasfast

Well-known member
Joined
Apr 10, 2014
Messages
874
Location
San Diego CA
Super detailed information and fascinating to learn more about things "over there". I will say I do think they've overthought the toilet just a bit but opinions vary.
 

FireTurtle

Well-known member
Joined
Dec 8, 2010
Messages
89
Location
Fort Worth, TX (North)
Definitely following this thread! I've always wished we could have Japanese style toilet options over here. Oh & their love of vending machines! I wish we had crazy vending machines here too. Seriously, the ones where you can get stuff like bananas, eggs & live seafood are crazy.
 

M-technik-3

Well-known member
Joined
Feb 16, 2008
Messages
1,785
Location
Western Mass
I still remember my three years of being gaijin. I used to be stationed at Misawa Kichii in northern Honshu. Welcome to the site.

Ah the warm heated toilet seat and self cleaning features. Or being able to by eggs out of a vending machine lol.
 

slik560

Well-known member
Joined
Oct 5, 2009
Messages
787
Location
Kansas, USA
Fascinating background info. I will never again complain about local zoning restrictions in my area. Subscribed!!! I wonder how Akira Nakai san got his shop built in Chiba-Ken with these kind of restrictions? Commercial property is likely different than homes. Thanks for starting this discussion. :)
 

Silostang

Member
Joined
Oct 13, 2010
Messages
6
The toilets in Japan are great, wish we had them in the US.


Sent from my iPhone using Tapatalk Pro
 

Bruce 993 SEA

Well-known member
Joined
Oct 22, 2016
Messages
1,033
Location
La Conner, WA
One trip to Japan was all it took to convince us to get a Toto Washlet. The Japanese are way ahead of us when it comes to hieny hygiene!

There are a full range of Totos available here in the US.

Silostang...just Goolize it! You will find lots to choose from. Our local Costco even has a washlet but it is not the Toto brand.

As far as toilets themselves, there are a number of very different brands available other than the standard stuff at Homedepot..

Cheers
 

hedgehog

Well-known member
Joined
Mar 11, 2010
Messages
115
Location
Southern Ontario
Do the wsshlets req. hot water supply or do they heat water on there own. And i bet a thing like that costs a bunch.

In Canada its nothing to find a outdoor toilet (outhouse) at a cottage/camp. You havent lived until you've pooped in -30c with snow blowing under the door into your pants, or a hot summers day.....
 

Bruce 993 SEA

Well-known member
Joined
Oct 22, 2016
Messages
1,033
Location
La Conner, WA
The one we have heats the water so all you have to do is connect the supplied splitter on the angle stop supplying water to the toilet.

As I recall, it was around $600. Our has the remote for operation on the wall. I did run a GFI protected outlet for it. The heated seat is the lap of luxury!

And before I get any grief, I have spent lots of time in the woods and did my share of squatting over a hastily dig hole!

Cheers!
 

HSpencer

ALLIANCE MEMBER
Joined
Nov 28, 2010
Messages
2,854
Location
South Central US
Welcome. Awesome information on Japan's building codes and thanks for posting in great detail. We will be looking forward to pictures!!! We also like photos of the surrounding area and thanks in advance for those. Again, welcome to the Garage Journal and we are very pleased to have you come aboard.

Best Regards
Herb Spencer
 

Radix2

Well-known member
Joined
May 28, 2014
Messages
1,853
Location
the thumb!, MI
Do the wsshlets req. hot water supply or do they heat water on there own. And i bet a thing like that costs a bunch.

In Canada its nothing to find a outdoor toilet (outhouse) at a cottage/camp. You havent lived until you've pooped in -30c with snow blowing under the door into your pants, or a hot summers day.....


I have a couple of the Brondell Swash bidet seats. They are excellent, the water is heated, pressurized,aimed,...all inside the unit, just cold water and electricity required.

These are good for places with limited septic too since you basically can get by with the proverbial one square of paper...after a good hose down of your backside....they even have dryers to avoid that...but that is too far...:bounce:
 

4xdog

Well-known member
Joined
Aug 18, 2012
Messages
5,595
Location
Santa Fe, NM
Terrific! Subscribed to your thread. Japan is a unique and special place. I love spending time there.
 

hedgehog

Well-known member
Joined
Mar 11, 2010
Messages
115
Location
Southern Ontario
I have a couple of the Brondell Swash bidet seats. They are excellent, the water is heated, pressurized,aimed,...all inside the unit, just cold water and electricity required.

These are good for places with limited septic too since you basically can get by with the proverbial one square of paper...after a good hose down of your backside....they even have dryers to avoid that...but that is too far...:bounce:

might have to place that on the must have list for the bathroom renos :thumbup:
 
To avoid these ads, REGISTER NOW!
OP
B

Bakafish

Well-known member
Joined
Feb 7, 2017
Messages
477
Location
Tokyo
I really appreciate the interest and welcoming words from all of you!

Fascinating background info. I will never again complain about local zoning restrictions in my area. Subscribed!!! I wonder how Akira Nakai san got his shop built in Chiba-Ken with these kind of restrictions? Commercial property is likely different than homes. Thanks for starting this discussion. :)

Most of what I’m talking about has to do with residential Tokyo and the other dense urban centers. The ‘countryside’ as the Japanese call it is much more relaxed and one would have a great deal more flexibility in how they could set things up. There is also a lot of commercial and industrial zoning inside Tokyo that would allow for a decent sized shop and a living space above it, but those are not the nicest areas, there would be a ton of noise and traffic, and cost would be in the millions of dollars just for the property. You’d have to build something like that from the ground up.

I put countryside in quotes because in Japan it seems their concept of countryside is any town that doesn’t have a 10 story building… You would be challenged to find any scenic vista in Japan unblemished by human construction. It is still beautiful, but you really can’t escape the power lines, extensive roadworks and vending machines, no matter how far you go. I grew up in rural California and spent my summers on the ranch where we got DC electricity from a 100 year old Pelton wheel, heated our water on the wood stove and shared a party phone line with the 10 other farms located many miles away. You could look 360 degrees and find no sign of humans past your nose. It’s all about a point of reference and perspective, but ‘countryside’ in Japan just means you are a 30 minute train ride from an international airport. Not quite the hardship, or the beautiful isolation we would imagine it to be. (Sorry for the digressive rant, it will be a regular theme of my writing.)

Do the wsshlets req. hot water supply or do they heat water on there own. And i bet a thing like that costs a bunch.

In Canada its nothing to find a outdoor toilet (outhouse) at a cottage/camp. You havent lived until you've pooped in -30c with snow blowing under the door into your pants, or a hot summers day.....

I looked up my invoice and the toilets I chose cost about $1500 each. You can use Google Translate to see some of the details here: http://www.sunrefre.jp/wc/lixil/satis_g.html

There are defiantly retrofit seats being manufactured and marketed towards the US, but there is still a very significant (and understandable) technology gap in the toilet wars between our two great nations.

The units take a single cold water feed and include a ball type quick shutoff valve. The water temperature is heated and adjustable from the remote, and you can even control the heating ramp time, meaning you can start off at full heat, or ramp up from warm to the final temperature. A lot of the more subtle customizations are hidden behind corded (multiple simultaneous) button presses, I haven’t started experimenting with the more esoteric ones, just the flush delay and lighting modes.
 

TomcoPDR

Well-known member
Joined
Oct 19, 2011
Messages
606
Location
Calgary, Alberta
going to following this, I'm really impressed with Japanese toilets. We've got a sushi restaurant that has something like that.
 

NewShockerGuy

Well-known member
Joined
Oct 12, 2010
Messages
2,481
Location
Northern Virginia / DC
Awesome toilet! We are VERY behind in the USA as far as toilets are concerned. For as clean as we like to think and use anti bacterial soap on everything when you mention a bidet or anything of the like, people get all weird and look at you like that's gross...

I love Toto toilets. When the time comes to start changing things in the house I already know which one I want, but the $4k price is hard to swallow...lol
When we were in Indonesia every toilet we were on had remote control that control heat, water temp/position, air dry...etc. Needless to say it was awesome and very enjoyable.

Look forward to seeing more in your thread!

-Nigel
 

KMinAF

Well-known member
Joined
Mar 5, 2011
Messages
698
Location
Fairview Utah
Who knew the subject of a toilet could be so interesting! Loving the post looking forward to the next installment
 

sean Buick 76

Well-known member
Joined
May 7, 2013
Messages
3,221
Location
Edmonton Alberta
Hi there, very interesting and nice job finding what you want! If you prefer many of us use "photobucket" to post our pics it makes it so they show up full sized on the forum and it automatically re-sizes the pics to manageable size.
 
OP
B

Bakafish

Well-known member
Joined
Feb 7, 2017
Messages
477
Location
Tokyo
Hotel New Otani

I apologize in advance, because the reason behind things is really interesting to me, so I’m going to tell you a bit of why things are done differently over here. The title is relevant, because in 1964 the Olympics were coming to Tokyo, and Japan wanted to show the world they were a peaceful country to be reckoned with. The Hotel new Otani was designed to highlight Japan’s new systemized and streamlined just-in-time manufacturing processes to construct a world class 5 star hotel in record time. Hold on, I’m about to digress again…

The Japanese Bath

Taking baths in Japan is a bit different than how we did it as a child, and perhaps more logical when you think about it. They completely clean themselves before entering, which makes sense from a communal use standpoint (there are still public baths all over Japan. I don't mean resorts, but actual inexpensive and spartan local places where people bring their kids and enjoy soaking naked with their neighbors shooting the ****.) So instead of stewing in your own filth in a big cold enameled cast iron tub as I did growing up (shower-less in a countryside farmhouse), they go to the bath separated by the sexes and put their clothes and things in unsecured cubby holes (Safe Japan!) and scrub themselves raw on the ubiquitous bath stools at one of the many low mounted spigots lining the walls.

Here's an unusually nicely decorated example and some more corroborative details

Only once you have double scrubbed every nook and cranny do you enter the main bath, which has a mild temperature gradient and usually an obvious inlet for the hot water.

I can go on quite a bit more about actual Onsen’s which are hot spring resorts, and some of the customs and protocols, but I’ll leave that to another time because I’m already a few Inceptions from where this is going. Suffice to say, Japanese love a big hot bath, and they require a space to clean themselves outside the bath before getting in. In a super space constrained country that is really difficult, which is why many people associate a “Japanese Bath” with a very deep almost square design. It’s all about the footprint requirement to give washing space, not that they prefer to bathe vertically. Japanese also like to splash around quite a bit (let's be honest, we all do), with the tub overflowing, water and soap and their kids all in the mix. This means the bathroom has to be watertight with a sealed floor and integrated drain system. Showers are now standard, but all Japanese bathrooms still have a spout to fill your little wash bucket, which is still apparently the preferred method to wash by the Japanese I’ve met.

So what does all of this have to do with a luxury hotel for the Olympics? Well, the Japanese knew that foreign people were not going to be interested in communal bathing (well, the American’s anyway) and so they decided to install little private Japanese style baths into all 1000+ rooms. This was more audacious than it sounds as they had very short timelines and the last thing you want in a luxury hotel is leaks from notoriously enthusiastic splashers as the locals were, or foreigners that were unfamiliar with the whole system. To custom tile and waterproof all those rooms would have been a nightmare and added to the weight and other factors. The solution was to prefabricate the entire bathing area as a sealed composite unit and install them modularly into the structure, plumbing and all. This was the commercialization of the Unit Bath, of which virtually all modern Japanese households now use, and our subject for this post.

You might be thinking, so what? They put a bathroom in a box, big deal. But if you have read about the toilets you may get an inkling that the Japanese don’t do the things they love by half-measures. A modern unit bath is a sophisticated system for not only luxurious relaxation, but also squeezing every bit of economy of water usage and heat management. We basically import most of our energy over here (yes, and export our cesium 137, let's all be adults here... :) ) Energy and water it isn’t cheap at all compared to the US, you really have to watch your consumption, meaning reusing your bath water for several days use is crucial for most families.

So, as I eluded, the bath in my older home was funky as all hell. 20+ years of moisture held in a tiny fiberglass cube, with just an old fan and tiny window directly venting onto the street was a big step down from my luxury apartment (they call them Mansions over here, so if you ever hear from a Japanese person that they live in a Mansion, they are not joking or rich, they just mean a nice apartment or condo.) It was the sickening colors of spoiled cream and over-poached Salmon, and inspecting under the skirts there was 20 years of the kind of crud that you couldn’t reach to clean.

Old_Unit_Bath.jpg


Now that new toilets were in everything else in the home was in great condition, if not a little old fashioned. But, the bathroom had to be replaced. The thing about Unit Baths, despite being very standardized in size and with many great manufacturers offering several tiers of luxury and complete customization of colors and features (I’ll detail this later), they are really intended for new construction, not retrofitting or replacement. As I said in my previous post, by the time one of these things are on their last legs, a typical Japanese family is just going to rebuild their house or move to a new one. Refurbishing or remodeling doesn’t make any financial sense in Japan as you are typically going to spend nearly as much, maybe even more, bringing an old house up to scratch. So, I had to either contract someone to replace it (at an enormous expense) or do it myself.

Japanese use the metric system, but housing is all still completely tied to the size of a Tatami mat (Whoo Hooo, I’m digressing again!.) They measure houses and apartments in units of Tatami mats, but just to keep things confusing, different parts of Japan use different sized mats, a single Tatami in Kyoto is quite a bit larger than one in Tokyo. But basically they have a generic unit that goes across all regions called a tsubo which is two idealized mats side by side making a 1.81818 meter square. One tsubo also happens to be the most standard size of Unit Bath in a house, although both larger and smaller sizes are also commonly available. My house fortunately used that size, but there were some problems as the existing one was installed so long ago. Back then, western style construction was very unusual (it still is I guess.) Most houses located their bathrooms on the first floor to ease plumbing and provide support for a giant bath full of water. It also helped mitigate any leaks and made the water supply system work properly (more about this later.) They would be propped on adjustable legs onto a slab under the house, essentially floating independent of the floor built around them. In the case of my house, they basically built a room of the correct size on the second floor, and then inserted the unit bath on top of it, meaning due to all the plumbing and drains that had to be run under the unit’s floor, it sat about a foot above the actual floor level. You had to step way UP into the ****** thing, and that was going to be the same situation with any unit that I could conceivably replace it with. That creeped me out as it just was such a crappy, half assed way to do it. Who wants to have a one foot drop-off just as you are exiting your shower with wet feet? The second problem was, that space also made the ceiling clearance that much lower. Unit baths typically had notoriously low ceilings as they tried to minimize the volume needed to heat and there is a lot of equipment above the unit (again, detailed later) but modern designs have options to order a full height ceiling which reduces the claustrophobic effect of being in a tiny box. The last thing was, this unit wasn’t designed to be removed any more than a new one was designed to be retrofit.

So, out came my trusty Makita 18v sawzall…
 

Radix2

Well-known member
Joined
May 28, 2014
Messages
1,853
Location
the thumb!, MI
Bakafish - I enjoy the digressions so don't stop!

Side note - I stayed at the New Otani a few years back, and I can't say that I recall the bathroom being a modular style at that point. Am I forgetting, or do you know if they took them out?

Digression - I was surprised to meet James Brown in the lobby/elevator at the new otani...
 
OP
B

Bakafish

Well-known member
Joined
Feb 7, 2017
Messages
477
Location
Tokyo
Pulling the plug

The existing unit had a single fiberglass floor pan with ceramic tiles epoxied into a depressed area around the main drain. A separate depression cradled the cultured marble tub which was hooked to the bath loop. As I mentioned, Japanese need to reuse the bath water, often over several days. The way their water heating systems work, this is something that can be done quite easily. You may be already aware that Japan almost exclusively uses instant water heaters. They typically have a small unit dedicated to the kitchen, and a larger unit for the bath and bathroom. The bath heater is typically equipped with two wired remotes, one located in the Unit Bath, and the other in the living room. The heater has two separate heating coils, one for fresh water, and a separate loop that can switch from a fresh source to a recirculation from the bath itself. Japanese baths have a special receptacle that has two hoses connected, one is a supply from the heater the other is a return line from the tub allowing it to easily maintain a set temperature or reheat the water. The heaters are very precise in the water temperature they provide, and you can set the two circuit temps separately. The remotes can automatically fill the tub to a specified level, and then alert you with a little song and recorded voice (the reason for the second remote) when the bath is ready. The two remotes are also handy as you can page your partner from the unit bath remote for a fresh beer while you are soaking. The controllers are quite sophisticated, with timers to have a hot bath ready when you get home and various other conveniences. This reheating loop has to be serviced by an integrated pump (very old systems just used thermal differentiation), which is one of the reasons why I mentioned most baths were located on the first floor.

The walls of the unit were made of a very heavy cement board faced with a textured epoxied steel sheet. It was held together with special clips and sheetmetal screws. Getting the two steel roof panels off first, I was then able to unstitch them without too much trouble. The tub itself weighed a million pounds, and me and my wife had to rotate it in more directions than an olympic diver to get it out of there and down the stairs without having to break it into pieces.

Bathtub.jpg


I used a cold chisel to knock out a line of the tiles, and the sawzall to cut the square steel tubing and fiberglass pan into two sections so it could be removed. The pan stood on six large threaded rods heavily epoxied to steel plates screwed to the sub-floor. I ended up having to use a hydraulic jack to free them from this arraignment, it was clearly meant to be permanently mounted.

Subfloor.jpg


I then started my examination under the sub-floor. I had a plan, but it depended on what was in there and if I could find a unit bath that would work with western “2x4” construction. What I found was the floor under that bath consisted of sistered 2x10 floor joists, with horrifyingly large mid-span holes for the recirculation lines, but otherwise conforming with my hopes. What I intended to do was box out the entire area, and mount the new unit bath into the gap suspended on a steel frame. Much to my delight, there was such a mounting kit available for the Lixil line of Unit Baths, and so I needed to start designing how I was going to cut a 2 meter by 2 meter hole in the middle of my second story floor without collapsing our 3 story house. I also needed to make sure that the new framing I was going to install was not going to impact the strength and integrity of the house, and would support a Unit Bath full of water and (at least) two adults :)

Here is some simplified drawings of what I intended to do.

Before:

Unit Floor Orig.png


After:

Unit Floor Mod.png


As I’ve said, western construction is very unusual here in Japan. Most high end framing is done with beautify notched and pegged framing beams, modular steel beams or reenforced concrete construction. I could order dimensional wood, actually they have a special grade in the US and Canada reserved for the very demanding Japanese market, but the sort of hardware I wanted was just not available here. Fortunately I still have family in the US and so I have them ship me items from there regularly. I special ordered 4 Simpson Strong Tie stainless steel heavy duty double 2x12 joist hangers and their matching hardened lag bolts.

Because of the exact dimensions I was dealing with I could squeeze one 2x10 under the subfloor, then glue and sister a 2x12 to it, giving me as much support as possible, but leaving just enough space ( a few mm) for the steel support frame. To be frank, I think the span was a bit over engineered, but that’s the point. In order to actually cut all these joists without imploding the house I had to construct some temporary supports under the load bearing walls. To do this I utilized the ubiquitous steel scaffold poles that are used here in Japan with jack screws and 2x6 top and bottom plates. These were lagged into the bottom of the joists, and allowed me to carefully cut the spans with the help of a special zero clearance blade for my jigsaw, as I wanted to allow the subfloor to overhang one of the two new beams.

Supports.jpg


Because of the design of the Strong Tie brackets, they were shaped like a U with the bolting flanges inside the U section. This means that you had to bolt them onto the sills first, then slip the new joists into them from the top, covering up the bolts. I believe this is done so that in the case the bolts try and back out, they run into the joists and are forced to sheer rather than tear out. Because one of the new joists is located under the existing subfloor and wall sill plate I couldn’t put them in as one beam, I had to slide in the first one, move it under the subfloor and tack it in. Then slide in the 2x12 after it with glue between them, nailing through it and the 2x10 into the **** edge of the doubled joists I had cut.

Cross Joists.jpg


They were then reenforced with heavy duty doubled 2x10 joist hangers. I used a mix of Simpson stainless steel nails (expensive but beautiful) and special SDS Strong Drive lag bolts. I measured the deflection before cutting the joists, when they were cut and supported by the steel temporary supports, and when the new sections were in place and there was no movement at all.

But before all this happened, I needed to replace the second story window…
 
Last edited:
OP
B

Bakafish

Well-known member
Joined
Feb 7, 2017
Messages
477
Location
Tokyo
Bakafish - I enjoy the digressions so don't stop!

Side note - I stayed at the New Otani a few years back, and I can't say that I recall the bathroom being a modular style at that point. Am I forgetting, or do you know if they took them out?

Digression - I was surprised to meet James Brown in the lobby/elevator at the new otani...

The whole building was rebuilt a few years ago, it was unusual for the Japanese that they kept it as long as they did :)
 
OP
B

Bakafish

Well-known member
Joined
Feb 7, 2017
Messages
477
Location
Tokyo
Here's one more shot from below, showing some of the framing details of the completed side. The unfinished side and its steel support bracing. Some temporary plumbing I will explain later, and the gaping hole my very tolerant wife allowed me to make in our -way out of our price range- house...

From Below.jpg


This room where the picture is taken from is where my shop, and eventually the main subject of this thread (one would hope) will be.
 

SiGmA_X

Well-known member
Joined
Aug 13, 2005
Messages
1,111
Location
Portland, OR
This should be an interesting read! I like your off topic discussions, thanks for that. How are you disposing of the construction waste?
 
OP
B

Bakafish

Well-known member
Joined
Feb 7, 2017
Messages
477
Location
Tokyo
This should be an interesting read! I like your off topic discussions, thanks for that. How are you disposing of the construction waste?

Japan has very sophisticated incineration facilities that recover a lot of energy and can safely burn a surprising amount of materials. They of course recycle aluminum, PET and steel (there are a high proportion of steel drink cans in use over here) and glass. Other non-burnables are typically used for landfill (see Odaiba Island, Tokyo Disneyland and Haneda Airport as examples) as Tokyo continues to encroach into the bay.

Garbage collection varies a bit by region, but in Tokyo there are basically collection points on the street about every 300 meters. They typically have weighted green nets hung over them (we have giant Ravens here who are only too happy to tear your garbage to shreds) and a sign indicating the type of garbage collected for each day. The collection is almost daily, but you have to know what they are going to pick up on what day, otherwise they will leave it with a nastygram sticker on it and all your neighbors will know you are an illiterate idiot.

Here's a picture of my local trash pickup sign showing the schedule:

Trash_Days.jpg


Note the alternating Saturday schedule, and that PET has it’s own day (not part of bottles, cans, cardboard and paper.) The area is kept pretty spotless by the neighbors, Japanese take responsibility for their little fiefdoms.

As I mentioned earlier for larger items you call the trash office and schedule pickup. They will give you the third degree if anything looks suspect or might be business related (like if I was installing toilets commercially and trying to get the subsidized residential trash collection to eat the disposal costs.) You will need to attach the correct amount of trash stamps to the item, and your name and address must be on it so they can track everything. The cost is pretty minimal, but there are a lot of hard to recycle items and appliances that you have to have privately recycled which leads to a unique local annoyance, the recycle trucks.

Often throughout the day you will hear a toneless anime voice blasting (really loud) over the roof mounted loudspeakers of a micro truck that is moving at about 3 miles an hour, reciting a long list of appliances that they will "recycle." The idea is you run out and negotiate a fee to take your old appliance, and they will take it to the recycling plant. As far as I'm aware, in practice, what they really do is sell off anything that still works to 3rd world exporters and local used goods shops, and then sell them to cut rate off-shore recyclers. The worst of them simply dump the stuff on rural roads and keep the money… Even if they were legit I would never use one as the noise pollution and annoyance is shocking and unexpected in a country that usually vehemently rejects this kind of personal intrusion. There's history though...

These "Speaker Trucks" are not just used by the recycle scammers and Yam vendors, but they are used every year for political advertising. Politicians are not allowed by law to make any policy speeches, so they have these trucks and micro vans race around saying, "Hello, I'm Mr. Takata." Basically just saying their name over and over again. Loudly. The other users of this sound blaster technique are the crazy right wing nationalists (yes, we've got them over here too.) Often tied to the Yakuza, they drive around in menacing militarized flat black painted vans with tinted windows, ignoring traffic laws, blasting old patriotic Enka songs and political rants about taking back the Northern Islands from Russia, kicking out all the Koreans (who have lived in Japan for multiple generations, but still are not given citizenship) and other nonsense. So, I guess that explains why no one passes (or enforces) any laws in this regard. In the US one of these trucks would last about 5 minutes before they became “Tactically Disabled", one of the few instances when I am seduced into thinking guns in the public's hands might actually be a good idea...

Anyway, I didn't answer your question. Other than the Unit Bath, the bulk of the waste material I generated was gypsum board. It actually makes very poor landfill material due to degenerating into Hydrogen Sulfide when it interacts with water, but it isn't a super common building material here so they don't have any specific recycling facility (that I could find anyway.) The municipal bulk pickup refused to take it (I think they didn’t know what it was) and there is no such thing as getting a 'dumpster' and just filling it up with trash over here. I know things have probably gotten more restrictive in the States since I left, but it still must be far easier to deal with this sort of thing.

So the scrap wood had all the nails pulled and was cut piece by piece into little 30cm^3 bundles and carefully tied with string. The sheetrock was similarly cut by hand into 10cm squares and packaged neatly into plastic bags. The unwritten rule is, the more neatly you package the trash, the more likely it is to be picked up :) These little ‘treasures’ were doled out to the regular trash pickup on the appropriate days over many weeks to keep from raising any red flags. I kept as many of the larger pieces of Gypsum board for reuse as possible, since getting sheetrock over here is very difficult. My house primarily uses 5/8" (18mm) panels which are not even stocked by the best professional building supply, but the ceiling of the shop was originally done with two layers of 12.5mm to reduce the noise of the shower and bath from the floor above, and they do stock that.

The Bathtub and Toilets, cement and steel wall panels, Unit bath floor pan, door and window were all carefully stacked and tarpaulined in my driveway for months while we negotiated with the municipality to pick them up. My wife had to prove we were not doing it as some form of business, they were completely dubious that a homeowner would replace their own Unit Bath, and it wasn't until I insisted they send someone out to inspect the gaping whole where the bath once was did they agree to pick it up. They sent a sizable truck with 3 guys and we worked together to load everything up in about 30 minutes. The total cost was maybe $30-40, with me applying $1 and $5 stickers to each piece based on the eldest man's wizened cost estimates. It was a relief to have it gone as the neighbors only have so much tolerance for eccentric foreigners collecting piles of garbage...

Here is part of the pile prepared for inspection and pickup on trash collection day:

Garbage_Pickup.jpg


So, I basically cut stuff up into small regular pieces with my power tools, package it neatly, and slip it into the correct trash pile under the cover of darkness. So far so good.
 
OP
B

Bakafish

Well-known member
Joined
Feb 7, 2017
Messages
477
Location
Tokyo
Rear Window

The existing window of the previous bathroom was located in the corner and dimensioned in order to minimize the amount of cutting they had to do on the cement and steel panels used by the old system. As is still very typically used in new construction, the unit was an aluminum framed single pane (uninsulated) window. It was in a crappy corner location, and barely allowed in any light. The exhaust fan above it was basically directly open to the outside and allowed the most gentle of icy breezes to enter and bite tender flesh. One of the options for the new bath we selected was adding an insulated modern window, so I opened up the wall to see what I was dealing with and how I would go about putting something decent in place.

I found a bit of a nightmare:

Old_Window.jpg

This was exactly as I found it, no lower sill, just some random pieces of wood and trash laying there. The fan wasn’t any better:

Old_Fan.jpg

Look at that hackery! Clearly there were some design issues that were best resolved by chopping up a load bearing post… Yeesh. Do note that that spring mounted damper is held open by a thermal fuse (the bow tie looking thing at the bottom.) That’s in case of a fire, it will melt and close off a possible source of oxygen.

It was clear that I was going to have to cut several studs as well as repair and enforce where the old window was located, as there was only a small amount of overlap with the most reasonably sized window we wanted. Again, this is the second story, I had unfortunately already pulled up the whole subfloor at this point, so all my work was done dancing across the joists (let that be a lesson about sequence!) This wall was basically a meter from a heavily trafficked street, (on a blind corner) making ladder access somewhat precarious and about 2.5 meters from the ground at a sharp angle. I already have (I believe a healthy) fear of heights, and so accessing this was basically going to be quite risky.

Rigging some form of support (like the steel scaffolds seen in previous posts) was much less plausible, as there were nothing like a British “Strong Boy” offset that could hold up that section while i cut the studs to insert the new window header. So given that I had a bit of room above the window, I added all my supplementary studs, then created a boxed section with the best 18mm plywood I could find, leaving room for the actual header beneath it.

Here you can see the initial framing and blocking, with all the new stuff using Simpson SDS lags. The bottom of that shorter sistered stud is where the top of my window header beam will set.

Pre_Box.jpg

I had to remove the existing window to make room for the new post I made to support the window header. Here is what the outside of the house looked like for a while as I worked on reenforcing this area as I prepared for the “big moment” where I cut several load bearing studs. Yes, that’s snow falling, the plywood window replacement increased the R value by a considerable amount :)

Outside_Old_window.jpg

So here’s a consideration that needed to be made. You see that strange wavy gray siding that clads the outer surface of my house, much as a doggie landmine complements the bottom of one’s Vibram sole? Yeah, you can’t buy that anywhere. It is a highly mineralized epoxy pressboard embossed with an irregular brick like pattern that is formed with a shiplap and is held to the sheathing with special aluminum clips. You can not remove it without removing the section above it, meaning start at the top, and work your way down. My ladder wasn’t anywhere near 4 meters tall, and there was no way I was interested in unstitching the whole side of my house while hanging from a rope or something equally idiotic. That stuff weighs as much as lead too. So I had to find a way to create the correctly sized opening 2.5 meters from the ground, and salvage enough material to repair the large area where the new window didn’t overlap the old one.

I did a ton of technical drawings covering that area looking at what I needed to remove and how to piece it all back together in a way that would fit with the material I removed. It was a very stressful puzzle. Then I carefully cut the uppermost section’s tongue, above where the new window would go with a multitool, and gingerly removed it from the wall. This was all done with a harness and safety rope while I stood on the most unsettlingly angled ladder tethered to the wall to keep it from vaulting me into the traffic below. This allowed me access to the aluminum clips, and I could unstitch the rest of the panels down from there. This tongueless panel would be relocated to the bottom since it would need to be cut down anyway, I only had millimeters of tolerance before I would need to sacrifice some unseen area of the house to provide material to cover up any mistakes. The siding will be replaced with something more elegant down the road, but for now, it is what it is.

Having insulated and nailed up the interstitial box section header, I began the harrowing removal of the studs. You can see in the picture below the 2x6 based beam I made to help reenforce the existing beam that was hacked up by the butcher who installed the fan. The hacked section was removed and replaced with new material and would transfer its load through the window header to this beam. The new window header and beam were made by sandwiching high grade plywood with 2x8’s and 2x6’s respectively, with tons of glue and nails to keep them together.

Stud_Removal.jpg

Nothing sagged or creaked, I worked as fast as I could getting the header into place and getting all the jack studs and steel reinforcements lagged and nailed in. Now I had a proper frame in place to put the new window.

New_Frame.jpg

From there it was just cutting the hole, carefully replacing the affected vapor barrier, using the wonderful 3M 8067 Flashing Tape (from the US) to seal everything up and sliding in the new window with the help of my wife who took this rare action shot.

Theres_a_Hole.jpg

A couple of tubes of high quality silicon ****** later, we have this:

New_Window.jpg

You can see the amount of siding I removed, now I had to carefully cut, biscuit join and rearrange the left over materials to make it look factory.

Finished_Window.jpg

You may notice that there is some minor color matching issues with the paint. It isn't as noticeable in real life, the camera seems to pick it out. In Japan you can’t go to the paint store with a color sample and have them scan it with a colorimeter and instantly mix you up a match, they don’t do custom colors. In fact you only have a set color palette of pre-mixed colors that you can (are allowed?) to choose from. Even if you get the right color code, when the paint has been exposed for many years, it obviously isn’t ever going to match :-/ Japan is full of unexpected, inexplicable and tedious little issues like this.
 

Simon

Member
Joined
Feb 22, 2008
Messages
6
Interesting post. I'm guessing Odakyu line - I'm likely not far from you. Looking forward to your updates!
 
To avoid these ads, REGISTER NOW!
Top Bottom