To avoid these ads, REGISTER NOW!

Below 265 SQ/FT Tiny Tokyo Shop

All workspaces below 265 squarefeet.
OP
B

Bakafish

Well-known member
Joined
Feb 7, 2017
Messages
477
Location
Tokyo
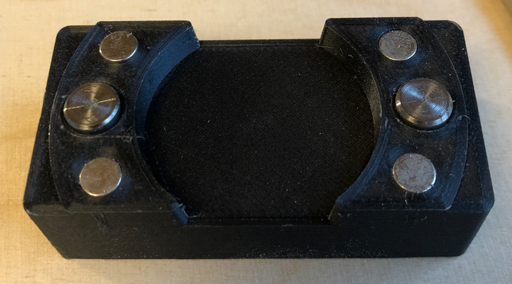
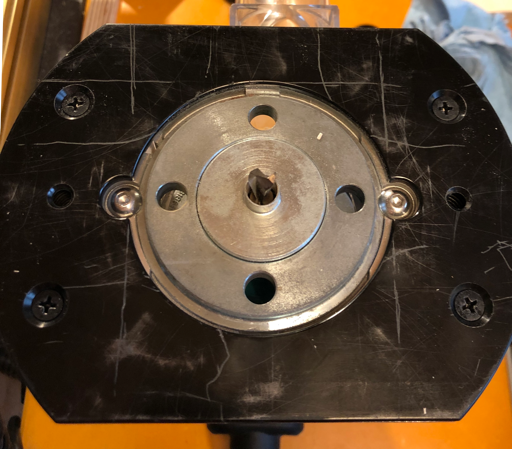
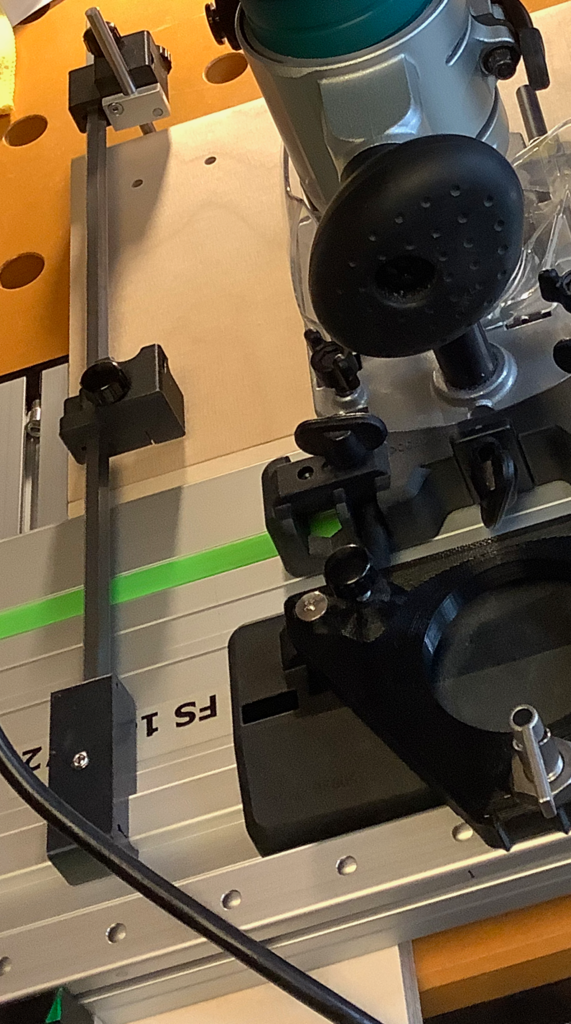
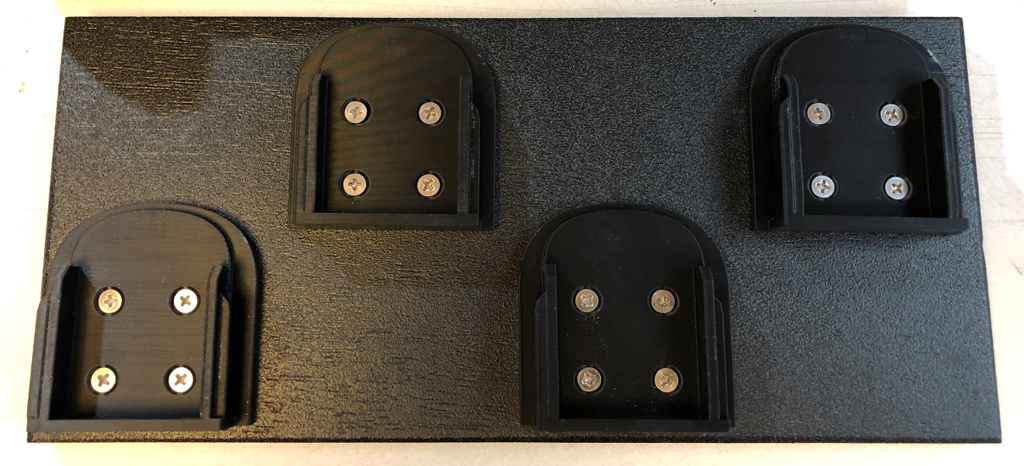
I mentioned the Zero Clearance Splinter Guard (Festool 499011) used by my track saw, and the frustration they present. The design has a sacrificial area that the blade removes at the first plunge, meaning you will destroy them if you retract it for storage and forget, set it down too hard (forcing the guard up and out of alignment) or change your plunge depth. The units are not terribly expensive, but at ~$5 a piece it kind of ***** when you destroy one.

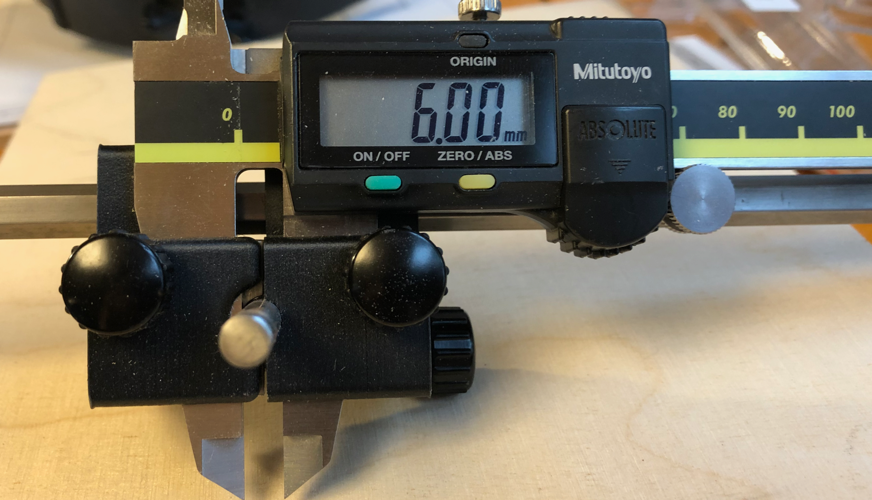
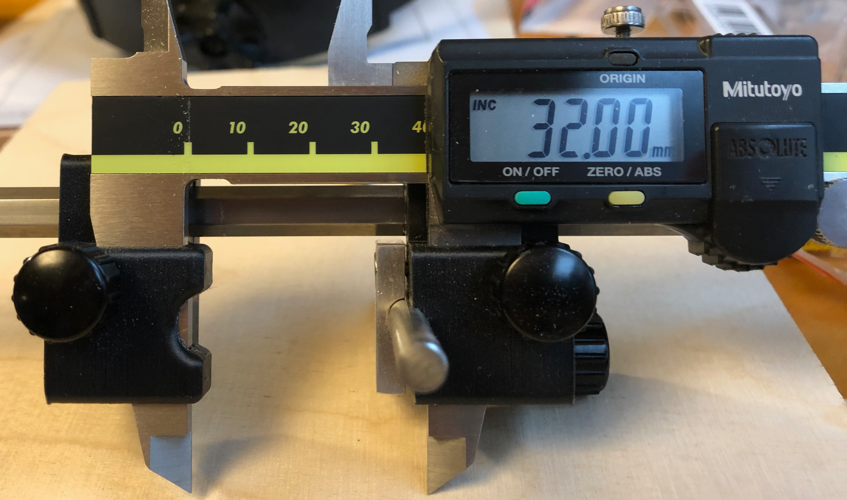
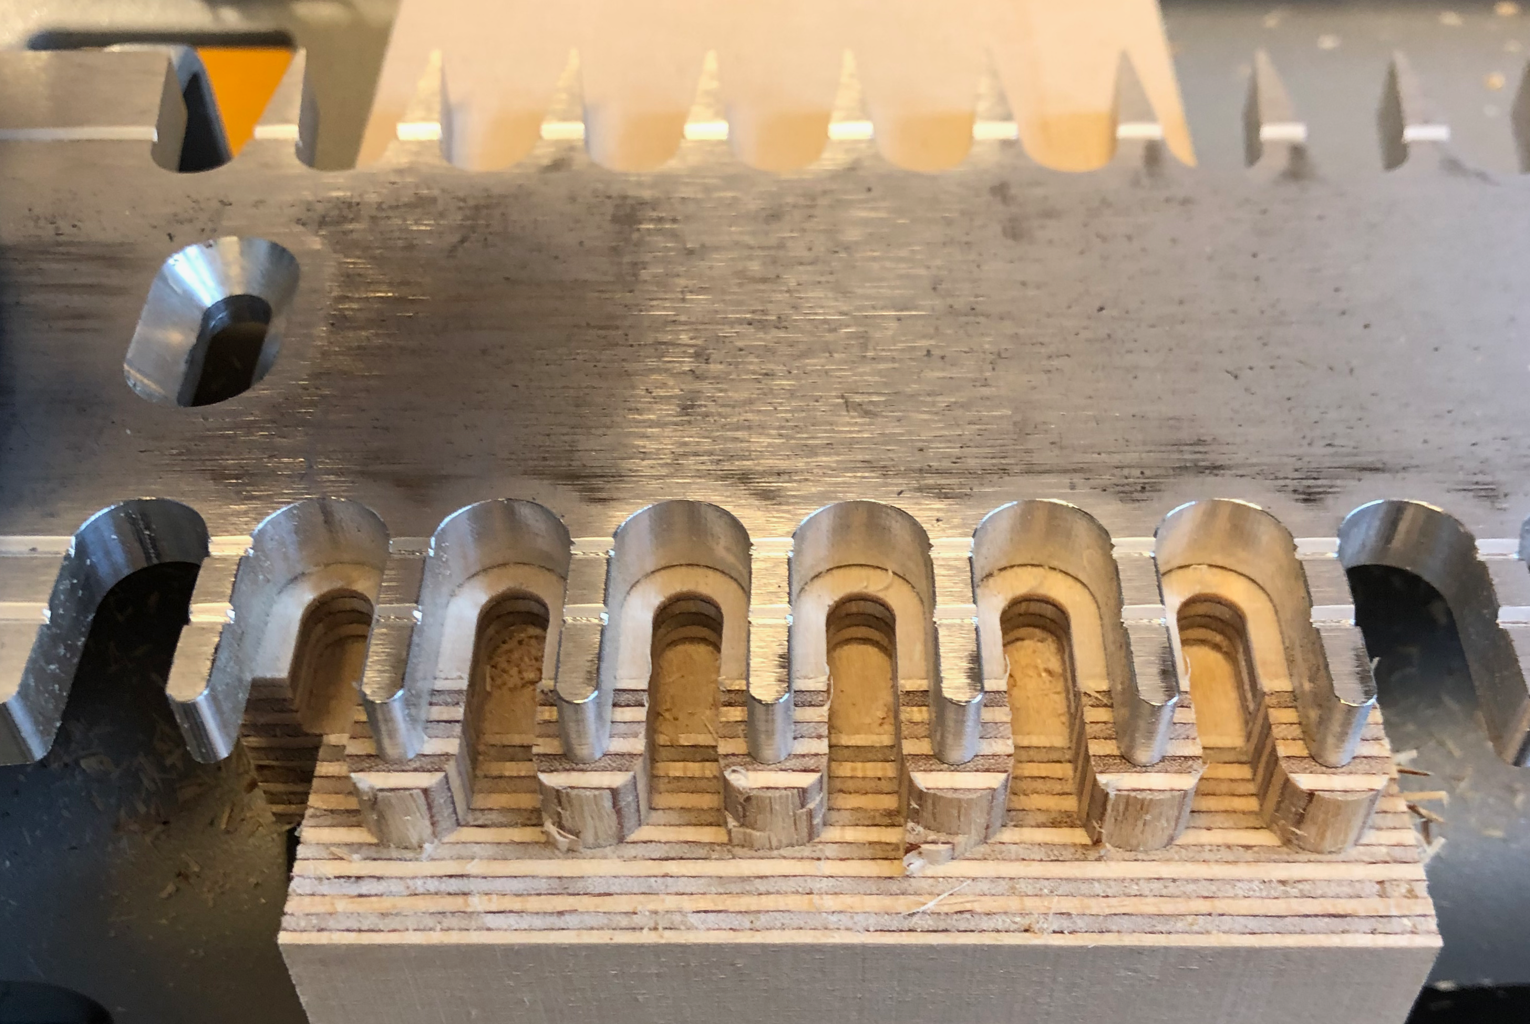
Example of an over-plunged insert compared to a new one.
splinter_guards.png


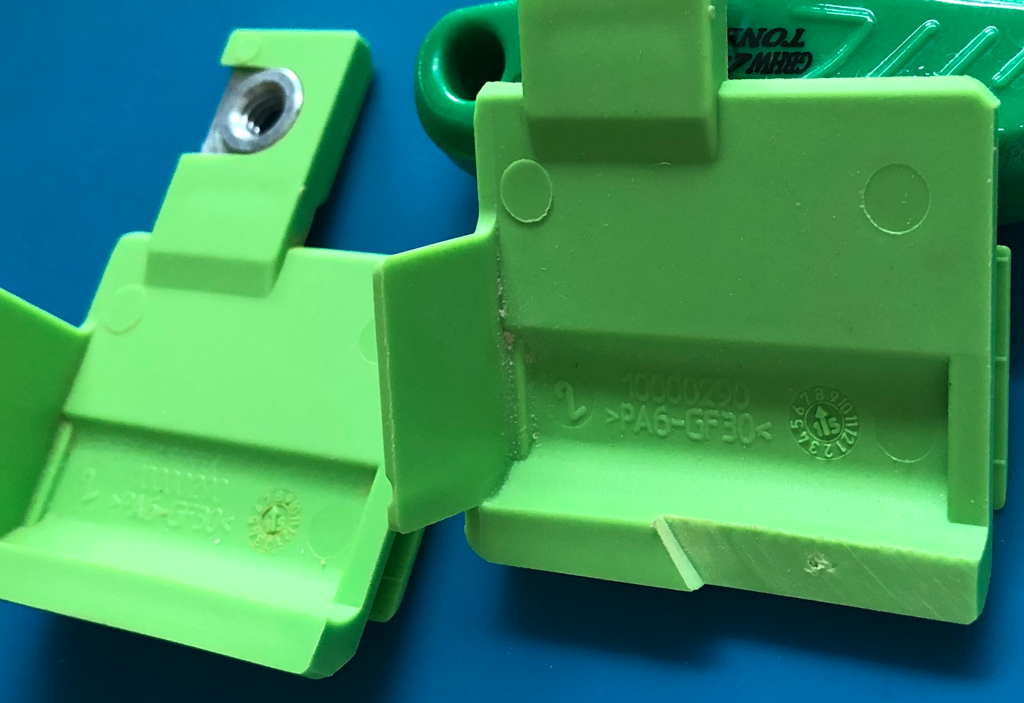
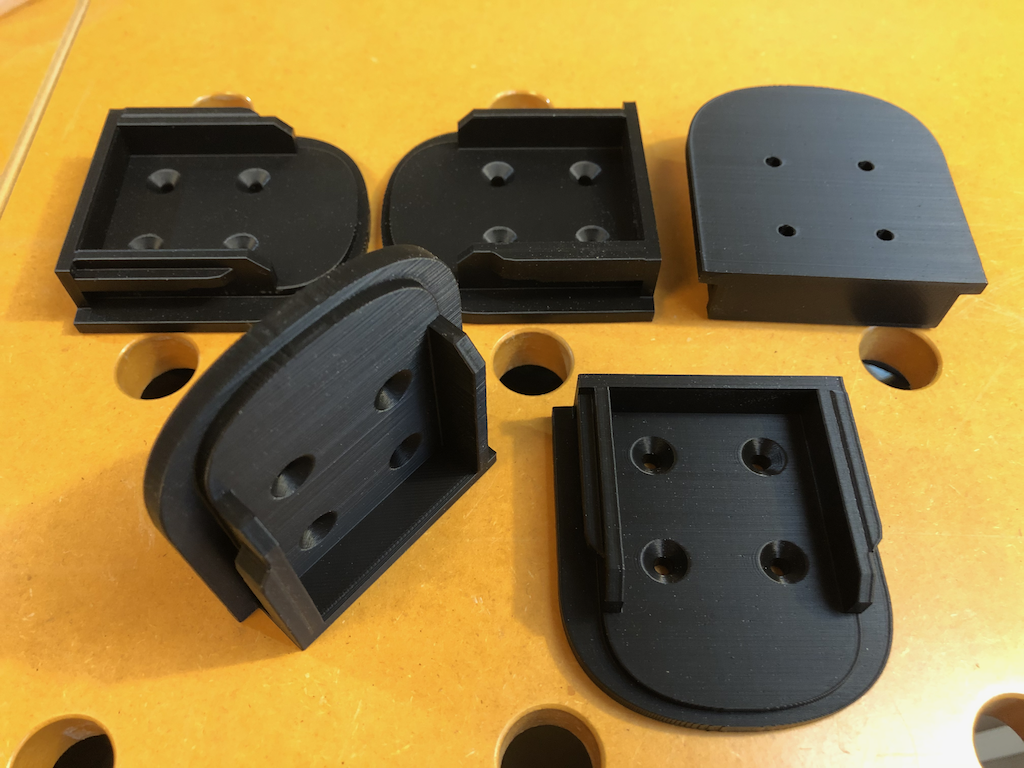
Since I'm in Japan, and these are far rarer and more costly (closer to $8 each), I stopped using them for most work keeping some new ones for some possible critical piece or fragile laminate. But like many trivialities, it always gets on my nerves when I see the avoidable tearout, and so I created a 3d printable solution.

splinter_guard_render.png


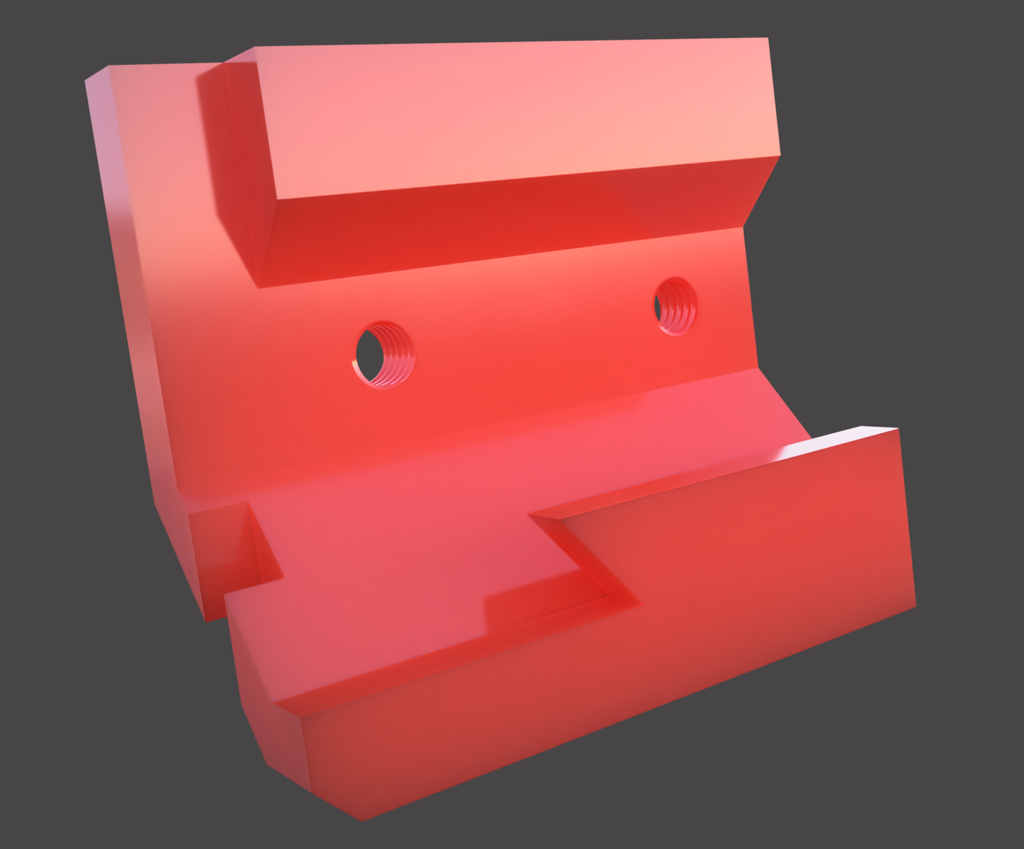
The idea behind this is it clips over the damaged guard and provides a new sacrificial surface. It is designed for the older style of guard, the ones I see currently advertised seem to be a slightly different shape and don't seem to integrate the threaded insert. Reach out to me if you need the model, I'm not going to publicly post it as I don't want to cause Festool any grief. These may be one of their major profit centers...


splinter_guard_attached.png


I use Aluminum M4 screws, just in case one backs out and makes blade contact. Doesn't seem probable, but why take a chance?

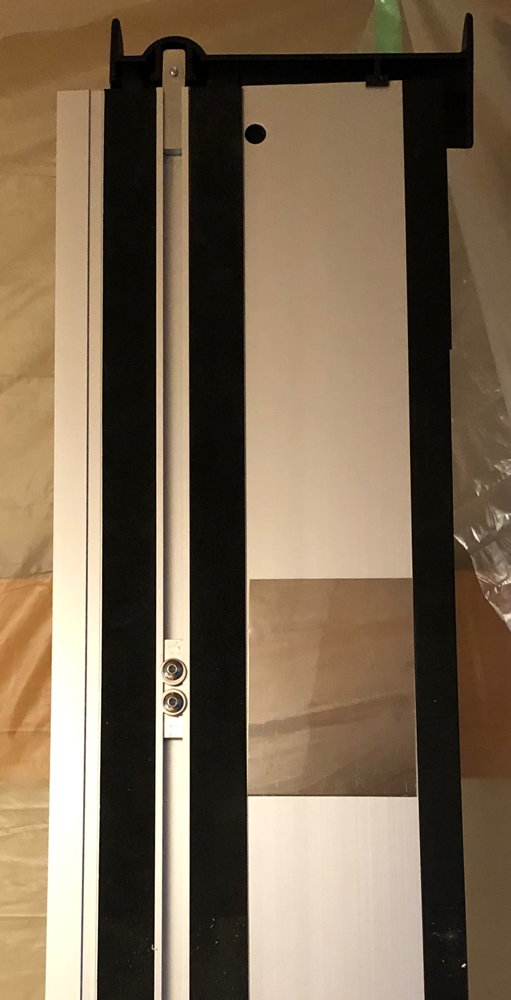
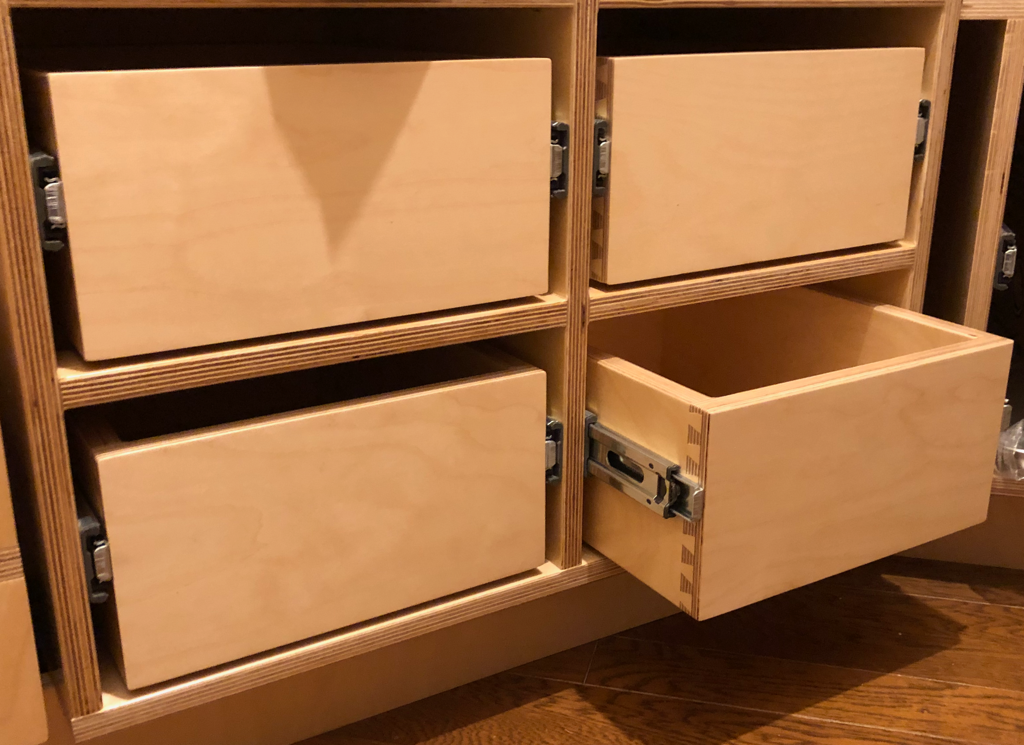
In slightly more broadly interesting developments, I finally made an effort to utilize the MFT style rail system on my table. I equipped it with a slightly longer rail which helped a lot, and reversed the Incra fence so I can have precision cuts.

mft_01.png


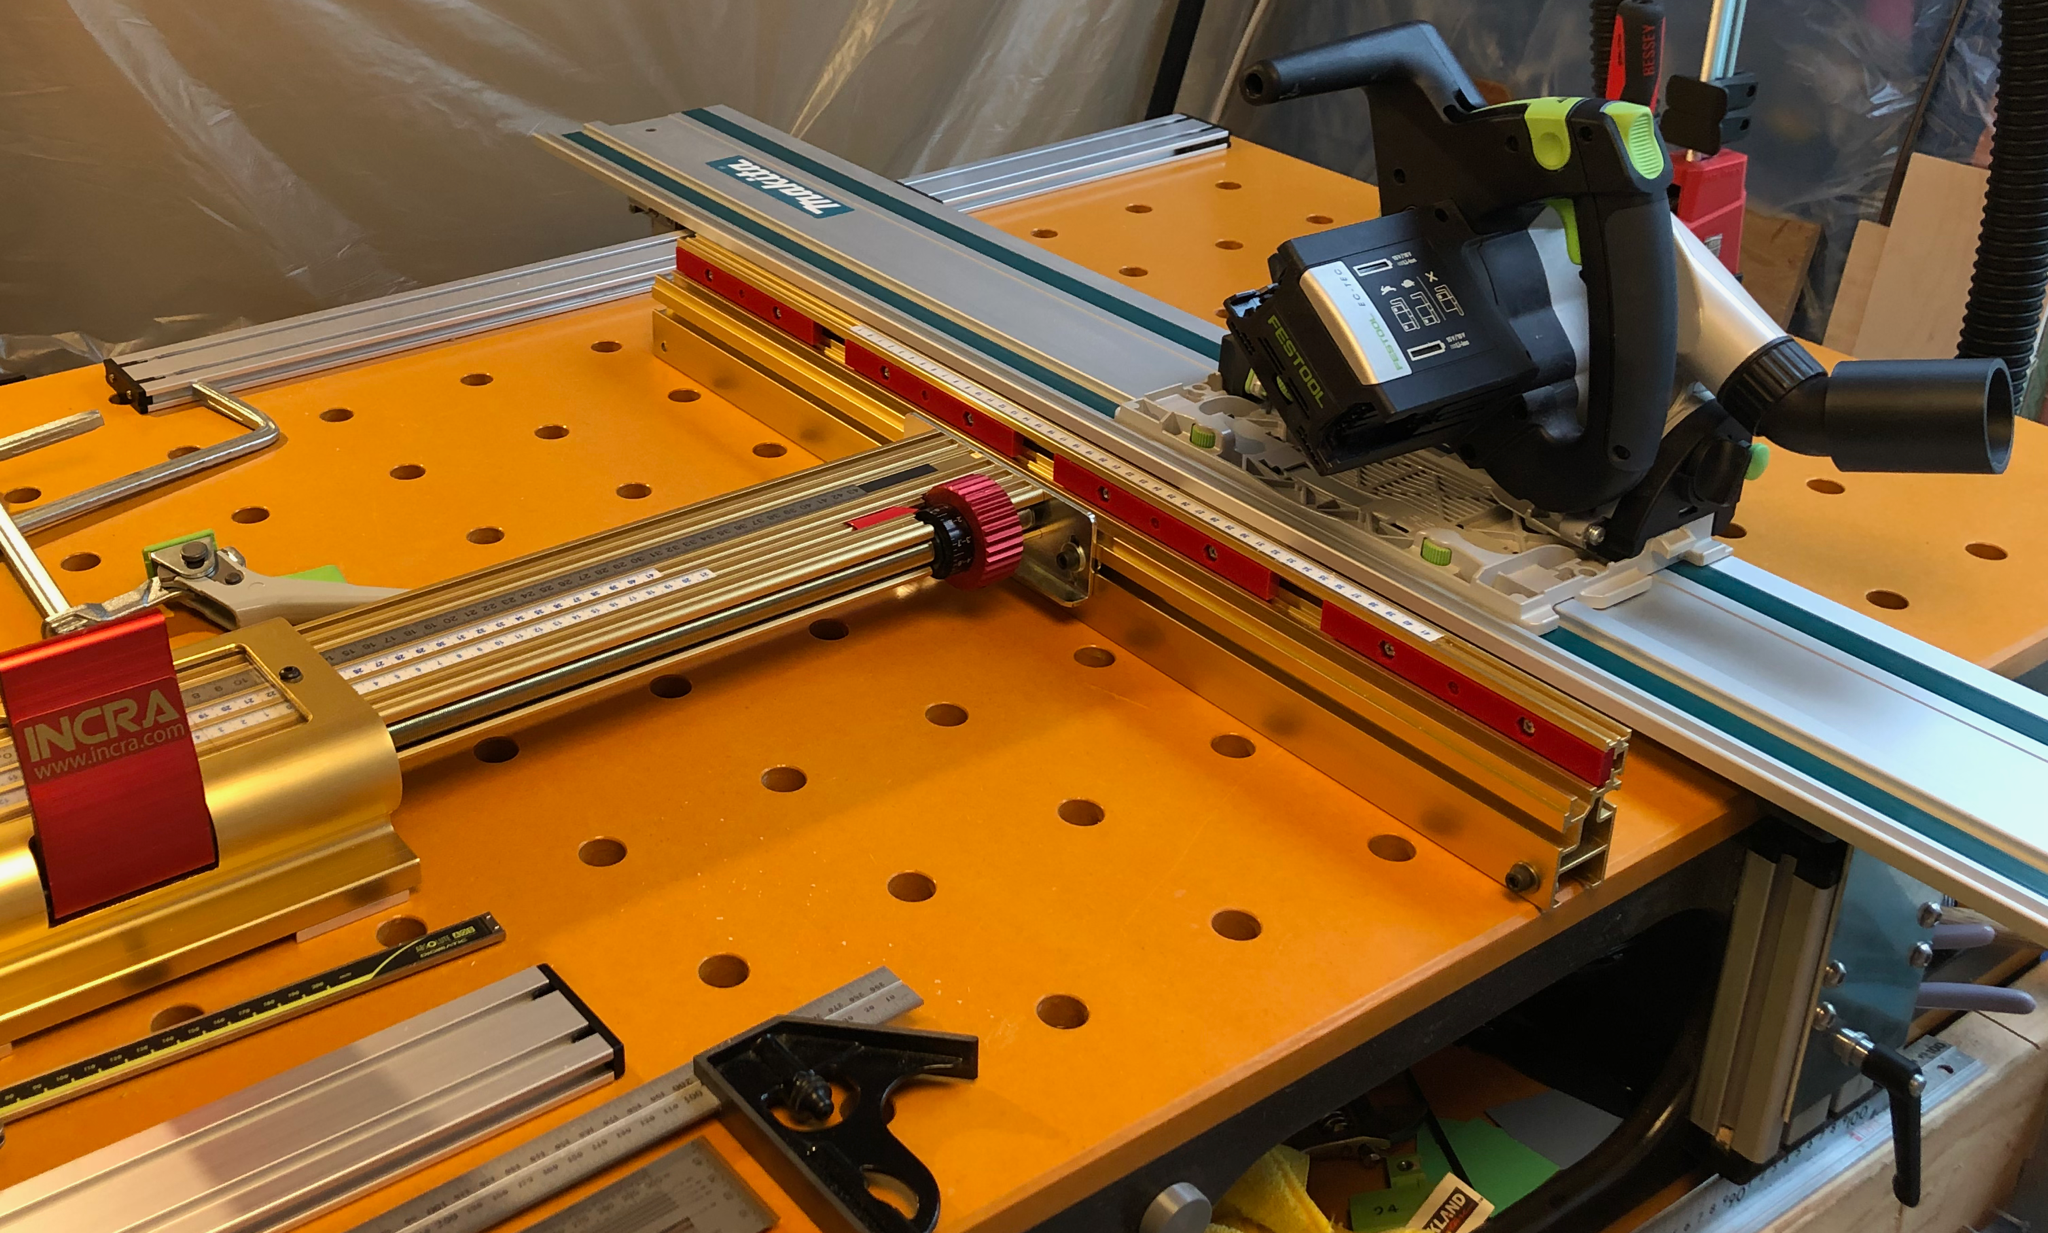
I detailed above how I made the Incra attach with two custom dogs, so it is easy to flip it or remove it when not needed. I expected to have to shim it to get it square, but it just lined up perfectly :dunno: just lucky I guess.

mft_02.png


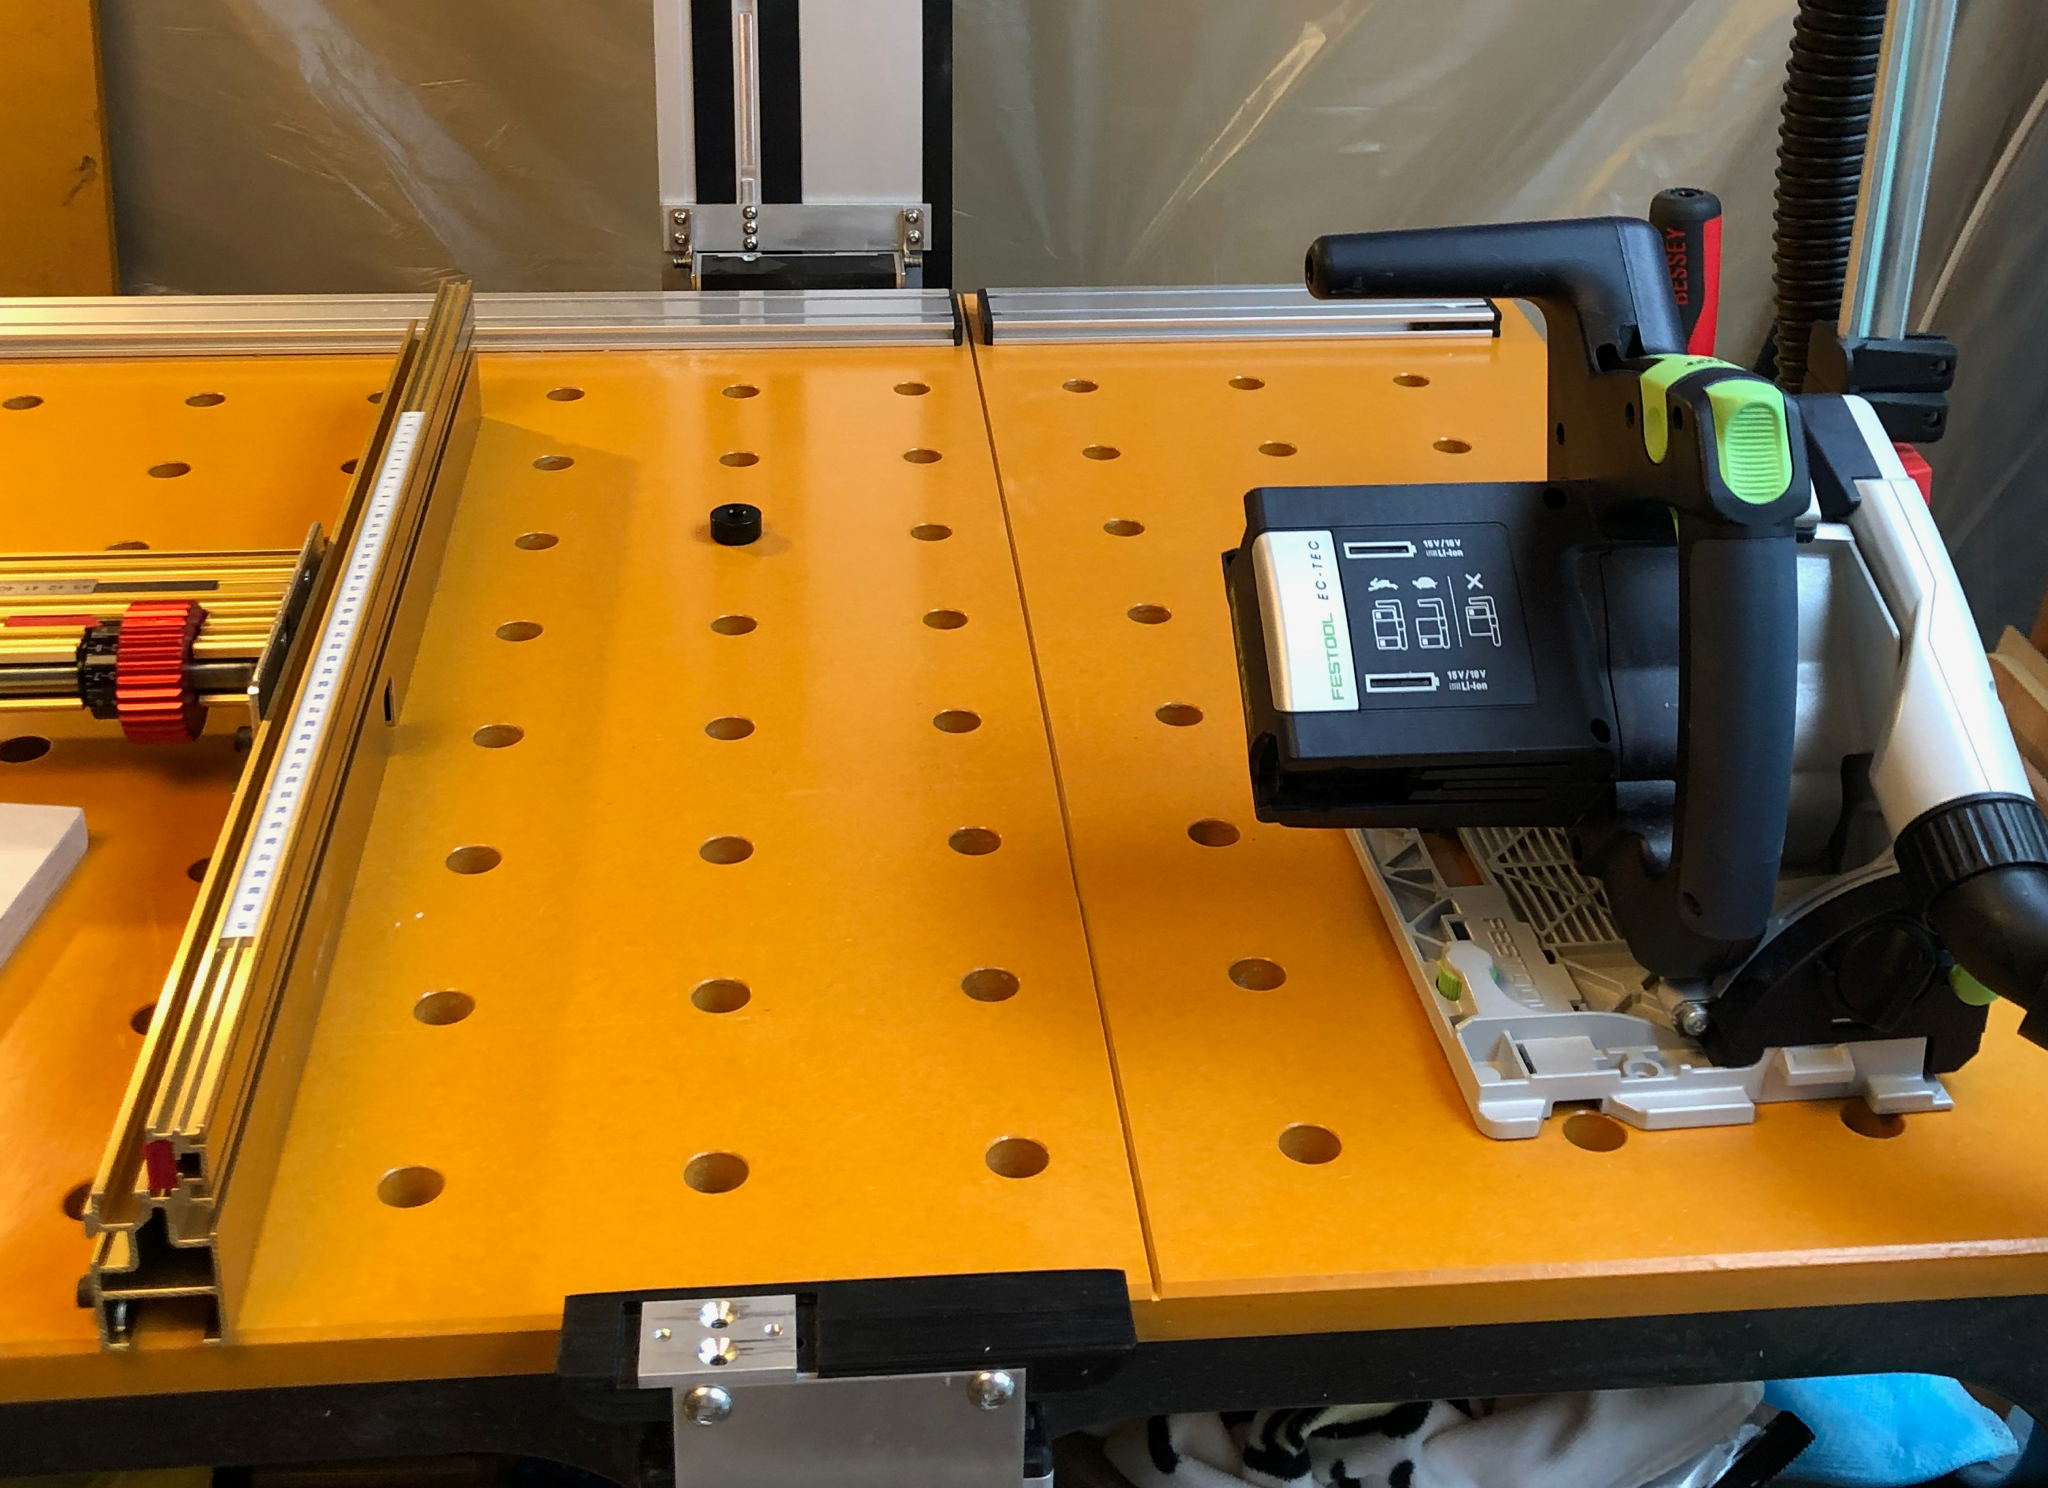
If you look towards the back of the table you can see those Aluminum rails. They are part of the router template, as I mentioned when it isn't being used it is easily disassembled and some other custom printed dogs can be screwed into the captured nuts that are in the T slots.

rail_dogs.png


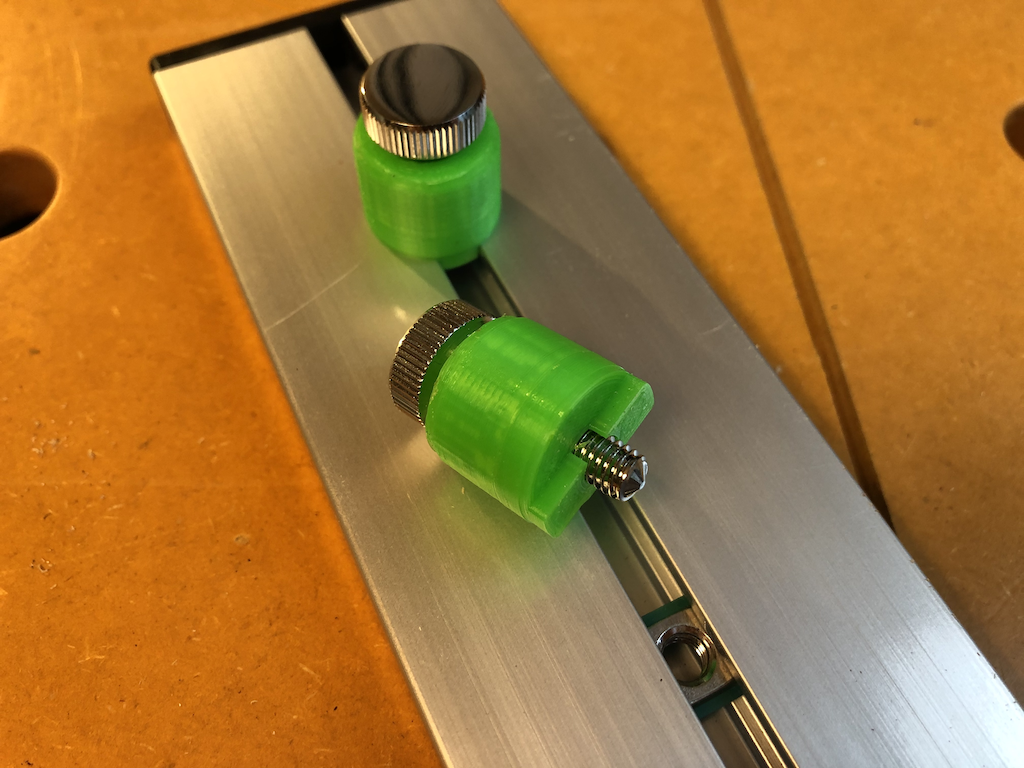
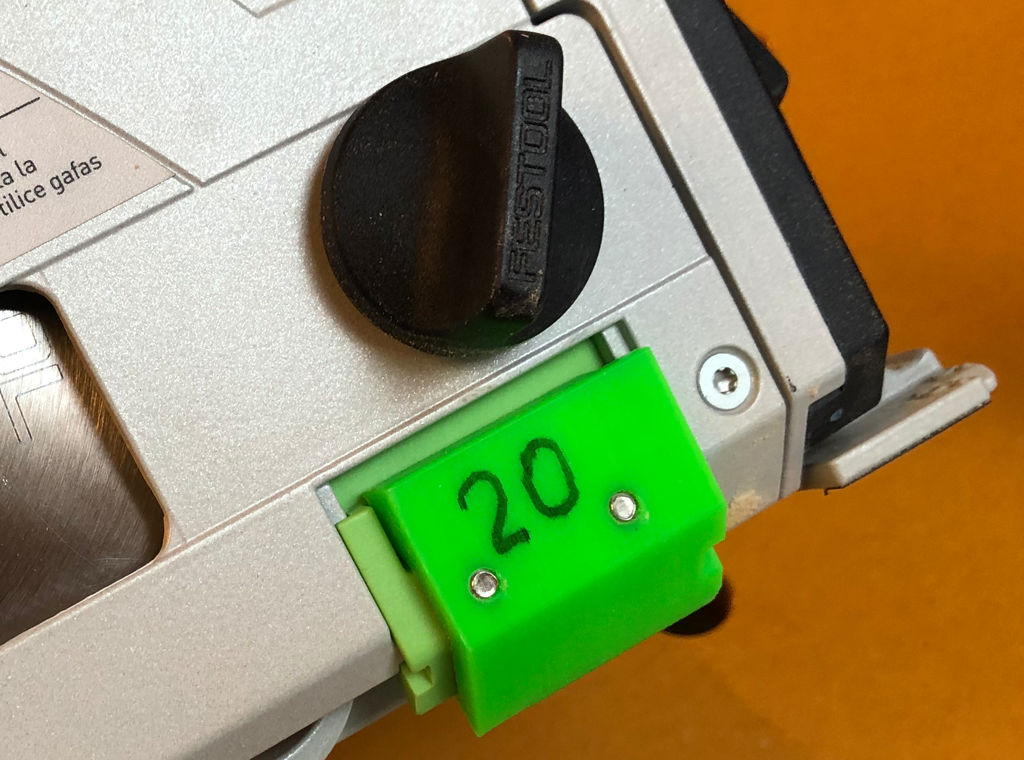
The dogs themselves were printed with a HDPE insert that keeps the chromed brass thumb nuts captured but free spinning, Festool green PETG makes them a little easier to locate in my messy area when removed.

rail_dogs_printing.png


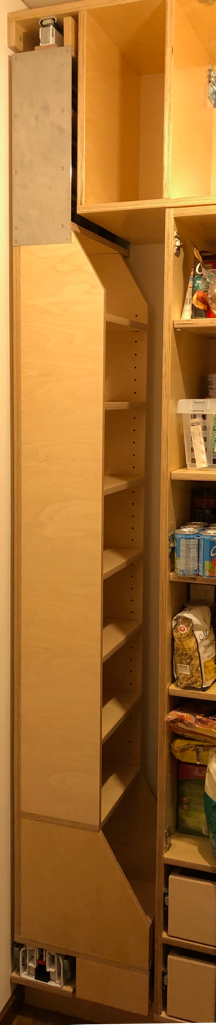
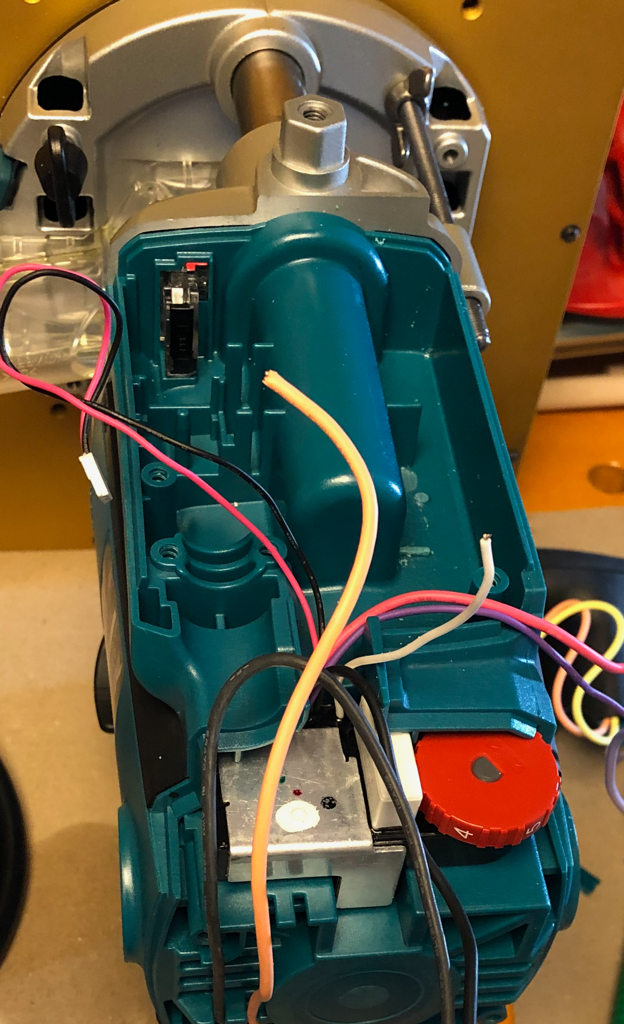
I had to do about 10 repeated cuts to redimension a bunch of my shelves due to some misguided application of my new Makita DKP181 power planer. I was trying to flatten a 1mm bow along the long edge of some side panels, and it certainly removed it, but it also created a 2mm difference between the two ends :( so I ended up trimming 4mm off the whole dimension.

The new setup worked like I had hoped. Set the dimension on the Incra, test it on a piece of scrap, then just pound out the cuts. Painless. :thumbup:
 
To avoid these ads, REGISTER NOW!

mitchellc

Well-known member
Joined
Nov 17, 2019
Messages
88
Location
Seattle
Read through the thread, and what makes me happiest out of everything is just how much you have been able to accomplish with a unfathomable (by American standards) 60A electrical service. Our passive heat/cooled townhouse with a lot of gas appliances has a similarly peculiar 100A service. It has served us just fine, but I don't have to need something to want it. Also, your breaker box is so tidy that ours looks shameful by comparison.
 
OP
B

Bakafish

Well-known member
Joined
Feb 7, 2017
Messages
477
Location
Tokyo
Read through the thread, and what makes me happiest out of everything is just how much you have been able to accomplish with a unfathomable (by American standards) 60A electrical service. Our passive heat/cooled townhouse with a lot of gas appliances has a similarly peculiar 100A service. It has served us just fine, but I don't have to need something to want it.

Yeah, I think electric water heaters, clothes dryers and full sized ovens used in the states all change the equation. I do want to add an oven and a (dedicated) clothes dryer, so I may start hitting the real limits of our power envelope at some point. We don't have an electric car yet, and I can imagine things getting dicey if we try to push 40A into one... The panel I put in has a lot of flexibility, and advanced car chargers have programmatic interfaces, so my thinking is that I can monitor the house load and dynamically change the car charging limit.

Of course Solar, natural gas fuel cells (Panasonic ENE-FARM) and local storage (Tesla Power Wall) are all potential workarounds to bridge peak loads beyond the 60A supply. And lastly it is theoretically possible to get up to 100A circuit with some kind of waiver, but it being Japan I can only imagine it would be ridiculously hard.

Also, your breaker box is so tidy that ours looks shameful by comparison.

I think it's a side effect of them having to be located in the living space. In the US the panel is always tucked away out of sight in a spider infested corner of the garage :)

These panels are clearly designed to work on 120/240v systems, all the breakers are uprated for that voltage. Maybe Japanese breaker panels will be the next trendy architectural export to go along with the fancy toilets...
 
Last edited:

mitchellc

Well-known member
Joined
Nov 17, 2019
Messages
88
Location
Seattle
I had an electrician come out so someone could "tell it to me straight" regarding the realistic limits of our service level. His feedback was that we could add a fast charger or a mini-split A/C down the line without pulling more service (which would be an ordeal for other reasons), but not both.

I'm fine with caveman cars. Given that electric cars are ideal for short trips, if we want to go electric we always have this option:

attachment.php
 

Attachments

  • Seattle_Trolley.jpg
    Seattle_Trolley.jpg
    156.6 KB · Views: 1,837
OP
B

Bakafish

Well-known member
Joined
Feb 7, 2017
Messages
477
Location
Tokyo
Seattle was where I experienced my formative summers as a young teenager, eventually moving up there when I turned 21 to live with our family friends at 21st and E. Highland on Capitol Hill. It was always a magical place, the dour gray skies bottling in the energy of the city, making it always feel like time was short and things needed doing. I'll grant that the sun did shine sometimes, but my fondest childhood memory of the place was searching for the silhouette of jet airplanes overhead, audible but concealed above the cloud deck on their final approach to SeaTac. Country boys are easily entertained :)
 

bdbecker

ALLIANCE MEMBER
Joined
Nov 18, 2015
Messages
5,543
Location
Iowa
...but my fondest childhood memory of the place was searching for the silhouette of jet airplanes overhead, audible but concealed above the cloud deck on their final approach to SeaTac. Country boys are easily entertained :)

Lol... that hit home. I grew up in a rural setting and my first few jobs out of college had me living in a small town. About 8 years ago we moved to "the city" and I still look up at the sky nearly every time a jet flies over.
 
OP
B

Bakafish

Well-known member
Joined
Feb 7, 2017
Messages
477
Location
Tokyo
I know I haven't updated in a while. Progress has been slow and steady. I finished the sliding pantry unit, and installed it. Keep in mind, the cabinet door faces and drawer faces are not done in these photos, you are seeing the internals still.

I'm getting better with assembling these large complex pieces, a lot of pre-assembly design work needs to go into them so that everything lines up, the dominoes don't work at odds with the assembly order, and there are enough clamps (there are never enough :( ) to keep it straight while the glue is drying. I didn't really take any photos of the fabrication or assembly, I was just not in that mode. You've likely seen enough pictures of plywood parts anyway.

Here is the finished internal assembly without the final facing panel.

pantry_closed.png

pantry_open.png


The top section (see post: #192) of the slider was built for these OXO modular containers. These upper shelves have subtle channels routed in them to keep the feet locked in, but are beveled so they easily slide into place (or from side to side.) The bottom shelves are adjustable, but I've set them for the larger size of the same containers. The base is designed to hold large bottled goods (cooking oils, vinegars and such.) I'm building a small drawer at the bottom for keeping the fancy chopsticks for when guests (eventually) come to visit.

The German Fulterer FR777 slide assembly works very well, except due to the height of my design, there is a tendency to rock in the direction of travel when it is fully extended open. I have a rotary damper and rack on its way, and I'm hoping I can smooth out those last few inches and remove the bounce at the end of travel. I can't blame them, but I think I would have modified the design for the top rail to deal with this if it were up to me.

In order to build this part I revisited the System32 hole system I made to address some of the issues I encountered during my first use (see post: #177 to see what I'm talking about.)

The first thing I added was a zero clearance "puck" that fits in the router guide location of the router. This provides the 5mm standoff so that the router is perfectly parallel with the surface, and prevents any tear-out. I was using a special 5mm downcut bit before, but my feeling was that because of its poor chip clearing behavior and the heat it generated, it was making slightly oversized holes. Maybe my imagination, but switching to a straight cut bit with the zero clearance puck results in a clean burn free hole. The holes in the sides are meant to encourage dust extraction, no idea if they actually help.

puck.png


The second part I made is a little block that magnetically attaches to the bottom of the router baseplate in order to set the offset of the hole pattern. That is required to make sure your holes are offset precisely from the reference edge of the panel you are drilling them in. Even being off by 0.5 mm is enough to cause rocking shelves, so you really need the holes to start at the same distance. Festool solves this problem by affixing a "longitudinal stop" to the guide rail itself. They have through holes in the special System32 guide rails, so it works well (I imagine), as the same set of holes that are used to align the router are also used to offset the system from the workpiece. My reference holes are only accessible from the top so in order to keep the abstraction as small as possible I wanted to tie the offset to the holes using the router itself as the reference if possible.

block.png

baseplate.png


The Makita baseplate designs require an adaptor to use standard router guides, and it has 4 equidistant 8mm holes drilled in it. I use those holes to precisely center align the block which has matching precision ground pins (ordered online for a few bucks) flanked by the embedded magnets. The block has a 16mm offsets on the narrow site, and 32mm offsets on the long sides. So basically I can just clip this block to the bottom of the router in the orientation I need (sometimes you want a 16mm offset, sometimes 32mm), lock the System32 guide into a suitable hole, then **** the block against the edge of the panel, giving the correct offset. The pins and magnets keep it firmly attached with zero play against any shearing forces, but still make it easy to pull off.

Of course, for that to work you need to make sure that the rail is perfectly perpendicular to that edge. I spent months a while back trying to make an adjustable set of rails that would act as both a right angle guide, and emulate the Festool Parallel Side Fences. I never got the kind of rigidity (or correspondingly the precision) I was hoping for. The design utilizes the extrusion with the 32mm holes to cinch a machined block of aluminum against the back of the rail, but the way the added extrusion is mounted to the rail it can flex in that direction, so when a normalish load is applied to the square beam, it can deflect from being perfectly square. :sad:

Anyway, rather than reinvent the wheel, I looked at the Festool solution. Then redesigned it instead... why are we even bringing wheels into this conversation? :dunno:

The main reason I had previously avoided their solution is that it consisted of 2 bars that 'clip' to the bulge of the Guide Rail. I felt that is inelegant as anything that clips to something else without some kind of secure interlock seems imprecise. That bulge on the rail also has no specific fixed distance to the reference edge (the rubber guide cut by the track saw blade and is somewhat unique to each tool) or obviously the router bit itself (which has its own changeable offset.) So we are dealing with abstracted reference points again.

Despite my distaste I realized that the key point would be to try and reduce the abstraction by setting a baseline reference to the router centerline, and once that is established I could offset from that with good precision. This lead to making a pair of this guy here.

standoff.png


I got some cheap stainless steel hex stock and 3d printed some clamps with a compliant relief so they securely snap onto the rail bulge, but can be levered off by hand easily. Then I designed several different parts that slide along these rods. They use thumbscrews to clamp securely, and can be easily adjusted along the length.

standoff_closed.png


These parts are designed so that the blades of my calipers can slot into them, and then reference off of a precision tool steel rod held by the outer slider. The inner slider is aligned and locked in position to the centerline machined into the routers base using the blade of the caliper to reference it. Then the outer slider is moved so both caliper jaws are in contact with the 6mm pin in the outer slider. The caliper then gets set on 'reference' mode, so it reads zero (indicating the distance of the pin to the centerline of the router.) Then the outer slider can be moved up to about 200mm with extreme precision, and locked in place. The calipers just slide out of the slots once I have set the distance I want, and thus I have a known accurate offset from the center of the bit. The second unit (not shown) is designed to align to the calipers as well, but uses the first unit as its reference to keep them identical.

standoff_open.png


Obviously for use with the track saw you set the guide pin flush with the reference edge of the rubber strip, lock the inner slider, (move the outer slider another 2.2mm to read 8.2mm to account for the blade kerf if desired) set it to zero and then dial in your cut dimension.
 
OP
B

Bakafish

Well-known member
Joined
Feb 7, 2017
Messages
477
Location
Tokyo
I also did a slight redesign to the homebuilt MFT hinged rail system. I added internal magnets and refined the alignment mechanism to the brace where the rail drops down on. I attached a thin sheet of 340 (magnetic) stainless steel to the bottom of the new, longer Makita guide rail so it is positively engaged into the front guide block when closed. It now gives me more confidence that it is aligned with the reference, square to the table and will not move around on me.

rail_plate.png

The mirrory stainless steel plate is affixed with double sided tape. The two button head screws seat into conical reliefs in the base support to fix and align the rail to the table.

I also identified that the inconsistency I was getting with the perpendicularity of my cuts was due to the baseplate of my Festool track saw being warped. This is a bit disappointing as I baby it, and Festool is such great stuff. I brought it over, new in the box, from the states, so no expectation of warranty here. It also took me a looong time to actually realize that the rocking motion when it was set on or off the track wasn't intentional and was responsible for the wavy edge quality. I applied some precision thickness ultra high molecular weight polyethylene tape to the low spots and now it cuts solid and smooth with less burn marks too.

After finishing the pantry slider I started working on the drawers. I didn't document their build as I expected them to be a challenge. I used half blind dovetails on the front, and a dado on the back. I did everything using the Incra system, and had a pretty decent experience with it. The only issues I had were extremely minor, and due to ignoring my design drawings by 0.5mm on the first (test) drawer. I was able to make corrections on the remaining 3 drawers and do some imperceptible relief cuts on the test drawer to get it to fit between its drawer slides properly. This stuff just takes so much precision, I'm getting better at keeping things tight, but you can't let your guard down at all.

drawers.png


A long time back I imported a Porter Cable 4216 Deluxe dovetail jig, but never had a chance to use it. With the experience under my belt using the Incra system, I wanted to try the Porter Cable out, so the little drawer at the bottom of the pantry slider seemed a good candidate. My initial experience was so bad I almost decided to give it away. I was using the mini template, and while the basic design of the system is extremely practical and sensible, trying to single cut very deep blind dovetail cuts into 18mm baltic birch was a smoke filled nightmare. I did one side, it was butchered, the bit slipped and extended its depth a little due to all the load. Just a s%$t show. I was really upset about it, then had myself a bit of a think.

bad_dove.png


Going back to the charred parts, it occured to me that lots of tiny progressive cuts would likely make this work a lot better. Now you can't actually do that with a dovetail bit, as the widest part needs to be flush to the bottom of the cut, but if the bit is straight sided and smaller in diameter than the smallest part of the cut, then clearing out the majority of the material with progressively deeper passes, then doing a final pass with the dovetail bit, might just make this system work!

Sure enough, the top of the cut was 5mm exactly, and who has several carbide 5mm straight bits of various geometry handy? I do! Four or five uneventful 2mm depth passes later I swapped in the dovetail bit for the final run and easily cleaned out the last 7 degrees of undercut. Easy peasy.

straight_dove.png

This is the clean burn free results of roughing out with a 5mm bit, before the finishing pass with the dovetail bit.

Oh, I also got a full air conditioner toolset (vacuum pump, flare tools, gauges, etc...) and put in a new split type (that's all we really use over here) heat pump/aircon for my wife's home office. Setting these systems up has been well documented by people on YouTube and so forth, but I can't say I wasn't initially a bit intimidated by the whole process. There were a lot of potential pitfalls, I navigated through it all successfully though, so if anyone has any questions I may be able to help!
 
Last edited:

nicholam77

Well-known member
Joined
Dec 18, 2016
Messages
2,655
Location
Minneapolis, MN
Always love it when this thread gets updated. The pantry is looking great. Glad to see you've been busy.

Genius-level work with the zero clearance puck and the guide rail caliper system. So cool. I am going to have to go back and visit your original post as I'd like to have a shelf pin jig eventually and yours seems like a great solution.

FYI I think the photos are missing from your latest post!
 
OP
B

Bakafish

Well-known member
Joined
Feb 7, 2017
Messages
477
Location
Tokyo
Always love it when this thread gets updated. The pantry is looking great. Glad to see you've been busy.

Genius-level work with the zero clearance puck and the guide rail caliper system. So cool. I am going to have to go back and visit your original post as I'd like to have a shelf pin jig eventually and yours seems like a great solution.

If I'm ever finally satisfied with it as a solution that could be replicated easily by others I will upload the various parts. It is still a bit fiddly, and requires precision drilling of the 20x20 guide extrusion which many (myself included to be honest) don't have. I'm very careful to always use the system in the same orientation for both sides of a cabinet so any spacing errors between the holes that likely exists is applied to all the holes of the same 'row' so at least they are level with each other. If I were to do it over again (and knowing me, I might) I would create a precision jig (or finally install the DRO) instead of relying on my mini-mill's manual table (which I know needs some repair as well.)

Anyway, I would strongly recommend the Festool solution if it is available to you and the tradeoffs were not too dear. For me, on the wrong side of the world, I didn't want to buy even more rails (I now have 4), another router that's not designed for my region (currently have 2), and the money, although that's more a mental barrier than an actual financial one.

Festool should have pre-drilled all their rails, the cost to them would have been negligible and it would have promoted better adoption of their system (and differentiated them from competing rail vendors, shout out for the wonderful and cheap Makita rails I now prefer.) Anyway, I'm not evangelizing my solution until I think it is competitive on precision, usability and can be made by someone with a little bit less resources than I have.

FYI I think the photos are missing from your latest post!

LOL, I just wanted to brain dump the remainder of my progress without overly detailing it... I'll add a photo or two just to keep it consistent with previous reports.
 

nicholam77

Well-known member
Joined
Dec 18, 2016
Messages
2,655
Location
Minneapolis, MN
Anyway, I would strongly recommend the Festool solution if it is available to you and the tradeoffs were not too dear.

[...]

Festool should have pre-drilled all their rails, the cost to them would have been negligible and it would have promoted better adoption of their system (and differentiated them from competing rail vendors, shout out for the wonderful and cheap Makita rails I now prefer.) Anyway, I'm not evangelizing my solution until I think it is competitive on precision, usability and can be made by someone with a little bit less resources than I have.

Unfortunately the tradeoffs are too much for me w/the Festool. My dewalt router works fine and the price of the LR32, holy rail, plus a Festool router is out of this world just to drill shelf pin holes (as cool as it would be).

It would be cool if Makita could come out with a similar, cheaper system with their rails, guide base, and routers.


LOL, I just wanted to brain dump the remainder of my progress without overly detailing it... I'll add a photo or two just to keep it consistent with previous reports.

Ha! My bad. The photos were weird loading in your other post when I first looked at it so I thought there might be a hosting issue going on.

Thanks for updating with some pics. I'm using the Festool rail pivots on my home-brewed MFT with a Makita rail, and there is a lot of slop on the back support. Yours look nice.

The dovetails look great, nice solve with the straight cutter.
 
OP
B

Bakafish

Well-known member
Joined
Feb 7, 2017
Messages
477
Location
Tokyo
Unfortunately the tradeoffs are too much for me w/the Festool. My dewalt router works fine and the price of the LR32, holy rail, plus a Festool router is out of this world just to drill shelf pin holes (as cool as it would be).

It would be cool if Makita could come out with a similar, cheaper system with their rails, guide base, and routers.

It is such a specialized application domain that I don't think Makita is going to go after it, but agree it would be great to see an alternate solution.

As far as doing it all over again, I would be tempted to buy the Festool System32 kit, make an adaptor to fit my router to the base plate and a jig to drill holes in my rails. Lack of access was the biggest barrier for me, at the time I was building this setup Makita in Japan had not started marketing the track system used internationally for a long time, so my Festool rails that I had imported at a very high cost (and locally available for an even higher one) were precious. I didn't want to do anything to them that wasn't reversible. Now I can have a new Makita rail dropped off at my door for relative pocket change, making holes in them would be tempting :)

All that said, the net cost of my solution (not counting my development time, which I don't, as that's the fun part) is ~$40 for the Makita Track Rail router adaptor and less than $80 for the aluminum extrusion, stainless hex and rod stock and the little plunger. So the cost is a fraction of the Festool.

If you are really interested I will share the parts models and help you get it running.

Ha! My bad. The photos were weird loading in your other post when I first looked at it so I thought there might be a hosting issue going on.

Thanks for updating with some pics. I'm using the Festool rail pivots on my home-brewed MFT with a Makita rail, and there is a lot of slop on the back support. Yours look nice.
Those pixels have a long way to swim to get to you! :bounce:

I've only ever seen the Festool version in pictures, it doesn't seem to have a very sophisticated hinge. I honestly imagined it was sprung and had some kind of bearings when I had seen it used on YouTube, but the reality of it was more pedestrian. None of their solution screams of precision, the little finger poking into the rail slot to locate it in the front also seemed a bit crude, but it must all work as people really seem to like them. My take on it was all built around recycling stuff I had on hand, I wasn't even trying to make something replicable.

That bottom slot in Makita rails is definitely a slightly different dimension than the Festool, so keep an eye on that.

The dovetails look great, nice solve with the straight cutter.

The 'precision' of the fit of the Porter Cable system, where (in a half blind) the back of the tails are radiused to match the round pocket the dovetail router bit cuts in the pins is a double edged sword. It makes the fit really fiddly. The Incra just makes a straight back cut along the tails, meaning there are internal voids, and presumably a little less strength, but the advantage is that you can manhandle a tight fit to become flush pretty easily with clamping pressure.

I will try it again, it is one of those tools where if it works as designed it should really allow one to bang out a lot of output, the Incra is a bit more interactive and human error prone, not as batchable.
 

mitchellc

Well-known member
Joined
Nov 17, 2019
Messages
88
Location
Seattle
What’s the “woodworking for dummies” description on the advantages of the Festool ecosystem? Before reviewing this thread I have never heard of the brand. The 30,000’ view is that it’s a lot of stuff in fancy green colors that costs a lot of green.
 
OP
B

Bakafish

Well-known member
Joined
Feb 7, 2017
Messages
477
Location
Tokyo
What’s the “woodworking for dummies” description on the advantages of the Festool ecosystem? Before reviewing this thread I have never heard of the brand. The 30,000’ view is that it’s a lot of stuff in fancy green colors that costs a lot of green.

Tool brands can be a contentious subject akin to politics and sports teams, so I hesitate to be seen as an advocate for any specific brand. I highly respect most manufacturers and you really need to judge a tool or system on its merits. I'm lucky (or maybe unlucky) that my income doesn't depend on my woodworking tools, and that gives me the flexibility to pick and choose, or even make my own solutions. Real tradesman most likely don't have the time to waste on months of research and cross referencing solutions, or designing and testing prototypes. When I was young and in the business I always remember us being a day behind, and one NiCad short. We never worried about the price of a good tool, as a broken tool can end your day.

As for Festool, they create solutions to niche problems that most other manufacturers are not willing to risk investment on, creating new market categories. The best example of a product that they helped pioneer are Track Saws, which are a safer and portable substitute for table saws. It is true that Makita and others have come out with lower cost versions that are compatible with the standardized track profile (and there are others that use their own tracks, for better or worse), so there is more choices in that tool category now. If the Makita version had been available to me, I likely would have bought that, but I have no real regrets about the Festool I have. The Festool products also hold their value very well and can be resold without nearly the depreciation of other brands.

Some of their more elegant niche products are the Domino line of floating morticers. I have one, and it is a very useful tool for many woodworking challenges. The System32 hole drilling system is another tool that is extremely valuable to a small group of woodworkers. The Rotex sanders also offered unique flexibility in operation (which is also being emulated by Makita and others.) They have great drywall finishing systems and edge banders, countertop jigs and other really time saving solutions for professionals. Go to their international website and just poke around, it's really interesting to see what they have come up with.

The quality and support is quite good, the interoperability and efficiency are a major focus, the engineering is Germanic and robust. It often comes down to subtle details, like the Kapex miter saw laser guide actually projects both edges of the saw blade cut lines. The vacuum hoses have a non-snag sleeve and are anti-static. The power cords are swappable between tools so you can utilize one cord per workspace. Just little details that you will really appreciate if you are using them all the time. They offer some of the best tool to bag dust collection solutions and are designed (and packaged) for convenient transport and on-site usage. So they really target the contractor and tradesman, even if dabblers covet it as it is so well respected by the professionals.

They are not perfect though, and as I noted above there are often lower cost alternatives that can solve the same challenges. But if I were doing this for my business, I'm not going to waste a lot of time 'mix and matching' potentially non-interoptable tools to save a few hundred bucks. It is an easy decision to buy into the ecosystem and just 'go green' and know I have reliable tools that can do everything I need, packaged in a transportable container system, that leaves no mess behind.
 

mitchellc

Well-known member
Joined
Nov 17, 2019
Messages
88
Location
Seattle
Tool brands can be a contentious subject akin to politics and sports teams, so I hesitate to be seen as an advocate for any specific brand. I highly respect most manufacturers and you really need to judge a tool or system on its merits. I'm lucky (or maybe unlucky) that my income doesn't depend on my woodworking tools, and that gives me the flexibility to pick and choose, or even make my own solutions. Real tradesman most likely don't have the time to waste on months of research and cross referencing solutions, or designing and testing prototypes. When I was young and in the business I always remember us being a day behind, and one NiCad short. We never worried about the price of a good tool, as a broken tool can end your day.

As for Festool, they create solutions to niche problems that most other manufacturers are not willing to risk investment on, creating new market categories. The best example of a product that they helped pioneer are Track Saws, which are a safer and portable substitute for table saws. It is true that Makita and others have come out with lower cost versions that are compatible with the standardized track profile (and there are others that use their own tracks, for better or worse), so there is more choices in that tool category now. If the Makita version had been available to me, I likely would have bought that, but I have no real regrets about the Festool I have. The Festool products also hold their value very well and can be resold without nearly the depreciation of other brands.

Some of their more elegant niche products are the Domino line of floating morticers. I have one, and it is a very useful tool for many woodworking challenges. The System32 hole drilling system is another tool that is extremely valuable to a small group of woodworkers. The Rotex sanders also offered unique flexibility in operation (which is also being emulated by Makita and others.) They have great drywall finishing systems and edge banders, countertop jigs and other really time saving solutions for professionals. Go to their international website and just poke around, it's really interesting to see what they have come up with.

The quality and support is quite good, the interoperability and efficiency are a major focus, the engineering is Germanic and robust. It often comes down to subtle details, like the Kapex miter saw laser guide actually projects both edges of the saw blade cut lines. The vacuum hoses have a non-snag sleeve and are anti-static. The power cords are swappable between tools so you can utilize one cord per workspace. Just little details that you will really appreciate if you are using them all the time. They offer some of the best tool to bag dust collection solutions and are designed (and packaged) for convenient transport and on-site usage. So they really target the contractor and tradesman, even if dabblers covet it as it is so well respected by the professionals.

They are not perfect though, and as I noted above there are often lower cost alternatives that can solve the same challenges. But if I were doing this for my business, I'm not going to waste a lot of time 'mix and matching' potentially non-interoptable tools to save a few hundred bucks. It is an easy decision to buy into the ecosystem and just 'go green' and know I have reliable tools that can do everything I need, packaged in a transportable container system, that leaves no mess behind.

Really appreciate the walkthrough; it paints a much better picture of what you are able to achieve. I’m always intrigued on the “grail” accoutrements in any hobby or trade, even hobbies that are not my own.

I watched a few videos on the track saw and the Domino, and can see how cabinetry and other fine woodworking would benefit from the tools’ precision. I’m over here doing caveman cuts with a circular saw and jig saw, who has been fine for the limited applications I’ve worked with, but a bit too rough around the edges for interior pieces. I can also see how having an effective vacuum system will hugely improve efficiency. If making cabinetry for a kitchen, for example, bringing the material and workspace inside and working in situ would cut a lot of back and forth when working in a client’s house.
 
OP
B

Bakafish

Well-known member
Joined
Feb 7, 2017
Messages
477
Location
Tokyo
One of the many side projects I had was a method to remotely start my Makita shop vac that's primarily used for dust collection. It has an outlet that auto-starts, which is great, except it isn't really rated for my bigger tools, and obviously is useless with my cordless stuff. The current, totally incompatible wireless dust collection methods are ridiculously overpriced, although Festool's solution of integrating the Bluetooth communication through the battery is quite clever and a great way to provide backwards support.

Makita uses an overpriced module ($50 per tool) that requires the tool to have a compatible port (so throw out your investment in tools), and although a Bluetooth receiver (Makita WUT02U) to trigger the vacuum can be retrofitted, the device is not available in Japan and costs $200 :wtf:

So under the guidance of the EEVBlog Angry Pixie Wranglers I decided to make my own remote activation, not tied to Bluetooth or the tool trigger, just a nice button at the end of the hose that could start and stop the vacuum so I didn't have to reach under the bench to turn it on and off all the time.

At first I was going to use a 555 based timer circuit connected to a solid state relay to switch in a high power resistor every few seconds to trigger the current sensor on the vacuum. One of the members pointed out that there were "Motor Run Capacitors" which are designed to stay in circuit, but do not dissipate power as heat like a resistor, so I wouldn't need to mess with the duty cycle, greatly simplifying the device.

circuit.png


I got a cheap generic wireless relay transmitter/receiver for $9 on amazon. A big Motor Run Cap for another $10, and a few parts from my scavenge bin, wired them up and put it in a 3D printed case, and now I have a remote trigger for the vac!

vacuum_remote.png


The outlet on the bottom is inline and not switched, so my lower power tools like the Sander and Domino can still use the auto-start. For my big router and miter saw, and my cordless track saw, I just use the remote.
 
Last edited:

zanyad

ALLIANCE MEMBER
Joined
Apr 26, 2018
Messages
2,755
Location
NE Ohio
So under the guidance of the EEVBlog Angry Pixie Wranglers I decided to make my own remote trigger, not tied to Bluetooth or the tool trigger, just a nice button at the end of the hose that could start and stop the vacuum so I didn't have to reach unter the bench to turn it on and off all the time.

That link didn't work for me, but this one did.
 
To avoid these ads, REGISTER NOW!

nicholam77

Well-known member
Joined
Dec 18, 2016
Messages
2,655
Location
Minneapolis, MN
Question for you on the shelf-pinning, I see you started with a downcut spiral bit and changed to straight bit. I'm looking to get a 5mm bit and see that upcut spiral seems to be popular. Is there a reason you didn't use that? Too much chip out? Is the straight bit what you would recommend?

Thanks!
 
OP
B

Bakafish

Well-known member
Joined
Feb 7, 2017
Messages
477
Location
Tokyo
Question for you on the shelf-pinning, I see you started with a downcut spiral bit and changed to straight bit. I'm looking to get a 5mm bit and see that upcut spiral seems to be popular. Is there a reason you didn't use that? Too much chip out? Is the straight bit what you would recommend?

Thanks!

Yes, I was concerned about chipout and there was no upcut version available over here so I don't have proof that this is an issue. If I was in the US and had better access to tooling I think a 5mm boring style bit is the ideal solution. They basically have design that scores and shears the outside edge as it penetrates, but still has a very effective cleanout. I believe Festool sells one that is designed for router speeds, but it uses an 8mm shank so make sure your router can support it.
 

nicholam77

Well-known member
Joined
Dec 18, 2016
Messages
2,655
Location
Minneapolis, MN
Yes, I was concerned about chipout and there was no upcut version available over here so I don't have proof that this is an issue. If I was in the US and had better access to tooling I think a 5mm boring style bit is the ideal solution. They basically have design that scores and shears the outside edge as it penetrates, but still has a very effective cleanout. I believe Festool sells one that is designed for router speeds, but it uses an 8mm shank so make sure your router can support it.

Ah, gotcha. Well, I just received a 5mm upcut spiral and a 5mm upcut boring bit. I thought the boring bit I got was for drill press but it's actually a router bit, very similar to the Festool one but cheaper. 10mm shank but I have a collet adapter for my DeWalt router. I'll have to do some tests and see which works better :)
 
OP
B

Bakafish

Well-known member
Joined
Feb 7, 2017
Messages
477
Location
Tokyo
Ah, gotcha. Well, I just received a 5mm upcut spiral and a 5mm upcut boring bit. I thought the boring bit I got was for drill press but it's actually a router bit, very similar to the Festool one but cheaper. 10mm shank but I have a collet adapter for my DeWalt router. I'll have to do some tests and see which works better :)

I've had an Amana 10mm adaptor and boring bit in my US Amazon shopping cart for over a year now, just haven't pulled the trigger to experiment :) Please let us know your results in your thread.
 
OP
B

Bakafish

Well-known member
Joined
Feb 7, 2017
Messages
477
Location
Tokyo
I have just completed another item on my list of extremely poor investments of time in pursuit of correctness, namely I wanted to add an external power switch box for the router table. By 'completed' I mean I haven't made it yet, I have just done all the things required to make it, now I can't procrastinate anymore (by writing a post about it for example :) ) So I know they sell external router switches with a big OFF paddle that you plug your router in to and everything is set. But, I have serious reservations about using one. Why? Because my router(s) incorporate an electric braking mechanism that stops the bit almost immediately, and if you just cut off power when the routers trigger switch still engaged it will just keep spinning freely until entropy or a careless appendage provides somewhere for that energy to go. I openly encourage my paranoia about safety, and my feeling is that adding some safety margin by putting the switch in a more accessible location, but removing some margin by defeating a safety feature, isn't a tradeoff I'm willing to make.

So my first thought was about building my own external switch box using modular industrial switches I learned about from Big Clive on YouTube. They are very clever as you can basically stack different modules that allow a single switch to open and close a totally configurable assortment of contacts. This would then allow me to extend the internal switch on the router using a multi-conductor replacement cord with a multi-pin power connector that could both socket into my external switch box, but also to connect a regular 2 wire power cord to the connecter (with appropriate internal jumpers) and allow the router to be used conventionally. This is still likely the best overall solution.

So I bought all the switches, rubber power cables of various wire counts and gauges and some robust inline and panel mount 5 pin power connectors. My concern was that in order to keep the size of all these components reasonable, I was undersizing the current handling capabilities a bit and when I was investigating how the braking circuit was implemented, I realized that there was a more elegant solution that wouldn't require such complexity or pushing of current limits...

There are a number of ways to implement an electric brake, in the case of this Makita router it seems that they have gone the route of shorting the primary motor lead to a dedicated winding in the motor. It isn't an active circuit, and doesn't require power to work. So it occured to me that by installing an internal relay I could enable the brake whenever power was disconnected, regardless of the position of the tool's power switch. Honestly this is something that I think router manufacturers should implement by design in tools designed for table mounting (such as this unit.)

router_before.png


Basically I installed a relay that is triggered by full 100vac current. When the router has line power, the relay allows the trigger to control the router exactly as designed. But if the relay is de-energized by unplugging (or switching power off on the external switch) it disconnects the trigger switch and enables the electronic brake. It was a bit of a tight fit to stuff all this into the existing space, but I used super flexible BNTECHGO silicone wiring which really helps in tight spaces. I've not documented the parts and wiring diagram as I think this is a bit of a risky project and I don't want to encourage the mod unless you really understand what you are doing. DM me if you need more info or change my mind about the public good of documenting this better.

router_after.png


So now I still have to build the external switch box using the nice Fuji Electric switches I bought. It will be much simpler now that all the switching is done inside the router, and it also means I can remove some of the switch modules and make it smaller. I had done extensive design work on a box that supported the multi-conductor line from the router, so I need to redesign it with the new requirements, hopefully that will go quicker and I can show the whole system in use.

switches.png


Autumn is in full swing over here, the heat of summer isn't missed, but I need to get back into production. The pantry needs the root cellar drawer, drawer faces, cabinet doors and the special shelves for the Shochu and Wine cellar racks. I've been putting this off as it is the most critical stage appearance wise. I do like the look of baltic birch, but it really doesn't mesh with the dark floors and I was hoping to apply some kind of darker veneer or treatment for the external surfaces, ideally a caramelized bamboo laminate. Everything I've read says that birch doesn't stain well, so I think that's not an option. Because of the big panels required I've also been worried about warping. So there is a lot of fear holding me back, but as with anything, I think I need to just decide and move forward.
 
OP
B

Bakafish

Well-known member
Joined
Feb 7, 2017
Messages
477
Location
Tokyo
e–switch_ii.png


I finished up the E-Stop box for the router table. Fusion 360 allowed me to model all the components to pack everything as tight as possible. I slanted the sides to keep dust and hopefully any spills out of the outlets. There is a switched circuit for the router (and vacuum) and an unswitched circuit, both are protected by the emergency stop button. I ended up running both the hot and neutral through the e-stop since I suspect that in an edge case with a miswired outlet or freak equipment short that just disconnecting the hot wouldn't be enough.

e–switch_i.png


The parts are all printed with Carbon Fiber impregnated PLA, which I know doesn't add a ton of strength, but prints well and has a nice semi-gloss sheen to it. I used a M8 barrel nut which is press fit into the shell using a soldering iron to heat it up first, which really couples it securely.

A 2 meter heavy duty natural rubber industrial power cord and Panasonic Tuff plug completes the box. The switch is well recessed into the box to hopefully prevent any accidental activation. The relay I installed in the router is working as I had hoped enabling the remote switch to activate the e-breaking of the router when switched "off" which just feels safer.

e–switch_f.png
 

Denwood

Well-known member
Joined
Sep 22, 2014
Messages
4,180
Location
Thunder Bay, Ontario, Canada
Baka, not sure if I've ever read through an entire thread before, but sheesh, this one pulled me in. Your insightful posts on Japanese culture, DIY challenges etc. are more informative than perhaps a dedicated book on Japan might be. I truly believe that the focus on efficiency, a reflection of expensive "island" power, is a glimpse of the path forward for all of us. I honestly find it refreshing. Even the trials with disposing of construction waste remind me of the excessive ease that we consume, and then spit out a pile of material and energy as waste. Pretty sure our landfills will be mined 50 years down the line...ha.

To read your perseverance with the unit bath, where many grown man would have wept openly, was inspiring. I have to admit laughing out loud at your surreptitious photography attempts to gather engineering details on installation at the showroom :)

It also seems very obvious that the Japaneses tendency to focus so intently on a given skill or hobby (archery comes to mind) has infected your tooling efforts at home. Crazy stuff. Looking at your remote control power setup, I was a bit surprised you haven't played with automation. I came up with a remote power system to sense tool power and then fire up the dust collection receptacle (different circuits) just with some SmarthThings code: https://community.smartthings.com/t/app-to-manage-shop-garage-dust-collector-vacuum-system/46753

Having just added EV to a garage with a sub panel "limited" to 30 amp (my 200 amp house service makes me slightly embarrassed reading your thread..) I can tell you that you 100% can charge an EV at 120V and 12 amps (or less) with no issues. For just about any EV this represents about 9 km range (or slightly more) added per hour. This site lets you play with voltage, amps and various models and provides range/hour estimates: https://evcompare.io/charging-calculator/
You'll likely purchase an EVSE (charger cable/box) and they come in all flavours including Japanese options, that would let you charge lower, say 9 amps at 100v. So you may only need 50 amps if you need to add range much faster.

Easily my favourite thread here...and I have read Sak's :) I should add that "Baka" is the term my kids use for their Croatian grandma..ha.
 
Last edited:
OP
B

Bakafish

Well-known member
Joined
Feb 7, 2017
Messages
477
Location
Tokyo
Thank you all as always for the encouragement.

For those of you who might be interested in video content of some of the more traditional Japanese building style and DIY challenges, there is a guy a bit south of me that has been doing a really good job of documenting a real adventure. The countryside has become so depleted of population that homes (and even towns) have become abandoned, and there are properties that are basically given to people willing to take possession of them. This brave foreign soul and his (I'm sure long suffering, but happy) Japanese wife scored a sturdy country house and he documents his restoration and retrofitting in order to move his family in.

He's definitely a journeyman, but he researches well and goes out of his way to explain the strange aspects of things over here from a western perspective. He also documents real local craftsmans work quite nicely. Please give his series a watch from the start to see a positive spark in the shadow of the crumbling colossus of Japan as she sinks under the waves of depopulation and urbanization.
 

Alcology

Member
Joined
Apr 26, 2010
Messages
11
Location
Hopkinton, MA
Thanks again for documenting all this! I can second Tokyo Llama as great outsider's inside view of Japan. Definitely enjoyable to watch. It's fascinating to see how everything works there. Nice work with the 3D printing!
 
OP
B

Bakafish

Well-known member
Joined
Feb 7, 2017
Messages
477
Location
Tokyo
My wife really likes to buy vegetables, which wouldn't be a problem if she didn't work 80-90 hours a week, but they pile up and create acute food guilt (is that a thing?) for me. I grew up really poor, and we just didn't waste food, the thought of letting something spoil still haunts me and I always have anxiety about the food we have and leftovers, etc... It's just the two of us, and she is out of the house so much I feel this obligation to make sure it all gets used. We also get random deliveries from her relatives and friends, sending food gifts from your travel destination is a big thing here in Japan. So at any point in time we might get a surprise box of citrus fruit, or a couple crabs and abalone. Not complaining about heartfelt gifts of delicious food, but it just disrupts all the internal timers in my head and causes me to refactor everything. I actually get depressed when I find something spoiled. I know it's crazy, I'm more wealthy than I could have ever dreamed, and a 99 cent head of lettuce going bad is just so far off the economic radar, but some things are just ingrained in you and people who haven't known true hunger are just never going to get it, nor would I wish them to.

Anyway, the point of this is I always intended to have a root cellar as part of this pantry to help keep the various root vegetables fresh and preserve them longer. I also wanted to make things easy to clean so dealing with the inevitable accidental fungal colony would be easier, so I wanted to try and use off the shelf stainless steel cooking wear rather than wood. Commercial cooking sheets are a cost effective way to gat a big stainless steel drip tray, so I dimensioned the drawer to utilize the standard full size sheet. I got a couple of stainless stacking wire baskets (about half-sheet sized) and a perforated steam tray to hold the smaller things like garlic and small citrus fruits.

root_d1.png


The baskets require a fairly tight tolerance to stack properly, so I took advantage of that to build cross bars inside the drawer body that act as a carrier for them. They are 5mm steel rods that are precisely located to engage with the stacking hoops of the baskets. The top of the drawer enclosure is actually the base panel where the freezer sits, and there is a large screened vent located at the back that is designed to take advantage of the convective heat coming from the rear of the freezer to pull fresh air through the drawer from the front of the enclosure. I have space on the left side (the hidden area) to equip a small fan to force air in if it seems necessary, but I'm pretty sure it will work fine without it.

root_d2.png


Again, modeling this in Fusion 360 saved me lots of grief as I'm running pretty low on larger pieces of plywood. I have 2 full sheets left, but they are set aside for the doors and drawer faces. One unwelcome surprise was that all the 'stainless' steel rods and hex stock I thought I bought was actually just mild steel. It was my fault, one of those lost in translation issues that I just have to chalk up to experience. The confusion came about from the terminology that is used over here. In the JIS standards system they abbreviate Stainless Steel as SUSXXX where the X's represent the grades 304, 416, etc. The small metal supplier I use had some great discount prices on SS400 which I naively assumed meant a generic 400 series Stainless Steel, but what it really means is "Structural Steel 400 N/mm2 tensile strength." This explained the rust that kept appearing on the stock I had stored. (face palm) After realizing my mistake I bought some 'real' SUS 304 stock to remake the rods if needed (and replace the hex stock I used in my track saw rail offset jig.) Corrosion mystery solved. I polished and waxed the mild steel rods (before I knew why they were rusting) so I will see how well they hold up. Cutting and threading them to a precise length (as they use cute cap head nuts) was a lot of work so I'm not crazy about having to replace them so soon.

root_d3.png


The top "drawer" is inset into the main enclosure and allows the steam tray to just plop into a frame that is sized to fit it snugly. The bottom drawer's face will extend the full height and cover the top drawer, I think this "drawer within a drawer" has started to become a common method in modern Kitchen cabinetry. Along the bottom of the inner drawer I used an edge profile router bit that was as close as I could get to the unobtanium Festool unit Sakarama has. Mine doesn't have the trick angled guide bearing that lets you free hand it, but I have the router table that allows me to basically get the same profile with a little more work. The bottom drawer uses full extension stainless Sugatsune slides, and for the top drawer I chose cheaper 3/4 extension slides that were long enough to allow full access to the pan as there is no shortage of cabinet depth. These slides had basically zero tolerance and were extremely rough until I could get them shimmed perfectly. The fancier slides have tabbed attachment points that allow them to flex a bit if required, my experience with them has been really good. I will not get more of these cheaper ones (not that they were particularly cheap.)

root_d4.png


Other than the sculpted bottle racks for the Shochu storage which I will work on later (they really need some kind of 3D router), this was the final piece I needed done before making all the drawer faces and cabinet doors. As I said before, I'm dreading this part as it's basically all got to stay flat, it will be cut out of single sheets so the grain all matches, and any mistakes will be really obvious with the gaps being so long and tight.

One good thing though is I scored some sweet hardware which I will detail in the next post ;-)
 

mitchellc

Well-known member
Joined
Nov 17, 2019
Messages
88
Location
Seattle
Wow, I love your root cellar cabinet! Your potatoes will be happy once you have the drawer faces present to block out the light.
 
OP
B

Bakafish

Well-known member
Joined
Feb 7, 2017
Messages
477
Location
Tokyo
LOL, yeah these poor fellas were out in the light. I just moved them to their new home. This pantry has no windows and an automatic light, so it will be better even without the drawer face. But you see what I'm dealing with, those spuds are only a week old and she just put them out in the open...
 
OP
B

Bakafish

Well-known member
Joined
Feb 7, 2017
Messages
477
Location
Tokyo
Time for show and tell!

As our friend from Kanukistan AvE pointed out recently, the Teal Tools we all know and love are not exactly the same here in Japan as over there in the west. Sometimes for the better, sometimes for the worse. I've complained in the past about the price differences, and the increased selection in some market segments over there, but one nice thing about JDM (Japanese Domestic Market) tools is that they are made here in Japan (or Jay-Ay-Pan as AvE calls it.) Today is the launch day for the TD172D, the replacement for the Purple TD171 unit that AvE was showing (these tools come in 5 different colors and I've seen a 'special edition' gold version too.) Mine was just delivered right on time, first thing this morning.

I know that people have their reasons for joining a specific 'team' and tool brands can bring up a lot of emotion and fealty, I'm not exempted from that. But I love tools, I am not so far gone that I would disparage any of the major brands, hell from what I hear some of the store brands over there are even decent these days. But I've got a loyalty to Makita based on years of them just never letting me down. The first cordless tool I ever used was a Makita 6010D drill/driver, it was my first 'real' job, I was 14 and just moved out of my home and needed to work.

My 20 year old housemate was contracting to install fancy wood stoves in the upscale houses for a local shop, and needed someone small and willing to climb around in attics to help spot and route the stove pipes (we used a lot of double walled insulated stainless steel, that stuff was heavy.) The Makita's were just indestructible, taking multiple falls off of roofs and ladders. They used NiCAD batteries, which were a pain to keep healthy due to the 'memory effect', but were revolutionary at the time. Being able to work cordlessly in cramped ceilings and hanging precariously from a ladder or chimney, they really got the job done. So I've been a Makita man for more than 40 years... I own and love my Festool and other brands, but only deviate when the feature disparity really calls for it.

So, as an obvious (and self admitted) tool addict you are probably wondering if I'm one of those guys who gets the latest model of every tool, and suspect that I'm replacing last years impact driver with this years because I can't stand the thought of using a TD171 when there is a TD172 available, but it's not the case. I'll admit I have ended up buying redundant tools, but mostly due to inadequate research or unavailability of what I needed at the time of purchase. None of my Makita tools has ever failed and required replacement, I haven't even changed brushes on any of them (although my Drill is getting close to needing some new ones.) So replacing my tried and true impact driver, a venerable BTD141 that came as part of a bundle 10 years ago, was something I've been putting off for a long time. The old tool still works great, and the only problem with it isn't really its fault.

shanks.png


Despite the widespread use of the metric system, some international tooling standards are based on imperial units, socket wrench square drives while spec'ed in metric (6.25mm, 9.5mm, 12.7mm) are all interchangeable with US standard sockets and the ubiquitous 1/4" hex drive are the best examples of this. But Japan did something really odd when it came to 1/4" hex drives, something that I've never found documented anywhere and that took me a long time to realize what was happening. They changed the detent spacing compared to how it is in North America (and I assume the rest of the world.) That means bits from Japan will fit in the chuck of a US tool, but they will not engage the lock! US bits will lock in a Japanese clutch, but they do not seem to seat against the back, so they will have a lot of slop and may damage the locking balls if you apply a lot of forward pressure. Keep that in mind before you place an order for a JDM Impact driver. This is a source of frustration whenever I use my Japanese made bits and drivers, as half the time I was spending pushing the bit back into the chuck, an annoyance that finally drove me to order this new driver.

new_driver.png


I remember when I got my old one, I was impressed with how small it was, and then gobsmacked when it snapped a stainless steel bolt I was driving like it was a twig. This unit is roughly half the size, and I suspect that with its brushless motor it will be even more of a brute. The speed limiting controls are a nice addition as the old one could get a little over eager to dive things. I'll try the special "Wood" mode that gives a slow start before going full speed, but suspect I will more often just use one of the fixed speed settings.

So, what's the difference between this model and the one AvE reviewed? It basically has a bit more of a receding hairline on the top casing and a 2mm reduction in length to allow it to get a little tighter into a corner. The chuck is easier to push a bit into without pulling the lock ring, and it has improved bearings to reduce runout on the chuck. It has a dedicated "light" mode, when you put the forward/reverse/lock switch in the lock position, the trigger will turn on the dual LED's for up to an hour before automatically shutting off. This is a cool idea, but I could see this inadvertently draining batteries if the tool is left loose in a bag. I always put it in the lock position when toting it in my tool bag to keep it from running, this could still accidentally drain the battery a bit. You can also replace the factory glow in the dark bumper ring around the front with an optional color matched ring... I don't know exactly what to think about this.

Anyway, new tool day is always a good day!
 

T-handle

Well-known member
Joined
Jun 17, 2019
Messages
440
Location
Northern Ostrobothnia Finland
Hi Bakafish! Just want to say that I really enjoy reading your inspirational thread. Great projects with a lot of thought and design behind them. Love the clean work and attention to details:thumbup:

Keep up the great work:beer:
 
OP
B

Bakafish

Well-known member
Joined
Feb 7, 2017
Messages
477
Location
Tokyo
I did some more "make-work" trying to appease a long standing organizational desire. I was looking at some plastic mounts that utilize the Makita tool's battery slots in order to get them out of the way and off of my limited horizontal surfaces, but was astonished how expensive they were and how cheaply made they appeared to be. It was yet another situation where I belatedly realized I have the ability to make this kind of thing myself with my 3D printer, and a few minutes later I had found a pretty good model that with a few tweaks looked way better than what they were selling on Amazon. I don't push my print speeds to hard, as high speeds in 3D printing feels analogous to the old "measure twice, cut once" so I had to print overnight, but the end result was 8 of these babies.

makita_mounts.png


I had some really abused scrap plywood that I cut two small platforms out of, grooved them with my miter saw to provide a relief for the wire rack shelving I use, then filled them with wall compound, sanded, primed and painted them with some flaw hiding 'granite' textured paint.

makita_b1.png


A couple of stainless mending plates hold them tightly to the rack, I used my German expanding transfer punches to make sure the countersunk screws would be relatively flush.

makita_b2.png


I staggered the mounting plates to allow space for the tools that have a bit of extra girth.

makita_b3.png


It still looks like a mess, but it got all these tools off of limited shelf space and they are easy to just grab and go.

makita_b4.png

makita_b5.png


I printed a bunch of similar mounts for my batteries, but need to find a good place to mount them.

makita_batt_mount.png
 

Trapps

ALLIANCE MEMBER
Joined
Feb 10, 2017
Messages
1,992
Location
The Detroit Zoo
I have been looking at these things on Amazon, Ebay and Etsy for months. The prices piss me off to no end. But then I didn't invest in a 3D printer. Supply, demand, business.

Looks like yours turned out great! Bravo! :beer:
 

ebarker9

Well-known member
Joined
Oct 1, 2010
Messages
85
I just HAD to see this, didn't I! Currently have Makita tools scattered all over the place. Looks like a great storage solution. I've never loved the tool cubbies because they don't seem adaptable enough.
 
To avoid these ads, REGISTER NOW!
Top Bottom