To avoid these ads, REGISTER NOW!

Tool Box Refurbishment Projects

W650Mike

Well-known member
Joined
Dec 17, 2010
Messages
1,093
Location
North Central Texas
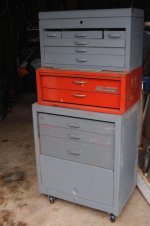
It seems that there are a number of people in the process of restoring, reconditioning, repainting, or otherwise refurbishing vintage boxes and roll cabs. I thought that in addition to the Vintage Boxes thread (my favorite), and the Show Us Your Toolbox thread (second favorite), we might engage in a refurbishing discussion to share thoughts, products, techniques, etc while our projects are WHIPs’ (?) destined to joint the Vintage thread upon completion.

Rather than a debate on what constitutes restoration and what is merely a wipe down, I’ve named the thread Refurbishment to encompass any aspect of improving the appearance and repairing the functionality of older boxes.

Here we go: :thumbup:
 
To avoid these ads, REGISTER NOW!
OP
W

W650Mike

Well-known member
Joined
Dec 17, 2010
Messages
1,093
Location
North Central Texas
I’ll go first.

I would like to start by thanking Mr. Frank Murch and his website collectingsnapon.com.

I didn’t take any before photos of my K-77 Roll Cab but it was grungy and had been poorly repainted at least once. It was picked up at a swap meet, stripped, primed and painted about mid 2009. The paint used was Wanda (Axzo Nobel) single stage polyurethane over 2K primer. The color is not SO original, but rather a reddish-orange that I liked. Most of the dings were handled by beating on it with a big hammer. I would like to have called it dollying, but the process wasn’t graceful in the least. I started out trying to coax the dents out using a couple of body hammers owned by a friend; no luck. This thing was built when steel was cheap and thick. There was a very small amount of filler used. This was my first attempt at using modern automotive paint – and I’m a rank armature at body work in general. All-in-all it turned out quite well, though not perfect, and I learned a bunch in the process.

camera008Medium.jpg


The K-23 top chest was purchased and processed later – but since I never really liked the box, I didn’t take as much time to work out dents and dings as they should have been done; only enough to restore functionality and some semblance of “better than before.”

I finally procured the pieces to the stack I wanted to complete and keep:

K-55 Tool Chest
KR-420 Two Drawer Section
K-77 Coaster Cab

StackBefore.jpg


Obviously the 55 is a “W” “Slate Grey – Wrinkle Finish” that will need to change to “Cardinal Red – Smooth Finish”
 
OP
W

W650Mike

Well-known member
Joined
Dec 17, 2010
Messages
1,093
Location
North Central Texas
The process:

First comes inspection, cleaning, and degreasing. I’ve found that one must resist the temptation to grab sandpaper (or start blasting) before a thorough removal of grease, oils, and other surface contaminants. If you blast dirty surfaces the media gets dirty and spreads the problem; same with sanding.

My plan was to strip areas to bare metal if necessary and just scuff areas where it wasn’t necessary to strip. In general, if the paint was intact, adherent, and I didn’t find evidence of corrosion under the finish, I didn’t feel a need for stripping.

I was told by a painter friend that I needed to apply a light coat of etching primer to any bare metal prior to applying the 2 part primer. So I did. I later checked a couple of edges and found that this stuff really grips and bonds well.

Products to this point:

StripnPrep.jpg


StrippedDrawers-1.jpg


WHIP.jpg


SmallDrawers.jpg


420.jpg
 
OP
W

W650Mike

Well-known member
Joined
Dec 17, 2010
Messages
1,093
Location
North Central Texas
After etching primer comes the regular 2K primer. I bought a cheap HVLP gravity gun for this. My old siphon gun was past repair and I liked working with the gun I borrowed for the 77.

And then sanding. More primer; a bit of filler here and there, sand again. And again.

Camera1-3-12033.jpg


FirstCoatofPrimer.jpg


More Products used:

PrimerSupplies.jpg


Final prime and one more sanding to come before color…maybe this coming weekend.
 
OP
W

W650Mike

Well-known member
Joined
Dec 17, 2010
Messages
1,093
Location
North Central Texas
What do you use to clean the grease and oil and what do you use for a filler?

I generally start with Fantastic spray cleaner, then Naptha. If needed, I'll also use denatured alcohol. If they are really bad I start with degreaser and high pressure at the car wash. Wipe down before paint is with Prep-All Wax and Grease Remover.

The filler is Evercoat Rage 105 Lightweight.
 

bobcatdan

Well-known member
Joined
Jan 4, 2011
Messages
9,948
Location
Kaukauna,WI
I have an old hout top chest that I got when I was 12 or so. I dug it out the barn last week to start working on it. I painted 10 or so years ago and was not happy how it turned out and so it sat. I'm looking at it now. It has broken spot welds, it is cracking towards the top, and the lid supports are gone. I wanted to strip it and have it sandblasted, but after a half hour, I still can't get a single slide to release. It's complete and fixable and I hate to throw it out, but there is one identical on craiglist 10 miles from me for $100 and it looks a hell a lot better then mine. I'd probably have more stuck into having mine sandblasted. I don't know. I'm thinking I will fix the the spot welds and the cracks and see how well those turn out before I go any further. I was real gun ho to fix this box, but have lost motivation just as quick.
 
OP
W

W650Mike

Well-known member
Joined
Dec 17, 2010
Messages
1,093
Location
North Central Texas
Hey Bob, post a pic or two of that Hout chest.

Remember that restoration projects are not about the destination, but rather the act and journey. The final product is just a reward for the time and effort – but you gotta enjoy the time and the effort. If I invoiced myself for my time I'd go broke (after paying all the taxes :) ). In your case, you can always replace the box with another; it just will never be the one you had when you were 12.

Here’s a shot of the ugliest box on the planet. It’s one I built in 8th or 9th grade shop class – Spooner Wisconsin. It will always be my first tool box and would have no value to anyone else. I did clean it up a bit last year - so I guess it's in keeping with the thread!

camera001Medium.jpg


camera003Medium.jpg
 

Jwrightkustomz

Well-known member
Joined
Dec 18, 2011
Messages
94
Location
Salt Lake City, Utah
Sorry for the cell phone pics. I picked up these boxes for $80.00 total. The top one I haven't started on yet, and don't know what brand it is. The bottom two are REM Line, or Powrkraft (thanks to this forum for ID!) Since they have a textured sharks tooth like finish I used steel wool to remove any rust from the body. I also used steel wool to polish the handles. After I removed all the rust and grease I shot them with "rusty metal primer", then 2 coats of flat black, and 3 coats of a flat clear. They aren't perfect but they turned out pretty good and I look forward to using them.


BobsurUncle

Well-known member
Joined
Dec 4, 2010
Messages
130
Location
Tracy, Ca.
I did this one for my 6 year old as a Christmas gift. Craftsman made in 4/73.

9521ead5.jpg


Striped it all the way to metal. Removed all the parts. Did some straightening and weldedthe corners. After painting, I aircraft riveted it all back together.

27a7423f.jpg


Good for another 40 years.

55094348.jpg
 
Last edited:
OP
W

W650Mike

Well-known member
Joined
Dec 17, 2010
Messages
1,093
Location
North Central Texas
I dig that flat black look JWright!

Bob, Elaborate on the stripper and paint used - that thing looks perfect. How about a close-up of the re-riveting? I found some small brass rivets at ACE that I'm considering for re-assembly but am curious about the aircraft style.
 

BobsurUncle

Well-known member
Joined
Dec 4, 2010
Messages
130
Location
Tracy, Ca.
Bob, Elaborate on the stripper and paint used - that thing looks perfect. How about a close-up of the re-riveting? I found some small brass rivets at ACE that I'm considering for re-assembly but am curious about the aircraft style.

I removed all the hardware, less the pull nobs. I was worried that I wouldn't be able to save enough of the stud to reinstall them. I sand blasted the entire box and hardware. After I did some metal work, I finished the metal with a 120 grit on a DA. I sprayed self etch primer, then shot it with the gray hammered Rustoleum. I used the quart can, and shot it with a spray gun.

All the hardware was painted silver, then cleared. I would have liked to have them plated, but time was short. I touched up the badge with a pin stripe brush. I riveted everything back on after it was painted.

I'll grab some pics of the rivets later. This was my second box I've done with them. The rivets come with a gold hue finish. The rivets are aluminum, so some quick work with a dremel the polish out to a bright finish.

Here is what I used. Obviously not as long, but this style.

http://www.aircraftspruce.com/catalog/hapages/solidalumrivets2.php


an470m.jpg
 
To avoid these ads, REGISTER NOW!

stripped

Well-known member
Joined
Nov 20, 2011
Messages
145
Location
N.E. Ohio
I picked this stuff up a couple of months ago. The intermediate box is MAC but the top and bottom are of an unknown pedigree as I can find no markings. Most of the drawers need slides but the major makers won't help without model numbers and I am currently trying to find sources. At one time they were sand blasted and primered but will need a good redo. So when the weather starts warming up a bit and I can paint I can get to work.
 

Attachments

  • Tool Box.jpg
    Tool Box.jpg
    126.4 KB · Views: 117

crewchief888

Well-known member
Joined
Dec 3, 2009
Messages
13,736
Location
NW indiana
I picked this stuff up a couple of months ago. The intermediate box is MAC but the top and bottom are of an unknown pedigree as I can find no markings. Most of the drawers need slides but the major makers won't help without model numbers and I am currently trying to find sources. At one time they were sand blasted and primered but will need a good redo. So when the weather starts warming up a bit and I can paint I can get to work.

remline ?

powrkraft ? (wards)

just a guess :headscrat

:beer:
 

gregthor

Well-known member
Joined
Feb 24, 2010
Messages
267
Location
MICHIGAN
Here’s a shot of the ugliest box on the planet. It’s one I built in 8th or 9th grade shop class – Spooner Wisconsin. It will always be my first tool box and would have no value to anyone else. I did clean it up a bit last year - so I guess it's in keeping with the thread!


Great thread, glad you started it!! You (and others) are doing some nice work here.
This box is not ugly, it is a family treasure. I have shop projects from my Dad he did in the forties, I am glad he kept them. I have a vise from him that he made in shop class. I have a commercial vise & tool box that he had so long he can't remember when he got them. I plan to restore the tool box this year.
 

Slow Gray Mule

Well-known member
Joined
Feb 23, 2010
Messages
68
Location
MS Gulf Coast
I removed all the hardware, less the pull nobs. I was worried that I wouldn't be able to save enough of the stud to reinstall them. I sand blasted the entire box and hardware. After I did some metal work, I finished the metal with a 120 grit on a DA. I sprayed self etch primer, then shot it with the gray hammered Rustoleum. I used the quart can, and shot it with a spray gun.

All the hardware was painted silver, then cleared. I would have liked to have them plated, but time was short. I touched up the badge with a pin stripe brush. I riveted everything back on after it was painted.

I'll grab some pics of the rivets later. This was my second box I've done with them. The rivets come with a gold hue finish. The rivets are aluminum, so some quick work with a dremel the polish out to a bright finish.

Here is what I used. Obviously not as long, but this style.

http://www.aircraftspruce.com/catalog/hapages/solidalumrivets2.php


an470m.jpg


What do you use to install those rivets? I assume it isn't the same as installing a pop rivet.
 

shannonw

Well-known member
Joined
Jun 18, 2010
Messages
660
Location
Florida
Here's mine..kra3800, not antique by any means just something decided to do on a whim

just went for improving the appearance not complete redo, drawers were in good shape. Used poly disks on the angle grimder to remove paint on cab and drawer faces and bottom. Rust converter and steel wool the major rust pits as much as possible, banged out a couple of minor dings.

Then random orbit steel, wiped with cleaner, dtm primer/sealer and sand, and shot with valspar 2k (cheap enough). I'm not an experienced painter at all but it came out good enough for me and passes the 5 feet away tests.

Then I used ikea butcher block cut offs i had left over from another project for the top.

Left the silver door front trim off, i liked it better and there were some nicks on them.

http://www.garagejournal.com/forum/showthread.php?t=103990

I wouldn't do it again...the drawers are a pain! as you have that lip and you need to sand up in there if you want good front coverage. i underestimated the space i needed to spread all the drawers out to get it all done was a bit of a pain trying to shoot everything at once, if i was going to do it again i'd build a quick 2by rack for the drawers...it was tying up my garage so i really knocked it out and didn't get overly detailed...just needed it done.

Also lots to tape/mask off just to do drawer fronts, pretty time consuming...didn't take long to get into 'good enough' mode =P
 

Attachments

  • 5774735508_9ff58514b8_z.jpg
    5774735508_9ff58514b8_z.jpg
    131.1 KB · Views: 180
  • 5989043841_9713a16385_z.jpg
    5989043841_9713a16385_z.jpg
    131.5 KB · Views: 195
OP
W

W650Mike

Well-known member
Joined
Dec 17, 2010
Messages
1,093
Location
North Central Texas
I wouldn't do it again...the drawers are a pain! as you have that lip and you need to sand up in there if you want good front coverage. i underestimated the space i needed to spread all the drawers out to get it all done was a bit of a pain trying to shoot everything at once, if i was going to do it again i'd build a quick 2by rack for the drawers...it was tying up my garage so i really knocked it out and didn't get overly detailed...just needed it done.

Also lots to tape/mask off just to do drawer fronts, pretty time consuming...didn't take long to get into 'good enough' mode =P

It's easy to underestimate the time it takes on these boxes. Sanding around the fronts and all of the corners of the drawers is very time consuming. Turned out great though. I like the drawers without the trim look.
 

shannonw

Well-known member
Joined
Jun 18, 2010
Messages
660
Location
Florida
Hi Mike thanks! That K-77 came out nice too!

It's rewarding like redoing anything. But yeah, far and away the drawers are the big item for sure and if you do the inside or not.

Just doing the fronts is *alot* of masking as I found you need to get the front, drawer lips, edges and blend a bit in the back...and it's pretty complicated areas right behind the drawer so detailed masking isn't as easy as it looks..and you gotta cover any accidental primer overspray too or clean it. It almost seems better to have someone abrasive everything then go from there...of course that adds to the cost.

for those planning on doing it, i basically just considered what the value of the box was vs the costs, in my case the box isn't an antique or anything so i decided getting it looking good enough was the goal. The costs adds up a bit too when you consider sand paper, abrasive blast and or masking paper, tape, sanding, primer, paint..i went a bit over budget but got away with a pint of paint. A bit over on the dtm primer sealer as I was covering moreso than sealing to make up for hurried prep...of course that led to more sanding =)

I say i wouldn't do it again but i've been known to have a 99% memory loss on that lol if you have the space and don't have to rush it it would be much easier and rewarding for sure and it does make it somewhat unique and personalized for sure.
 

USMCdodge

Well-known member
Joined
Oct 12, 2011
Messages
453
Location
MCBH
KR488 cart with kr274a bolted to side i know the flag was backwards, i fixed it!

<a href="http://s47.photobucket.com/albums/f156/jlecarno/?action=view&current=DSCF6270.jpg" target="_blank"><img src="http://i47.photobucket.com/albums/f156/jlecarno/DSCF6270.jpg" border="0" alt="Photobucket"></a>

took em apart, busted rust and primed

<a href="http://s47.photobucket.com/albums/f156/jlecarno/?action=view&current=DSCF6307.jpg" target="_blank"><img src="http://i47.photobucket.com/albums/f156/jlecarno/DSCF6307.jpg" border="0" alt="Photobucket"></a>

taped off old stickers, rapainted. finished

<a href="http://s47.photobucket.com/albums/f156/jlecarno/?action=view&current=DSCF6317.jpg" target="_blank"><img src="http://i47.photobucket.com/albums/f156/jlecarno/DSCF6317.jpg" border="0" alt="Photobucket"></a>
<a href="http://s47.photobucket.com/albums/f156/jlecarno/?action=view&current=DSCF6312.jpg" target="_blank"><img src="http://i47.photobucket.com/albums/f156/jlecarno/DSCF6312.jpg" border="0" alt="Photobucket"></a>
left the dents in
<a href="http://s47.photobucket.com/albums/f156/jlecarno/?action=view&current=DSCF6313.jpg" target="_blank"><img src="http://i47.photobucket.com/albums/f156/jlecarno/DSCF6313.jpg" border="0" alt="Photobucket"></a>

the cart, I busted rust. rewelded cracked welds painted the chrome black ( i hate chrome.)

<a href="http://s47.photobucket.com/albums/f156/jlecarno/?action=view&current=DSCF6416.jpg" target="_blank"><img src="http://i47.photobucket.com/albums/f156/jlecarno/DSCF6416.jpg" border="0" alt="Photobucket"></a>

screwdriver lock box i repainted
<a href="http://s47.photobucket.com/albums/f156/jlecarno/?action=view&current=DSCF6404.jpg" target="_blank"><img src="http://i47.photobucket.com/albums/f156/jlecarno/DSCF6404.jpg" border="0" alt="Photobucket"></a>
 

BobsurUncle

Well-known member
Joined
Dec 4, 2010
Messages
130
Location
Tracy, Ca.
What do you use to install those rivets? I assume it isn't the same as installing a pop rivet.


Not anything like a pop rivet. You need a bucking bar and a ball pein hammer. You can use a rivet set for an air hammer for a bar, just put some tape on it. Aircraft rivets are perfect for this. It gives the OE look, but very easy to do since they are aluminum. They aren't weak, I haven't had any come loose.

I made my own bucking bar. Made out of a piece of 1" square stainless. I wouldnt do handles/latches/emblems any other way.

Still need a pic, don't I?:beer:
 

Slow Gray Mule

Well-known member
Joined
Feb 23, 2010
Messages
68
Location
MS Gulf Coast
Not anything like a pop rivet. You need a bucking bar and a ball pein hammer. You can use a rivet set for an air hammer for a bar, just put some tape on it. Aircraft rivets are perfect for this. It gives the OE look, but very easy to do since they are aluminum. They aren't weak, I haven't had any come loose.

I made my own bucking bar. Made out of a piece of 1" square stainless. I wouldnt do handles/latches/emblems any other way.

Still need a pic, don't I?:beer:

If you got some, please do.
 

billybudge

Well-known member
Joined
Apr 17, 2011
Messages
321
Location
UNITED KINGDOM
I have had the pleasure of restoring loads of tool boxes and roll cabs, please chech out one of my threads( Restoring a 1947 vintage snap on tool box ) on that thread I also explain how to paint professionally with a brush and roller.
I also have a lot of tips and advice on making a show room finish an a very tight budget,
 
OP
W

W650Mike

Well-known member
Joined
Dec 17, 2010
Messages
1,093
Location
North Central Texas
http://garagejournal.com/forum/show...estoring+1947+vintage+snap+tool+box&showall=1

Link to Billy's thread. In it, he describes an alternate to spray painting and the result is amazing. Billy took a desperate old box and made it absolutely beautiful – a journey indeed!

USMC, What did you do to prep the chrome for paint? Rough up with sanding/blasting I assume. Special primer? Special Paint? The cart is awesome. (and I really dig the Lunati sticker)
 

Foxx

Member
Joined
Jan 1, 2012
Messages
19
Location
Columbia sc
i plan on redoing all 5 of my boxes in the next few months.
i have quite a few gallons of auto paint including red.
macbox2.jpg
 

FJ 432

Well-known member
Joined
Aug 2, 2010
Messages
3,723
Location
Littleton Colorado
My interest in restoring tool boxes started with this 1940-50's Machinist Chest from Craftsman that I had powdercoated silver and orange.

This past Summer a Commercial Craftsman that I had powdercoated yellow and black.

My latest purchase is a Powr-Kraft Chest that I cleaned up and with the exception of adding some drawer liners, I'm planning on leaving it original. Unlike the top two chests, this one was too nice to mess with restoring.
 

Attachments

  • Craftsman Machinist.jpg
    Craftsman Machinist.jpg
    47.3 KB · Views: 129
  • Commercial Craftsman Side.jpg
    Commercial Craftsman Side.jpg
    43.7 KB · Views: 110
  • Commercial Craftsman Top.jpg
    Commercial Craftsman Top.jpg
    41.1 KB · Views: 94
  • Front Craftsman.jpg
    Front Craftsman.jpg
    39.5 KB · Views: 92
  • Powr Kraft front.jpg
    Powr Kraft front.jpg
    44.3 KB · Views: 93
  • Powr Kraft Drawer.jpg
    Powr Kraft Drawer.jpg
    52.6 KB · Views: 91

shannonw

Well-known member
Joined
Jun 18, 2010
Messages
660
Location
Florida
Fj432, man those are sharp and that mac powder coated one above is too. I'm curious how much it runs (where abouts) to powder coat something like these?
 

Wi Fire 10

Well-known member
Joined
Jan 12, 2012
Messages
109
Location
Appleton, Wi
Bobsuruncle, that would be great if you could show us guys some picture how you install aircraft style aluminum rivets and the tools you use.
 

geologist

Well-known member
Joined
Dec 14, 2011
Messages
5,326
Rustoleum hammered grey in the quart can, sprayed from a gun. For got to mention, I thinned the paint with MEK. Makes it lay down flat and takes a lot of the "hammer" out of it. :thumbup:

I just learned something amazing. Thank you. I've been wondering how to get less hammering. Any particular ratio?
 
To avoid these ads, REGISTER NOW!
Top Bottom