To avoid these ads, REGISTER NOW!

Toolbox Refinishing - The "Barn Find" Look

Smokeshow69

Well-known member
Joined
Dec 7, 2012
Messages
8,383
Location
Pacific Northwest
There was just a little too little original paint left on the inside of this Plomb midget box I got from Catfishdan in a trade recently (tools are mine...)...

20210719_124544.jpg

...and none whatsoever to speak of on the outside.

20210719_124508.jpg

But you all know how I feel about new paint jobs on old tool boxes, so I barnfinded it! :pimpflash

20210726_105629.jpg

20210726_105351.jpg

20210726_105616.jpg
Nice work as usual!
 
To avoid these ads, REGISTER NOW!

Shiftless

Well-known member
Joined
Mar 9, 2014
Messages
14,553
Location
East Bay SFO
Great jobs Smoke and Lugz :beer:

I‘m gonna borrow that phrase “a little too little original paint” that you just coined, Lugz.
 
Last edited:

amecks

Member
Joined
Jun 5, 2012
Messages
18
Location
Jordan, NY
I bought a Park machinist tool chest a while ago and wanted to just clean it and use it. Didn't work - the cleaning process ended up losing half the paint and I had to repaint it. It looks great but I lost the original "Park" logo.
Last week I bought this box at a garage sale and was determined not to have a repeat. I cleaned the green felt drawer liners and re-glued it. The handle lost its leather cover so I got some black friction tape and recovered it. Not as nice as leather but I like the look. Other than wiping it down with mineral spirits, I pulled the drawers and put a very slight grease on the slides.
Does anyone recognize this box? Is it military? And what era?
 

Attachments

  • 20210716_164625_01.JPG
    20210716_164625_01.JPG
    381.1 KB · Views: 55
  • 20210716_164837_01.JPG
    20210716_164837_01.JPG
    363.9 KB · Views: 44
  • 20210716_164850_01.JPG
    20210716_164850_01.JPG
    442 KB · Views: 53
OP
P

Private Lugnutz

Well-known member
Joined
Mar 30, 2012
Messages
30,617
Location
The Authentic Jersey Shore
Does anyone recognize this box? Is it military? And what era?
Sure do. I have one just like it. It is military. It's an armorer's chest from WWII made by Art Steel Company in NY. They are excellent boxes. The center drop front latch and the side handles are nice features and my drawers slide like butter. I will post photos shortly. If you want to re-clad the handle with leather, it's easier than you might think. I have done it on a few boxes, as have a few others here.

Link to one of my albums hosted here on GJ with several photos of my ASCO box here. Looks like yours is a little shorter (4 drawers vs my 5), but you'll see what I mean. Spot on ASCO all the way.
 
Last edited:

amecks

Member
Joined
Jun 5, 2012
Messages
18
Location
Jordan, NY
Thanks for edumacating me Lugnutz. Art Steel Co? World War II - Wow! What do think is the purpose of the small 90 degree tab near the handle? Oh - this chest weighs 25.2 pounds - empty!
 
To avoid these ads, REGISTER NOW!

gpw_42

Well-known member
Joined
Apr 24, 2017
Messages
718
Location
NC Sandhills, USA
I've been looking forward to offering something to this thread for a long time.

In May, 2020 I bought this civilian production toolbox, much like a WW2 vintage 41-B-1840 box, except that someone rattle canned it black (note the teal underside of the tool tray). Not bad for $5 from Facebook Marketplace. You really have to be down into the details (hinge element count) to figure out that it's not from the 40s.

Stripped and primed it in 2020. Finally painted Signal Green from Midwest Military in fall of 2021. Needed to let it dry well and then cure. Then got a stencil from a guy on Facebook who makes some fantastic WW2 reproductions. Eventually stenciled in Nov. 2021. Key lesson there was to put down the color coat, apply the stencil, then a LIGHT color coat over the stencil. That seals the edges of the stencil. Then the stencil color. Of course, allow to dry between coats.
 

Attachments

  • 20200530_Toolbox From FB Marketplace.jpg
    20200530_Toolbox From FB Marketplace.jpg
    39.2 KB · Views: 25
  • 000_0359.JPG
    000_0359.JPG
    332.8 KB · Views: 23
  • 000_0355.JPG
    000_0355.JPG
    339.5 KB · Views: 21
  • IMG_7309.jpg
    IMG_7309.jpg
    53.5 KB · Views: 22
  • IMG_7312.JPG
    IMG_7312.JPG
    83.2 KB · Views: 21
  • IMG_7318.jpg
    IMG_7318.jpg
    63.1 KB · Views: 22
  • IMG_7701.JPG
    IMG_7701.JPG
    109.9 KB · Views: 22
  • IMG_7702.JPG
    IMG_7702.JPG
    108.4 KB · Views: 23
  • IMG_7706.JPG
    IMG_7706.JPG
    94.8 KB · Views: 22
  • IMG_7707.JPG
    IMG_7707.JPG
    78.5 KB · Views: 26

gpw_42

Well-known member
Joined
Apr 24, 2017
Messages
718
Location
NC Sandhills, USA
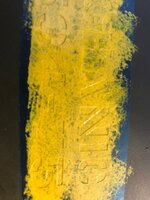
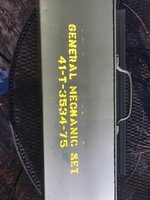
I am a lot happier with the side of the box where I sealed the stencil first, just because it looks better. But I saw lots of overspray on stencils when I was in the Army, and saw some associated chickensh*t related to that. None of that here!

On to weathering the box.

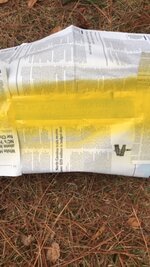
I used weathering techniques from when I was building models as a teenager, so it's a different style/approach than what Lugz uses on his restorations. This is just more familiar to me. Supplies are turpentine, white, yellow and brown (burnt umber is what I used) and a small paintbrush. And a lint free rag.

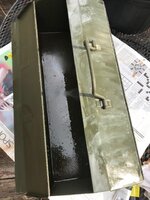
I started by a liberal application of burnt umber and turpentine to the corners of the bottom of the box, the tray, and the external feet and where the handles join the box. Intent here was to create the appearance/illusion of dirt/gunk in the corners and out of the way locations. All other color application is designed to break down the uniform appearance of the (OD) base color. The idea is to give the appearance of some color, but not enough to look painted. I just slopped on some color, added turpentine above it, let it wash down the box and then evaluated. If it looked painted, add some more turpentine. If it looked faded/washed out, perfect. I used the rag to soak up the turpentine where it gathered in places (seams & corners) and left an off-color residue. Then tried to cover that with the brown color. Very trial and error, non-scientific approach; remember this is to break down the uniformity of the base color. This is where your inner aritiste can came out, lol.
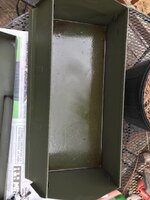
 

Attachments

  • IMG_8003.jpg
    IMG_8003.jpg
    65 KB · Views: 26
  • IMG_8004.jpg
    IMG_8004.jpg
    60.2 KB · Views: 26
  • IMG_8005.jpg
    IMG_8005.jpg
    65 KB · Views: 26
  • IMG_8010.jpg
    IMG_8010.jpg
    52 KB · Views: 27
  • IMG_8013.jpg
    IMG_8013.jpg
    76.2 KB · Views: 24
  • IMG_8016.jpg
    IMG_8016.jpg
    56.3 KB · Views: 27
  • IMG_8018.jpg
    IMG_8018.jpg
    88.6 KB · Views: 36

d42jeep

Well-known member
Joined
Oct 22, 2014
Messages
16,558
Location
Northern California
It looks great, in my opinion. Here are some pictures of the historic “Wynmkr“ GMTK toolbox markings. This set is as close to an original WW2 GMTK that has ever been found. It currently resides in Tennessee.
-Don
E0B9AFEB-08BE-45BB-B661-ADD8D5EF4BE8.jpegB13A62EB-22D2-4E82-810B-C539B5E82BB2.jpeg
 

Smokeshow69

Well-known member
Joined
Dec 7, 2012
Messages
8,383
Location
Pacific Northwest
I've been working on a thread appropriate revival of this plomb 9990 top chest I purchased last year for $35. It had several broken hinges or spot welds that had been popped lose. The maker of this box, Pressteel , did alot of good things in manufacturing but spot welds and hinges were not their strong suits unfortunately. I had a parts box that had been spray bombed and was beyond restoration due to welding destroying the metal on that box so I used it to remove several good functioning hinges and hinge pins. I will also use it to provide a drawer as this box has a drawer with a rusted through back corner.

To start with I removed the donor hinges from the parts box and then cleaned up the areas on the barn find box project. Then I welded the "new" old hinges onto the lid and swivel tray. Needless to say I am not a welder and am not entirely satisfied with the results but it's good enough for the condition of this box. Once everything was welded and dressed, I wanted to "add rust" onto the donor hinges to make them not stick out. I looked up online how to create rust on items and mixed the following 3 things up- salt, hydrogen peroxide and vinegar. I put them in a spray bottle and doused the areas of shiny metal. I covered them with paper towels and packing tape to prevent evaporation and I let them sit 24 hours. The rust isn't a total match but it's much better. The rust matches the rest of the box condition and makes it look aged to say the least. I've still got to finish making the rust blend better with the surrounding rust but it coming along.

Once I am done with rust promotion on the hinges, I will move onto removing the spray bombing paint of the face of the donor drawer. Luckily the donor box was green as well so I just need to remove the gold paint of the face of the new drawer :). After that I will coat this box with my favorite brand of protectant- "patina sauce".

This isn't a high dollar box and it is too rough to restore but I'm having fun curating a barn find box to make it appear more authentic and to also improve my fabrication skills at the same time.
 

Attachments

  • IMG_6211.jpeg
    IMG_6211.jpeg
    920.4 KB · Views: 16
  • IMG_6196.jpeg
    IMG_6196.jpeg
    562.2 KB · Views: 13
  • IMG_6199.jpeg
    IMG_6199.jpeg
    975.7 KB · Views: 13
  • IMG_6208.jpeg
    IMG_6208.jpeg
    1.1 MB · Views: 13
  • IMG_6205.jpeg
    IMG_6205.jpeg
    958.5 KB · Views: 13
  • IMG_6209.jpeg
    IMG_6209.jpeg
    1.4 MB · Views: 13
  • IMG_6212.jpeg
    IMG_6212.jpeg
    1.1 MB · Views: 12
  • IMG_6215.jpeg
    IMG_6215.jpeg
    730.5 KB · Views: 11
  • IMG_6217.jpeg
    IMG_6217.jpeg
    1 MB · Views: 13
  • IMG_6298.jpeg
    IMG_6298.jpeg
    755.9 KB · Views: 22

Smokeshow69

Well-known member
Joined
Dec 7, 2012
Messages
8,383
Location
Pacific Northwest
I was able to get my barn find 9990 all finished up. I covered the box in “patina sauce” and which I have used in a few boxes now. Love that stuff. It works well and smells good! I purchased a logo sticker from “jimsenginedecals” on eBay and roughed it up to go with the rest of the box. That’s a high quality decal because I really had to work at it! And yes it’s crooked! The original was even more crooked so I compromised between level and original crooked as much as my ocd would allow 😂
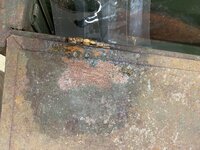
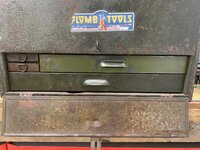
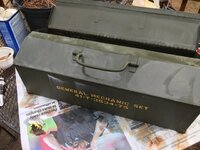
. Also the smaller of the two drawers was rusted but my parts box one was solid. It was totally spray bombed gold and red but i managed to strip it by hand with a rag and goof off. This box very isn’t the nicest one but it’s a lot better than I found it and it’s one you could actually use now!
 

Attachments

  • IMG_6428.jpeg
    IMG_6428.jpeg
    937.9 KB · Views: 15
  • IMG_6429.jpeg
    IMG_6429.jpeg
    1 MB · Views: 14
  • IMG_6430.jpeg
    IMG_6430.jpeg
    596.2 KB · Views: 13
  • IMG_6431.jpeg
    IMG_6431.jpeg
    655.6 KB · Views: 13
  • IMG_6432.jpeg
    IMG_6432.jpeg
    654.7 KB · Views: 12
  • IMG_6433.jpeg
    IMG_6433.jpeg
    647.4 KB · Views: 11
  • IMG_6393.jpeg
    IMG_6393.jpeg
    696.9 KB · Views: 11
To avoid these ads, REGISTER NOW!
Top Bottom