To avoid these ads, REGISTER NOW!

Tooling (Re)Organization

BoilermakerFan

Well-known member
Joined
Apr 17, 2006
Messages
2,188
Location
Indianapolis, Indiana
So, I know what lilscorpion is planning to print with his...

What are some things you guys have printed, or plan to print?

Vices. :p

I'm planning to print prototype custom parts for my motorcycle builds to test the fit and looks before I commit to machining them in aluminum. That's the main thing I'll use it for. My other planned uses are very wide spread. Parts for DIY amplifiers (knobs, bezels, feet, etc.); figurines for gifts for my kids and nieces/nephews; probably some small pieces for my folks miniature building projects; upgrades for my reloading presses; different tool and part organizers; model rocket parts for my son; RC vehicle parts...

Then I'll build a bigger printer to make side covers and fenders for my motorcycles. Might try my hand at printing custom tail light and turn signal lenses.
 
To avoid these ads, REGISTER NOW!
OP
L

lilscorpion

Well-known member
Joined
Mar 15, 2010
Messages
3,599
Location
Colorado
So, I know what lilscorpion is planning to print with his...

What are some things you guys have printed, or plan to print?


Initially it’ll be organization stuff but, after browsing Thingiverse, I realized there’s many other uses that I’d never considered and it was easy to find more than a dozen in less than a few minutes.

I like building stuff and I’m certain I was a “Maker” before a maker was a thing/label. I started in metals, expanded into wood, and then have been dabbling in plastics and foam but only using wood and metal tools which I found works exceptionally well in some cases and extremely poorly in others. I knew that this year I wanted to expand my capabilities and, around Christmas, I was considering a CNC router (for wood, plastics, and foam) because a CNC router is the same machine as a CNC plasma (and I’ve had 2). I had not looked into 3D printing because it seemed complicated (meaning I’d not researched it much).

I tend to make parts out of metals and woods because thats where my capabilities lie not because those are necessarily the right materials for the task at hand. I build fixtures all the time and plastics are perfect for fixtures. I have dozens of projects queued up that may have components that are better or more easily constructed out of plastics or the designs themselves are more easily accomplished with 3D printing. End mills do a very poor job of making square corners...these are the reasons why I dipped my toe in the pool. I’ll learn by making organizers (maybe ;).

If I was further along with printing I’d probably make all of the drawer pulls for my new cabinets. Being able to be in complete control over the profile would be really cool and a completely customized finishing touch.


Sent from my iPhone using Tapatalk Pro
 

niget2002

Well-known member
Joined
Oct 2, 2012
Messages
11,115
Location
Josephine, TX
I bought one of the geeetech MKII clones.

It was a PITA to get it up and running, but it's been running great ever since. I cannot recommend this printer to newbies to printing, though. Too much fussing and I had to replace most of the straight rails because the stock ones were bent.

If you want to run a laser, I'd highly recommend using your new printer to print the parts for the MPCNC. I built one about this time last year and I cut stuff with it all the time. I use it with a small router for cutting wood parts, but you can pretty easily mount a laser to it. I did a 24"x24" machine which ends up taking almost 36"x36" with the rails and everything else.

Have fun with the new rabbit hole.
 

niget2002

Well-known member
Joined
Oct 2, 2012
Messages
11,115
Location
Josephine, TX
Initially it’ll be organization stuff but, after browsing Thingiverse, I realized there’s many other uses that I’d never considered and it was easy to find more than a dozen in less than a few minutes.

I like building stuff and I’m certain I was a “Maker” before a maker was a thing/label. I started in metals, expanded into wood, and then have been dabbling in plastics and foam but only using wood and metal tools which I found works exceptionally well in some cases and extremely poorly in others. I knew that this year I wanted to expand my capabilities and, around Christmas, I was considering a CNC router (for wood, plastics, and foam) because a CNC router is the same machine as a CNC plasma (and I’ve had 2). I had not looked into 3D printing because it seemed complicated (meaning I’d not researched it much).

I tend to make parts out of metals and woods because thats where my capabilities lie not because those are necessarily the right materials for the task at hand. I build fixtures all the time and plastics are perfect for fixtures. I have dozens of projects queued up that may have components that are better or more easily constructed out of plastics or the designs themselves are more easily accomplished with 3D printing. End mills do a very poor job of making square corners...these are the reasons why I dipped my toe in the pool. I’ll learn by making organizers (maybe ;).

If I was further along with printing I’d probably make all of the drawer pulls for my new cabinets. Being able to be in complete control over the profile would be really cool and a completely customized finishing touch.


Sent from my iPhone using Tapatalk Pro


heh... google 3d printed parts for total-loss metal forming. Then you can make aluminum handles.
 
OP
L

lilscorpion

Well-known member
Joined
Mar 15, 2010
Messages
3,599
Location
Colorado
:D She'll thank us later when you make her something cool.


I was kidding (mostly). We’re way beyond that. Once she learns what is possible, things get added to the honey-do-list and we’ve already figured out that he amount we’ve spent on tools is les than what we would have paid others for lesser outcomes. In the end, the real issue seems to always end up being not enough time.


Sent from my iPhone using Tapatalk Pro
 
OP
L

lilscorpion

Well-known member
Joined
Mar 15, 2010
Messages
3,599
Location
Colorado
niget2002 said:
heh... google 3d printed parts for total-loss metal forming. Then you can make aluminum handles.


When the second search result starts with “3D Metal Printers under $30k...” you know it’s not the technology the DIY’er is looking for.

Neat concept and maybe someday...not likely someday soon.


Sent from my iPhone using Tapatalk Pro
 
OP
L

lilscorpion

Well-known member
Joined
Mar 15, 2010
Messages
3,599
Location
Colorado
niget2002 said:
If you want to run a laser, I'd highly recommend using your new printer to print the parts for the MPCNC. I built one about this time last year and I cut stuff with it all the time. I use it with a small router for cutting wood parts, but you can pretty easily mount a laser to it. I did a 24"x24" machine which ends up taking almost 36"x36" with the rails and everything else.

Have fun with the new rabbit hole.


Edit: seems there’s a few that upgrade common CNC systems with this stand alone Laser head - https://jtechphotonics.com/?product=3-8w-laser-and-2-5amp-safety-compliant-driver-kit

Sent from my iPhone using Tapatalk Pro
 
Last edited:

niget2002

Well-known member
Joined
Oct 2, 2012
Messages
11,115
Location
Josephine, TX
When the second search result starts with “3D Metal Printers under $30k...” you know it’s not the technology the DIY’er is looking for.

Neat concept and maybe someday...not likely someday soon.


Sent from my iPhone using Tapatalk Pro
Odd. The very first link should be an instructable for total loss casting using pla.

http://www.instructables.com/id/From-3d-printed-part-to-metal-the-lost-plaabs-me/

There's other videos on youtube of people doing this with aluminum.


Sent from my VS987 using Tapatalk
 
OP
L

lilscorpion

Well-known member
Joined
Mar 15, 2010
Messages
3,599
Location
Colorado

BoilermakerFan

Well-known member
Joined
Apr 17, 2006
Messages
2,188
Location
Indianapolis, Indiana
Edit: seems there’s a few that upgrade common CNC systems with this stand alone Laser head - https://jtechphotonics.com/?product=3-8w-laser-and-2-5amp-safety-compliant-driver-kit

Sent from my iPhone using Tapatalk Pro

Nice score on the searching... but I think 3.8W might be too much power for engraving with the FT-5. I don't think it can traverse as fast as a CNC mill. I know you could change the steppers and/or drivers, but it might actually work better to have a lower power laser that etches more slowly so the printer can still be used for 3D printing too. Most of the dedicated laser etchers move really fast!
 

BoilermakerFan

Well-known member
Joined
Apr 17, 2006
Messages
2,188
Location
Indianapolis, Indiana
Odd. The very first link should be an instructable for total loss casting using pla.

http://www.instructables.com/id/From-3d-printed-part-to-metal-the-lost-plaabs-me/

There's other videos on youtube of people doing this with aluminum.


Sent from my VS987 using Tapatalk

Wonder what I typed. I see it now and I can’t find what I was looking at before. Who’s messin’ with me?!


Sent from my iPhone using Tapatalk Pro

There is a great guy up in Michigan that goes by Crafty B. He hosts casting classes at his shop on casting aluminum. You could easily use the 3D printer to make the plugs for molds. I follow Crafty B on Instagram. His website is CRAFTY B


And here is a blog post he shared on his sandcasting class: Sandcasting Class
 

niget2002

Well-known member
Joined
Oct 2, 2012
Messages
11,115
Location
Josephine, TX
I wonder if you landed on a link about a metal sintering machine. Basically a metal 3d printer

Sent from my VS987 using Tapatalk
 
OP
L

lilscorpion

Well-known member
Joined
Mar 15, 2010
Messages
3,599
Location
Colorado
EOC_Jason said:
Next he'll be getting a Wire EDM machine... :lol:

Hater. [emoji6]

Knew an old timer who I met because he re-splined axles (I used roll in a very different scene but that’s another Oprah). He had a mold and die shop and he had an EDM. When I’d stop by, it would be running...zzzzt, zzzzzt...basically a piece of metal gets charged and submerged in a very thin oil. An electrode is submerged extremely close to the work piece which causes the circuit to complete. That spark essentially burns the metal away. Crazy $hit. It’s ideal for making square corners in molds (which can’t be done with a rotational cutter (end mill). This guy, Tom, would get orders from companies who had a mold fail and needed a replacement yesterday. They’d pay $40k+ (up to multi-hundred K) so the machines could come back online again. All orders were emergency-rush, same day shipping, money is no object, get-er-done because I have bottomless pockets kinda work.

Any who...I don’t need one but, if I had one, I’d know how to position its capabilities. I’m in the market. [emoji857]


Sent from my iPhone using Tapatalk Pro
 
Last edited:
OP
L

lilscorpion

Well-known member
Joined
Mar 15, 2010
Messages
3,599
Location
Colorado
niget2002 said:
I wonder if you landed on a link about a metal sintering machine. Basically a metal 3d printer

Sent from my VS987 using Tapatalk


That was the $30k thing I found somehow. I want one.

Did you guys hear that? Swear I heard my wife swinging a bat...woosh, woosh.


Sent from my iPhone using Tapatalk Pro
 

BoilermakerFan

Well-known member
Joined
Apr 17, 2006
Messages
2,188
Location
Indianapolis, Indiana
Give them 5-10 years and the laser sinter printing will be a $3K machine with DIY kits at $1K...

That technology is just hitting it's stride for manufacturing, then it will trickle down like 3D printers have done.
 

kazlx

Well-known member
Joined
Oct 30, 2012
Messages
2,851
Location
Tustin, CA
Good thread. If you are looking for 3D printing stuff, check out 3D Magic Mike on Instagram. His design work and 3D printing application is off the charts.

https://www.instagram.com/3d_magic_mike/?hl=en

Also, if you are looking for a CNC router, check out the Axiom. My dad bought one and for the cost, it's an exceptional machine. He moved up from an X Carve and it's night and day. Easily under 10K for all the options, came almost fully assembled and we had it together and running in a few hours. Really nice machine.

https://www.axiomprecision.com/

I'll be following along. I need more organization in my life.
 
To avoid these ads, REGISTER NOW!

BoilermakerFan

Well-known member
Joined
Apr 17, 2006
Messages
2,188
Location
Indianapolis, Indiana
Thanks for the tip on 3D Magic Mike.

I found out that the 3D printer my buddy is giving me is a Geeetech i3:

imagejpeg_0001.jpg


Not the best i3 clone out there, but the price is right and I can use it to print out upgrade carriers and bearing holders for it to make it better. Still planning to pick up the FT-5 for my main needs.
 
OP
L

lilscorpion

Well-known member
Joined
Mar 15, 2010
Messages
3,599
Location
Colorado
Drawers, Drawers, and...Drawers

All week I’ve mentally prepared for building a ****-load of drawers while the UPS guy fumbled to figure out how to get 32 pairs of 100-lb drawer slides from ahturf.com to my house without the boxes falling apart. Squirrel…

I have built many many many cabinets over the past 5 years. I can say, without question, that ahturf.com is the least expensive place to buy them that I’ve found on the net by quite a bit. They ship very quickly, box the slides extremely well (better than anyone else I’ve ordered from), have excellent customer service, and have never drifted even once on any of those categories (consistent). I was not paid a penny for this feedback, just sharing my experiences with my GJ brothers and sisters.

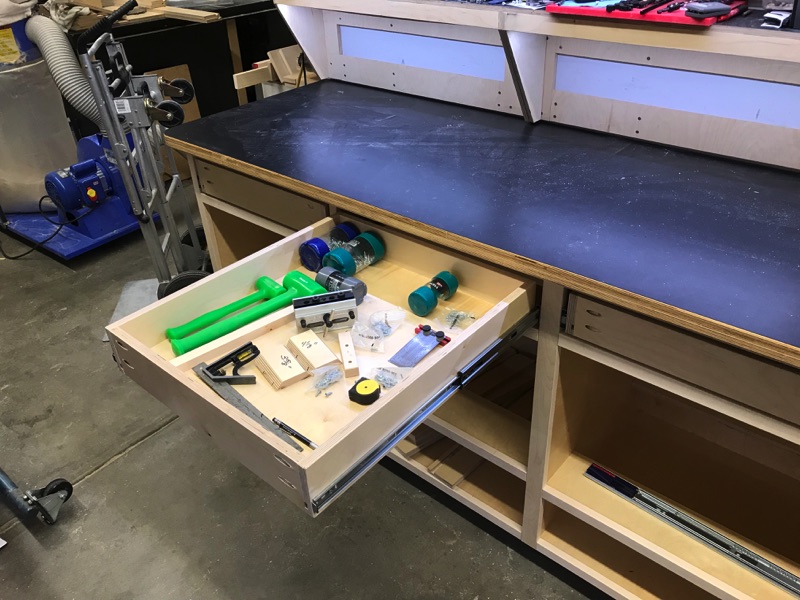
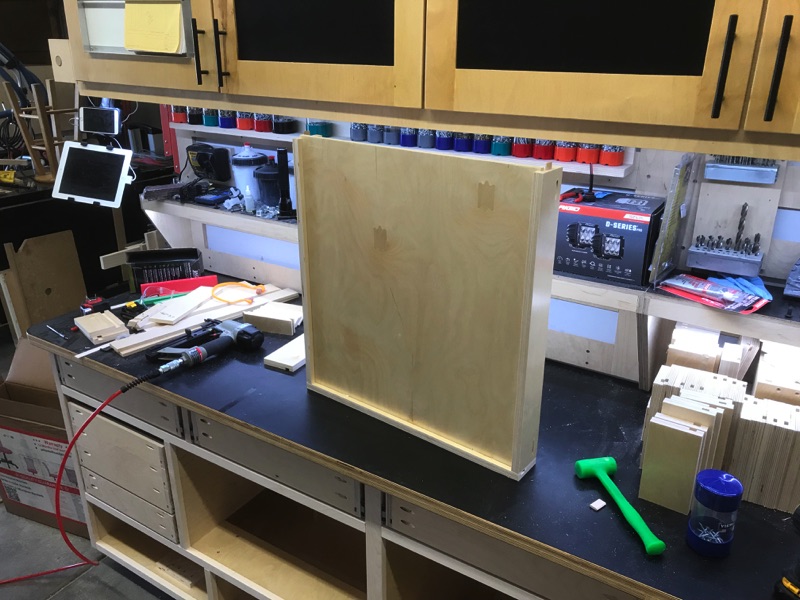
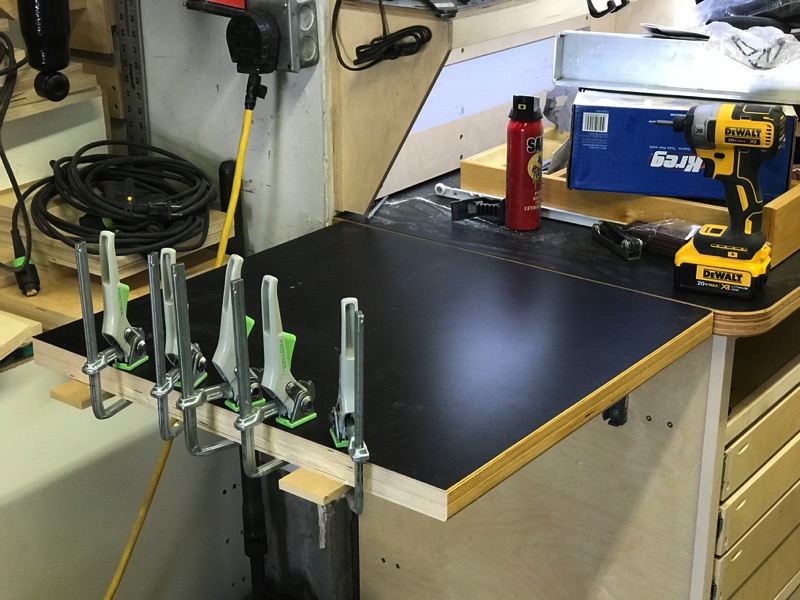
Back to the build…I miss the repetitive nature of working in the machine shop and this type of work tends to satisfy that void…until I’ve built about 15 drawers and then I just want it all to be over. Before I get started I move all of my assembly tools into the top drawers so I can keep the work surface as clear as possible as I assembly the drawers.

IMG_2236.JPG


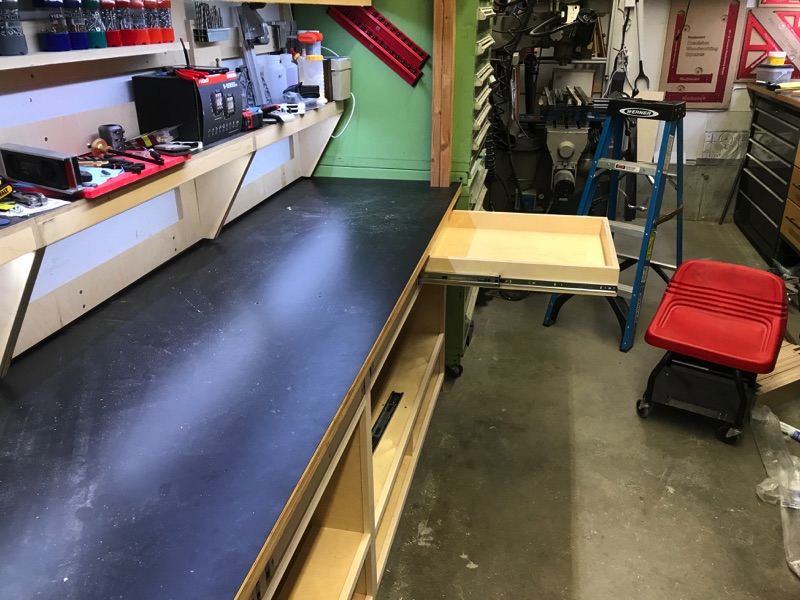
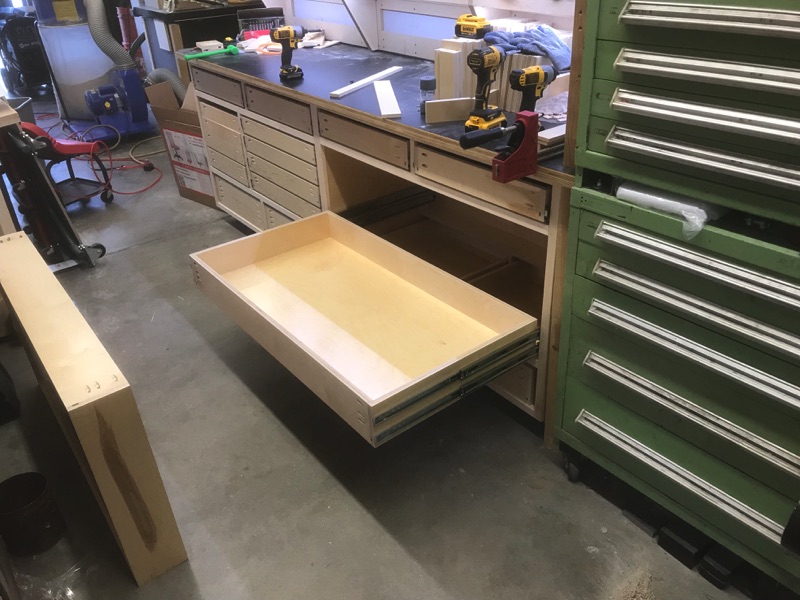
While doing so I also wanted to snap a few reference shots. This shows how far into the “isle” the drawer protrudes at full extension. This is one aspect I did not consider at the time of designing the cabinets on paper. The larger drawers are going to take up so much of the walk way that it may even be difficult to fully open the drawer while standing in front of it. It may be necessary to access contents from either side. Too late now, it’s gonna have to work.


IMG_2238.JPG


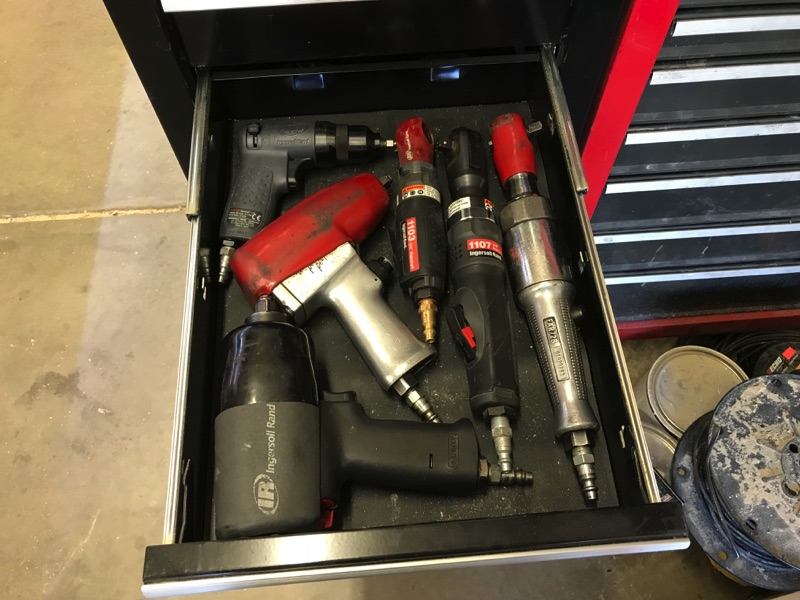
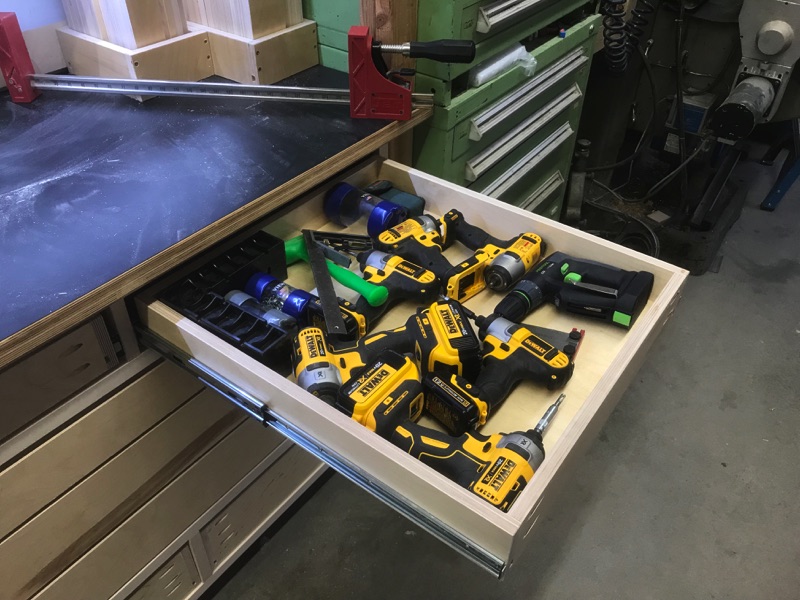
After reviewing the pictures I started to realize just how much I was procrastinating on getting started. For whatever reason I really wanted to see this drawer with air tools in it so I grabbed my impacts for a quick test fit. Today they’re cram packed in a really small drawer.


IMG_2163.JPG


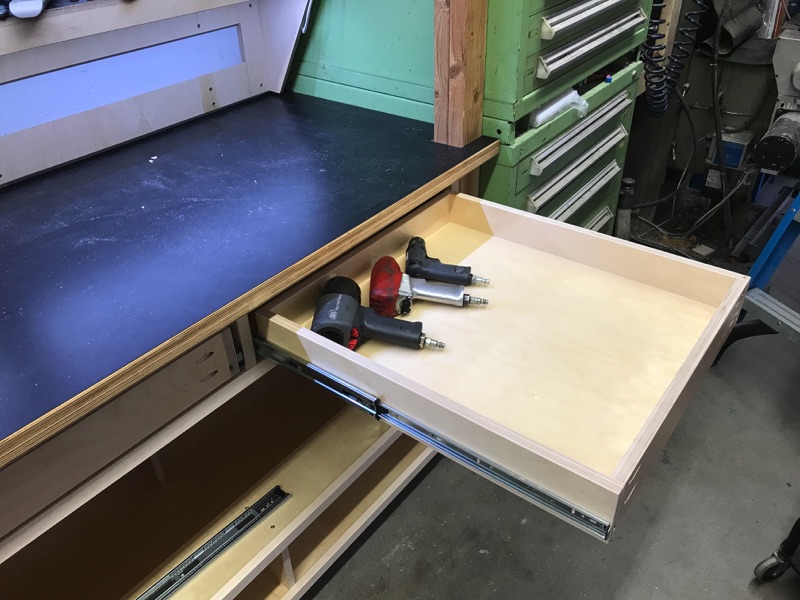
Now they’ll be able to breathe a little. These drawers were set to a depth to be exactly like the above craftsman box only I added 1/2-inch spacing between the drawers. This one drawer can hold all of my air tools with room for expansion. This one drawer replaces about 4 of these smaller drawers.


IMG_2237.JPG


For the most part, I just go heads down and build one after another until progress is realized. To make things easy on myself, I build the first of a certain size and get all of the dimensions perfect and then assemble the remaining drawers of the same-sized drawers back to back just following that pattern. By the time I get the hang of it, I run out of drawers that size and have to go back to measuring and fitting.


IMG_2325.JPG


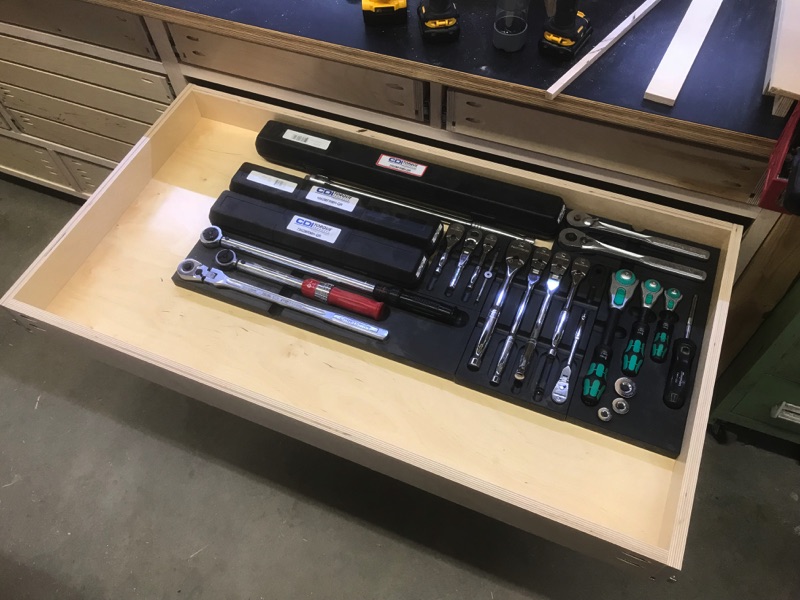
Some drawers are more difficult to assemble than others using only the bench top but a little creative balancing and I manage my way through. The drawers I’m using for my sockets and ratchets are clumsy large and have double 100lb slide assemblies. They’re HUGE and that’s exactly how I wanted them. Previously my various socket and ratchet drawers were maxed out and I had no room for those next tools I just have to have (I refer to them as “expansion opportunities).


IMG_2331.JPG


To give you an idea of how much bigger they are than the drawers inside the Craftsman 41-inch box, this should give adequate perspective. The overall size of the drawer almost perfectly doubles in square inches. Looking down at the drawer I realize that maybe I made them a little too large but I should probably wait until I move in before going there.

IMG_2335.JPG


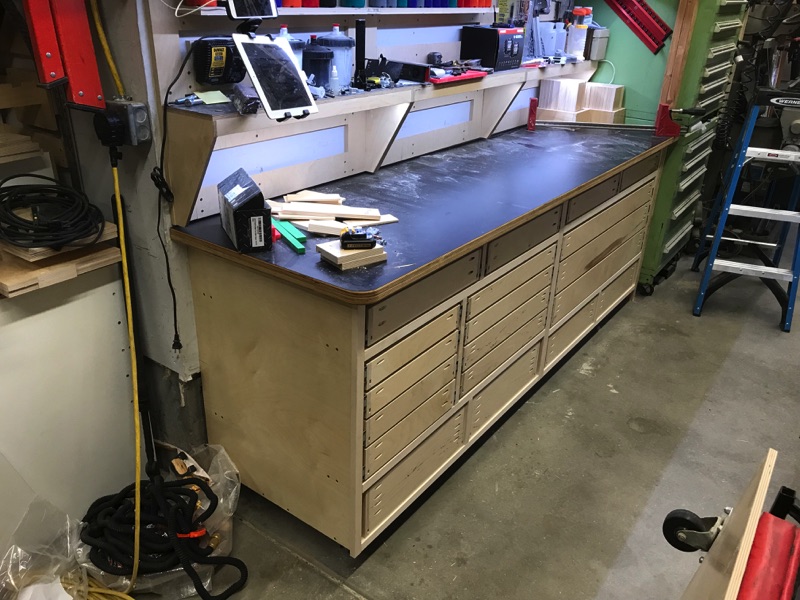
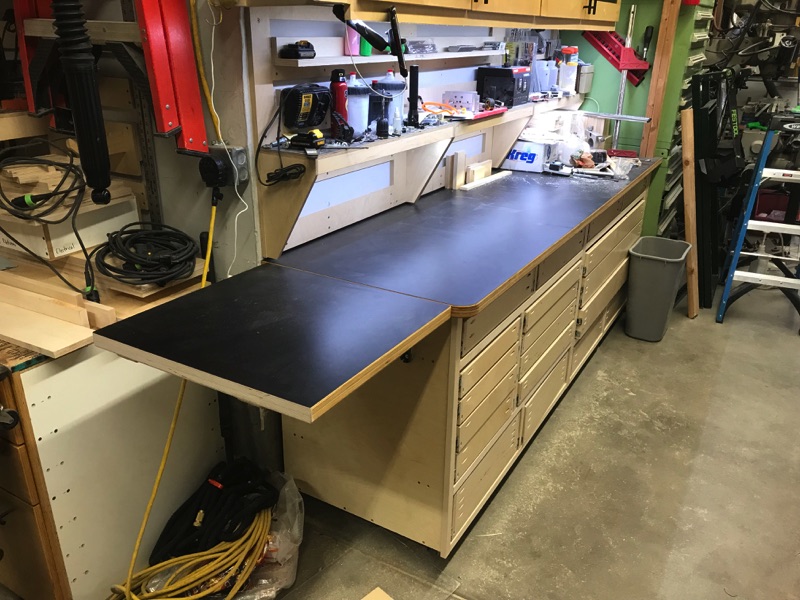
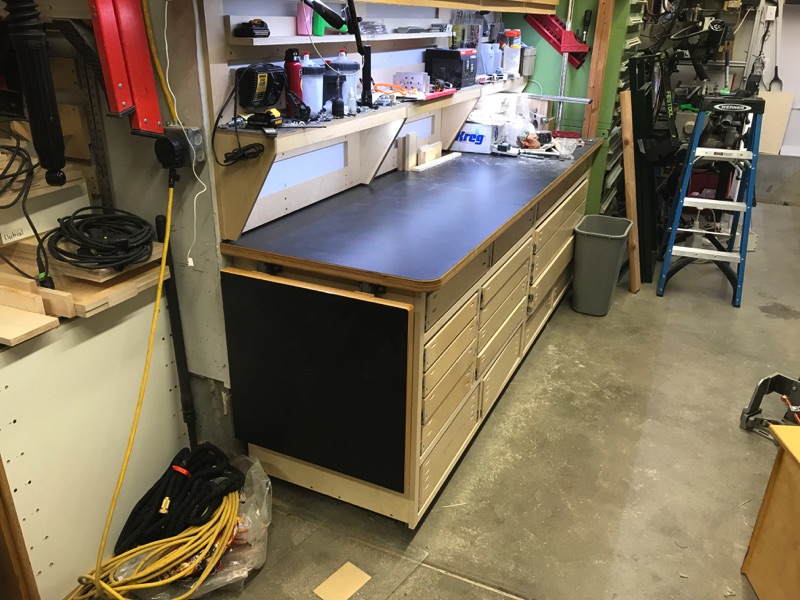
I spent the rest of the weekend installing drawers but it really feels like most of the work is installing drawer slides. I built a couple fixtures to try to speed up the slide install but none really saved me time. After a long weekend I’m getting close to having the main bench done now. Close enough that I think I can shift my focus to the other side of the shop next weekend.


IMG_2341.JPG


There is one moment to celebrate though. Now that I have some drawers installed, I start using them to keep he work surface clean/clear.


IMG_2339.JPG


I feel like I've made great progress however I also feel that I'm a long ways away from being able to pull the car in (which needs to be done by mid-march or so I negotiated). would have been a lot easier had I not wanted so many drawers.
 
Last edited:

neilc

Well-known member
Joined
Jan 17, 2014
Messages
94
Location
Chicagoland
Great progress. Are you just pocket holing and gluing these? Looks like you may be using dominos. Some are carrying a lot of weight, which is why I was asking.

And what about the bottoms - half inch? three-quarter ply?

What about a finish? I have had great luck with water based satin poly. Sprays easily or you can brush on with a foam brush.

Thanks for taking us on this next journey -

neil
 
OP
L

lilscorpion

Well-known member
Joined
Mar 15, 2010
Messages
3,599
Location
Colorado
neilc said:
Great progress. Are you just pocket holing and gluing these? There's a lot of weight, so not sure I'd trust pocket holes personally.

And what about the bottoms - half inch? three-quarter ply?

And are you putting a finish on them? I have had great luck with water based satin poly. Sprays easily or you can brush on with a foam brush.

Thanks for taking us on this next journey -

neil

Neil, thanks for the compliment. The drawers have Domino tenons and then are pocket hole screwed together. No glue. The drawer bottoms are 1/2-inch Baltic birch inset in a half inch dado and then stapled about 7 per side (total of ~28 total). The screws take very little load.

All of the wood is pre-finished plywood which is a UV stable clear coat. The only finish (I’ll use a satin waterborne polyurethane) I’ll need to apply will be on the drawer edges and I’ll wipe on. Still will probably take me all of a weekend when I get around to it.

Matt


Sent from my iPhone using Tapatalk Pro
 

BoilermakerFan

Well-known member
Joined
Apr 17, 2006
Messages
2,188
Location
Indianapolis, Indiana
Re: Drawers, Drawers, and...Drawers

All week I’ve mentally prepared for building a ****-load of drawers while the UPS guy fumbled to figure out how to get 32 pairs of 100-lb drawer slides from ahturf.com to my house without the boxes falling apart. Squirrel…

I have built many many many cabinets over the past 5 years. I can say, without question, that ahturf.com is the least expensive place to buy them that I’ve found on the net by quite a bit. They ship very quickly, box the slides extremely well (better than anyone else I’ve ordered from), have excellent customer service, and have never drifted even once on any of those categories (consistent). I was not paid a penny for this feedback, just sharing my experiences with my GJ brothers and sisters.

Thanks for that info! I will be needing a few drawer slides for my hanging chest of drawers under my basement workbench. I have 6 or 7 sets that I salvaged off an old Sauder desk before it was put in the trash, but I want a few soft close ones for the upper drawers.

And how is it that you have SIX cordless impact drivers but only 3 dead blow hammers? :D How many guys do you have visit your place to work? I have two cordless impact drivers, but I only use one at a time.

But seeing your Wera socket wrenches reminded me that I need to jump on KC Tool and order a new impact driver and impact driver bits as well as the JIS screwdrivers. Today I did pick up another set of the Kobalt Pro90 socket wrenches and two sets of 6-pt metric sockets. I hate that all the new socket sets come with so many 12-pt sockets. And for old nuts and bolts, the "Universal" sockets aren't much better... damn things round off the old hardware way too fast.

Isn't your FT-5 going to be shipping any day now?
 
OP
L

lilscorpion

Well-known member
Joined
Mar 15, 2010
Messages
3,599
Location
Colorado
BoilermakerFan said:
And how is it that you have SIX cordless impact drivers but only 3 dead blow hammers? [emoji3] How many guys do you have visit your place to work? I have two cordless impact drivers, but I only use one at a time.

But seeing your Wera socket wrenches reminded me that I need to jump on KC Tool and order a new impact driver and impact driver bits as well as the JIS screwdrivers. Today I did pick up another set of the Kobalt Pro90 socket wrenches and two sets of 6-pt metric sockets. I hate that all the new socket sets come with so many 12-pt sockets. And for old nuts and bolts, the "Universal" sockets aren't much better... damn things round off the old hardware way too fast.

Isn't your FT-5 going to be shipping any day now?

Building cabinets as much as I have I’ve learned it’s more efficient to have the countersink in one and Phillips in another...with a #2 square driver in the third. 12-volt drivers are perfectly suited to drive 1 5/8-inch screws and pocket hope screws so those are the 3. Then I learned that the 3-speed 20v impacts were necessary for driving screws longer and the second was, hmmm,don’t remember why I got a second.

Deadblows...you’re only seeing the two I have out. Like most of the GJ members, I got a little over zealous with the trusty cook. Have nearly a complete set of red for automotive and near complete set of green for wood working. Ordered half a dozen 0’s (they’re sweet for general purpose persuasion), three pink, and one blue ballpein flat/flat to be dedicated to my tool cart (but has managed to make its way back to the mill. [emoji6]

I have some 12-point sockets but they’re really only good for square and 12-point fasteners. Last time I needed one was on the Acura MDX. That was also the first time in probably 5 or so years.

I just sent and email to Folger. I received and order confirmation when I ordered but nothing since so I had to see what’s up. I half want the damn thing here but the other half of me wants it to delay a couple weeks so I can get to a good stopping point in the garage.
 

BoilermakerFan

Well-known member
Joined
Apr 17, 2006
Messages
2,188
Location
Indianapolis, Indiana
Ahhhh. I just swap bits. I guess it's easier to me to have a handful of bits than keep changing drivers. My Makita 18V have a lot of torque so I use my drill with the clutch if I need less torque, but I have been eyeing the new Makita sub-compact 12V drivers.


Funny story... last week during lab I had to crack a fitting on the hydraulic trainer to bleed off trapped pressure. I asked a student to go get me the big orang dead blow that was over on a bench next to a mill. He brought me an 8oz rubber mallet. I went and grabbed the big ORANGE dead blow off the bench and showed him the difference. Had all the students hammer the top of a bench. Then explained why I needed the dead blow since I was hammering at the level of my face and didn't want the mallet to bounce off the wrench and hit me.

Even my 12yo son knows the difference between my rubber mallet and my dead blow in the garage... both of mine are black. And I almost bought 3 more dead blows tonight at Lowes. I need them, but just decided to wait a couple weeks.
 

Sawdustmaker

Well-known member
Joined
Jan 15, 2017
Messages
928
Location
Placentia, Orange Co., California
Like where you are placing your pocket holes. Drawer fronts will hide them nicely. Haven't started my drawers yet, distractions keep popping up. The lumber supplier I go to has pre-finished baltic birch like you are using in 1/4", 1/2" and 3/4" thickness. Rethinking using the premade drawer sides and do what you are doing. I know what you mean about getting into the "zone" when assembling drawers. The error I've made in the past is miscounting sides when I am cutting the lumber, start assembly.....oops, short a side, front or back....back to the table saw:(
Your whole build is looking good. My "negotiated" deadline is the end of April.
 
OP
L

lilscorpion

Well-known member
Joined
Mar 15, 2010
Messages
3,599
Location
Colorado
BoilermakerFan said:
Ahhhh. I just swap bits. I guess it's easier to me to have a handful of bits than keep changing drivers. My Makita 18V have a lot of torque so I use my drill with the clutch if I need less torque, but I have been eyeing the new Makita sub-compact 12V drivers.


Funny story... last week during lab I had to crack a fitting on the hydraulic trainer to bleed off trapped pressure. I asked a student to go get me the big orang dead blow that was over on a bench next to a mill. He brought me an 8oz rubber mallet. I went and grabbed the big ORANGE dead blow off the bench and showed him the difference. Had all the students hammer the top of a bench. Then explained why I needed the dead blow since I was hammering at the level of my face and didn't want the mallet to bounce off the wrench and hit me.

Even my 12yo son knows the difference between my rubber mallet and my dead blow in the garage... both of mine are black. And I almost bought 3 more dead blows tonight at Lowes. I need them, but just decided to wait a couple weeks.

12v impact drivers in bare tool format for almost nothing - Almost Free on Ebay. ;). Once you find it easier to not swap bits, a second one isn't difficult to swallow.

Maybe some of the kids in your class need to take an intro to shop class first. :lol_hitti
 

Bob Heine

ALLIANCE MEMBER
Joined
Oct 24, 2009
Messages
10,703
Location
Boca Raton, Florida
12v impact drivers in bare tool format for almost nothing - Almost Free on Ebay. ;). Once you find it easier to not swap bits, a second one isn't difficult to swallow.
I was happy to have three mini impact drivers but your link bit a $40 hole in my wallet. Of the three, my Porter Cable works the best so now I have another. Then I came across a Porter Cable clamp saw that I had never seen before.
attachment.php


It should be perfect for me, especially cutting PVC pipe in our sprinkler system. I doubt I'll be using it to cut copper pipe -- I prefer the old-fashioned pipe cutters for that.
attachment.php


At $60 I thought it was worth a try.
 

Attachments

  • Porter Cable Clamp Saw 1.jpg
    Porter Cable Clamp Saw 1.jpg
    31.9 KB · Views: 2,103
  • Porter Cable Clamp Saw 2.jpg
    Porter Cable Clamp Saw 2.jpg
    54.3 KB · Views: 2,100

niget2002

Well-known member
Joined
Oct 2, 2012
Messages
11,115
Location
Josephine, TX
I need to pick up another driver. I did work the other day that required removing a bunch of phillips screws and replacing them with lag bolts. Such a pain swapping bits the entire day.
 
OP
L

lilscorpion

Well-known member
Joined
Mar 15, 2010
Messages
3,599
Location
Colorado
Bob Heine said:
I was happy to have three mini impact drivers but your link bit a $40 hole in my wallet. Of the three, my Porter Cable works the best so now I have another. Then I came across a Porter Cable clamp saw that I had never seen before.
attachment.php


It should be perfect for me, especially cutting PVC pipe in our sprinkler system. I doubt I'll be using it to cut copper pipe -- I prefer the old-fashioned pipe cutters for that.
attachment.php


At $60 I thought it was worth a try.


For years I used a saw/sawzall to cut PVC when rebuilding valve bodies for irrigation systems. That was late 80’s - early 90’s and cordless wasn’t a thing yet. That little tool should be perfect for such a task. Smokin’ deal too..


Sent from my iPhone using Tapatalk Pro
 

BoilermakerFan

Well-known member
Joined
Apr 17, 2006
Messages
2,188
Location
Indianapolis, Indiana
The ratcheting blade cutter for PVC works great because it leaves a clean cut. Any sawed cut will nee to be cleaned up.

That little recip would be great for galv or black pipe though.
 
OP
L

lilscorpion

Well-known member
Joined
Mar 15, 2010
Messages
3,599
Location
Colorado
Squirrel!

Got a little something in the mail today and it prompted me to get out to the garage and do a little fab mid-week. This is a pair of folding table arms. The pair are supposed to be able to support 300lbs though, based on the materials they’re made out of, I’m gonna bet that they’d hold much more than that. The biggest issue for strength will be how they’re attached.

IMG_2632.JPG


Here’s a neat fact. I purchased them from Kitchensource.com which has them listed as a pair for load and then per/single for ordering @ $130. I bought 2 pairs so that I could make folding benches in two places but, since I didn’t really read the site right, I actually only ordered 2. So, today I get to attach only one of the two tops so I’ll start with the add-a-leaf to the end of the main bench. I started with the shorter of the two tops I pulled off the previous base cabinets.


IMG_2575.JPG


After cutting it down I needed to add some “build up” to the edge so it looks finished. After cutting, gluing, and fitting the piece I clamped it in place and let it dry.


IMG_2577.JPG


Once dry I attached it to the brackets I had already installed on the side cabinets (sorry, forgot to shoot a pic) and now the bench is an (optional) 26-inches longer.


IMG_2583.JPG


But when not in use, it’s only 2-inches longer but tucked completely out of the way. Doesn't feel like I have a bunch of extra room now because of all of the stuff I have piled up below but it will make a huge difference later once everything is cleaned up.


IMG_2582.JPG


So, 45 minutes and I now have a place to put tools and materials as I assemble on the main bench. More or less it enables me to use the entire 8’+ bench for assembly which is fantastic. Now I just need to order another pair for the other fold-up top. Kinda pissed that each will now cost about $260. Had I known that I would have built them myself. I still have a few more work surfaces to add in the shop, maybe I’ll save off building a set myself for one those later.
 

Bob Heine

ALLIANCE MEMBER
Joined
Oct 24, 2009
Messages
10,703
Location
Boca Raton, Florida
The ratcheting blade cutter for PVC works great because it leaves a clean cut. Any sawed cut will nee to be cleaned up.

That little recip would be great for galv or black pipe though.
BMF, I also use the ratcheting blade cutter for PVC but the one I have won't handle anything bigger than 1-inch. I should probably add a bigger one to the herd -- I see some tool drawer Tetris in my future. Hmmm, maybe a plumbing tool drawer.
 
OP
L

lilscorpion

Well-known member
Joined
Mar 15, 2010
Messages
3,599
Location
Colorado
BMF, I also use the ratcheting blade cutter for PVC but the one I have won't handle anything bigger than 1-inch. I should probably add a bigger one to the herd -- I see some tool drawer Tetris in my future. Hmmm, maybe a plumbing tool drawer.

Could you remove the guard and run a longer blade? Normal reciprocating saws don't have them anyway.
 

Bob Heine

ALLIANCE MEMBER
Joined
Oct 24, 2009
Messages
10,703
Location
Boca Raton, Florida
Re: Squirrel!

IMG_2632.JPG


...Kinda pissed that each will now cost about $260. Had I known that I would have built them myself. I still have a few more work surfaces to add in the shop, maybe I’ll save off building a set myself for one those later.
Lilscorpion, I hate it when a simple solution is outrageously priced. I was looking for the same kind of shelf bracket but only wanted a 12-inch fold-down shelf for a grinder. I don't actually believe their claim of 550-pound capacity but if it holds up the grinder I'll be happy. It also feeds my obsession for stainless steel.
attachment.php


It's beefier than I expected, especially at $11.98 each.

https://www.amazon.com/gp/product/B00LGBZC4G/?tag=atomicindus08-20
 

Attachments

  • Folding Shelf Bracket.jpg
    Folding Shelf Bracket.jpg
    32.1 KB · Views: 3,006

Dusty.House

New member
Joined
Jan 21, 2018
Messages
3
Re: Squirrel!

Lilscorpion, I hate it when a simple solution is outrageously priced. I was looking for the same kind of shelf bracket but only wanted a 12-inch fold-down shelf for a grinder. I don't actually believe their claim of 550-pound capacity but if it holds up the grinder I'll be happy. It also feeds my obsession for stainless steel.
attachment.php


It's beefier than I expected, especially at $11.98 each.

https://www.amazon.com/gp/product/B00LGBZC4G/?tag=atomicindus08-20


I’ve ordered three different sets of these from Amazon and found all three were not 90 degrees. They were all a few degrees more, which made no sense to me. Once installed I couldn’t see how the tops would align...


Sent from my iPhone using Tapatalk
 
To avoid these ads, REGISTER NOW!
Top Bottom