bugnut
ALLIANCE MEMBER
Matt, that rack really looks good and powder coat to boot! And then look at all those Craftsman wrenches....WOW")


Sorry for going back in time 4-years or so but I have a question about pictures in this thread from this post back to Jan 20, 2018 (start of tool (re) organization thread). All of the pictures just show the file name and extension (IMG_XXXX.JPG), no picture showing.New Workbench Build
In the past 4 years I’ve learned a thing or two about building cabinets. Even though melamine has been good to me (meaning it hasn’t yet failed me), It’s not the strongest for cabinet assemblies. The previous bench utilized unfinished baltic birch for the face frames and the drawers. To finish, it took me about a month to apply 3 coats of poly (spray, scuff, spray, stuff, spray) on both sides of the drawers and a single side of the face frame spraying sometimes 2-3 times per day and many times per day on the weekends.
This go around I'm going to apply what I've learned and build the boxes out of pre-finished baltic birch. This pre-finished material comes from the supplier with a fairly durable UV stable clear coat that has a much nicer finish that what I'm able to spray myself in the garage and it only costs $10-$20 more per sheet depending on where you get it and if you get a break on quantity. I've only been able to find 2 places that sell it in town but they regularly have on hand so there's no need to order it in advance. The only downside to using it is it requires careful handling during machining (or it looks like junk when you're done). For the price difference, I have no issue slowing down to go MUCH faster.
I really really wanted to get the main boxes built this weekend so I didn't slow down to take pictures until I had the main assemblies pieced together. I apologize however I promise that once you've seen me break down a sheet of ply, you've seen it...fast forward...the two boxes, a total of 8'2" long, are laying on their back machined and ready for the face frames.
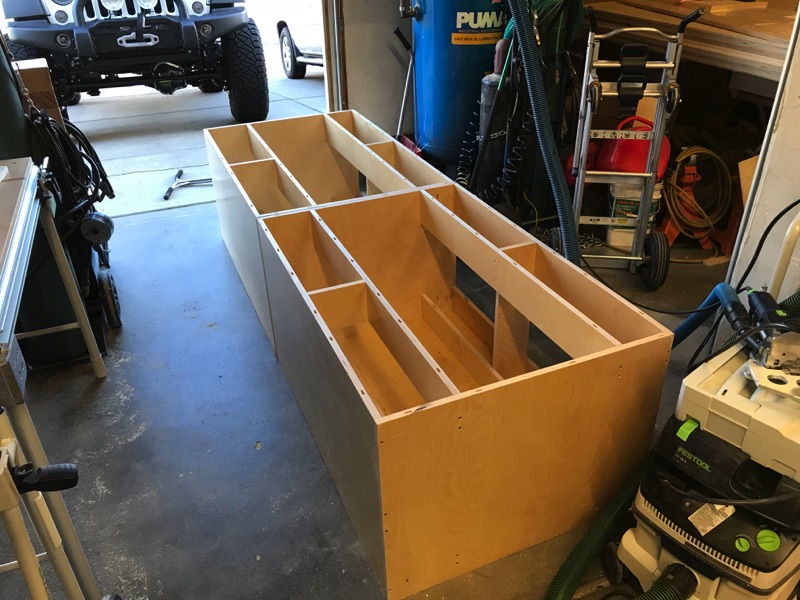
Orientation-wise, you can see the bottom in this picture. These assemblies are designed to have some fairly wide drawers so they can hold tools that I never had a dream of storing in my old bench (e.g. 36" long impact extensions).
On the old bench I used remnant pieces of the baltic birch cut into thin strips for the face frames and attached them using brad nails. This cause me to spend time patching holes and sanding before I could finish. Since I have a few dozen feet of white maple left over from the kids closet builds I decided I'd use that up. It being hardwood makes it a better choice for shop cabinets anyway because it can take more abuse.
The face frames are hall hand fitted pieces. I cut the verticals so they run a little long top and bottom and then hand fit the rest by measuring and cutting the smaller pieces one at a time. I'll do a more comprehensive breakdown when I feel like I have more time, like when I build the uppers.
Once i have everything fit, I mark and trim the verticals to be flush top and bottom. I do it this way because it allows me to hide slight imperfections in the boards (like if one is 1/16th narrower) by cutting them point to point instead of 90* to length...if that makes sense.
The conventional face frame would be held together as a single assembly using pocket screws which would require me to mark all of the intersections and pocket hole screw the thing together on a large assembly table. I did that for my first two cabinets but, since then, have done it a little differently. I, instead, leave all individual pieces floating so I can remove them, refinish them, and/or replace them later individually if necessary. Then I attach each one using pocket screws which, along with the dominos, prevents it from moving. This allows me to color change or repair my cabinets easily down the road. The cabinetmaker probably cringes...I’ve had no issues to date so no evidence that the face frames actually need to be one assembly. Again I'll go into better detail when I build the uppers.
With the face frames complete, I then moved the cabinet assemblies over to the new location in preparation for install using this conversion hand truck/dolly.
Before installing them, I need to add rear nailer boards. Here’s another notable difference in these cabinets over the old ones. The back have a 1/4-inch thick back panel and I add 5 1/2-inch wide nailers to the top and the bottom. When attached with pocket screws, these nailers serve three purposes - (1) they add a substantial amount of strength to the cabinet. (2) They provide a strong way to attach the cabinet to the wall. (3) they push the back panel forward solidly into the groove so, from the inside, the panel appears to have zero reveal.
Took me all weekend to get to this point...dropping them in place.
It's fun to see a pile of ply turn into something like this in a weekend and to think that all of the flat surfaces already have clear coat on them! I'd bet I build this one in 10th the time. Kinda wished I'd timed myself on the previous one.

Edit: Shoot, looks like all pics from the thread are gone. I was right about tapatalk after all. That's a super bummer. There's no way I can get them all back the way they were but I'm going to have to figure out how to publish a photo album with my mountain of organization pics.Sorry for going back in time 4-years or so but I have a question about pictures in this thread from this post back to Jan 20, 2018 (start of tool (re) organization thread). All of the pictures just show the file name and extension (IMG_XXXX.JPG), no picture showing.
Any idea on how to get the pictures to show? I am in the process of building a Shop and will eventually be looking for work bench ideas. Judging from the text, it sounds like you have great ideas but I am more of a visual learner.
Thanks for the help.
More than a few people will be extremely happy if you are able to make that happen. I personally would account for at least three of them.Edit: Shoot, looks like all pics from the thread are gone. I was right about tapatalk after all. That's a super bummer. There's no way I can get them all back the way they were but I'm going to have to figure out how to publish a photo album with my mountain of organization pics.
Thank you. I usually have a good picture of what it may look like in my head before I start but sometimes it ends up not quite as neat. I this case the result was a little bit better. The color helps immensely. They looked cool as bare aluminum but bright red...Matt, that rack really looks good and powder coat to boot! And then look at all those Craftsman wrenches....WOW
I wish I had a bigger machine and more advanced processes. I thought about building a few extra and selling them but since there will likely be 6 different lengths/styles in just my box, it seemed more complicated than it's worth. On the flip-side, maybe I do need to create an etsy account.Those look nice! Where do we order?
I'll start looking for a place to host them. Would like something that allows me to control order/sequencing as well as a blurb below the pic. If you know of something that would work like that, let me know.More than a few people will be extremely happy if you are able to make that happen. I personally would account for at least three of them.
Matt, I went back to page 1 and 3 and I can see all your pictures. I noticed quite a few picture-rich threads weren't showing the pictures when I first opened them but they appeared when I refreshed the page (sometimes required multiple refreshes). It may have something to do with my connection -- AT&T just upgraded me to fiber so I have 600 Mbps upload and 510 Mbps download speeds.Edit: Shoot, looks like all pics from the thread are gone. I was right about tapatalk after all. That's a super bummer. There's no way I can get them all back the way they were but I'm going to have to figure out how to publish a photo album with my mountain of organization pics.
 www.garagejournal.com
www.garagejournal.com
www.garagejournal.com
www.garagejournal.com
www.garagejournal.com
Matt, in the first post I can see 22 pics, in the second I can see 3 pics (screenshots?) and in the third I can see 10 pics (and 10 thumbnails at the bottom of the post).Bob, can you see pics in these posts:
Tooling (Re)Organization
Regarding my stuff count - it’s acquired capability. Lathe Tooling as an example - nearly 2 dozen tools but they all have a purpose. I usually don’t just buy tools...I says to my wife. Regarding being organized - LOL. I was not always, I just realized one day that I had a choice - the space...
Tooling (Re)Organization
I really enjoy following your work, and gain lots of inspiration from your build. I've been thinking about picking up some CA glue and finally ordered some tonight. Was looking at the fastcap, but decided to go with the titebond that you've been using. I haven't done much as far as cabinets go...
Tooling (Re)Organization
I engrave the tooling tray lettering on the backside of the clear 1/8 acrylic. A layer of black under that and the lettering shows up white. Works well and keeps relevant info with each tool. This is the digitizing tablet. I put whatever shape I want on it, use a pen shaped transducer and it...
Understand the hassle of selling. Been dabbling on eBay for close to 20 years. Recent changes on the bay and meddling by the Feds on reporting rules has taken all the fun out of it. Now using local consignment to flip Estate Sale finds I’m not keeping.Thank you. I usually have a good picture of what it may look like in my head before I start but sometimes it ends up not quite as neat. I this case the result was a little bit better. The color helps immensely. They looked cool as bare aluminum but bright red...
I wish I had a bigger machine and more advanced processes. I thought about building a few extra and selling them but since there will likely be 6 different lengths/styles in just my box, it seemed more complicated than it's worth. On the flip-side, maybe I do need to create an etsy account.
Edit: after a little reading, Etsy isn't my jam so that ain't gonna happen anyway. My biggest issue in regards to selling is having to deal with the commercial side of things. I've been there, done that and don't want to do it again. Shipping, returns...blek. I had considered just making one extra of stuff throughout the year and then use them in the secret santa...
that's odd. I feel better but still odd. Regardless I think I'll find a place to post up the pics anyway. I know the older thread has some missing as well.Matt, I went back to page 1 and 3 and I can see all your pictures. I noticed quite a few picture-rich threads weren't showing the pictures when I first opened them but they appeared when I refreshed the page (sometimes required multiple refreshes). It may have something to do with my connection -- AT&T just upgraded me to fiber so I have 600 Mbps upload and 510 Mbps download speeds.
EDIT: When I expanded the post @Weirth It quoted, the pictures were there. They also were there when I clicked the @lilscorpion link in his post, taking me back to page 3.
I get ebay is a business but they take quite a chunk of a sale. During covid I sold off a bunch of tools I'd not used (ever that I can remember) which I purchased at an auction about 20-ish years ago. Getting anything for them was nice but I learned the hard way that they can take up to 40% if you take advantage of their premium services. That's just nuts.Understand the hassle of selling. Been dabbling on eBay for close to 20 years. Recent changes on the bay and meddling by the Feds on reporting rules has taken all the fun out of it. Now using local consignment to flip Estate Sale finds I’m not keeping.
Fantastic!!The next step was to figure out how to machine a mirror of the long/right rail. After some futzing around, I figured out how to make a mirror version of the rail. There’s a mirror function. I used a piece of 1/4 6061 as a fixture base and cut the next revision.
A few heavy spot welds I’m the corner keep things where they need to be.
A quick sand blasting to prep for powder coat helps slightly break the edges and give the coating to something to bite onto.
The single in-wall kitchen oven can creating challenges for larger parts.
Spaced it just so the box end of the wrenches would fit between the rack rail and the drawer side. This will keep them from sliding around as much as is possible.
And loaded it up.
I like the contrast of the red behind the clean wrenches. Now that I can see one finished, I know I’ll like the whole drawer organized this way.

Links are all good! We see well organized (Shocking!) pics in well labeled albums with the ability to download. It looks like that ability expires on February 15. not sure if pics will be visible after Feb 15; I am not familiar with iCloud Photo.****, that was a LOT easier than I thought it would be. Tell me what you see when you click these links:
Container Shelves: https://share.icloud.com/photos/0bbZV3fWsYRc5ImxVDegOMPIQ
Lathe Tooling Organizers: https://share.icloud.com/photos/010lyolVfLnONm-GxbcXTcAkA
MFT Horses: https://share.icloud.com/photos/010lyolVfLnONm-GxbcXTcAkA
MFT Table: https://share.icloud.com/photos/00eSRy2yifQC3fHzRniOjIL3Q
MFTC: https://share.icloud.com/photos/0fetFpJ4pQYHGW6HRazD3tGqw
Kurt Vise Stops: https://share.icloud.com/photos/0c3mCYb5WjsMVpypf-PpFNa3Q
Knee Mill Tooling Arm: https://share.icloud.com/photos/050gLZxzZuNLtdCweadrjnbbg
Nail Gun Rack: https://share.icloud.com/photos/0abW-AArlcO7RhDc8QovkZEEA
HPLV Drawer Organizer: https://share.icloud.com/photos/0abyfuQcXRDp2C9FOwzEeNZWQ
French Cleat Clamp Rack: https://share.icloud.com/photos/048F69SgZS-0-S6iRs7sQPjKQ
Domino Offset Base: https://share.icloud.com/photos/049Z4rzo47ohIXPlqOw-xkLvw
Gas Cylinder Stand: https://share.icloud.com/photos/030eAGQ5TwYiHBBGKf9LGJ4XA
8020 Aluminum Corners: https://share.icloud.com/photos/0f7jCl2kBB_gzB8so9CxQxiGA
Portable Drying Rack: https://share.icloud.com/photos/084tQ4lKdKKf_4XioEqjSeiFw
Drawer Organizers: https://share.icloud.com/photos/0eblqPGRIcK_CbhiU0i3W5frw
Systainer Tool Box: https://share.icloud.com/photos/02fwkKesXXv5Wqeu3c4QJCk9Q
Sys-System: https://share.icloud.com/photos/0f1I_ZfmProJvUyufydEq2Cjw
Router Cabinet Module: https://share.icloud.com/photos/0ffFnNnrV5E2kVYN7B-Gb7Cjg
Systainer Shelf: https://share.icloud.com/photos/0ccIdbrkljaJAZhOUxuP3BQqw
Systainer Power: https://share.icloud.com/photos/02b0YcpGaPlp7yRbSQkmx75DA
Sys-Ports: https://share.icloud.com/photos/056q50axoqTY5GHeusmdhZtGA
R8 Tooling Rack: https://share.icloud.com/photos/08bpJOMJfOPhhj8kvAjswFJog
Powered Sys-Port: https://share.icloud.com/photos/099_UDg_yAM0T5O3mS8rokEMQ
Router Table: https://share.icloud.com/photos/0a4JUl9S78p_Wx3VbBszrL0xA
HDPE Socket Organizers: https://share.icloud.com/photos/06fxvZRR--_lYVvwEWwsoD0CA
Ratchet Organizers: https://share.icloud.com/photos/07eYTlSqsrpVs9KB77kfByaPA
Router Plate: https://share.icloud.com/photos/017SI3NZfuIj_REfH4Q0aq9JA
Router Plate - Jig Saw: https://share.icloud.com/photos/0d18ukfRTpPz-AkqqFkollrxA
Router Plate - Bandsaw: https://share.icloud.com/photos/0b0UXP-Ji1MRvZPMsiSo8F8lw
HDPE Organizers: https://share.icloud.com/photos/0abJQLkZpJPiDPMpJ2tU6Axzw
Power Coating Booth: https://share.icloud.com/photos/0b0tclEZIzOXbencjS3vl964w
Socket Organizers: https://share.icloud.com/photos/035WX4aG9ijGXVeuRa77lSntQ
Wrench Organizers: https://share.icloud.com/photos/005ozdAAX5gyIhmKlJGpDazxg
Ah, the catch. Ok, plan B (I was prepared though I did miss the expiration):Links are all good! We see well organized (Shocking!) pics in well labeled albums with the ability to download. It looks like that ability expires on February 15. not sure if pics will be visible after Feb 15; I am not familiar with iCloud Photo.
Thanks a ton!
I’ll have to redo the albums. The public share I created expires but there’s a “shared album” that you can share as a website and it stays forever (until I switch to Android) and the albums are living things so if I add pics to them later, anyone who has the link will be able to see them.Using iCloud is interesting, I have all but given up on photo sites, they either disappear or start charging too much, or add limitations that make it near useless. I have been using the GJ to host them now, it seems a lot cleaner since they swapped platforms.
Matt, one of the reasons I'm an Alliance Member is to keep Ryan in business. Rather than donating to a website that just provides a home for pictures, I'm donating to one that focuses on my interests (and the people who fail to upset me).I do still wonder if they’ll expire or there will be a time where they age off (for $$$ reasons).
Matt, one of the reasons I'm an Alliance Member is to keep Ryan in business. Rather than donating to a website that just provides a home for pictures, I'm donating to one that focuses on my interests (and the people who fail to upset me).
Matt, one of the reasons I'm an Alliance Member is to keep Ryan in business. Rather than donating to a website that just provides a home for pictures, I'm donating to one that focuses on my interests (and the people who fail to upset me).
Well said Bob. I don't support many websites but I am proud to support Ryan for one of the places I enjoy sharing and learning from others. I figured this is where I can post my work kind of like in a blog format and host pictures.


You didn’t guilt me into anything. I’ve noticed “Alliance Member” under peoples alias many times and didn’t know what it was and never even looked into it. Sometimes I get stuck in my 3-foot world and Covid had certainly amplified the haze around it. I should support Ryan and the board. It’s the only place I go and socialize.Didn't mean to guilt you into it Matt. I was just expressing my reasoning for helping support the forum.
There is a great group of people here and a vast amount of knowledge to be gained from its members.
On a side note Matt, I stumbled across your son's Instagram page the other night. I had posted some pics from a truck I was working on and his midas_lj popped up on my feed. The LJ sure looks great and it's been interesting to follow along on the turbo setup.

You didn’t guilt me into anything. I’ve noticed “Alliance Member” under peoples alias many times and didn’t know what it was and never even looked into it. Sometimes I get stuck in my 3-foot world and Covid had certainly amplified the haze around it. I should support Ryan and the board. It’s the only place I go and socialize.
Thanks Mike, we’re having a lot of fun with the Jeep. I have most of it figured out. I’m so tempted to build a turbo kit to sell…it’s taking everything in my being to not just buy a plasma table and get back into it.
Regarding Instagram - Andrew has been working on figuring the Instagram algorithm. Social media is crazy. He even did a live feed last weekend to answer questions about the Jeep. He did way better than I could have.


I wish I had the space for more. That’s how stuffed a drawer should be!Wrench drawer looks great Matt. Wish mine looked that good. I have wrenches stuffed anywhere they'll fit.
I wish I had the space for more. That’s how stuffed a drawer should be!
I just don’t have anything big enough to need a wrench over 1 5/16…or haven’t yet. The big sets look cool tho.Yeah, it's a bit cramped in there. Those are just up to 1" SAE and 24mm Metric. My large wrenches (up to 2") are in another drawer as they don't get used quite as much and would never fit in there.
You can remove a coil but it will make the spring stiffer - there is less spring length to deflect for a given load. If the spring in its assembly has a lot of preload then removing a coil could reduce the force it is applying despite the stiffer spring rate - would have to analyze it for a given application.Thanks, the idea of adding washers to stiffen a spring that's too soft is what I'll have to do then, great idea. Wish I could make a stiff spring a scosh softer...could I make a spring shorter by taking a coil off the end maybe?
I just don’t have anything big enough to need a wrench over 1 5/16…or haven’t yet. The big sets look cool tho.


Hehe, there’s always a critic.Done? I see two wrenches without a holder????


