To avoid these ads, REGISTER NOW!

Truss Design

OP
M

Medeek

Well-known member
Joined
Jan 13, 2013
Messages
550
Location
Copalis Beach, WA
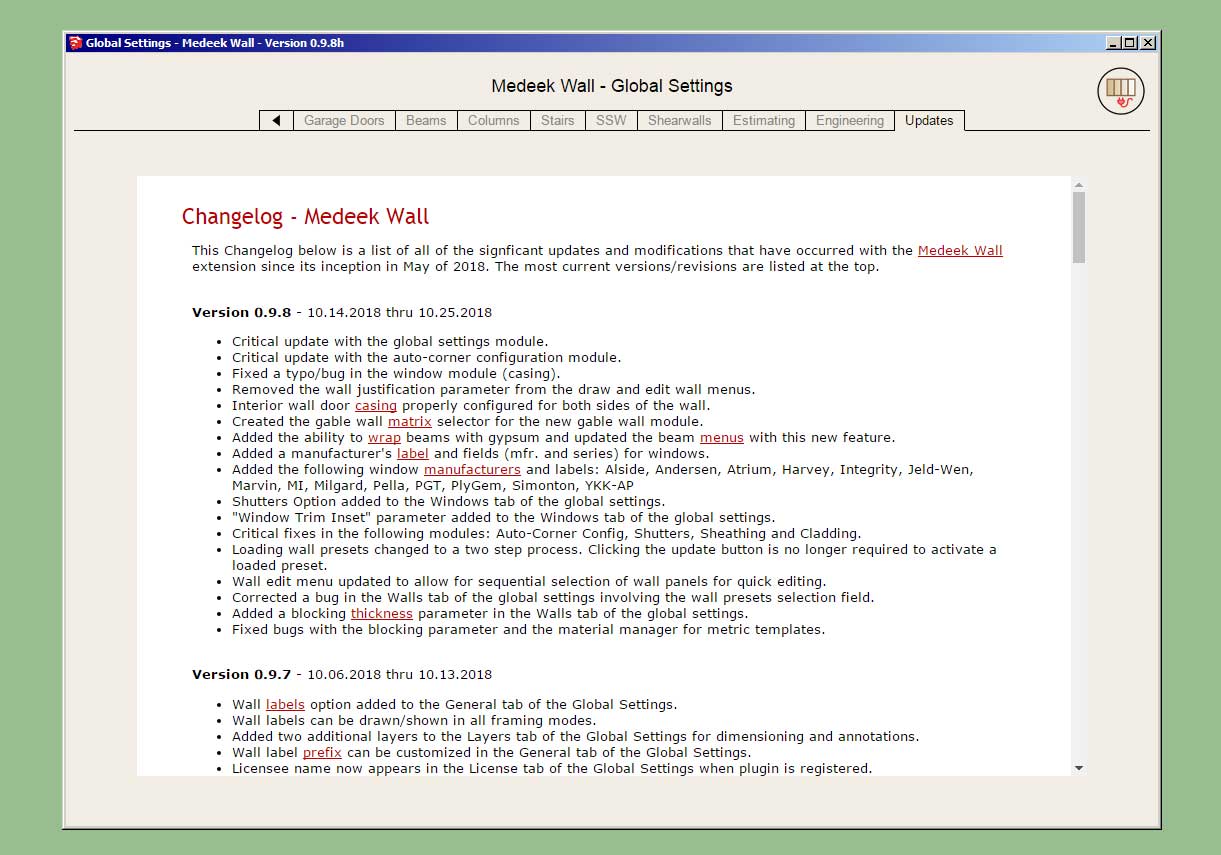
Version 0.9.8 - 10.14.2018
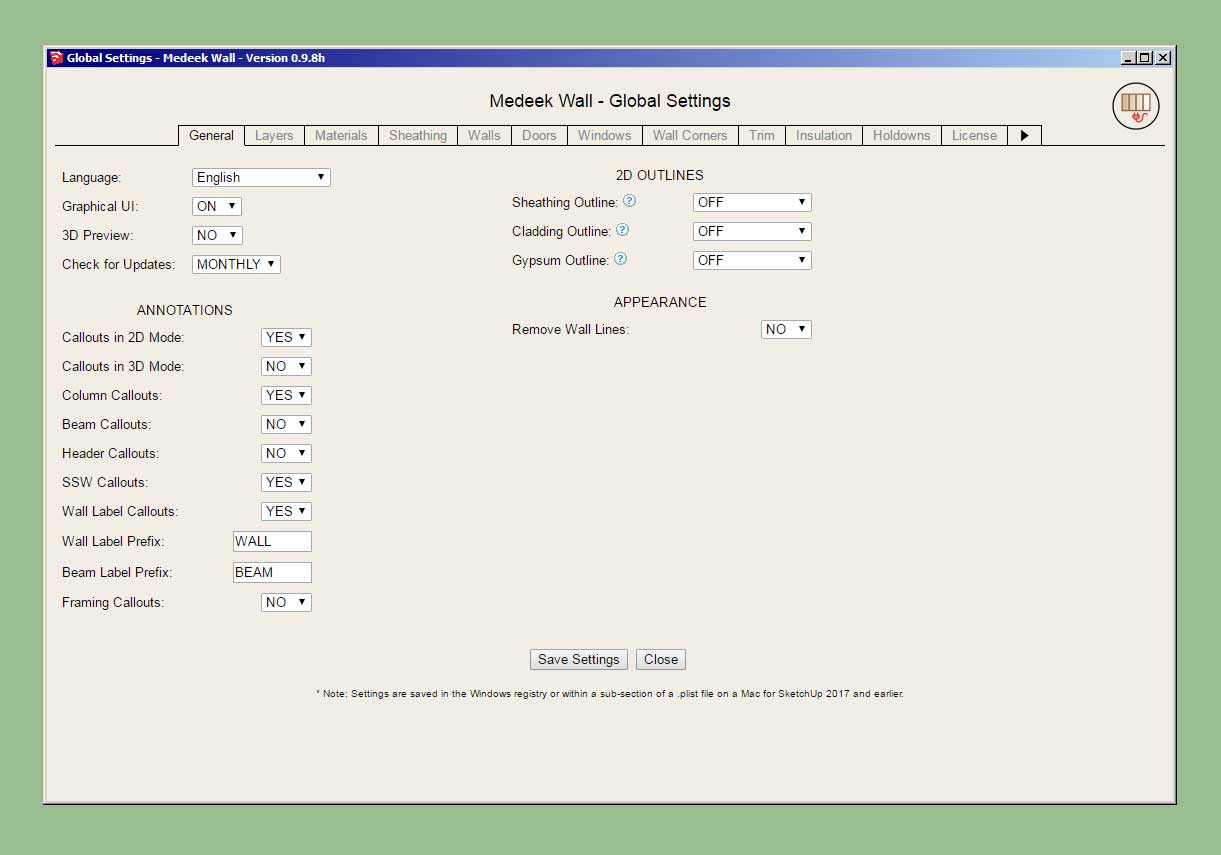
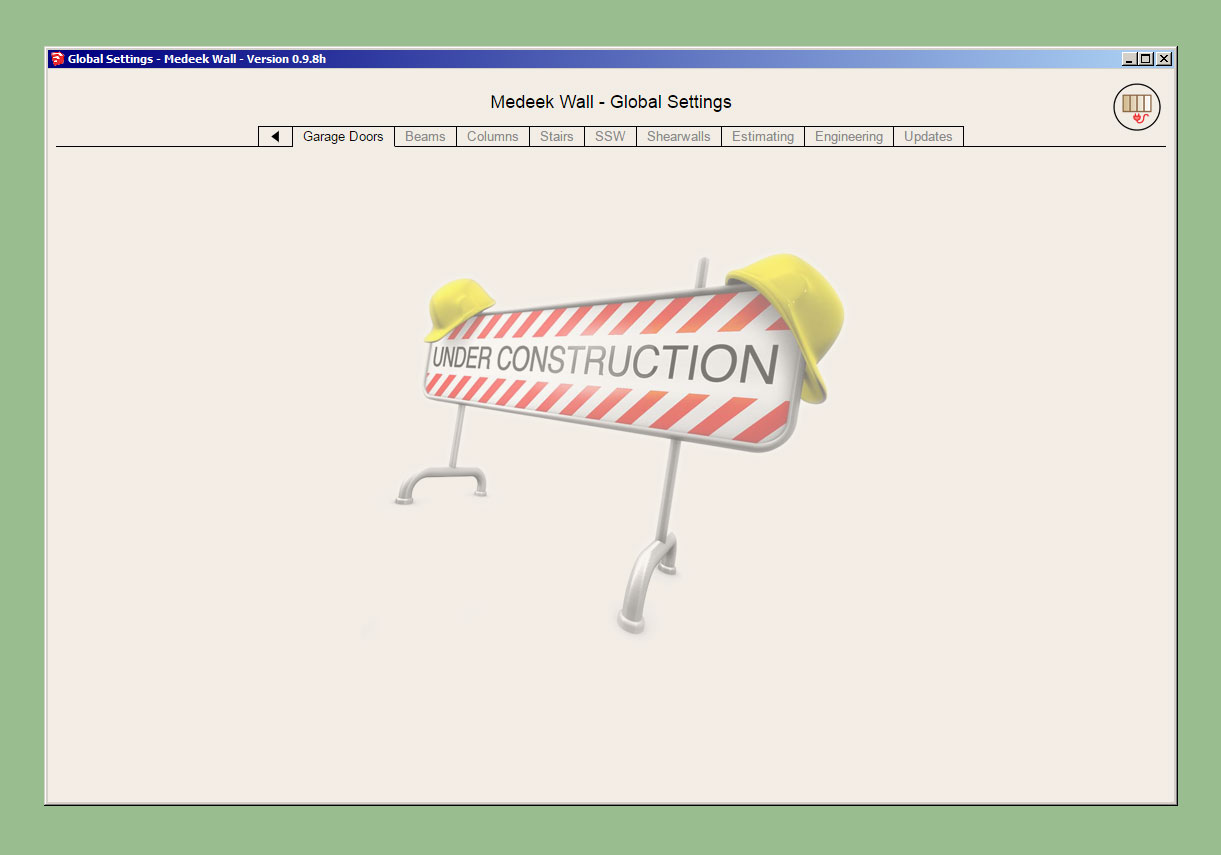
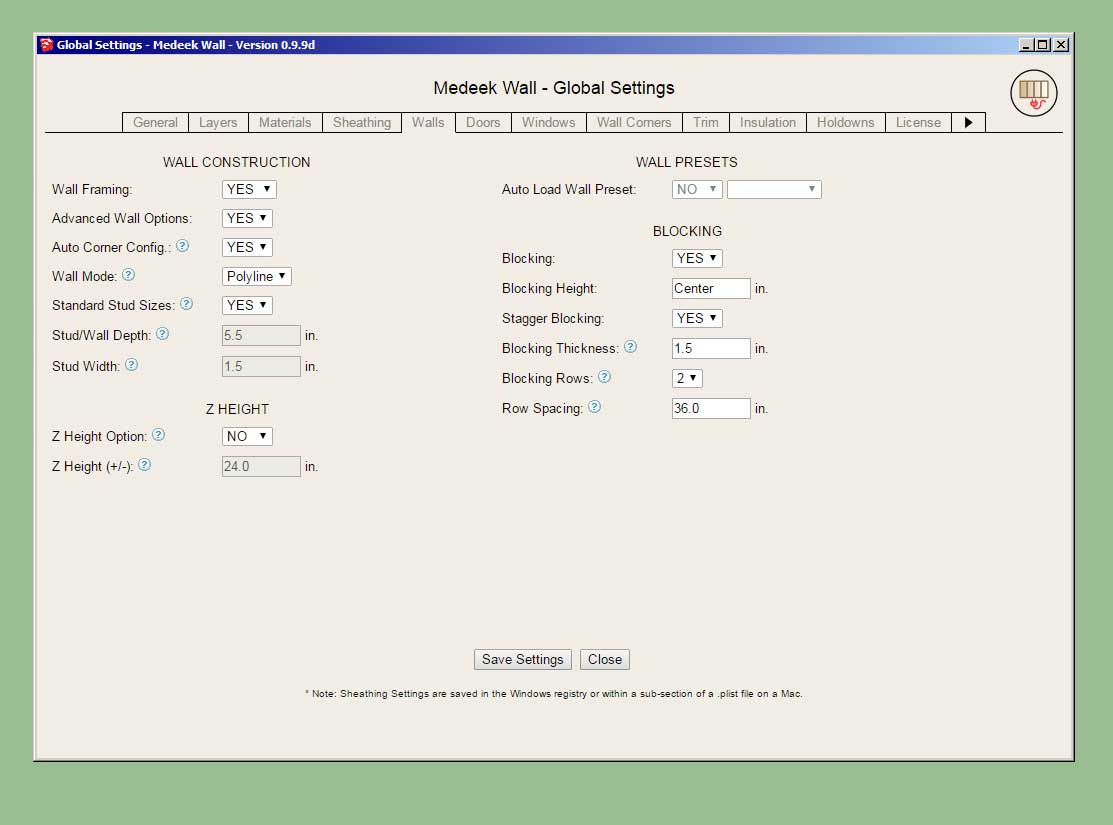
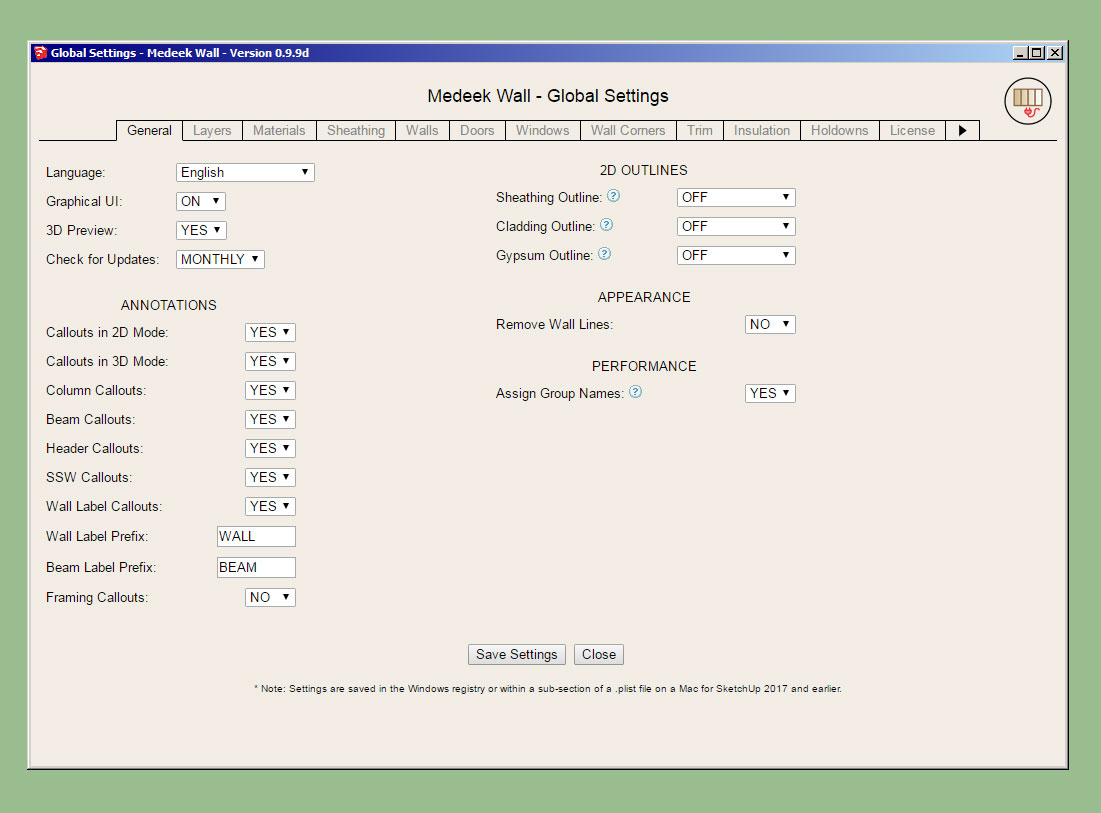
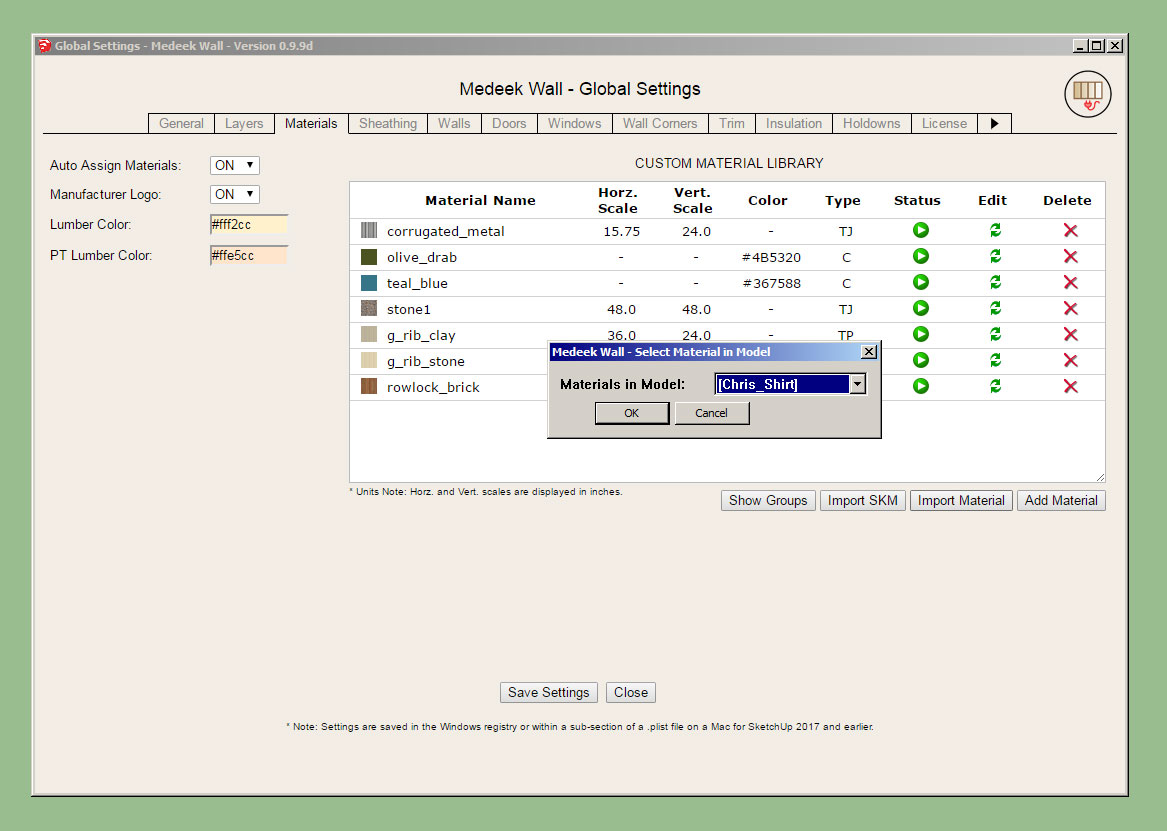
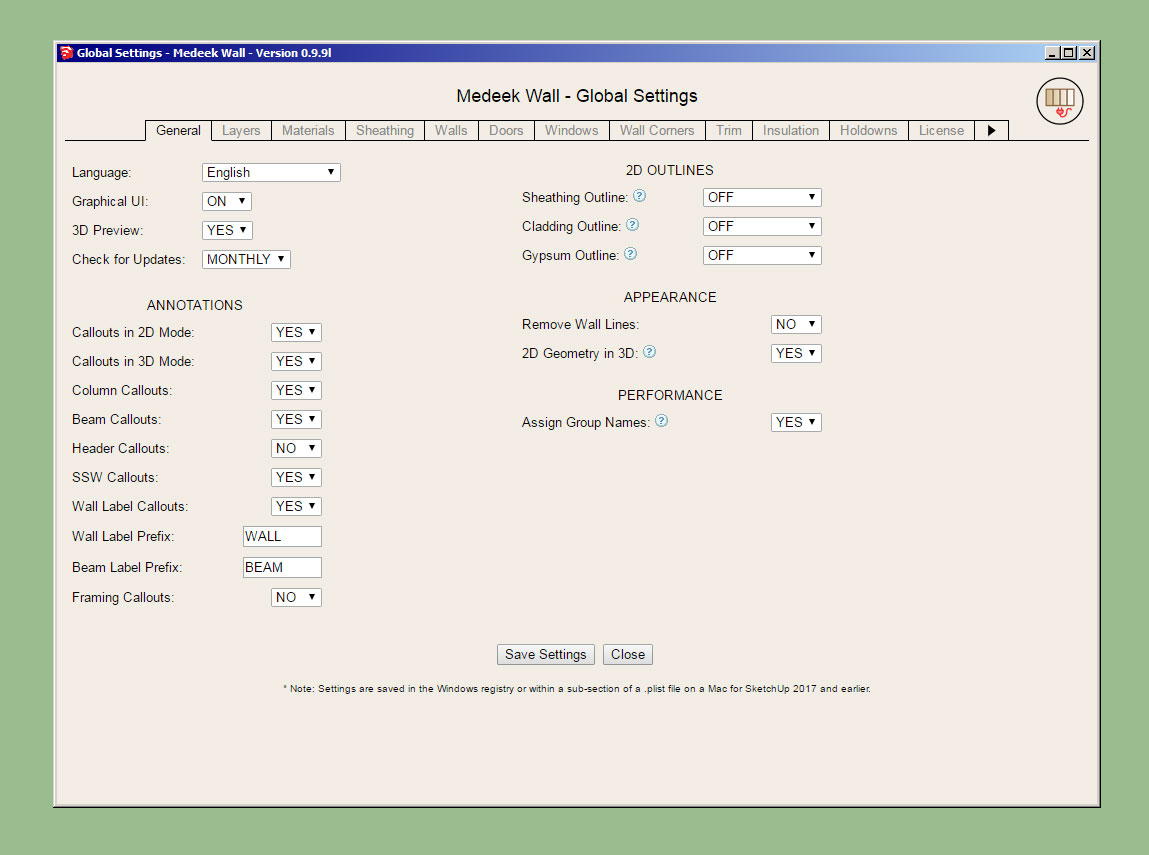
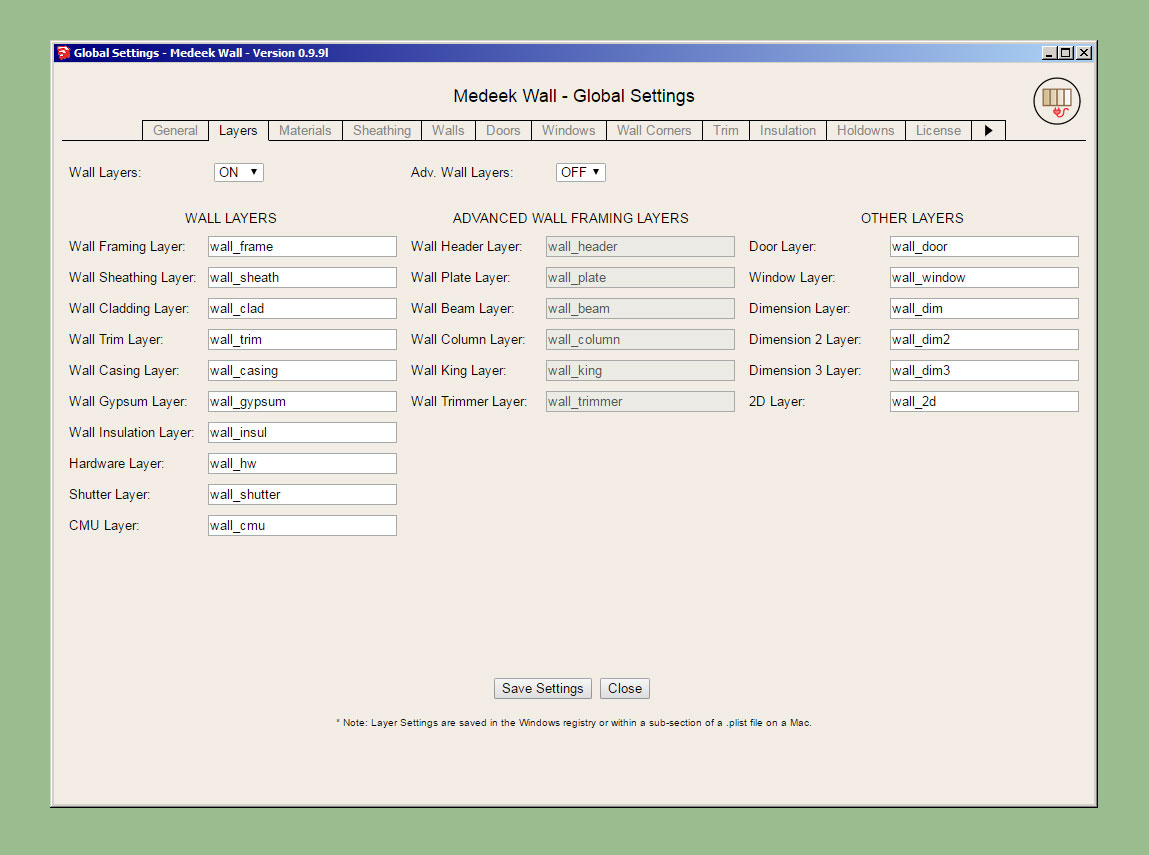
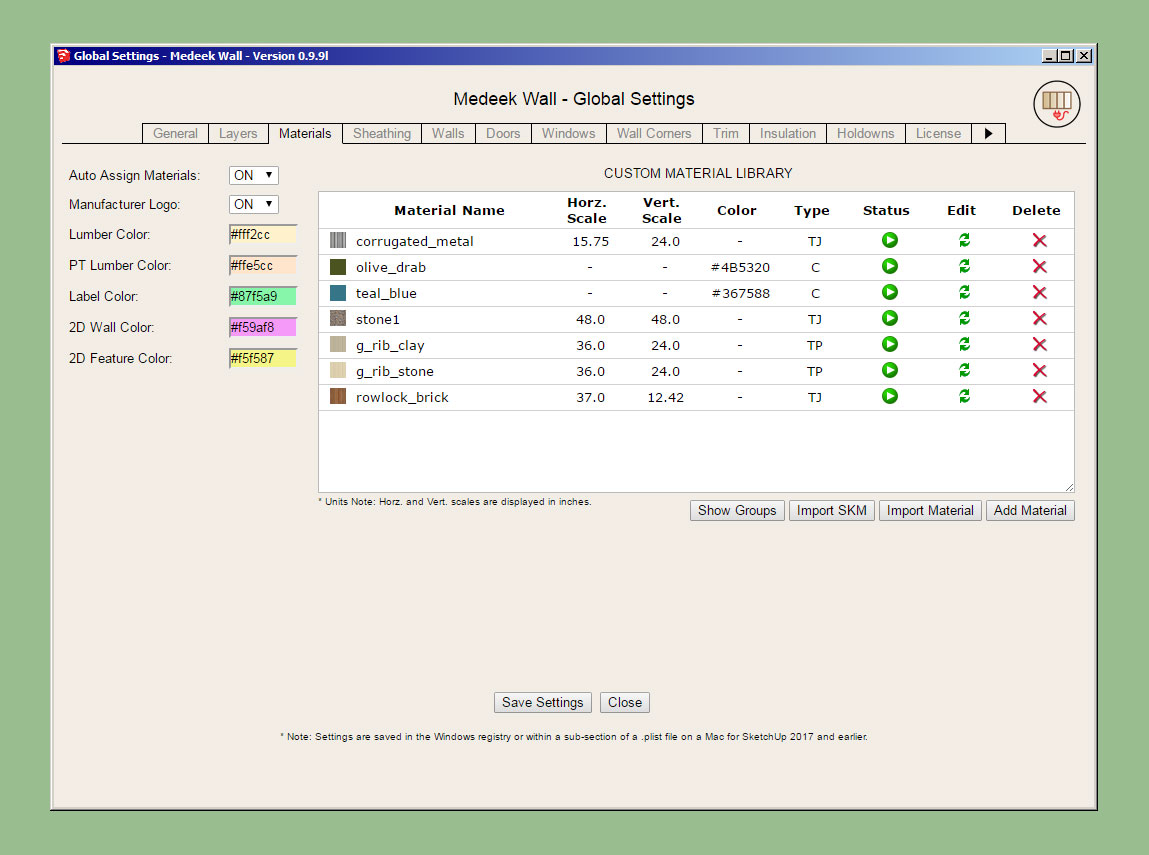
- Critical update with the global settings module.
- Critical update with the auto-corner configuration module.

I noticed an error that seemed to be common across a number of users and after digging down through the code I think I unearthed the bug that was causing this error. This error was actually caused by a recent change in the code where I was attempting to improve the performance for larger models (0.9.6).

I believe this fix should address the bug and also augment the performance for large modules. Sometimes when you try to fix things you break things but in the end it will all work out.
 
To avoid these ads, REGISTER NOW!
OP
M

Medeek

Well-known member
Joined
Jan 13, 2013
Messages
550
Location
Copalis Beach, WA
Version 2.2.2 - 10.14.2018
- Name of plugin changed to "Medeek Truss".
- Updated the licensing system to include a 30 day limit of the trial version.
- Updates to the HTML pages of the global settings.

This next week I plan on returning to the multi-pitch hip roof and start back up where I left off a few months ago. I am also going to be adding in the custom material manager so that the truss plugin has the same capabilities as the wall plugin.

After that the next big push is to make all of the rafter roofs parametric with HTML based edit menus similar to the common truss edit menu.

While all this is going on I would also like to complete the stair module of the wall plugin. A lot of things to juggle right now.
 
OP
M

Medeek

Well-known member
Joined
Jan 13, 2013
Messages
550
Location
Copalis Beach, WA
Version 0.9.8b - 10.15.2018
- Fixed a typo/bug in the window module (casing).

This bug was only an issue in imperial templates and when you enabled casing but not ext. trim.
 
OP
M

Medeek

Well-known member
Joined
Jan 13, 2013
Messages
550
Location
Copalis Beach, WA
Wall Presets often seem to be confusing many of our designers so I've put together a short video trying to clarify some of this functionality and possible quirks that users should be aware of:

 
OP
M

Medeek

Well-known member
Joined
Jan 13, 2013
Messages
550
Location
Copalis Beach, WA
Here is a first look at the gable wall matrix:

wall_su239_800.jpg


The rabbit hole is going to get really deep. I am initially concentrating on the standard gable wall and then onto the shed wall.

Some of these wall types will also require a mirrored version (just another parameter in the wall menus).

Note, that a triangular wall is nothing more than a degenerate gable wall where the wall height is zero at the start and end of the wall. A shed wall with the lower wall set to zero height is a right triangle. The same sort of logic can be applied to all the other various wall heights shown.

Things get a little interesting when you start moving these type of walls or walls that are adjacent to these walls (attached at the corners). Each wall type may require its own special auto-corner configuration algorithms. As long as I keep things modular all of this complexity shouldn't be too big of a problem.
 
OP
M

Medeek

Well-known member
Joined
Jan 13, 2013
Messages
550
Location
Copalis Beach, WA
Version 0.9.8d - 10.18.2018
- Created the gable wall matrix selector for the new gable wall module.
- Added the ability to wrap beams with gypsum and updated the beam menus with this new feature.

wall_su240_800.jpg


wall_su241_800.jpg


Note that the material used to wrap the beams can be chosen from the custom materials so technically any material can utilized.

The start offset and end offset allow the designer to pull back the wrap any specified amount to allow for beam pocketing or in the case where the beam extends beyond the wall to the exterior of the building.

The wrap covers the sides and bottom of the beam. Thickness can also be specified as shown above.
 
OP
M

Medeek

Well-known member
Joined
Jan 13, 2013
Messages
550
Location
Copalis Beach, WA
This screenshot shows an application where the gypsum offset comes into play:

wall_su242_800.jpg


Note the 18" offset from the end of the beam. Also note the use of the miter cut and the notching out of the gypsum, sheathing and cladding (advanced options for the column with beam pocket).

Surprisingly there is quite a lot going on here even though the geometry looks relatively simple.
 
OP
M

Medeek

Well-known member
Joined
Jan 13, 2013
Messages
550
Location
Copalis Beach, WA
Per user requests I've enabled an additional parameter for windows so that you can assign a manufacturer to the installed windows (door also coming soon). Note that the window geometry itself is not manufacturer specific but is controlled by the users preferences.

In the near future I will also be creating a window and door preset feature so various options can be pre-configured.

If manufacturer's logos are enabled in the Material tab of the Global Settings and a manufacturer is assigned then the plugin will affix a label to the window in order to quickly and easily identify the window manufacturer:

wall_su244_800.jpg


wall_su243_800.jpg


The label is actually its own group/face on the dimension 3 layer and can be toggled by turning this layer on or off.

In the future it might be useful to enable a tool that allows one to switch all of the windows and door from one manufacturer to another with the single click of a button. If a cost database is setup for the various manufacturers then the estimating module can create comparative cost estimates depending on the manufacture of the fenestration.

I've initially added the following manufacturers/brands:

Pella, Milgard, Marvin, Integrity, Plygem, and Andersen

The label is constrained to a square 8"x8" and offsets the window glass by 0.125 so that it does not z-fight with the window glass.

Please send me any window and door manufacturers that you would like to see added to the plugin.
 
OP
M

Medeek

Well-known member
Joined
Jan 13, 2013
Messages
550
Location
Copalis Beach, WA
Version 0.9.8e - 10.21.2018
- Added a manufacturer's label and fields (mfr. and series) for windows.
- Added the following window manufacturers and labels: Alside, Andersen, Atrium, Harvey, Integrity, Jeld-Wen, Marvin, MI, Milgard, Pella, PGT, PlyGem, Simonton, YKK-AP
- Shutters Option added to the Windows tab of the global settings.
- "Window Trim Inset" parameter added to the Windows tab of the global settings.

The Window Trim Inset parameter allows the trim to be brought right up against the window. Previously the trim around the window was flush with the framed opening however since the window is typically 1/2" less in overall size than the framed opening this left a 1/4" gap all the way around the window.

The default value for the inset parameter is 1/4" so that the trim butts right up to the window frame. This parameter can be set to a positive or negative value. If the parameter is set to zero then the trim will be flush with the framed opening.

The shutter option parameter allows one to set the default behavior of this advanced option for the window draw tool.

The manufacturer series parameter has been added however I have not yet added all the series for each manufacturer. I will be contacting each manufacturer and inquiring which of their window series should be added to the plugin.
 
OP
M

Medeek

Well-known member
Joined
Jan 13, 2013
Messages
550
Location
Copalis Beach, WA
Version 0.9.8f - 10.23.2018
- Critical fixes in the following modules: Auto-Corner Config, Shutters, Sheathing and Cladding.
- Loading wall presets changed to a two step process. Clicking the update button is no longer required to activate a loaded preset.
- Wall edit menu updated to allow for sequential selection of wall panels for quick editing.

There are even more minor fixes that are too numerous to list.

The wall edit menu update should be a welcome fix. If you are right clicking on each wall to edit them then each time you right click and "Edit Assembly" the wall settings will appear in the edit menu for that wall. Previously a separate window would open up for each wall panel but only the last edit window actually worked. This resolves that issue and makes it more intuitive and robust.

If you are using the edit icon to edit walls this is even a quicker method of selecting and editing walls. After you select a wall the tool remains active and you can continue to select and update walls by clicking on your target wall panels. To terminate the tool, close the edit menu and hit the space bar.

Both methods of editing are now faster and much more intuitive and robust.
 
OP
M

Medeek

Well-known member
Joined
Jan 13, 2013
Messages
550
Location
Copalis Beach, WA
Version 0.9.8g - 10.24.2018
- Corrected a bug in the Walls tab of the global settings involving the wall presets selection field.
- Added a blocking thickness parameter in the Walls tab of the global settings.

wall_su247_800.jpg


This particular bug in the Walls tab only became an issue when a previously selected default preset was deleted and then the user navigated to the Walls tab after the deletion.

Now the javascript checks first for the existence of the default preset before trying to assign it in the drop down menu.

Not a really big issue but in a certain state it will lock up the form and not allow the user to save their settings.

The blocking thickness parameter was a quick item to add per a user request. Note that this is a global default and cannot currently be adjusted per wall panel. If we need more granularity I can do that but it means an additional parameter in the attribute library of the wall panel which means it will break backward compatibility with previous versions of the plugin.
 
OP
M

Medeek

Well-known member
Joined
Jan 13, 2013
Messages
550
Location
Copalis Beach, WA
As a follow up discussion to the multi-story tutorial I was asked a question by a designer regarding installation of a band board between the two stories as shown below:

wall_su248_800.jpg


To be honest I hadn't tried this before but the band board is provided by the 1st level walls and then its height is actually set such that it is actually above the sheathing, cladding and wall height. It seems this is possible.

On the same token one could use the 2nd story walls to specify the band board and input a negative number to set the band board below the actual wall itself.

In this particular design case, there is more than one way to solve the problem.

The frieze and skirt boards are a little more static, in that they will always be positioned at the top and bottom of cladding respectively.
 
OP
M

Medeek

Well-known member
Joined
Jan 13, 2013
Messages
550
Location
Copalis Beach, WA
Version 2.2.3 - 10.26.2018
- Added a Custom Material Library/Manager in the Materials tab of the Global Settings.
- Enabled custom materials for wall sheathing, wall cladding, roof sheathing and roof cladding in the HTML wall draw and edit menus for common trusses.
- Enabled the ability group materials and control which drop down menu they will appear in.
- Added an SKM file import utility to the Material Library.
- Default wall sheathing and wall cladding materials brought in line with options available in wall plugin.

truss_su360_800.jpg


truss_su359_800.jpg


Note the various wall sheathing options that are brought over from the wall plugin (ie. Tyvek, Zip Systems, Plywood, Densglass etc..)

Also note that the custom and expanded materials selection is only available for common truss shapes (ie. common trusses, scissor trusses etc...). I have not yet implemented the new system for other truss shapes and rafter roofs, that is work for yet another day.

There is still a tremendous amount of work that needs to be done with this plugin. Many of the specialty truss shapes do not even have advanced options available to them yet. All I can do is keep hacking away at it and maybe one day I will have the resources to really push this thing along.
 
OP
M

Medeek

Well-known member
Joined
Jan 13, 2013
Messages
550
Location
Copalis Beach, WA
The next release of the plugin will have an arrow as shown to the right of the tabs in the global settings which will take the user to the next set of tabs:

wall_su249_800.jpg


Currently there are nine new tabs planned, most of which will have an under construction sign until I fully flesh them out:

wall_su250_800.jpg


The Updates tab will display the current changlog which is paralleled on the website as well.

wall_su251_800.jpg


Clicking the left arrow will return the user back to the first set of tabs.

If required an additional right arrow can be added to the second set of tabs taking the user to the third set of tabs.

In total there are 12 tabs in the first set and 9 tabs in the second set, for a total of 21 tabs in the global settings.
 
OP
M

Medeek

Well-known member
Joined
Jan 13, 2013
Messages
550
Location
Copalis Beach, WA
Version 0.9.8i - 10.28.2018
- The following tabs added to the global settings: Garage Doors, Beams, Columns, Stairs, SSW, Shearwalls, Estimating, Engineering and Updates.
- Enabled custom materials for gypsum in the HTML wall draw and edit menus.
- Felt + OSB material added to the pre-installed plugin materials.

wall_su252_800.jpg


Felt + OSB is similar to Tyvek + OSB where the outer face of the OSB has the felt material applied.

The felt material application depicts a typical 36" roll with 2" of overlap.

The change to the way I'm handling the gypsum material is a significant upgrade and allows for usage of custom materials from the material library within the global settings.
 
OP
M

Medeek

Well-known member
Joined
Jan 13, 2013
Messages
550
Location
Copalis Beach, WA
The current Wall Plugin ToDo list as of 10/29/2018:

1.) Gable Walls (Standard and Shed) [in progress]
2.) Stair Module (straight run then landings and complex shapes) [in progress]
3.) Estimating [in progress]
4.) Adv. Gypsum (multi-layer gypsum both sides of int. walls)
5.) Custom width of king and trimmer studs for doors, windows and garage doors.
6.) Transom windows above doors (rectangle and arch)
7.) Additional door types (bifold, sliding glass, pocket doors)
8.) Join/Split Wall Tools
9.) Wall Stretch Tool
10.) Wall Grouping
11.) Wall Dropper
12.) Engineering
13.) Levels/Stories Manager
14.) Interior painting of gypsum
15.) Wall justification in draw wall tool.
16.) Gypsum backer studs at tee intersections
17.) Interior Trim (crown molding, baseboard, chair rails, wainscoting)
18.) Global Settings (8 new tabs) [in progress]
19.) Shear Wall Module

Some of these are extremely high priority and some of these are much lower on the list.
 
OP
M

Medeek

Well-known member
Joined
Jan 13, 2013
Messages
550
Location
Copalis Beach, WA
Version 0.9.9 - 10.30.2018
- Enabled custom window header and trimmer widths within draw and edit menus.
- Added king and trimmer width parameters to Windows tab of global settings.
- Fixed a bug with insulation positioned above windows where trimmer quantity is greater than one.

wall_su255_800.jpg


This addition was per customer request. I will probably add the same two additional parameters for doors and garage doors in the very near future.
 
OP
M

Medeek

Well-known member
Joined
Jan 13, 2013
Messages
550
Location
Copalis Beach, WA
I'm trying to simulate a G-rib metal wall panel here (clay and stone color):

wall_su256_800.jpg


The problem of course is that the shadow will be cast a certain direction on the original texture/image but when you render it out the light source may be the opposing direction which will make things look a bit off.

Modeling the actual texture/profile of the panel is not a good idea either since it would make the model very heavy.

Thoughts?

View model here:

https://3dwarehouse.sketchup.com/model/6e963b76-13f4-4632-aef0-dec78588f019/G-Rib-Wall-Panels
 
To avoid these ads, REGISTER NOW!
OP
M

Medeek

Well-known member
Joined
Jan 13, 2013
Messages
550
Location
Copalis Beach, WA
Version 0.9.9b - 10.31.2018
- Enabled built-up headers within the window draw and edit menus: None, Top, Bottom or Both.
- Added the built-up header parameter to the Windows tab of the global settings.

wall_su257_800.jpg


The window to the left is a good example for where the top plate is not needed, just the bottom plate. as the header butts up directly against the top plate of the wall.

The window to the right is set lower in the wall and requires both top and bottom plate as shown.

The built-up header parameter allows four options: None, Top, Bottom or both. The default behavior can also be set in the global settings.

As with the custom widths on the trimmers and kings I am test bedding this with the windows first, once everyone has had a chance to work this through a bit I will roll it out for doors and garage doors.
 
OP
M

Medeek

Well-known member
Joined
Jan 13, 2013
Messages
550
Location
Copalis Beach, WA
This is an example of metal roof and wall cladding (utilizing the Material Manager in both the Truss and Wall plugins):

wall_su259_800.jpg


wall_su260_800.jpg


wall_su261_800.jpg


View model here:

https://3dwarehouse.sketchup.com/model/dbab0b27-58c2-41f8-86a2-441544a2b939/Metal-Siding-Test

The model was created with all three plugins. The only manual edit was moving the person outside of the structure and re-positioning of two anchor bolts that landed in the middle of the garage door. The entire model except for the foundation (slab-on-grade) is fully parametric, moving openings or changing the roof pitch is a couple clicks of the mouse. Model creation time was about 10 minutes.

As far as speed of modeling goes I think this is starting to close in on other design packages like Revit and Chief Architect. Once I add the estimating and then the engineering it will even exceed their capabilities.
 
OP
M

Medeek

Well-known member
Joined
Jan 13, 2013
Messages
550
Location
Copalis Beach, WA
Version 2.2.4 - 11.02.2018
- Enabled wall sheathing, wall cladding, ceiling gypsum and roof cladding for monopitch trusses.
- Enabled gutters and downspouts for monopitch trusses.
- Enabled the "Edit Truss Assembly" function for all monopitch trusses (imperial and metric units).

truss_su364_800.jpg


I still need to add a few more advanced options to the monopitch truss type:

- Roof Returns
- Battens
- Soffit Cut
- Heel Blocking

I'm also thinking about adding an insulation option for the ceiling for trusses and rafter roofs so that the truss plugin is up to speed with the wall plugin. Some additional feedback in this regard would be helpful.

With monopitch trusses there is also the issue where the exterior wall corner is created by the truss and hence I need to apply some corner trim on these corners. I will give this some more thought.
 
OP
M

Medeek

Well-known member
Joined
Jan 13, 2013
Messages
550
Location
Copalis Beach, WA
A whole different area I really haven't explored yet is fixtures (and furniture).

Technically this is a very broad topic and could really use an entirely different plugin to do it justice.

However, I will add in a toolbar called "Fixtures" which will allow the user to select from a matrix of options (Bath, Bedroom, Kitchen etc...) and then to select from some standard layouts.

For bathrooms the layout below (Layout A) is very typical in the US for many mid-range homes:

wall_su262_800.jpg


An 8'x5' bathroom with a sink, toilet and tub.

The idea being that the user can quickly generate any standard layout from a library of components. I will probably include a few default (low poly) components however it will be up to the user to drop their own preferred components into the plugin sub-folders if they want to be able to select from them in the drop down menus.

I don't want to include a large number of high poly count components in the plugin because is will make the .rbz file too large and cumbersome. Besides there are vast libraries of manufacturer components available in the 3D warehouse.

The cool thing about integrating this within the plugin suite is that it will then be possible to obtain counts for estimating purposes on many of these fixtures and assign prices etc...

The Edit menu will allow the user to swap out any of the components and also custom position them as required.

For this particular bathroom layout (and most layouts in general) there is a left and right hand orientation. The user will be able to select the orientation in the draw and/or edit menu. The first mouse click will establish the insertion point the second click will establish the rotation. Clicking the shift key will toggle orientation (left or right).

Some fixtures such as the bath tub shown come in a left and right version. It will be up to the user to upload both versions for use however I will include an additional parameter (rotation: 0 or 180) so that orientation can be controlled.

wall_su263_800.jpg


With this new module I will start with bathrooms first and then branch into other rooms as the need arises.
 
OP
M

Medeek

Well-known member
Joined
Jan 13, 2013
Messages
550
Location
Copalis Beach, WA
Version 0.9.9d - 11.07.2018
- Added a material parameter for ext. wainscot ledges.
- Added toolbar icons for "Fixtures" module.

wall_su265_800.jpg


wall_su264_800.jpg


This extra parameter was added per customer request.

This will allow the designer to setup a texture/material for rowlock brick.
 
OP
M

Medeek

Well-known member
Joined
Jan 13, 2013
Messages
550
Location
Copalis Beach, WA
Version 2.2.4b - 11.08.2018
- Licensee name now appears in the License tab of the Global Settings when plugin is registered.
- Removed all advertising banners from the global settings.

Even though this may appear to be a minor revision it is actually a critical fix/upgrade for users running on Mac and Windows 10.

The advertising banners would only load intermittently and hence would cause the HTML menus to not render (blank white browser window). After giving this some more thought and deciding that the advertising revenue generated by the plugin was not a significant amount, and a less cluttered look is always more appealing, it just made more sense to remove all of it completely.

I've also updated the license tab to be up to date with the Wall plugin's license tab.

This same issue with the advertising banners in the global settings also plagues the Wall plugin. I will be issuing a new revision for it in short order, that strips the advertising from the plugin. I appreciate everyone's patience in this regard.
 
OP
M

Medeek

Well-known member
Joined
Jan 13, 2013
Messages
550
Location
Copalis Beach, WA
Version 0.9.9f - 11.08.2018
- Added two additional parameters for mid-span blocking to enable multiple rows of blocking in a wall panel.
- Added two parameters (number of rows, row spacing) for blocking into the Walls tab of the global settings.

wall_su268_800.jpg


wall_su269_800.jpg


There may be an issue with previously created wall presets due to the addition of more parameters to the wall panel dictionary module. The number of parameters now stored for a preset is 97.

I am also wondering if anyone would be interested in having me publish the attribute library for the wall panels. This would allow other developers to potentially access and modify the Medeek wall panels with their own plugins or have their plugins interact with the Wall plugin.
 
OP
M

Medeek

Well-known member
Joined
Jan 13, 2013
Messages
550
Location
Copalis Beach, WA
Version 0.9.9i - 11.10.2018
- Added angle iron (L) beams to the beam module.
- Added fillet radiuses to wide flange (W) and universal (UB) beams.

wall_su272_800.jpg


Nine different beam types with two series of wide flange beams (W and UB).

wall_su273_800.jpg


Aside from residential structures one could also use the beam module to create various structural steel assemblies, however that is not really the purpose or target audience for this module.

I added the fillets to the wide flange profiles per customer requests. The primary reason for including this information it to better predict and check bolt patterns that are on the web of the beam(s). Fillet radiuses are per the various standards.

I haven't take the time yet to add in the few hundred standard sizes from my steel manual but as time allows I will continue to populate these fields. Also if there is specific requests for sizes or series of beam types I will accommodate those requests.
 
OP
M

Medeek

Well-known member
Joined
Jan 13, 2013
Messages
550
Location
Copalis Beach, WA
Version 0.9.9j - 11.13.2018
- Added the following corner treatments: 3 Stud Solid, 4 Stud Solid, 3 Stud Block, 4 Stud Block, U-Cal
- Enabled a parameter in the General tab of the global settings to toggle the labeling of groups.

wall_su275_800.jpg


I also addressed some minor issues with the way blocking and insulation interact with the corner treatments. Its seems I have that ironed out now and much less likely to generate geometry that clashes.

wall_su277_800.jpg


I don't know how commonly the U-shape California Corner (U-Cal) is used (shown above) but I really like the fact that it offers more nailing surface for ext. trim and siding. I've had a few requests for it as well, so being as it was not too hard to include I added it in. There are now seven possible corner treatments for walls, the other two are California or None.

wall_su274_800.jpg


I typically like to name all of the groups I create within the assemblies however there may be some who do not want this behaviour and so I have made it optional.
 
OP
M

Medeek

Well-known member
Joined
Jan 13, 2013
Messages
550
Location
Copalis Beach, WA
Version 0.9.9k - 11.15.2018
- Added the ability to import materials directly from the model within the Custom Material Libary/Manager in the global settings.
- Provided an additional parameter in the Wall Corners tab of the global settings for setting the thickness of corner blocking (3 and 4 Stud Block corner treatment only).

wall_su278_800.jpg


With this latest update the tutorial on the Material Manager is somewhat out-of-date/obsolete. However the basic functionality has not changed, I've really only added one additional action.

wall_su279_800.jpg


The ability to customize the blocking on these corner treatments was per a request from one of our Australian clients. I've added a tooltip in the global settings to more fully explain the usage of this parameter.

Now back to the big items on the list.
 
OP
M

Medeek

Well-known member
Joined
Jan 13, 2013
Messages
550
Location
Copalis Beach, WA
Per customer request the available sizes of Wide Flange Steel Beams will be increased to the following:

W8x10
W8x13
W8x15
W8x18
W8x21

W10x12
W10x15
W10x17
W10x19

W12x14
W12x16
W12x19
W12x22

W14x22
W14x26
W14x30
W14x34

W16x26
W16x31
W16x36
W16x40

W18x35
W18x40
W18x46
W18x50

W21x44
W21x50
W21x57
W21x62

W24x55
W24x62
W24x68
W24x76
 
OP
M

Medeek

Well-known member
Joined
Jan 13, 2013
Messages
550
Location
Copalis Beach, WA
Version 0.9.9l - 11.16.2018
- Added an option to include 2D wall geometry in 3D modes (Framing, No Framing, CMU).
- Added an additional layer for 2D geometry.
- Added customizable colors for labels, 2D wall geometry, and 2D features (windows, doors, columns etc...)

wall_su280_800.jpg


wall_su281_800.jpg


wall_su282_800.jpg


The custom colors for the labels, and 2D geometry is per a discussion with a client today. Hopefully this upgrade will help facilitate bringing the 2D geometry into layout for creating floor plans.
 
OP
M

Medeek

Well-known member
Joined
Jan 13, 2013
Messages
550
Location
Copalis Beach, WA
First look at the output of the Stair Module:

wall_su283_800.jpg


Note, that only straight runs of stairs will be available for now, however it is possible to create L and U shaped staircases just by combining straight runs as shown and framing in a landing.

View model here:

https://3dwarehouse.sketchup.com/model/610cb4dd-67d7-48f9-aa1c-5c28cc412032/Stair-Test-1

I will probably need one more day to fine tune it completely and finish adding in the hanger board and landing tread advanced options.

Future advanced options will be landings, hand rails, skirt boards etc...

The stringer algorithm is really the core of the module and drives everything else. The logic was not nearly as complex as I initially thought it might be, regardless it was a blast to work through it and turn the math into reality.
 
OP
M

Medeek

Well-known member
Joined
Jan 13, 2013
Messages
550
Location
Copalis Beach, WA
Had to jump through a few hoops to get the materials/textures to all work out correctly but I'm pretty pleased with the way its coming together:

wall_su285_800.jpg


LVL stringers with timber (wood grain) risers and treads.
 
OP
M

Medeek

Well-known member
Joined
Jan 13, 2013
Messages
550
Location
Copalis Beach, WA
Version 0.9.9m - 11.21.2018
- Added the stair module (straight run only) with the following advanced options: thrust block, landing tread, hanger board.

Hanger Board and Landing Tread:

wall_su287_800.jpg


Landing Tread:

wall_su286_800.jpg


There are quite a few options with the stair module so I will need to make another tutorial video explaining the usage of these parameters. I have provided tool tips next to each option in the draw and edit menus to help explain what each is.

A few items with the draw tool:

1.) First select the top of the stairs location and then select a point for the bottom of the stairs. The preview wireframe should be fairly explanatory as to the location and geometry of the stairs that will be created.

2.) Once the first point is selected you can lock to an orthogonal axis (0, 45, 90, 135 deg.) or direction by repeatedly clicking the "Ctrl" key.

3.) Once the first point is selected you can also toggle the placement of the stairs by repeatedly clicking the down arrow. The justification is: Center, Left, or Right.

4.) As with the other HTML draw menus, you update/change your parameters and then click the Update button to make them live. You can leave the menu open while drawing your stairs. Hitting the space bar will exit the tool, hitting the ESC key will reset the tool.

With the draw and edit menus you will notice that for the tread and riser material you also have the option of utilizing materials found in your custom library. The stringer material is limited to certain specific material types (at least for now).

This is a completely new module so I expect there may be some minor issues and additional features that will be requested.

I still need to create the global settings tab for the stairs so that default parameters can be set for each option. However, it is not critical to the function of the module.
 
OP
M

Medeek

Well-known member
Joined
Jan 13, 2013
Messages
550
Location
Copalis Beach, WA
I'm not sure if my scribbling is readable but the bottom diagrams try to explain possible configurations and parameters for the skirt board(s):

STAIR_SKIRT_BOARDS_800.jpg


I think I can reduce the skirt board configuration down to three parameters:

- Terminal Height Top
- Terminal Length Top
- Terminal Height Bottom
 
To avoid these ads, REGISTER NOW!
Top Bottom