To avoid these ads, REGISTER NOW!

Truss Design

OP
M

Medeek

Well-known member
Joined
Jan 13, 2013
Messages
550
Location
Copalis Beach, WA
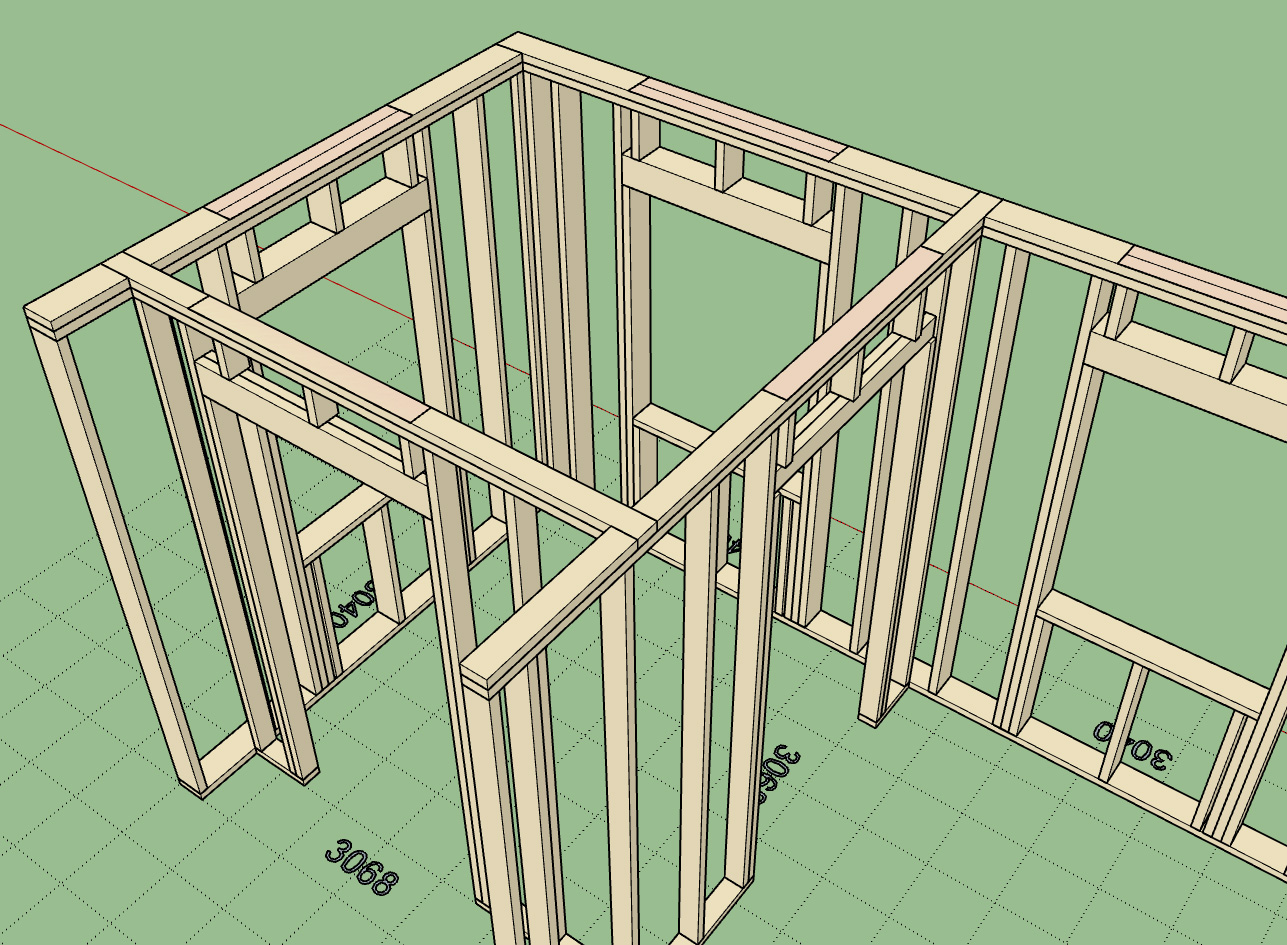
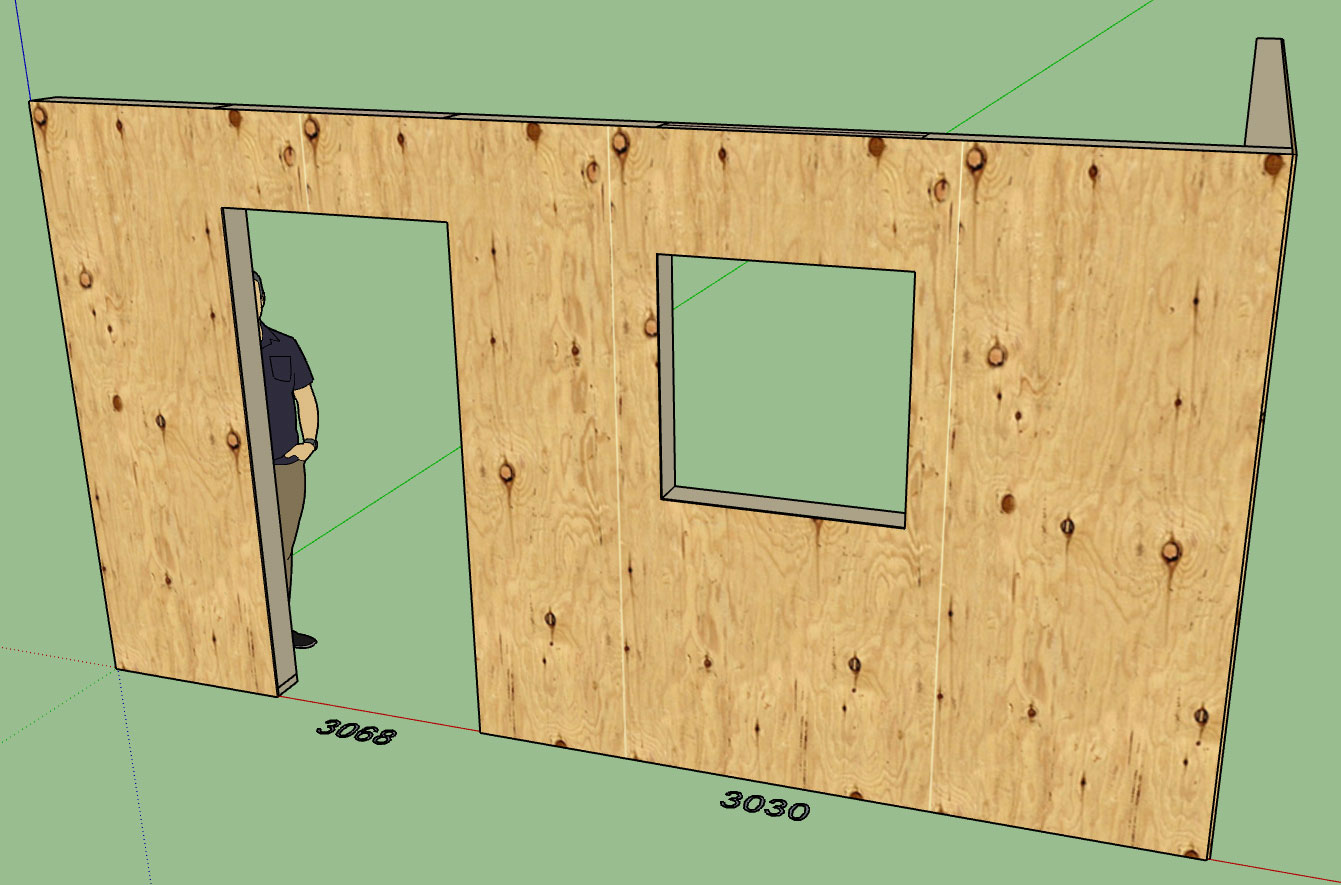
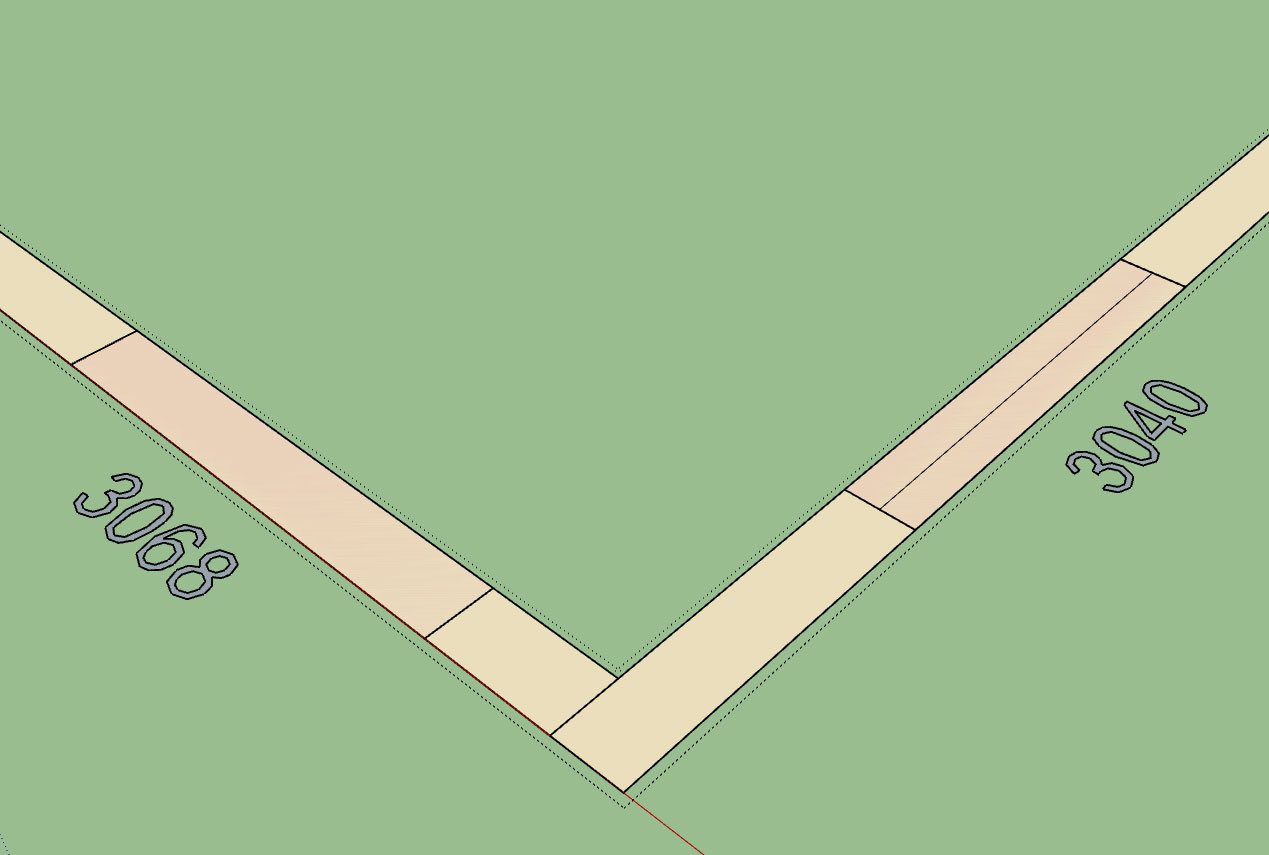
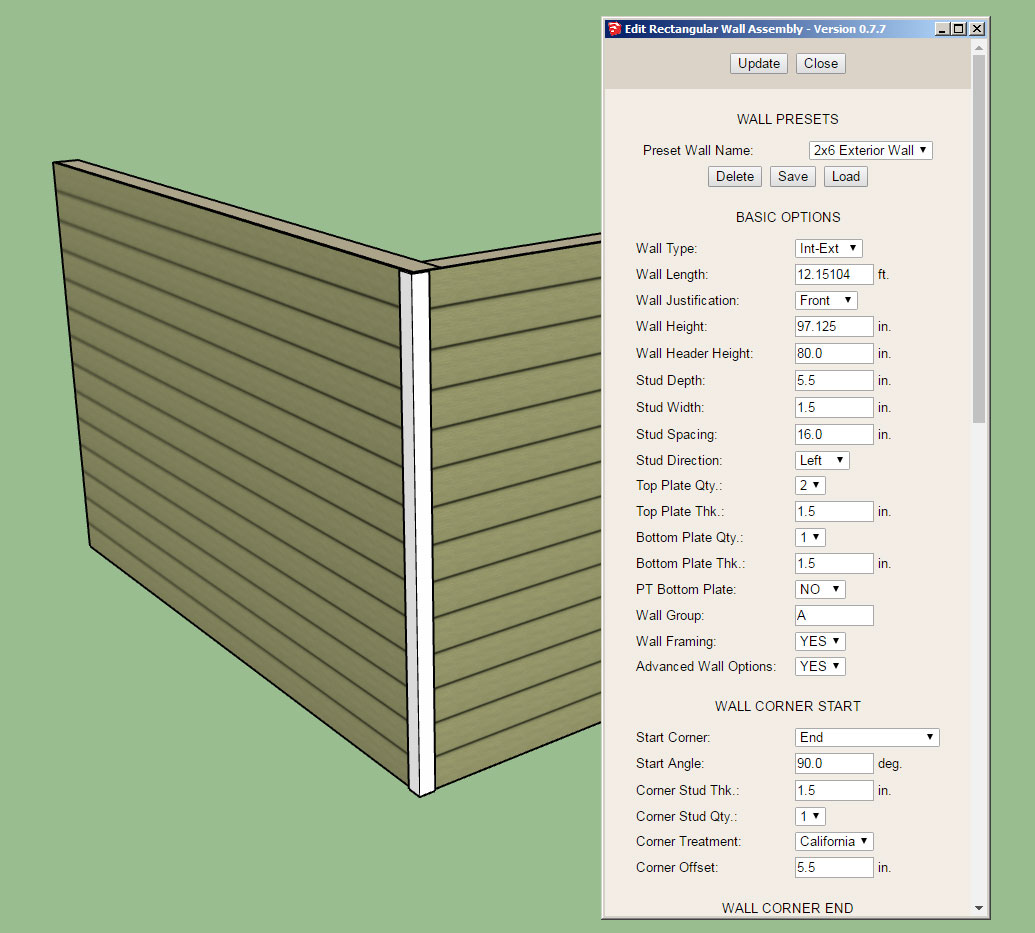
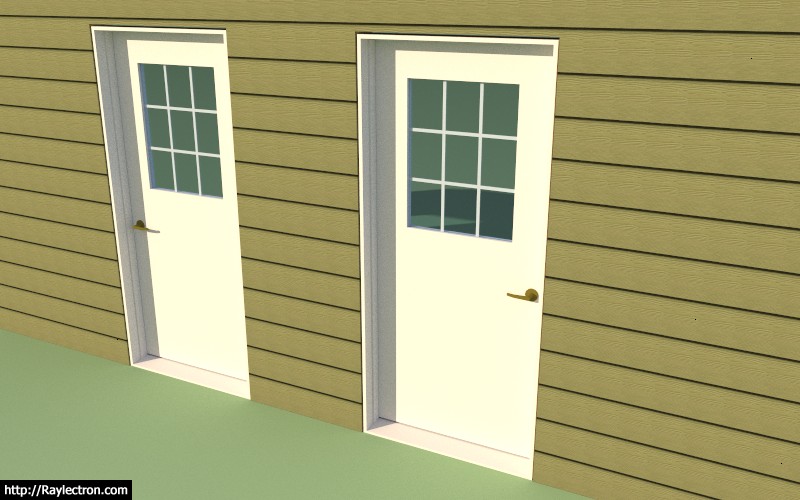
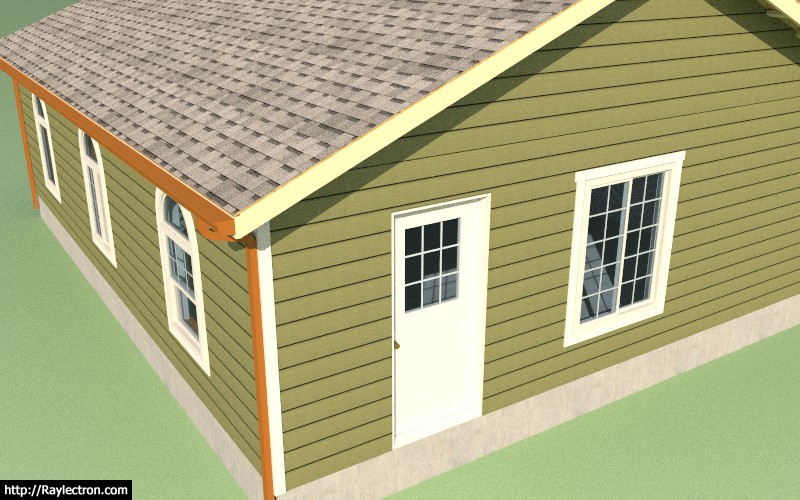
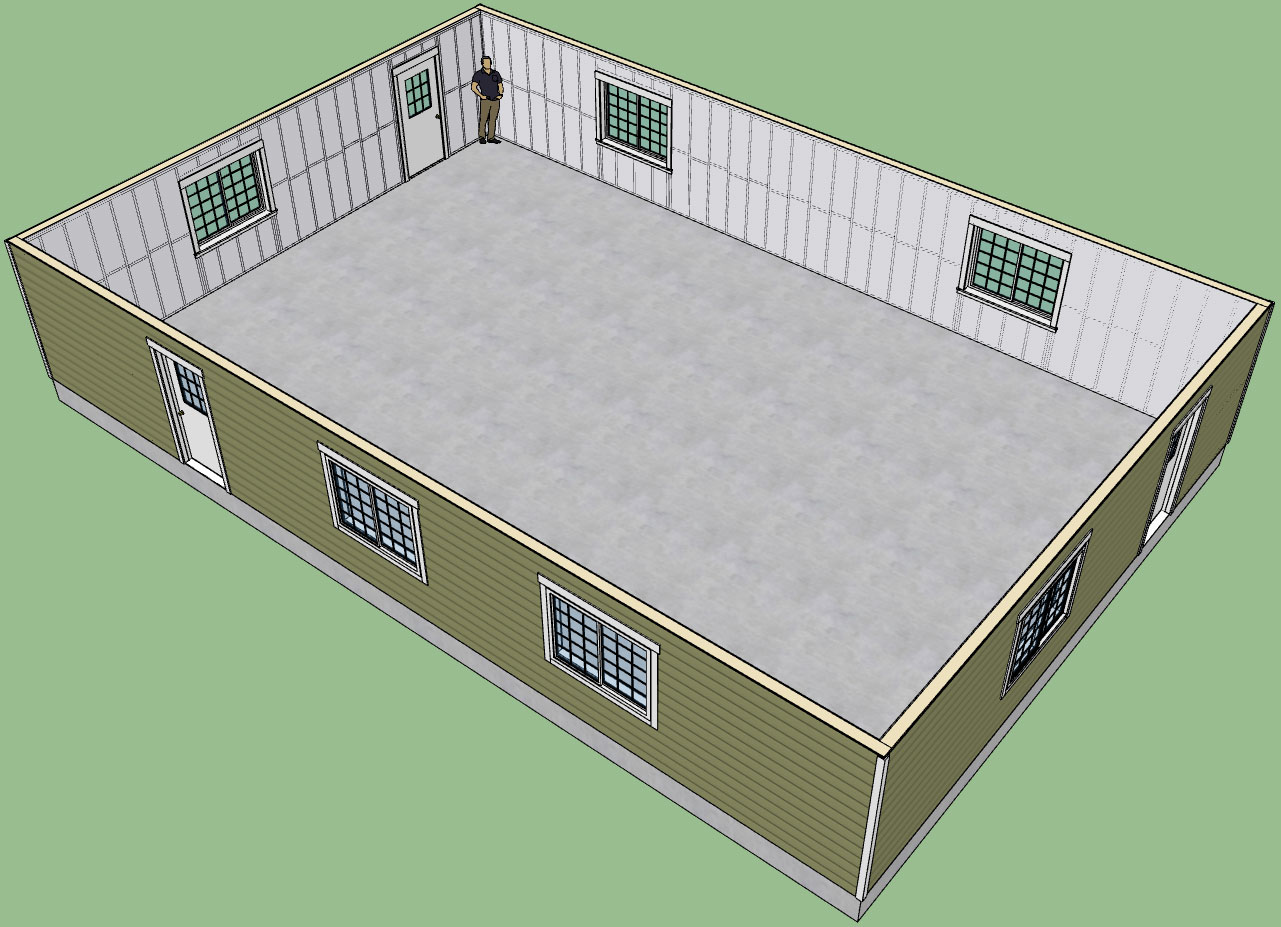
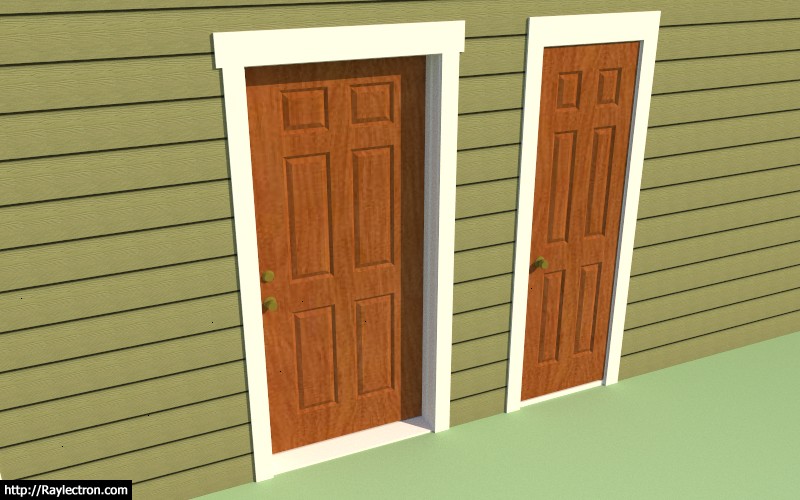
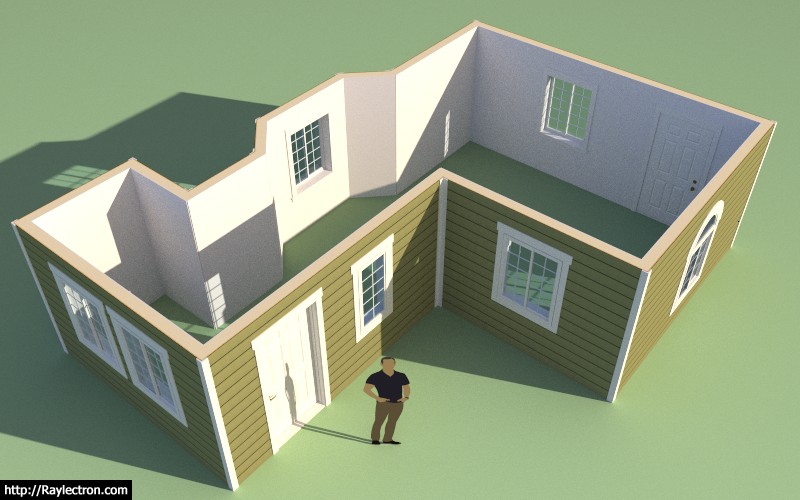
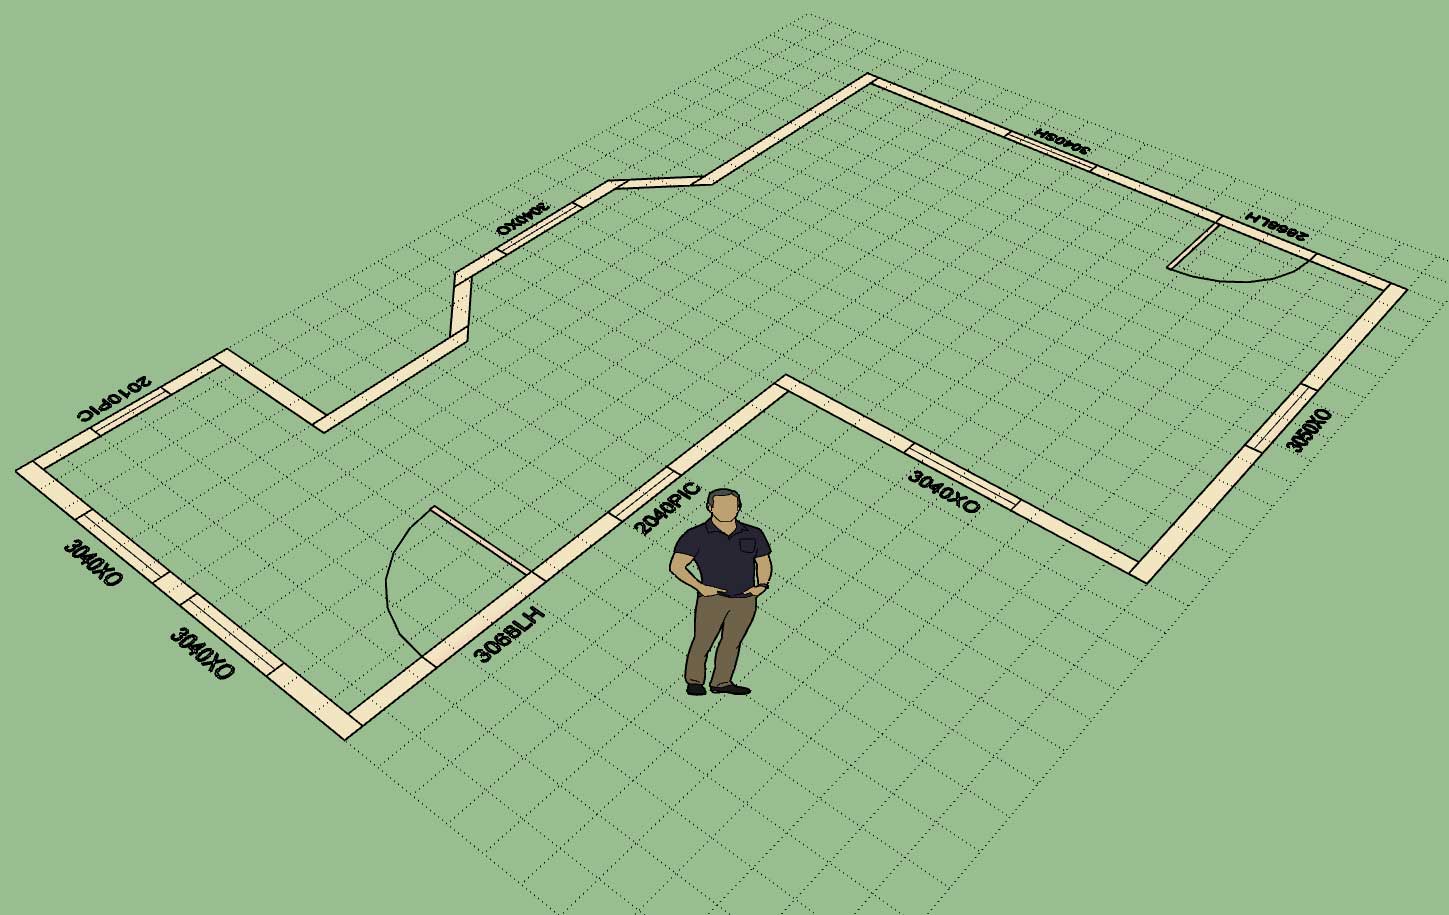
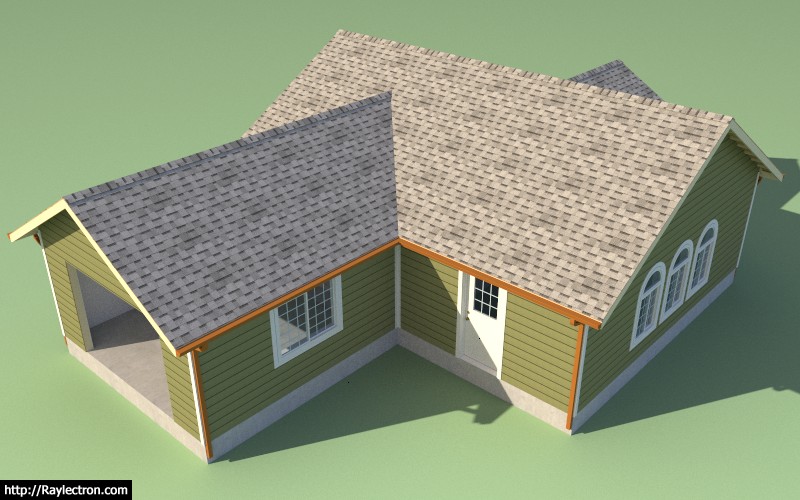
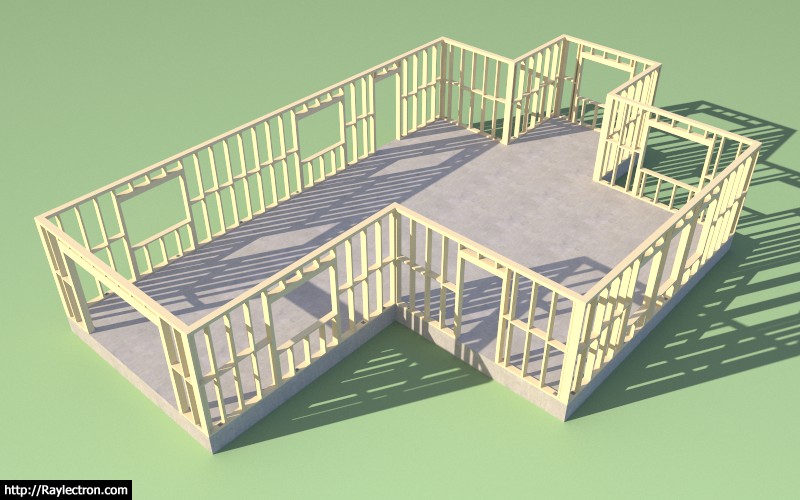
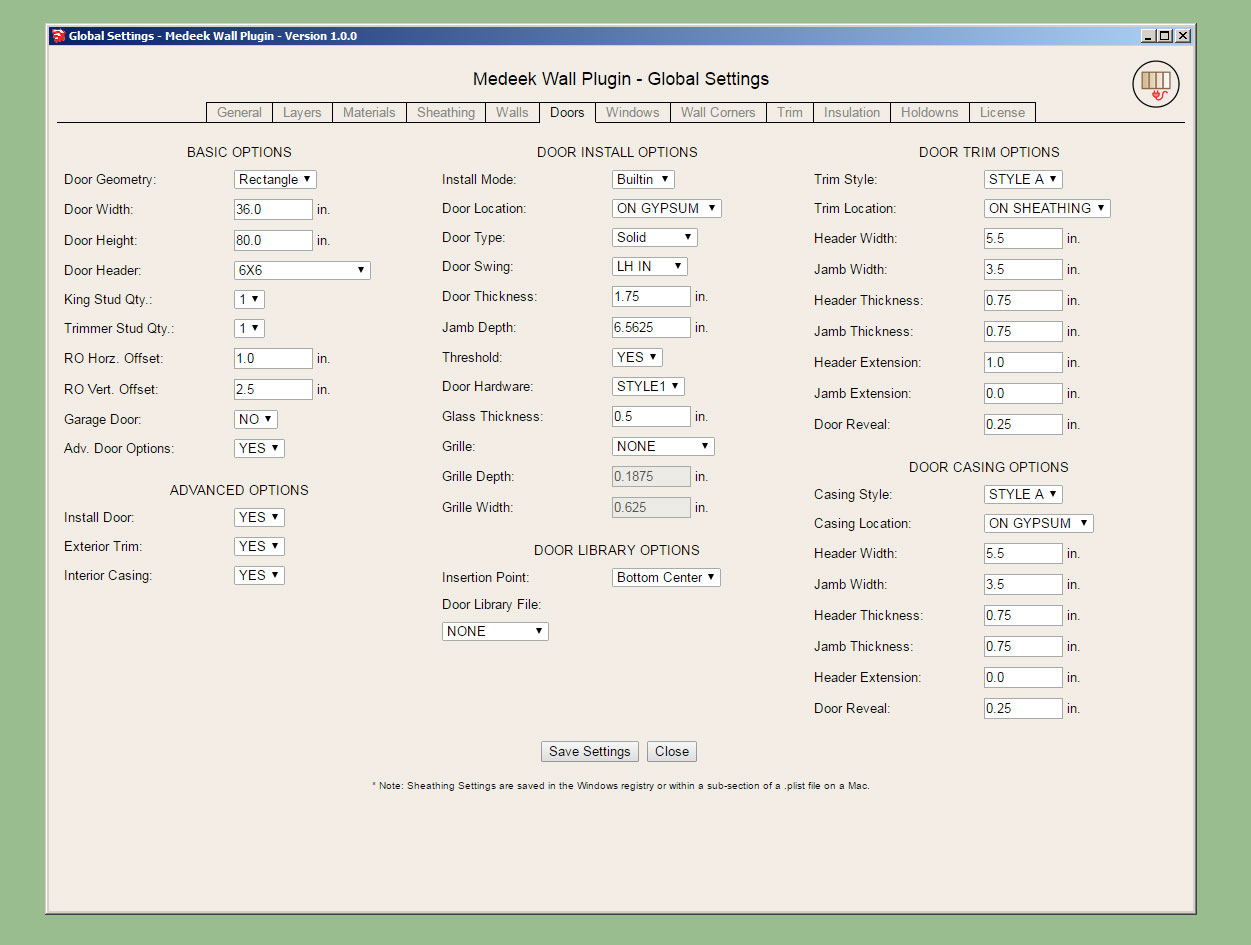
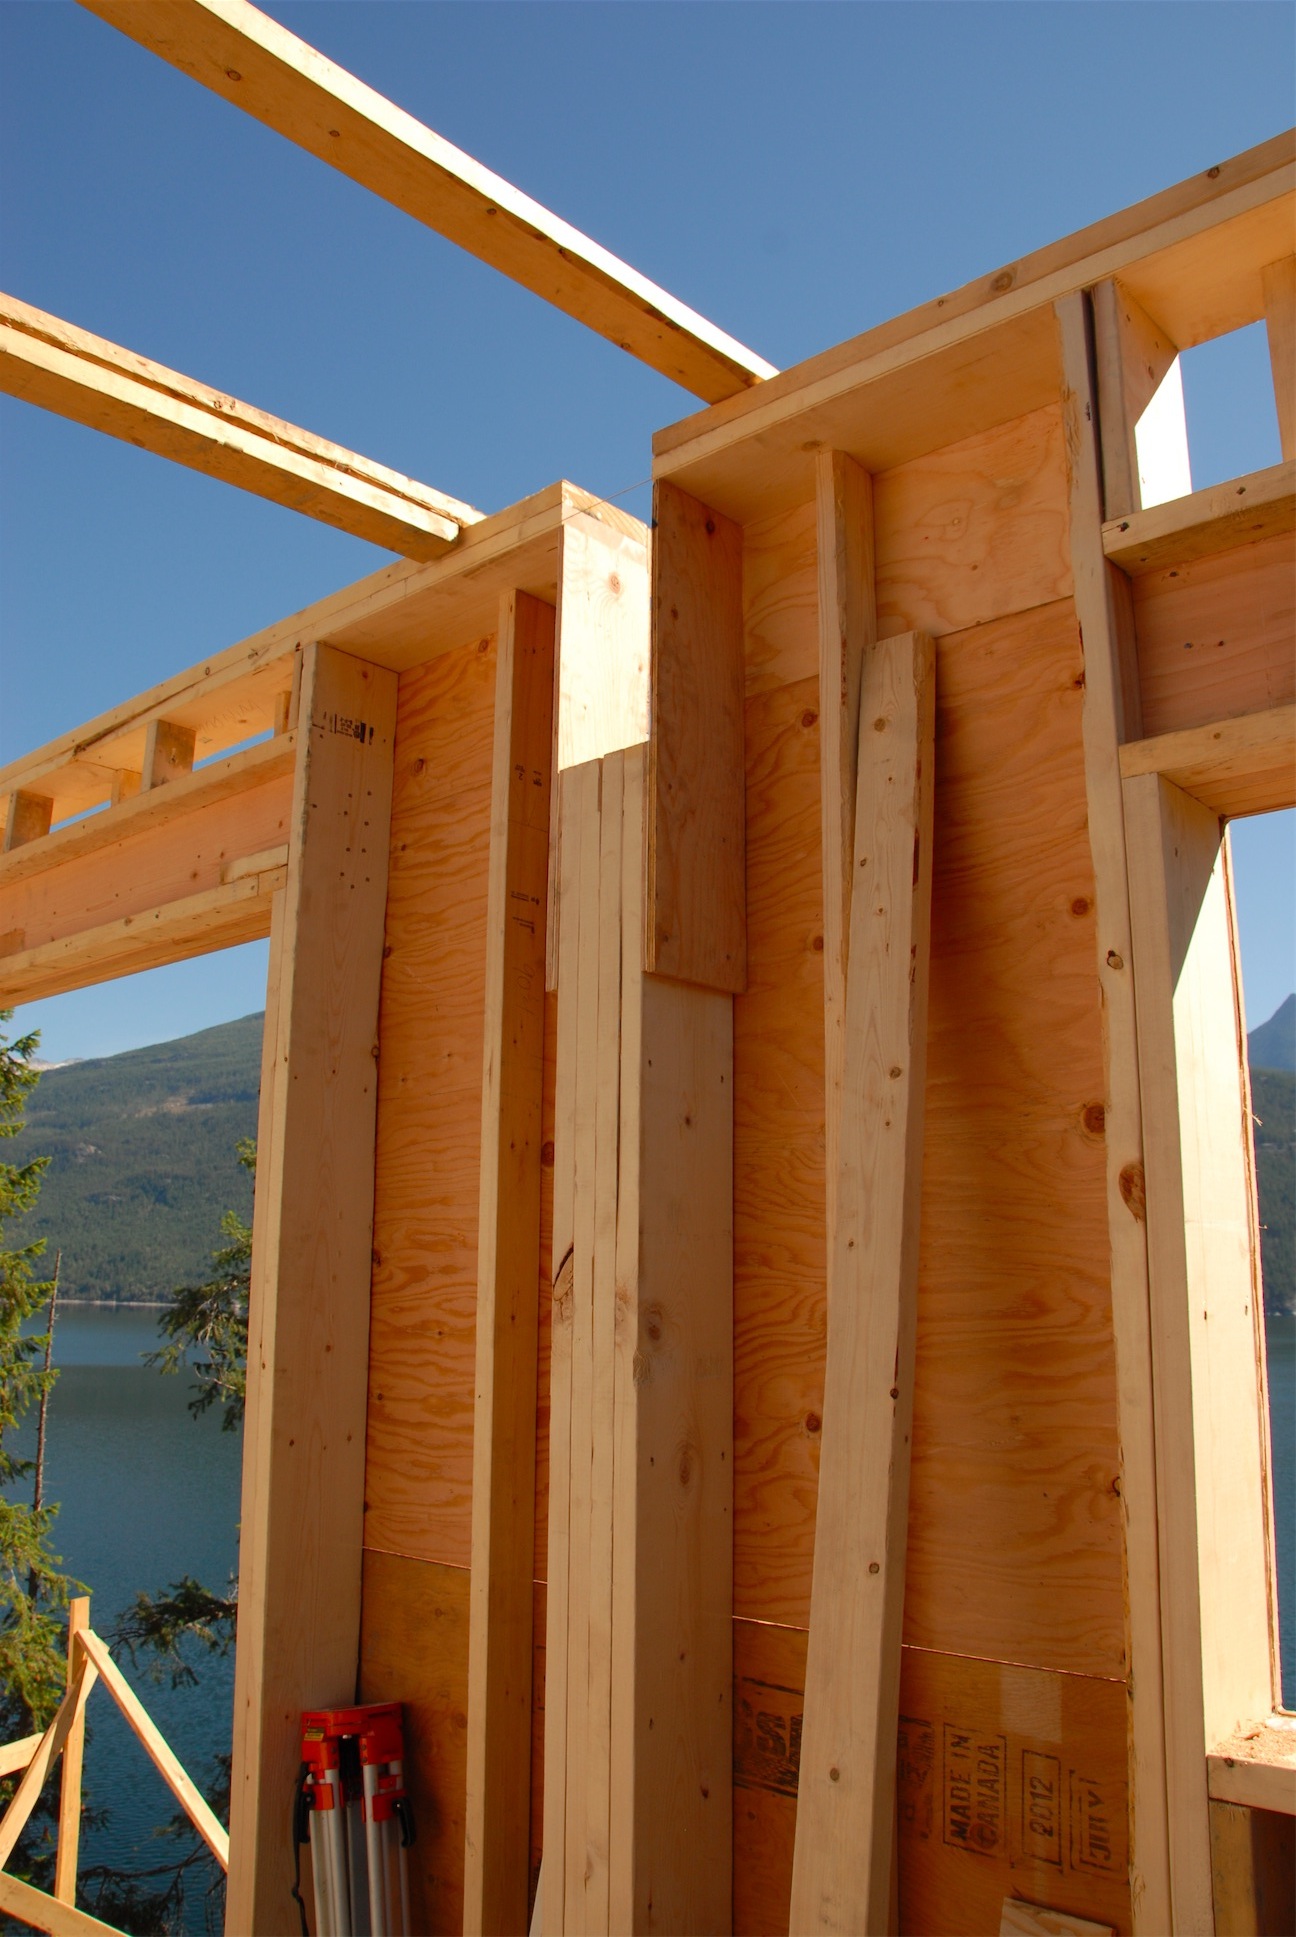
I've decided I'm not going to attempt a full blown window and door plugin just yet since the Wall Plugin has become a larger project than I anticipated. However, for the time being I will provide a rudimentary (fully integrated) window and door feature which I have been testing out today, see images below.

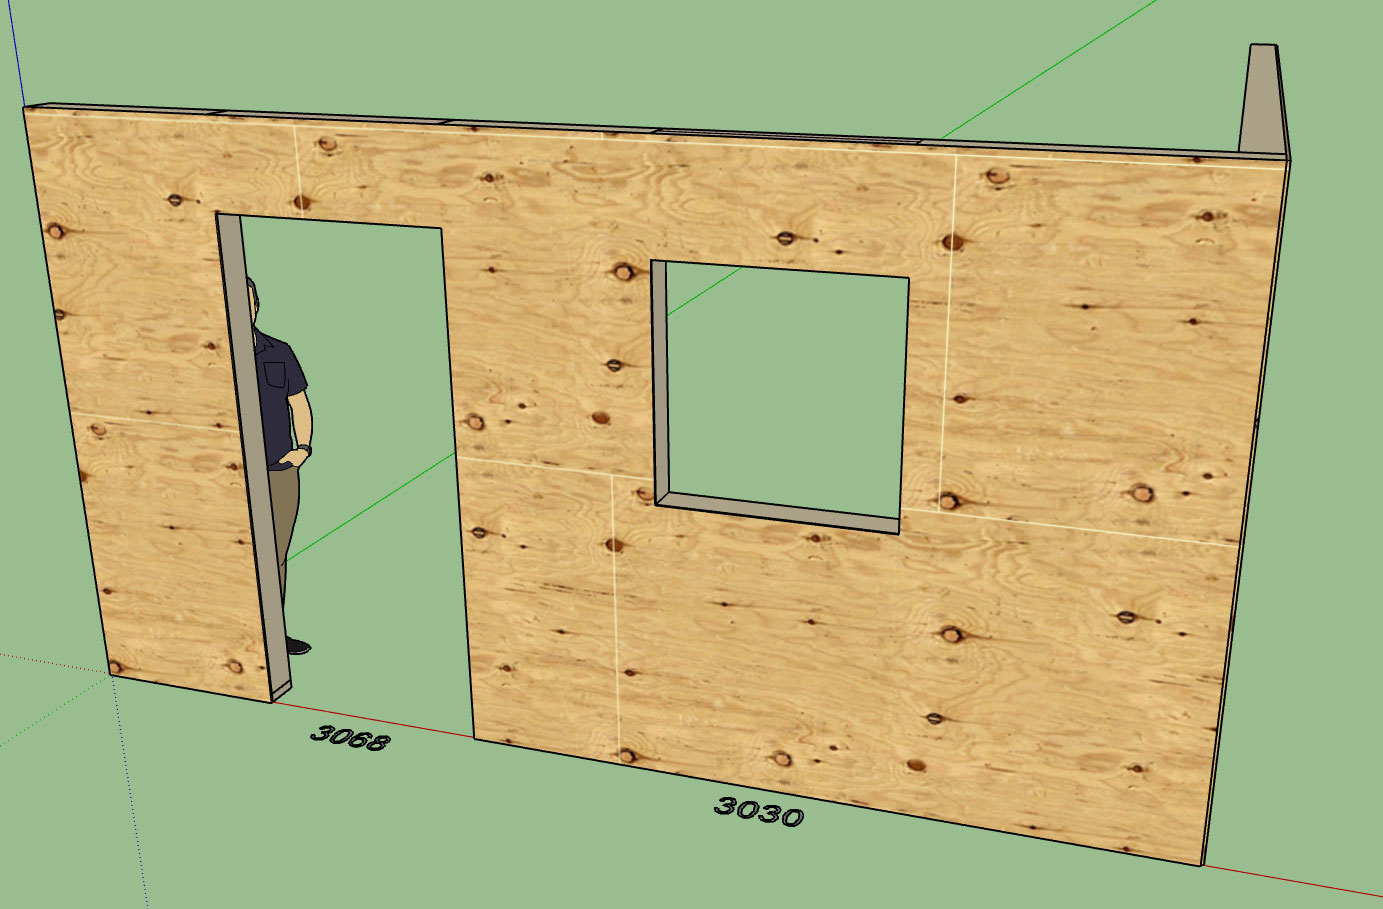
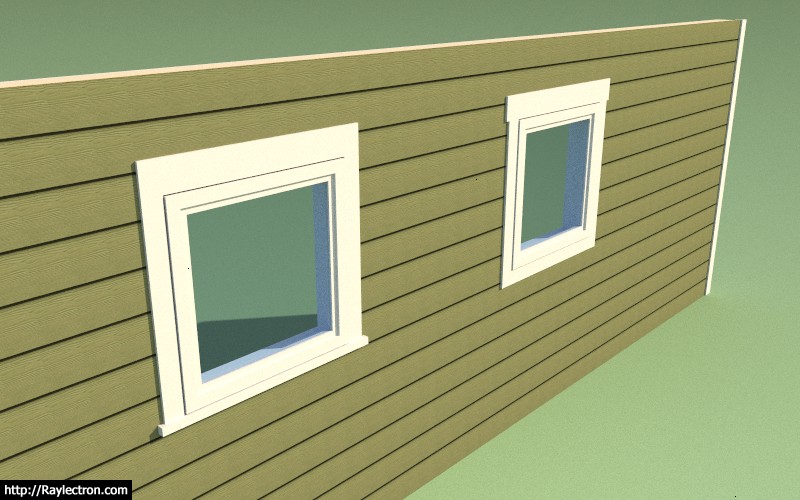
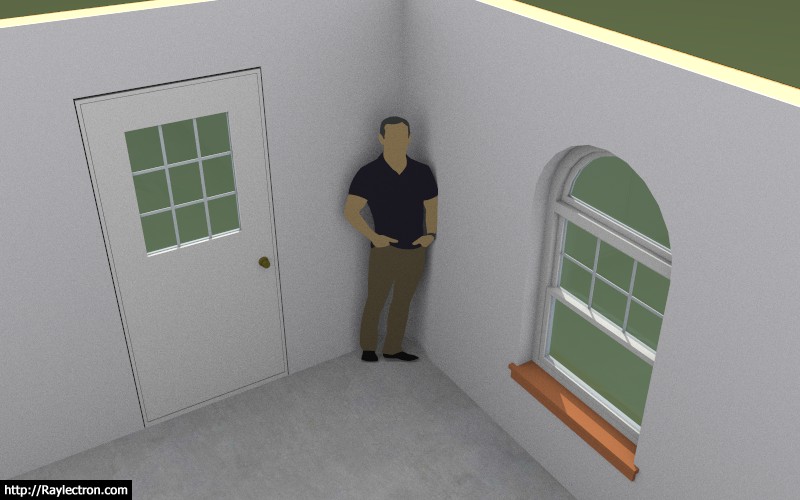
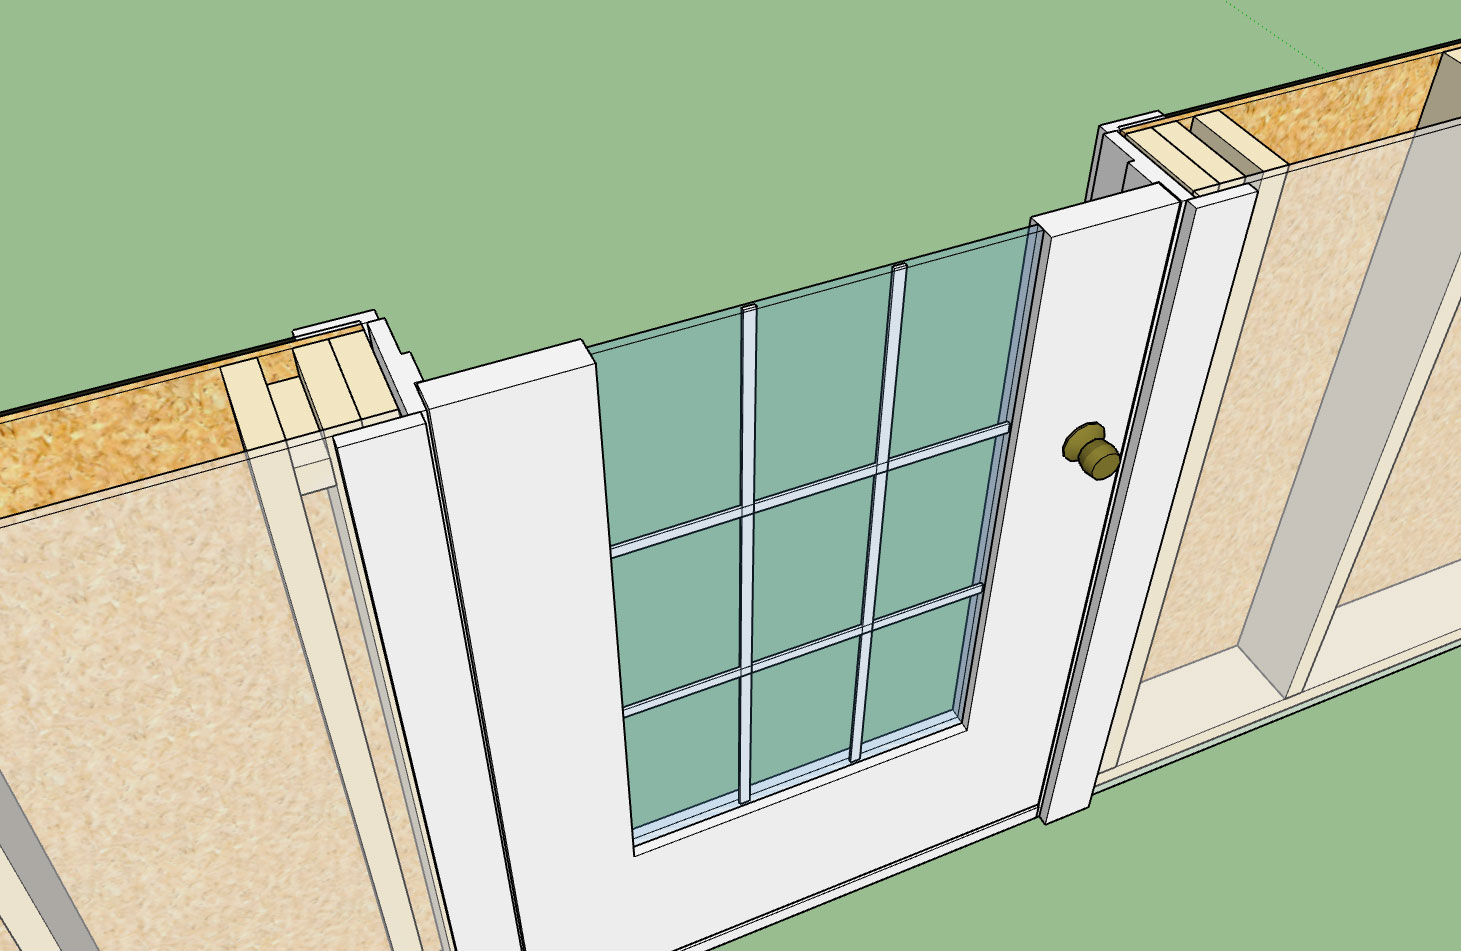
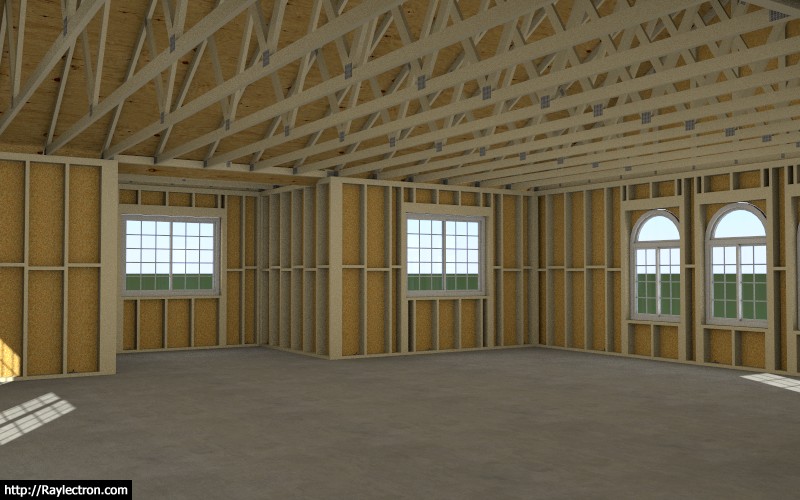
The jamb extensions are automatically calculated so that they close the gap to the window and finish out the window well as shown:

wall_su35_800.jpg


wall_su36_800.jpg


wall_su37_800.jpg


wall_su38_800.jpg


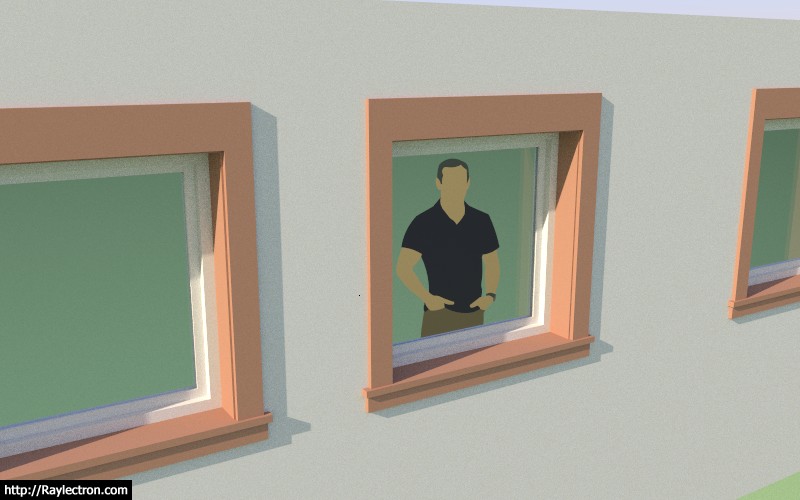
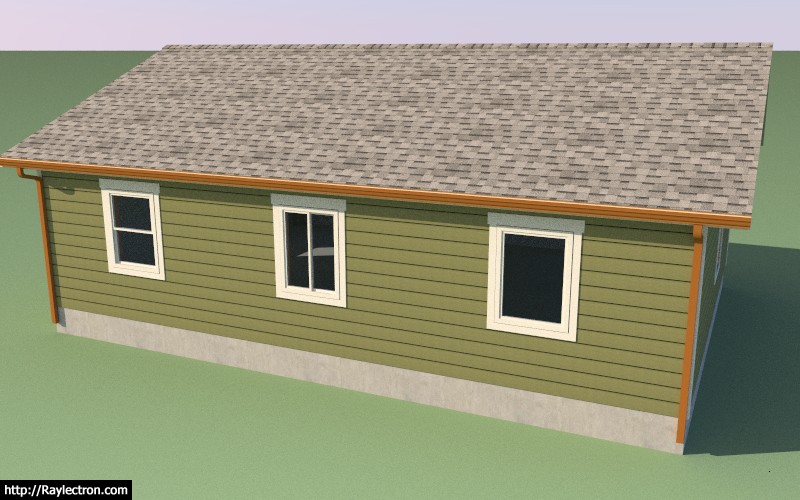
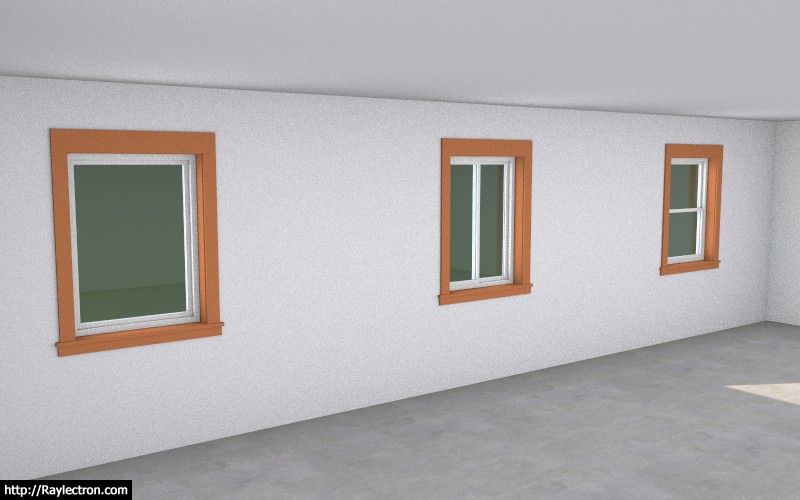
Currently I have the Picture, Slider and Single Hung window types enabled.
 
To avoid these ads, REGISTER NOW!
OP
M

Medeek

Well-known member
Joined
Jan 13, 2013
Messages
550
Location
Copalis Beach, WA
Doors are coming along, just need to add the exterior trim and the interior casing, then on to bigger and better things.

wall_su47_800.jpg


wall_su48_800.jpg


wall_su49_800.jpg
 
OP
M

Medeek

Well-known member
Joined
Jan 13, 2013
Messages
550
Location
Copalis Beach, WA
Trim and casing for man doors is now complete. The garage door module has been planned out but will have to come after the initial release of the plugin.

wall_su55_800.jpg


Currently there is only one style of trim and one style of casing for doors.

With the completion of the doors all of the primary geometry programming is done. What is remaining is the edit menus for the door and windows and the move and split functions for the walls.

The number of parameters is rather large so it will probably also be another two days worth of programming just to fully update the global settings so that it encompasses all of this information.
 
OP
M

Medeek

Well-known member
Joined
Jan 13, 2013
Messages
550
Location
Copalis Beach, WA
OP
M

Medeek

Well-known member
Joined
Jan 13, 2013
Messages
550
Location
Copalis Beach, WA
This is an update on the previous "todo" list and the current status of various high priority items:


1.) Wall and Window edit, move and delete functions/Tools.

Edit and delete is complete, currently working on the move function.

2.) Global Setting tabs for Window and Door settings.

Parameters have multiplied five fold, will need to spend more time adding in all of these new parameters.

3.) Rudimentary Door and Window plugin that integrates with this plugin tightly.

This is complete, three door types, three window types, more variants to be added after initial release.

4.) Wall Move and Split Tool.

Wall move tool is planned prior to release, split tool will probably be after.

5.) Add air gap parameter for the cladding (ie. brick fascia).

Done.

6.) Auto corner configuration

Approximately, 50% complete, more debugging and testing required.

7.) Polyline Wall Tool and Face Wall Tool (right now all you can do is create a single segment at a time).

Polyline tool is now planned prior to release, face tool is on backburner until requests drive it to top of list.

8.) Final clean and addition of any additional parameters to the Global Settings.

This is part of item #2.

9.) Further refinements to the Add Window and Add Door Tools.

Complete for now, some additional error checking could be added to check for impossible geometry situations.

10.) Gable/Shed Wall Tool.

This is planned after initial release, for now.

11.) Add glulam beams to Window and Door header options.

This will be added when the garage door module is added, which will probably be post release.

12.) Update Wall Plugin web page.

Will attack this just prior to release of plugin.

13.) Additional logic for interior walls

This needs attention before release of plugin.

14.) Mitered corners for cladding.

Code is in place however further testing and debugging required.
 
OP
M

Medeek

Well-known member
Joined
Jan 13, 2013
Messages
550
Location
Copalis Beach, WA
The opening move tool is now complete and I am now working on the wall move tool along with the wall polyline creation tool and the auto-config for wall corners. This is the last major item(s) on the todo list prior to release. All other items are fairly minor in comparison and constitute mere housekeeping rather than actual significant development.

wall_su61_800.jpg


wall_su62_800.jpg


View model here:

https://3dwarehouse.sketchup.com/model/27520763-62ee-47d0-a0ab-31bd1c313465/Framing-Test-17
 
OP
M

Medeek

Well-known member
Joined
Jan 13, 2013
Messages
550
Location
Copalis Beach, WA
I've added a callout option so that when the designer is in the 2D mode the window and door sizes and types are called out:

wall_su65_800.jpg


This particular option can only be set in the global settings.

One thing to note is that the door handedness and the window type are only in the callout if the user has specified a particular door or window type to install. If the advanced options are not enabled then only the opening size will be displayed (ie. 3068 vs. 3068LH or 3040 vs. 3040SH).
 
OP
M

Medeek

Well-known member
Joined
Jan 13, 2013
Messages
550
Location
Copalis Beach, WA
Another test of the wall plugin combined with the foundation and truss plugin.

wall_su66_800.jpg


The wall plugin is now in better shape than the truss plugin since no manual edits are required and all the windows and doors are fully parametric.

However note that the interior walls and garage doors are still missing, more work yet to be done.

wall_su67_800.jpg


wall_su68_800.jpg


View model here:

https://3dwarehouse.sketchup.com/model/859fad2e-3b88-4312-a5e6-e5e7dc913151/Framing-Test-19

After spending the last month on this new plugin I can see where the other two plugins have room for some serious improvement, I've really got my work cut out for me.
 
OP
M

Medeek

Well-known member
Joined
Jan 13, 2013
Messages
550
Location
Copalis Beach, WA
OP
M

Medeek

Well-known member
Joined
Jan 13, 2013
Messages
550
Location
Copalis Beach, WA
Straps, holdowns, anchor bolts, threaded rod and couple nuts are now part of the plugin. More details on that later. At some point the engineering module will be able to do the entire lateral calcs on a structure with the click of a button and input of a few site criteria parameters. The idea is to fully automate the engineering of a residential structure, engineers shouldn't have to work this hard.

wall_su74_800.jpg


wall_su72_800.jpg


Tomorrow I will wrap up the global settings and we will release the plugin for beta testing.

I still have quite a bit more stability testing to make sure I have missed any glaring errors but I'm sure the beta testers will help sniff out a lot of those issues.
 
OP
M

Medeek

Well-known member
Joined
Jan 13, 2013
Messages
550
Location
Copalis Beach, WA
Working on updating the global settings to reflect the myriad of settings added to the plugin in the last month.

This is what you will see when you pull up the license tab with a fully licensed plugin:

wall_su76_800.jpg


Notice that there are twelve tabs:

- General (complete)
- Layers (complete)
- Materials
- Sheathing
- Walls
- Doors
- Windows
- Wall Corners (complete)
- Trim
- Insulation
- Holdowns (complete)
- License (complete)

The window and door tabs will have the largest amount of options. Updating all of these html pages is rather tedious work but it is necessary.
 
OP
M

Medeek

Well-known member
Joined
Jan 13, 2013
Messages
550
Location
Copalis Beach, WA
After a few mind numbing hours of parameters the global settings are now up-to-date. See a screenshot of the door tab below:

wall_su77_800.jpg


There are probably a few more additions that can be made to some of the tabs but I think we are good enough now for the initial release.

I still have one major item that needs some attention:

Updating of the interior wall algorithm so that it properly detects "Tee" intersections.

I also need to update the door casing for interior walls and add the gypsum wrap for interior walls with framed openings that do not have a window or door installed (ie. plain opening), however these are minor items and can probably be attended to after the initial release.

I have some known issues with the "no frame" option that need to be addressed but should only require a few minutes to remedy.

I will start working on the "Tee" intersection algorithm tonight and hopefully wrap this up tomorrow.
 
OP
M

Medeek

Well-known member
Joined
Jan 13, 2013
Messages
550
Location
Copalis Beach, WA
Ladies and Gentleman I give you... The Medeek Wall Plugin

http://design.medeek.com/resources/medeekwallplugin.html

WALL_PLUGIN_ICON_FILLED.png


Version 0.7.2 - 05.25.2018

Please do not use the plugin in its current state for any production work. I am afraid that you may loose data given the potential for bug splats and other issues with the plugin being so newly minted.

Please keep your ruby console open while using the plugin and feel free to cut and paste any issues to me via email. As much explanation regarding any errors would also be helpful.

To be honest I don't feel like I've tested the plugin out nearly enough especially while using metric templates however the pressure to release the plugin now, rather than later was quite overwhelming.

Tomorrow I will begin addressing bugs and also I will begin work on the new todo list.
 
OP
M

Medeek

Well-known member
Joined
Jan 13, 2013
Messages
550
Location
Copalis Beach, WA
Had an interesting request for Simpson Strong-Walls to be added to the plugin this morning. I may entertain this possibility seeing as it probably would not be too hard to add this functionality.

strong-wall-fmly.jpg


The addition of elements within the wall other than windows and doors actually is something I've been meaning to give some additional consideration to. Right off the top the two items I can think of that are similar to windows and doors (at least logistically or from a coding standpoint) are "in wall" columns and posts and specialized panels such as Simpson wood or steel strong-walls or Simpson Moment Frames. In fact, all of these can be essentially treated as door like openings with their own special set of parameters so the wall geometry creation algorithms are already in place to add these elements in.

What other "in wall" elements am I missing here?

With regards to walls and beams, I've often seen situations where the beam is dropped below the floor joists above and is set in a a "beam pocket":

bm_pocket_2.jpg


In the situation shown above I probably would have carried the king studs next to the column all the way to the bottom plate but I think the idea his clear. Some inwall columns are the full height of the wall with the beam resting the on the top plates and some are similar to the situation shown, both must be made available.
 
OP
M

Medeek

Well-known member
Joined
Jan 13, 2013
Messages
550
Location
Copalis Beach, WA
Toolbar Menus and Icons for the upcoming Columns and Simpson Strong-Wall modules:

wall_columns_su_menu_active.jpg


wall_ssw_su_menu_active.jpg


With the Strong-Walls the plan is to offer both the steel and the wood varieties.
 
To avoid these ads, REGISTER NOW!
OP
M

Medeek

Well-known member
Joined
Jan 13, 2013
Messages
550
Location
Copalis Beach, WA
Version 2.1.9 - 05.27.2018
- Replaced the 64 bit SketchUp check in the installation module to fix an incompatibility issue with SketchUp 2014.
- Added additional wall cladding materials in the sheathing tab of the global settings.
- Fixed a bug in the top level assembly method of the roof truss module.
 
OP
M

Medeek

Well-known member
Joined
Jan 13, 2013
Messages
550
Location
Copalis Beach, WA
Version 0.7.4 - 05.29.2018
- Fixed a bug with the wall polyline tool so that the wall line will snap to the X or Y axis.
- Added ZIP Systems(c) 7/16" and 1/2" wall sheathing materials to the sheathing tab of the global settings.
- Added the Z Height option to the wall creation tools. The Z height parameter and option to enable this feature are found in the walls tab of the global settings.
- Created icons and added toolbars for the Simpson Strong-Wall module and the Columns module, both of which are still under construction.
 
OP
M

Medeek

Well-known member
Joined
Jan 13, 2013
Messages
550
Location
Copalis Beach, WA
Here is a good example of a stucco structure with a cultured stone wainscot:

CIMG0911.JPG


Notice the stucco trim just above the wainscoting and then the ledge of stone that projects beyond the wainscoting just below it.

The additional parameters for a two cladding exterior system (wainscoting) would be:

Exterior Wall Wainscoting: YES/NO
Wainscoting Thickness: in./mm
Wainscoting Air Gap: in./mm
Wainscoting Corners: Flush/Lap/Miter/Return
Wainscoting Material: Brick/Culture Stone etc...

Wainscoting Height: in./mm
Wainscoting Ledge/Trim: YES/NO
Ledge Height: in./mm
Ledge Depth: in./mm

Also in the Trim Tab another couple of parameters for the Exterior Trim option above the wainscoting:

Wainscoting Trim: YES/NO
Wainscoting Trim Width: in./mm

Also notice how the stucco trim around the window and doors meets the wainscoting trim and terminates there.

Why can't you designers and architects keep things simple, I'm going to have to jump through some hoops to code all of this. :)
 
OP
M

Medeek

Well-known member
Joined
Jan 13, 2013
Messages
550
Location
Copalis Beach, WA
I've already rolled out two revisions since the initial beta release. Please download, uninstall the older version of the plugin and then install the most current version.

I've seen some issues with corrupt installations where a newer version is installed on an older version. You need to uninstall the plugin first before upgrading, that is the safe bet.

Also please check the changelog so you are aware of the updates, even though I do post each update on the board:

http://design.medeek.com/resources/wallpluginchangelog.html

I am still noticing a lot of people sending in comments that they are unable to get materials applied when they have not enabled the auto material assignment in the materials tab of the global settings.

I think what I am going to do is have the plugin set this particular setting to "ON" as the initial default behavior rather than "OFF". I will make this change live with the next release.
 
OP
M

Medeek

Well-known member
Joined
Jan 13, 2013
Messages
550
Location
Copalis Beach, WA
The tee intersection algorithm has been revamped and is now properly cutting out top plates when walls intersect at these intersections:

wall_su88_800.jpg


When a wall gets rebuilt (ie. edited, moved, opening added, or switched between modes) the tee intersection algorithm is run and any intersecting walls will be detected (any walls that are touching the wall in question and have a "tee corner" configuration at that end).

What this means is that if you manually move an intersecting wall and slide it along the main wall and then rebuild the main wall the top plate will automatically update with the correct cut out as shown above.
 
OP
M

Medeek

Well-known member
Joined
Jan 13, 2013
Messages
550
Location
Copalis Beach, WA
Version 0.7.5 - 05.31.2018
- Fixed a bug with the callout positioning method to allow for the correct placement of wall opening text.
- Intersecting walls now cut through the top plate of the primary walls at tee intersections.
- Wall cladding and sheathing materials option now added to wall creation tool.
- Default behavior for the Wall Mode parameter added the Walls tab of the global settings (Line or Polyline).
- Added DensGlass™ sheathing material to the sheathing tab of the global settings.
- Began the addition of tooltips to every parameter within the global settings.
 
OP
M

Medeek

Well-known member
Joined
Jan 13, 2013
Messages
550
Location
Copalis Beach, WA
Version 0.7.6 - 06.04.2018
- Added the option for Glulam Beams for window and door headers.
- Cladding corner treatment now has MITER and LAP available as two additional corner options.
- Sheathing corner treatment now has LAP available as an additional corner option.
- Cladding materials selection extended to include all SketchUp materials currently in model.
- Minor bug in exterior corner trim corrected.
- The update status message in HTML edit menus (wall, door and window) moved to top of form for better visibility.
 
OP
M

Medeek

Well-known member
Joined
Jan 13, 2013
Messages
550
Location
Copalis Beach, WA
Just had an interesting conversation with a professional estimator about the plugin this morning.

He reinforced what already I'm seeing with this plugin and how it relates to design, designers and architects.

As I've mentioned previously the plugin audience is three fold and the design side probably will utilize the 2D and 3D (no framing) mode the most. The reason being is that most designers are not overly interested in how the structure goes together, their main concern is the layout and placement of windows and doors.

The full framing mode will have more utility among the engineers, panel designers, estimators, contractors and DIYers.

A building design is really no more than a concept and it takes a whole team of professionals to take something off of paper (or pdf) and make it into a physical reality.

Once I have the design side of this software put together and reasonably solid I will begin focusing on the engineering and estimating pieces.

This estimator talked at length about the disconnect between himself and the architects. My goal is to help heal this disconnect and get everyone on the same page, I think we can do this.
 
OP
M

Medeek

Well-known member
Joined
Jan 13, 2013
Messages
550
Location
Copalis Beach, WA
Version 0.7.6b - 06.05.2018
- Auto-Corner Configuration algorithm revised to handle "stepped" walls.
- Wall "Draw Tool" configured to retain most recent inputs from user. Parameters not shown in UI default to global settings.

This sub. revision is actually fairly significant and worth upgrading to since it addresses a major flaw in the UI.
 
OP
M

Medeek

Well-known member
Joined
Jan 13, 2013
Messages
550
Location
Copalis Beach, WA
Version 0.7.6c - 06.05.2018
- Added the option to toggle between standard stud sizes and custom (user defined width x depth) sizes with the "Walls" tab of the global settings.

wall_su95_800.jpg


Note that within the wall edit menu the stud width and depth can be adjusted independently regardless of the standard stud size option being enabled.
 
OP
M

Medeek

Well-known member
Joined
Jan 13, 2013
Messages
550
Location
Copalis Beach, WA
Version 0.7.6f - 06.07.2018
- Added the ability to lock the cursor to the X or Y axis for the "Draw Wall Tool" (line and polyline) by pressing the SHIFT key.
- Added the ability to lock the cursor to the 45 deg. and 135 deg. axis for the "Draw Wall Tool" (line and polyline) by pressing the CTRL key.

Also note that I fixed a couple of bugs I accidentally created when making the code adjustments for version 0.7.6e, I managed to break the plugin for all TRIAL users.

Therefore this is a critical update, please remove the prior version and install this version which will fix the error introduced last night. This is what happens when I try to get too much done in one day.
 
OP
M

Medeek

Well-known member
Joined
Jan 13, 2013
Messages
550
Location
Copalis Beach, WA
I've been getting a lot of feedback on the UI lately, for good reason of course (it's terrible).

The wall draw tool with its multiple menus is what I am talking about.

After reviewing various suggestions and giving it some more thought I think the solution is two fold:

1.) Go to an HTML menu, similar in design to the current edit menu that remains open during wall creation and allows the user to make changes during wall creation with the polyline tool (ie. changing wall height on specific wall segments that are in a drop down living room).

2.) Enabling user presets where all of the basic and advanced parameters for a wall are saved to a user defined preset that can be instantly recalled within both the wall draw and edit menus. For example, this would allow the user to quickly define and then recall a 2x6 ext. wall with a 1" air gap and brick cladding, rather than having to peruse through all of the settings every time and recreating the wheel just to put together a standard wall type.

Certain parameters would not be saved as part of a wall preset. I haven't nailed down exactly which of those parameter to exclude but my first shot at it would be:

- Wall Length
- Wall Group
- Wall Framing (2D, 3D etc...)
 
OP
M

Medeek

Well-known member
Joined
Jan 13, 2013
Messages
550
Location
Copalis Beach, WA
Version 0.7.7b - 06.09.2018

- Horizontal and Vertical plywood sheathing materials added to the pre-installed plugin materials.

wall_su98_800.jpg


wall_su99_800.jpg


I realize this a fairly insignificant item, but it was user requested and one of those things I could knock out in about 10 minutes or less.
 
OP
M

Medeek

Well-known member
Joined
Jan 13, 2013
Messages
550
Location
Copalis Beach, WA
I'm actually not a big fan of Tyvek, at least not in our marine environment on the beach out here in western Washington but I do know it gets used a lot. This is the OSB + TYVEK option:

wall_su100_800.jpg


Only the outside face of the sheathing gets the Tyvek material and the sheathing group gets the generic OSB material.
 
OP
M

Medeek

Well-known member
Joined
Jan 13, 2013
Messages
550
Location
Copalis Beach, WA
Version 0.7.7c - 06.09.2018
- Tyvek + OSB material added to the pre-installed plugin materials.
- Added 2D construction line options for sheathing, cladding and gypsum within the global settings.

wall_su101_800.jpg


Taking it a bit slow today, just a few minor items and some small fires to put out, catching a bit of a breather.
 
OP
M

Medeek

Well-known member
Joined
Jan 13, 2013
Messages
550
Location
Copalis Beach, WA
Version 0.7.7d - 06.10.2018
- Added 2D (construction or solid) line options for sheathing, cladding and gypsum within the global settings.
- Fixed a bug within the corner trim module (trim width).
- Added additional standard metric stud sizes: 36x68, 36x98, 36x148, 36x198, 48x72, 48x98, 48x148, 48x198
 
OP
M

Medeek

Well-known member
Joined
Jan 13, 2013
Messages
550
Location
Copalis Beach, WA
This is the direction I am going with the Wall Edit Menu UI and Draw wall Tool:

wall_su102_800.jpg


Notice the wall presets section at the top of the UI, here you can delete, load or save a preset wall template.

The actual templates will be stored in a simple text file within a sub-folder called "presets", that way the user can also manually edit the wall preset file and even cut and paste presets from other users into their preset file. This solution offers the most flexibility and user control in my opinion.

Loading a preset will re-populate all of the parameters in the form below except for the excluded items.

The save function will create a new preset (with user entered name/description) based on the currently listed parameters in the form.

Does this make sense? and the better question, am I missing anything here?

Hopefully this new addition of presets will speed up the wall creation process and spare the user from having to recreate a specific wall type from scratch each time they start a new model or session.

I still have not fully arrived at what the excluded parameters should be in the wall preset functions so please provide any feedback in this regard.
 
OP
M

Medeek

Well-known member
Joined
Jan 13, 2013
Messages
550
Location
Copalis Beach, WA
There are really three functions in one here: Loading, Saving and Deleting.

Quite a bit of new code to implement the new presets system. I'm still testing it out to make sure it is solid, but so far it is looking pretty good.

Note, that it is possible to give a preset the exact same name as another preset, this is by design and they will both appear in the drop down list. What you are not seeing in the drop down is the hidden number assigned to each preset which is stored in the presets file. This number is really the identifier of the preset and allows one to correctly specify which preset you are wanting to load or delete.

Once this system is in place for the walls and fully tested and verified I will implement a similar system for windows and doors.

I have a number of minor fixes and bugs that are quite hot items right now that have been delayed due to my attention to this latest upgrade, I apologize for the delay in getting the fixes out, but I really feel that this UI upgrade is top priority right now.
 
OP
M

Medeek

Well-known member
Joined
Jan 13, 2013
Messages
550
Location
Copalis Beach, WA
Version 0.7.8 - 06.14.2018
- Added the ability to create, load and delete wall presets within the Edit Wall (HTML) Menu.
- Fixed a bug within the auto-corner configuration module which caused issues for walls less than 36" in height.

Note that wall presets can only be currently loaded and applied after the fact (within the Wall Edit Menu). My intent is to also make this feature available within the reworked Draw Tool within the next few days but I first want to introduce this feature within the Edit Menu and work out any potential pitfalls before rolling it out further.
 
To avoid these ads, REGISTER NOW!
Top Bottom