
You are using an out of date browser. It may not display this or other websites correctly.
You should upgrade or use an alternative browser.
You should upgrade or use an alternative browser.
Walker Turner Drill Press - Rebuild
- Thread starter MAYOR28
- Start date


TH878
New member
Your Twin!
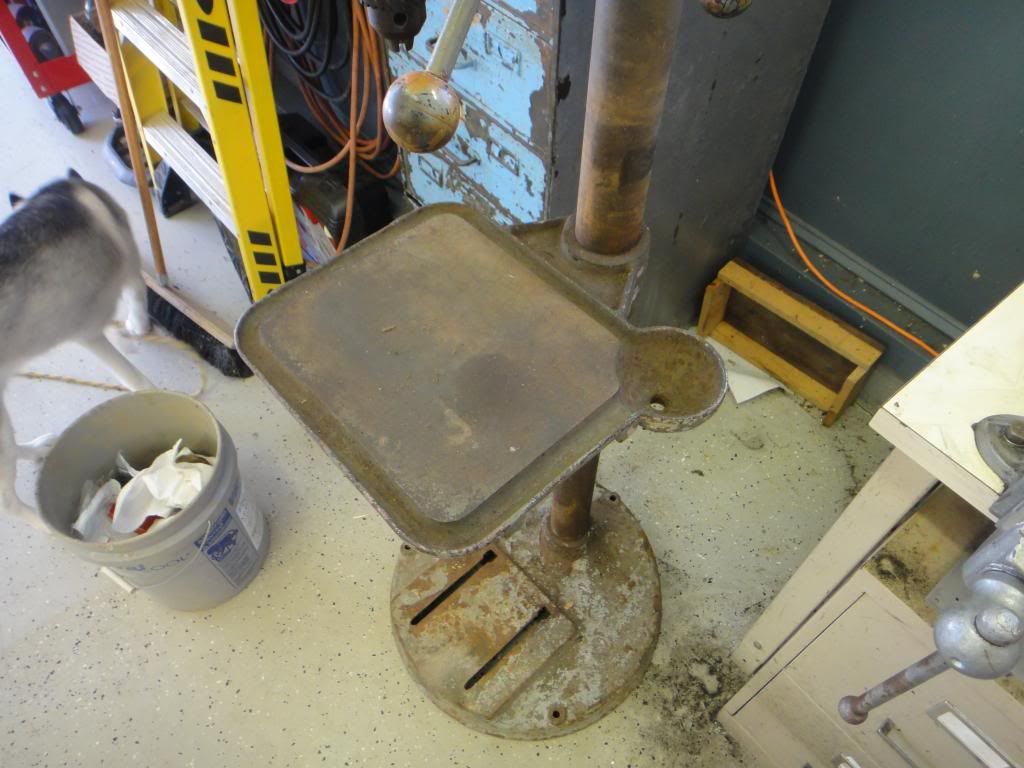
More basic table with an arc of shame. I've got that same plate on the right side with what is likely a serial number. This is a 50DH4A. Note the pipe through the motor hole that supports the belt guard. To the best of my knowledge this is how it came from WT. The power switch on mine has been changed.
This is a great thread on doing the restore on similar model:
http://www.forums.woodnet.net/ubbth...78276&page=0&view=collapsed&sb=7&o=&fpart=all
Have fun with your resto!
Attachments


I bought some Sherwin Williams paint a while back that I plan on using for this rebuild. It is a slightly blue-ish green that I hope to use for any future refurbs I work on. I bought a HF purple HVLP gun to shoot the paint with, can anyone recommend a dilution ratio for the Sherwin Williams paint? I am completely new to shooting paint, but thought I would give it a try on some practice parts before getting into the drill press.
Your Twin!
More basic table with an arc of shame. I've got that same plate on the right side with what is likely a serial number. This is a 50DH4A. Note the pipe through the motor hole that supports the belt guard. To the best of my knowledge this is how it came from WT. The power switch on mine has been changed.
Have fun with your resto!
TH878-
Your rebuild looks incredible.

That thread on the WoodNet is great, lots of info in there.
This is the paint and primer that I got (at least as much as I can remember.....)
that drill press is in amazing shape the table is awesome its gonna look sweet when your done your grandpa would be proud of the way you are restoring it and gonna use it i know a guy here that has a DP like yours but it just has the standard slotted table that table of yours is in amazing shape you can tell by looking at the table your grandpa appreciated the tools he had
I started cleaning up the blasted surfaces today:


I want to polish the handles, column, and other pieces, but I am not having very good luck with buffing wheels on my drill. I fear that my bench grinder is also too weak to buff and polish........


Does anyone know how I could clean these up?

.
I want to polish the handles, column, and other pieces, but I am not having very good luck with buffing wheels on my drill. I fear that my bench grinder is also too weak to buff and polish........
Does anyone know how I could clean these up?
.
Outlawmws
Well-known member
Those balls are the plastic handles? I'd give McGuire's Plastic cleaner a shot first, and if that won't take the paint over spray off, then try Simple Green (short times as possible, ) then assuming the paint is off, back to McGuire's Plastic Cleaner followed by McGuire's Plastic Polish.
Hot Chop shop
Well-known member
I started cleaning up the blasted surfaces today:
I want to polish the handles, column, and other pieces, but I am not having very good luck with buffing wheels on my drill. I fear that my bench grinder is also too weak to buff and polish........
Does anyone know how I could clean these up?
.
Seeing you do this restore makes me want to do mine all over again... Think I am going too, I wasn't too happy with the color I chose...
It looks like bare metal polished up real nice what did you use to polish it?
Seeing you do this restore makes me want to do mine all over again... Think I am going too, I wasn't too happy with the color I chose...
It looks like bare metal polished up real nice what did you use to polish it?
The handles and stuff are just wire wheeled. The column was ground with a bristle disk and I tried to polish it with a cloth wheel on my drill.....really time consuming......
.
GRG!@(*#YY#@$OUYFGKGO*UY*&(*@#$^%*&^*#()$*!!!!!!!!!!!!!!!!!!!!!!!!!!!!!!!
I broke part of the pulley!?!?!?!?!?!? Smallest groove:


But I did get the column polished a little more.....


What should I do about the pulley? Find a new one, just get the right puller, pull it and never use that setting (leaning toward this)? HELP!
I broke part of the pulley!?!?!?!?!?!? Smallest groove:
But I did get the column polished a little more.....
What should I do about the pulley? Find a new one, just get the right puller, pull it and never use that setting (leaning toward this)? HELP!
Outlawmws
Well-known member
On the pulley, it looks like the two smallest are separate from the larger? Did you release all the setscrews? If they are separate you can more easily replace...
Outlawmws
Well-known member
ps: you will need the smallest, as that gets you to the slowest speeds...
Hot Chop shop
Well-known member
I'm no help... I was scared to mess with the motor since it hummed so nice, I just taped it and sprayed it.
The metal on the shaft shined up real nice... Can you post a pick of the buffet you used? Also did you use rubbing compound with it? I used a wire wheel on my angle grinder then used a scotch bright pad and wd-40 to shine mine up and didn't come close to that finished.
The metal on the shaft shined up real nice... Can you post a pick of the buffet you used? Also did you use rubbing compound with it? I used a wire wheel on my angle grinder then used a scotch bright pad and wd-40 to shine mine up and didn't come close to that finished.
Krokodil
Well-known member
Sory about the pulley. What did you use to polish with?
I'm no help... I was scared to mess with the motor since it hummed so nice, I just taped it and sprayed it.
The metal on the shaft shined up real nice... Can you post a pick of the buffet you used? Also did you use rubbing compound with it? I used a wire wheel on my angle grinder then used a scotch bright pad and wd-40 to shine mine up and didn't come close to that finished.
For the column, I started with a 100 grit bristle disk, then hand sanded with 200 paper, and then buffed with one of these in my drill:
I used brownish/reddish buffing compound which was the coarsest the store had.
All that, plus a ton of elbow grease, got from this:
To This:
Krokodil
Well-known member
Wow! Thats excellent progress.
Outlawmws
Well-known member
Thank you. I just wish I planned things better with the weather so that I could actually paint right now......I always find myself doing work in the winter......
.
Large carboard box, 300-500 Watt reflector lamp = temporary "paint booth" for small jobs.
I like to let the parts get warm to the touch, or better still bake them in an oven or hit them quick with a torch (do this away from the temp paint booth) to get any sub surface moisture out of the metal, then go for it and leave the lamp on it.

Outlaw-
Interesting idea, I had been contemplating bringing everything (including the paint) into the house and letting it get to room temp over the course of a few days. Then taking it out into the garage to shoot the paint. Have you had any issues with your method and longevity of the paint job?
Interesting idea, I had been contemplating bringing everything (including the paint) into the house and letting it get to room temp over the course of a few days. Then taking it out into the garage to shoot the paint. Have you had any issues with your method and longevity of the paint job?
Outlawmws
Well-known member
Actually preheating was something that developed out of heating headers before painting with "high heat" paint as unless you did, the paint would blister off anyway. I started noticing the visible "flash" of moisture as we heated it and once it was gone then painting (after letting it cool just a bit... too hot and the paint will "boil" on the surface)
If anything I get better results on a warm to the touch surface, and for larger things like tool boxes I will leave them out to sit in the sun to "bake" before shooting them.
If anything I get better results on a warm to the touch surface, and for larger things like tool boxes I will leave them out to sit in the sun to "bake" before shooting them.
SUCCESS!!!!!!!! and a little failure......
I was able to get the pulley off this evening......it is still damaged from my previous attempts to gently remove it , but it is at least off
The pulley looks like it is a 1" 2" 3" 4", so I may be looking to replace it anyway....looks like they are under $30 from Amazon/ebay.....so not a huge expense. Anyway, here are the pics:


A few questions:
Does anyone know what size pulley these presses take?
Does anyone know how I could clean the phenolic balls from the handles?
I would like to rewire everything outside of the motor, does anyone have a different switch suggestion?
.
I was able to get the pulley off this evening......it is still damaged from my previous attempts to gently remove it
, but it is at least off The pulley looks like it is a 1" 2" 3" 4", so I may be looking to replace it anyway....looks like they are under $30 from Amazon/ebay.....so not a huge expense. Anyway, here are the pics:
A few questions:
Does anyone know what size pulley these presses take?
Does anyone know how I could clean the phenolic balls from the handles?
I would like to rewire everything outside of the motor, does anyone have a different switch suggestion?
.
Outlawmws
Well-known member
SNIP
A few questions:
- Does anyone know what size pulley these presses take?
- Does anyone know how I could clean the phenolic balls from the handles?
- I would like to rewire everything outside of the motor, does anyone have a different switch suggestion?
.
- You have it in your hand:

- See post No 50?

- Are you looking for a switch, or a location for the switch?
Those balls are the plastic handles? I'd give McGuire's Plastic cleaner a shot first, and if that won't take the paint over spray off, then try Simple Green (short times as possible, ) then assuming the paint is off, back to McGuire's Plastic Cleaner followed by McGuire's Plastic Polish.
Oops.....thanks Outlaw!

Outlawmws
Well-known member
Those two holes on the left side of the housing attract me for a location for a switch box that is in reach when operating the thing. (sometimes you need to be able to slap it off...). Just make sure it clears the lever on the back side of it.
I'd use a high grade toggle (10A minimum), preferably the type with the red safety cover the you can slap at blindly to turn it off. It also acts as a cover reducing the odds of an accidental turn on...
I'd use a high grade toggle (10A minimum), preferably the type with the red safety cover the you can slap at blindly to turn it off. It also acts as a cover reducing the odds of an accidental turn on...
justanengineer
Well-known member
Good job thus far, I admire your determination.
For polishing I'd highly suggest either trying your bench grinder or buying a cheapie on Craigs for that purpose. You dont need big power, 1/3 and sometimes even 1/4 hp is plenty. Its all about light touch and speed, not heavy handedness and power (the prior especially will remove parts from your hands instantly and/or burn your knuckles). If youve never done it, realistically all you need is a cloth wheel similar to the one youre using on your drill and a bit of rouge, play around and have fun with it. I'd bet most of that paint on the phenolic knobs will polish right off, if it doesnt I'd suggest either carefully using steel wool or scotchbrite + WD40 followed by the buffing wheel. As with everything else, when working with machinery (buffing) and small parts you need a bit of fixturing, ie, a long bolt to hold the knobs.
For the switch I'd highly suggest finding a good Cutler Hammer or Allen-Bradley industrial switch over a toggle or other cheapie switch any day, but Im also a big fan of "permanent" solutions vs ones that simply will work in the home shop. You dont necessarily have to buy new, CH and AB switches can often be cleaned/lubed and/or just plain used as theyre built like tanks. Regardless, the original location looks rather inconvenient to say the least.
jakemac
Well-known member
I've been buying these to put in handi-boxes for some of my machines. IDK if they will fit in your space though.
http://www.ebay.com/itm/380696719197?ssPageName=STRK:MEWNX:IT&_trksid=p3984.m1439.l2649
http://www.ebay.com/itm/380696719197?ssPageName=STRK:MEWNX:IT&_trksid=p3984.m1439.l2649


Outlawmws
Well-known member
I vote none of the above...
this is what I was talking about:

this is what I was talking about:
Outlawmws
Well-known member
I meant, what size belt does the press need?
I could not say fro direct knowledge but set the motor for a bit less than 1/2 the adjustment or so, and:
- measure center to center (X2)
- Measure the large pulley on one end and calculate the circumference, (divide by 2)
- Measure the small pulley on the other end and calculate the circumference, (divide by 2)
Add 'em up.
Got it.
I vote none of the above...
this is what I was talking about:
I think since I cannot find what I was looking for, this is what I will go with. Thanks for all our help, Outlaw.
.