You are using an out of date browser. It may not display this or other websites correctly.
You should upgrade or use an alternative browser.
You should upgrade or use an alternative browser.
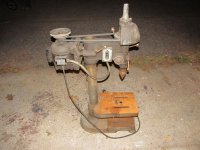
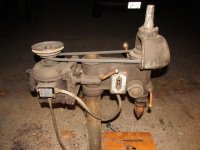
Walker Turner Drill Press - Rebuild
- Thread starter MAYOR28
- Start date


Outlawmws
Well-known member
Progress looks good Mayor!
Use a piece of wire to check the pulley for runnout. you can see the tiniest variations if you have a point of reference.
One of a very few things I'll say go to HF for: get a link belt. made in the USA too!
Use a piece of wire to check the pulley for runnout. you can see the tiniest variations if you have a point of reference.
One of a very few things I'll say go to HF for: get a link belt. made in the USA too!
Progress looks good Mayor!
Use a piece of wire to check the pulley for runnout. you can see the tiniest variations if you have a point of reference.
One of a very few things I'll say go to HF for: get a link belt. made in the USA too!
How do you do the wire check? with the motor running? I can probably get a dial indicator to check both the motor and the pulley....

Outlawmws
Well-known member
Just get a stiff wire bent around to point to the edge of one of the pulley vees, sort of close, then rotate the motor, you can tap on the on button to get it spinning or do it by hand, and you can, with the reference point, tell if its wobbling side to side (up and down..) or out of round.
Much quicker than a dial indicator, you only need that if something is amiss and need to measure the issue.
Much quicker than a dial indicator, you only need that if something is amiss and need to measure the issue.

Fretters
Well-known member
...so I am hoping to finish the rebuild in under 1 year.......kind of embarrassing, but oh well, so is life.
Too right it's embarrassing. The first year or two should just be the 'thinking about it' stage.
 Nice work you've done there. It's a credit to you.
 And I was able to polish the knobs:
You have absolutely no idea how hard it is, (no pun
 ), resisting the multitude of possible responses to that sentence.
 95riosnake
Well-known member
Awesome work, my WT restoration has been on hold for many months in favor of working on my mustang to hopefully take it for a spin before the snow flies. I'm gonna jump back on the WT soon, looks like I have some catching up to do!
Hi - I just found and looked through the 11 pages of your excellent floor model rebuild. About 40 years ago now I bought a group of Walker Turner tools - 10" table saw, 6" jointer, belt & disc sander, band saw, floor and bench drill presses. I've always liked their quality - all have the original "driver line" motors and run perfectly.
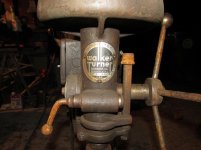
The chuck on my floor drill press has loosened on the spindle and I don't have a diagram showing how the spindle is assembled. The threaded collar above the chuck tightens against the collar above it before the taper tightens in the chuck. If you have a parts drawing or anything that would show how it's built I'd really appreciate seeing a copy. Thanks **** Bargeron - [email protected]
The chuck on my floor drill press has loosened on the spindle and I don't have a diagram showing how the spindle is assembled. The threaded collar above the chuck tightens against the collar above it before the taper tightens in the chuck. If you have a parts drawing or anything that would show how it's built I'd really appreciate seeing a copy. Thanks **** Bargeron - [email protected]
****,Hi - I just found and looked through the 11 pages of your excellent floor model rebuild. About 40 years ago now I bought a group of Walker Turner tools - 10" table saw, 6" jointer, belt & disc sander, band saw, floor and bench drill presses. I've always liked their quality - all have the original "driver line" motors and run perfectly.
The chuck on my floor drill press has loosened on the spindle and I don't have a diagram showing how the spindle is assembled. The threaded collar above the chuck tightens against the collar above it before the taper tightens in the chuck. If you have a parts drawing or anything that would show how it's built I'd really appreciate seeing a copy. Thanks **** Bargeron - [email protected]
I will throw some pictures up later, but I think you are talking about the knurled collar above the chuck, correct? When I disassembled mine I did not take the lowest stop collar off of the shaft (I think). So when I reassembled, I just put the collar back in place and tapped the chuck back on. I don't have a diagram, but have you looked over at OWWM?
Great reminder about OWWM - there was a link to http://vintagemachinery.org/pubs/808/2244.pdf
The exploded view shows an adapter collar part 30 - which on your machine is knurled. On mine it is smooth with spanner holes - and is retained to the Jacobs chuck with a snap ring. There's another "collar" above that with spanner holes - which also shows in your spindle picture. In the diagram this collar looks to be integral with the spindle. It doesn't show as a separate part. The diagram does show a set-screwed collar further up, above the quill. Anyway, my chuck will not draw all the way onto the tapered arbor - the threaded collar hits the next collar too soon. Thanks for the reply - I'll take it apart and report what I find.
P.S. It's amusing to be a "junior" member here - at most of the tractor, auto, and farm machinery sites I frequent I'm considered a fossil....er....senior member
Last edited:
Alexbn921
Well-known member
Looking good. The color came out great too. Now show us some action shoots.
Pics of some more progress. The belt that fit the best was a 46" (p/n: 4L460). With that installed I gave it its first test run in years.......and disappointment. There seems to be a lot of run-out with the chuck installed. I am hoping that for some reason the chuck is not seating correctly, or that the upper pulley is not fully seated (more likely). I am going to borrow a dial indicator and check for sources of the run-out.


Does this look too high? Or not seated properly?

HELP!!! Any suggestions on sources of error or something I did wrong?
.
Does this look too high? Or not seated properly?
HELP!!! Any suggestions on sources of error or something I did wrong?
.


I would probably make a bracket for that light to hang off of the motor plate. As for run out, you need that dial indicator to find the source. Start with the bare spindle, measure the top where the pulley rides and the bottom where the chuck goes. If it's bent, you can either try straightening it or finding a replacement. If it's straight, check it at the chuck end with the pulley seated. I forgot, did you change bearings?
I recall now, check it with an indicator, the bearings should not be the problem but you never know. Another thing, check the run out by spinning the pulley by hand first, then with the belt on. That new belt may be the problem, the ones without indents on the inside take a while to wear in good. I was using the green farm and garden belts until I realized they have a "memory" so to say, they hold a kink where they used to be in the belt package and every time that spot gets to the pulleys, it causes vibration through the machine. A good automotive belt with indents inside or a link belt will cut down on that vibration tremendously.
Outlawmws
Well-known member
You can start with a stiff wire to eyeball source of runout. An indicator ii only really needed if you need to measure it. Bend the wire tip close, near touching, and give it a spin working down/out from the spindle.
57JoeFoMoPar
Well-known member
Anybody would be proud to have that in their shop. Beautiful job with the resto and put that think to another 50 years of good use
Sonny2010
Well-known member
Thank you for sharing!
I was able to get the chuck apart to see if there was any grime and grit inside. There seemed to be a lot of small metal chips inside, so I cleaned it and re-greased it, but when I went to put it back together one of the jaws was extremely hard to get back in place. It finally did go back in, but the final result is that the jaws close nice and smooth to this point:

It then really takes a lot of force on the key to close them the rest of the way. I think that the chuck is true, so I am going to try to re-seat the quill and spindle to see if that is where the error is......
It then really takes a lot of force on the key to close them the rest of the way. I think that the chuck is true, so I am going to try to re-seat the quill and spindle to see if that is where the error is......
GirchyGirchy
Well-known member
Where did you source the bearings? Many W-T drill presses used oddball bearings so you can't order them from just anywhere. If you ordered them from Walker-Turner Serviced Machinery then you should have received a note about using some Loctite bearing retainer (like 609) to take up the slight slop.
Good job BTW! What paint did you end up using, was it that All Surface Enamel? I have my 1200-series apart and need to strip & paint one of these days...
Good job BTW! What paint did you end up using, was it that All Surface Enamel? I have my 1200-series apart and need to strip & paint one of these days...
Where did you source the bearings? Many W-T drill presses used oddball bearings so you can't order them from just anywhere. If you ordered them from Walker-Turner Serviced Machinery then you should have received a note about using some Loctite bearing retainer (like 609) to take up the slight slop.
Good job BTW! What paint did you end up using, was it that All Surface Enamel? I have my 1200-series apart and need to strip & paint one of these days...
http://www.accuratebearing.com
I am wondering if I need to take the spindle back apart and fit the bearings a little better. I may have someone check the spindle for true when it is out of the machine again.....
The paint in SW Enamel, it is a little soft, I think I should have added a hardener or clear over top, but oh well.....maybe next time.....


jakemac
Well-known member
Perhaps your rod isn't running true. Try another one and see if the results are the same. Measure up near the fingers of the chuck.
Perhaps your rod isn't running true. Try another one and see if the results are the same. Measure up near the fingers of the chuck.
I thought of the rod being out of true, but I do not have another, so that will have to wait for another day.
I will try closer to the chuck tonight when I get home,..
Outlawmws
Well-known member
Have you cleaned and lubed the chuck, and inspected the mating surfaces for wear or galling?
Including the mating tapers,.
Does the spindle adaptor indicate true?
Including the mating tapers,.
Does the spindle adaptor indicate true?
Have you cleaned and lubed the chuck, and inspected the mating surfaces for wear or galling?
Including the mating tapers,.
Yes, I cleaned the individual jaws with scotchbrite and reassembled.
Does the spindle adaptor indicate true?
Do you mean the internal taper on the chuck? Or the internal chuck piece?
Outlawmws
Well-known member
OK lets start at the spindle adapter (I hadn't noticed you were indicating off the Taper)
Indicate off the part of the taper nearest the spindle, and then near the tip. is the runnout consistent, and in the same place? Or is it more at the tip?
If the latter the adapter is either bent, in crooked or simply out of round.
If there is more at the tip than at the top, that gets increased out on the tip of your dowel even if the chuck is perfect.
- Has the adapter been removed from the spindle?
- If so were the mating surfaces cleaned and inspected for any galling or rust?
Indicate off the part of the taper nearest the spindle, and then near the tip. is the runnout consistent, and in the same place? Or is it more at the tip?
If the latter the adapter is either bent, in crooked or simply out of round.
If there is more at the tip than at the top, that gets increased out on the tip of your dowel even if the chuck is perfect.
Outlawmws
Well-known member
SNIP
Do you mean the internal taper on the chuck? Or the internal chuck piece?
The tapered part committing out of the spindle is a separate adapter from whatever the female taper inside the spindle is, to whatever taper the chuck is using. Rarely are they the same...
I was able to mess with the drill press again this weekend for the first time in months. I cleaned up the chuck internals and that runs really smooth now. I still have the run-out issue, but I was able to null out the spindle and chuck error to reduce the amount of chuck run-out. Net result = chuck run-out of .009" total. Not bad, I think. I am still disgruntled about the run-out, I feel like I shouldn't be able to see a drill wobble. So I have my eye on a replacement chuck.......if the price is right.