To avoid these ads, REGISTER NOW!

west of Philly - barn saving

OP
R

rieferman

Well-known member
Joined
May 18, 2009
Messages
2,586
Location
Collegeville PA (30 min west of Philly)
Nice! Thanks so much for posting pics! I'm glad you were able to follow my plans and even go off-plan to suit your needs. That was my hope and goal in creating this design. Your daughter will think of you every time she relaxes in those chairs!

(Side note: I've employed two additional "anti-warping" techniques as the PT lumber has dried. I've installed an additional brace on the back slats, and have installed a center brace on the seat slats.)
 
To avoid these ads, REGISTER NOW!
OP
R

rieferman

Well-known member
Joined
May 18, 2009
Messages
2,586
Location
Collegeville PA (30 min west of Philly)
I've long been interested in learning metal fabrication, but that needs to be "another day" because I still have a ton to learn in woodworking, and am a busy dad/professional/husband etc.

So, in the meantime, I've begun searching locally for a fabrication guy because I want to hire out a few small projects.

1)
For one, I've seen a few truck rim vise stands here on GJ over the years. I have no good spots for a vise in my shop, and really need a solution. A stand is the way to go in my case, but I need to be able to easily move it. The truck rim solution is perfect in my mind. Heavy, and able to be tipped/rolled.

2)
We have a metal chimenea that offers 360 degree viewing (i.e. you can sit all around it and see full fire), captures embers before they pop and hit kids/wife/dog/me, and it drafts smoke up the chimney above our heads. We love it.... except that it's cheap, thin metal, rusting out all over the place. So, I want to work with someone to design something that's tough as nails, and achieves the benefits we already enjoy. I think the design is something the fabrication guy could repeat and sell over and over actually, no good options are available online after many searches.

I've sent some emails to local shops that I found via a web search. We'll see.

(And, GJ'ers... if you're a local to me fabrication guy, or know one, let me know)
 

WhoWhatNow

Well-known member
Joined
Feb 22, 2011
Messages
1,890
Location
Collegeville, PA
I've long been interested in learning metal fabrication, but that needs to be "another day" because I still have a ton to learn in woodworking, and am a busy dad/professional/husband etc.


So, in the meantime, I've begun searching locally for a fabrication guy because I want to hire out a few small projects.


1)

For one, I've seen a few truck rim vise stands here on GJ over the years. I have no good spots for a vise in my shop, and really need a solution. A stand is the way to go in my case, but I need to be able to easily move it. The truck rim solution is perfect in my mind. Heavy, and able to be tipped/rolled.


2)

We have a metal chimenea that offers 360 degree viewing (i.e. you can sit all around it and see full fire), captures embers before they pop and hit kids/wife/dog/me, and it drafts smoke up the chimney above our heads. We love it.... except that it's cheap, thin metal, rusting out all over the place. So, I want to work with someone to design something that's tough as nails, and achieves the benefits we already enjoy. I think the design is something the fabrication guy could repeat and sell over and over actually, no good options are available online after many searches.


I've sent some emails to local shops that I found via a web search. We'll see.


(And, GJ'ers... if you're a local to me fabrication guy, or know one, let me know)


I may be able to help and I'm just up the road. I can certainly help with the vise stand and may have some suggestions for the chimenea. I have part of a stand if you can source a wheel. Shoot me a PM.

I am busy today but have a few hours of shop time carved out for tomorrow.
 
OP
R

rieferman

Well-known member
Joined
May 18, 2009
Messages
2,586
Location
Collegeville PA (30 min west of Philly)
Happy Memorial Day Weekend GJ! Thank you to all the men and women who have served our country!!!

Well, true to my self promise (and wife's requirements) I have been doing (almost) nothing since finishing up the pool deck project recently. It's been nice, but I'm starting to get that itch to do some stuff again.

Some ideas:
- Entry bench and shelf project
- Re-do split rail fence and gates (I think this will be the winner)
- build some bird houses (fun, but a better winter project)
- desk build (this is a big project and probably needs to wait)

Funny thing is that I was at my buddy's house the other day watching our kids play some basketball and his neighbor stops over to say hi. He sees me and is like "what's this week's project at your place?". I barely know the guy, so I'm sort of unsure how to respond. He goes on to say "we all laugh that you make us look bad to our wives because you're constantly improving your place over there.. looks awesome!". That felt nice - sometimes it's hard to tell if all the effort is making a difference or not. He's going to stop by for a barn tour soon, and he gave us some fresh eggs from their chicken coop. Win, win.

A little bit about the upcoming fence project noted above...

The first time around, we bought all the supplies at Lowes. The posts have all completely rotted out at ground level within 10 years. I'm not sure, but that feels like a short lifespan to me.

I replaced the posts at our front gate recently using material from our local Agway. The posts are noticeably thicker (about 1/2" wider in both directions) and heavier than the Lowes posts that I'd gotten years ago. The wood looks more like wood too, rather than the greenish PT posts from Lowes. I have to ask them what the difference is, but my gut tells me they're just better quality and will last longer.

Anyways, as I replace the fence, there are a few improvements that I'd like to incorporate this time around...

- I have a drive through gate that is quite wide and not that pretty. It sags because it's so wide. Solution = add a middle post in a sleeve, and have two smaller gates that terminate to that spot. I rarely need to drive through, so this will work nicely.

- The basketball court by my barn has a Frankensteined mish mash of fencing that I've rigged up over time that stops balls from constantly running into the bramble/bushes or down into the yard. It's about 8 feet tall and works well but looks like hell. So, as I split rail that that section, I'll be sistering a much taller posts into the same holes to create a nice looking version of this solution.

- The man gate up there needs to be replaced too.

- Lastly, I'd like lighting on the fence all the way around the yard. I'm thinking subtle down lighting installed on each post, either on a timer or dusk/dawn sensor. This would really add ambiance to the yard at night, and would also make it safer for the kids to run around.
 
OP
R

rieferman

Well-known member
Joined
May 18, 2009
Messages
2,586
Location
Collegeville PA (30 min west of Philly)
For father's day, one of my presents from the wife and kids was a Wi-Fi range extender. It's by "Belkin". I plugged it into the wall in my barn, where my Wi-Fi from the house barely reaches, followed a few easy steps, and here I sit in my barn rec room with awesome connectivity. Wow. Big win.
 

sublime68charger

Well-known member
Joined
Sep 9, 2014
Messages
5,415
Location
SW Wisconsin
Nice having good wifi out in the shop.

Mine reaches the front doing a better wifi system is on my to due list but that is way down on the list in the 50s or better.

Great thread you have here
 
OP
R

rieferman

Well-known member
Joined
May 18, 2009
Messages
2,586
Location
Collegeville PA (30 min west of Philly)
Hey Sublime! Thanks for dropping in :)

Yes, wifi in the shop (and the rec room above the shop) has long been a need/want of ours. Now, I just have to figure out a system to have a laptop out there without it getting all clogged with woodworking dust!
 
OP
R

rieferman

Well-known member
Joined
May 18, 2009
Messages
2,586
Location
Collegeville PA (30 min west of Philly)
This is completely bad-***, your building is like nothing seen here in a long time.....BUT GET RID OF THE EXERCISE EQUIPMENT!!!!!

LOL, thanks!!!

The exercise equipment was removed within the last year as we transitioned that room to what we now call the "multi-purpose room" because the use of the room shifts from time to time.

Sometimes, I use it as a finishing room. My son's indoor batting station is installed in there right now. Last night, I added a pull up (chin up) bar for my own use.

I think that space will continue to evolve.

-------

Speaking of evolving use of space... I have an old bench from my college days that has had the wooden slats replaced (by me) a few times in the last 20 years... Each time, I've simply slapped more paint on the metal parts to make it look new.

Well, after all those years, the bench just wasn't looking too hot anymore, and I had a need to lengthen the bench as well - we use it for the boys to rest between games on our basketball court each week, and just need more sitting space.

So, I decided to take the bench apart, and really try to restore it. 2x boards will replace deck boards to create a sturdier sitting surface, and allow me to stretch the bench out longer, to 8 feet in length. And the metal was all stripped with a citrus product, and then wire brushed, and spray painted.

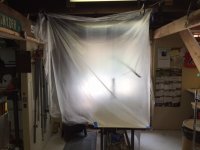
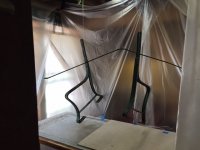
I didn't want to do the paint stripping outside, just in case I would get overspray on my steel siding, or nearby cars. So, to strip and paint, I created a temporary and rudimentary spray booth over top of my assembly table. I didn't have a ton of spraying to do, nor did I have a ton of fumes, so a window fan, open doors and windows, and respirator helped me keep this project manageable. Worked pretty well! More pics soon.
 

Attachments

  • bench redo_spray booth 1.jpg
    bench redo_spray booth 1.jpg
    59.4 KB · Views: 75
  • bench redo_spray booth 2.jpg
    bench redo_spray booth 2.jpg
    57.4 KB · Views: 87
OP
R

rieferman

Well-known member
Joined
May 18, 2009
Messages
2,586
Location
Collegeville PA (30 min west of Philly)
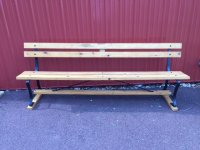
Well, that was one of those project that seemed simple ahead of time but ended up being a lot of work and thinking. But, the end result is a bigger bench to fit more kids on our basketball court, and maintaining a fun history for the bench components. Worth the effort.
 

Attachments

  • bench redo_complete.jpg
    bench redo_complete.jpg
    80.7 KB · Views: 135
OP
R

rieferman

Well-known member
Joined
May 18, 2009
Messages
2,586
Location
Collegeville PA (30 min west of Philly)
FENCE PROJECT

Recently, I talked about the upcoming fence re-do project that I have on my mind.

Those of you that have followed this thread know that I tend to think things through for quite awhile (Mrs. Rieferman calls it "obsessing") before making final design decisions and starting a project. This process allows me to make mistakes in my mind and usually end up with a better end result. Kind of a "measure twice, cut once" type of project management.

Anyways, I've been obsessing about the fence project and my brain figured out what I think to be some improvements as a result.

Background:
- Existing split rail fence (with wire mesh to keep the dog in) is rotted out at ground level consistently. Cheapie big box store posts and rails.

- Other than poor quality materials, we like the split rail look and functionality.

- Where the split rail fence goes behind our basketball court, it needs to be much taller to stop bouncing balls from constantly jumping out of the court into the yard. Current solution was a Frankenstein test solution from scrap materials where each post was extended to 8 feet tall with 2x4's and wire mesh. Works pretty well, looks like hell.

- Existing gates (which I built long before I had any beginnings of skills) ****. They're ugly too. Especially the drive through gate which sags like crazy and is hard to open and close.


Basketball court fence idea

- I'm still forming on some of this, so please chime in.

- Let's start with the basketball court needs, as this is one of the primary areas for improvement.

- I'd like the fence to be 9-10 feet tall around the court. I don't want to really be able to see the tallness of it from the rest of my yard / house. And I want it to be strong enough to withstand the volume of play the court gets (which is a LOT).

- BUT, I'd also like the lower portion to look like split rail to match the rest of the yard.

- I think the solution is... Put in a chain link fence for height and sturdiness purposes, and build off of it to get the split rail look too. I'm guessing you can buy black posts and chain link, which would visually disappear (or at least be less noticeable) from a distance. The posts would be set in concrete. And, to get the split rail look, I would cut split rail posts to length (so they sit on the ground but do not go into the ground) and affix them to the chain link posts using some sort of brackets (like U-brackets or similar) or bolting through the chain link posts into the split rail (e.g. Timberlocks).

- My questions are... Would chain link posts be able to achieve the height and "weight bearing" needs as I describe it here? Split rail spans 10+ feet... can chain link span that far? Is chain link DIY?


Rest of the fence ideas

- The rest of the fence is much easier to solve.

- I plan to use Locust posts and rails this time around. From my research, this appears to be the best option for longevity.

- Gravel in the bottom of each post hole is another trick I've read about in terms of helping posts last longer.

- I have a nice gate design that I'll be using. It's similar in concept to how I built the pool deck gate recently.

- For the drive through gate, I will split it into two gates this time around. Where they terminate in the middle, I will have a removable post that slips into a sleeve in a concrete collar.


So, the chain link / bball court questions appear to be the items I need help with. Any thoughts?
 
OP
R

rieferman

Well-known member
Joined
May 18, 2009
Messages
2,586
Location
Collegeville PA (30 min west of Philly)
I decided to get a quote from a fencing company for the project described above. Quote came to almost $9,000.

Ha ha ha ha ha ha ha haaaaaaaaaaaaaaa

For less than 100 feet of split rail fence (where the holes are already dug!!!) and 40 feet of chain link... and with ME building the gates myself... I just can't justify that kind of spend.

I'm not necessarily saying the price isn't fair.. they have equipment, trucks, employees, insurance, etc. But, this is why I always end up doing the work myself. I predict I can do the whole job for under $3K.
 
OP
R

rieferman

Well-known member
Joined
May 18, 2009
Messages
2,586
Location
Collegeville PA (30 min west of Philly)
Priced out materials for the basketball court portion of this project... $600.

Instead of chain link, I'm going with wood posts in sleeves surrounded by concrete (to allow me to swap out posts over time if ever needed) and 12 gauge black coated welded wire.

Materials quote for the split rail portion of the project will be a second step because I expect this to take me a couple weekends to complete. But, $600 is far better than $9,000, and the end product will be much more pleasing aesthetically.
 
OP
R

rieferman

Well-known member
Joined
May 18, 2009
Messages
2,586
Location
Collegeville PA (30 min west of Philly)
A couple shop projects recently. Nothing fancy, but fun.

The first...
My buddy/neighbor asked if I could turn an old barn door and barn beam into a coffee table for him.

The beam was about 10 x 10 and in tough shape, but milled up nicely to make the aprons and legs after considerable effort. The apron boards sit on a cut shoulder. Very strong. (edit: the lines you see on the table legs are just chalk marks that will clean right off during sanding)

The top (aka door) is entirely "as is" per his request.

He has responsibility for the sanding and finishing steps, but you can get an idea of how it turned out below.


The second...
My daughter doesn't get as much "daddy time" as my son because she's just not as much of a sports junky as we are. My boy and I are constantly playing hoops or baseball together.

But, she's shown an interest in the woodshop, so we decided to get some one on one time by building a project together.

After some searching, we decided on making a candy dispenser.

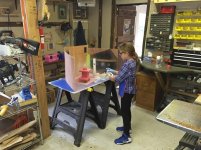
While I had to do most of the cuts, she was able to read/understand the plan, operate the drill press, hammer in the finish nails, do all sanding, and prime/spray paint. (Note: During painting, we had all doors/windows open, and two big exhaust fans running)

She had a blast and is proud of the end product.

Best part for me was when my wife came out to visit... my daughter quietly takes her aside and tells her she has to leave because this is our special time together. LOL.

Now she's already bugging me to do another project (which I'll happily oblige).
 

Attachments

  • finished project.jpg
    finished project.jpg
    57.1 KB · Views: 171
  • Emi painting.jpg
    Emi painting.jpg
    90 KB · Views: 181
  • buttercup likes the table.jpg
    buttercup likes the table.jpg
    58.5 KB · Views: 168
  • barn wood table.jpg
    barn wood table.jpg
    71.7 KB · Views: 159
Last edited:

Hannibal Selector

Active member
Joined
Jul 4, 2015
Messages
30
Location
US Pacific Northwet (no, not a typo)
What up, rieferman?

My 1st post on your thread.

From one of your recent posts: "I wasn't sure how interesting the woodworking stuff was
on a "car guy" website...Glad to know it's of interest to some!"

I'm guessing this thread resonates among a great many GJ'ers whether they're deep into
woodcraft or not. We're all about self-reliance, creativity, and problem-solving. I worked my
way to here from the beginning of your thread. Even though I'm way more oriented to metal-
work, automotive, and machinery in general, i still found it though-provoking. What you have
here is an engaging and detailed chronicle of achievement, learning, attitude, progress,
visualizing and following that vision - and balancing the pursuit of your vision with work &
family. (And of course, building/outfitting and using a Really Cool Shop.)

That, and there's just something about the theme of barn resurrection that will strike a
chord in just about anybody.
 

Hannibal Selector

Active member
Joined
Jul 4, 2015
Messages
30
Location
US Pacific Northwet (no, not a typo)
BUT WAIT! THERE'S MORE!

I do have to throw in my 2 cents on safe rigging:
In some of your earliest posts, you mentioned some hairy moments with eye bolts
starting to fail - and having to pull back from straightening up the structure as much as
you'd have liked. I'm surprised nobody brought up the subject of one-piece forged eye
bolts. I will now, for the benefit of anybody else that may be looking at a project similar
to yours. One-piece forged eye bolts won't un-scroll, and best of all, finding them doesn't
always mean a visit to an industrial supply house; your better hardware stores often carry
them - you just have to look past the zinc-plated junk. They'll often be with the fencing
stuff or near the wire-rope & chain display. They're similar to the eye bolts you often see
screwed into the top of large electric motors, compressors, gensets, etc., which are then
used for flying same via cherry-picker, chain-hoist, crane... you get the idea.

Overall, it's best to do lots of homework on taking a life-critical approach to all your rigging
in cases like this. Say you're eye-splicing a wire-rope, don't use one saddle-clamp or
fist-grip, use three - torqued, spaced and oriented as specified for life-critical applications.
Etcetera.
Okay, end of shpiel. :D
Love the home-grown walnut, BTW. That stuff is gorgeous!
 
OP
R

rieferman

Well-known member
Joined
May 18, 2009
Messages
2,586
Location
Collegeville PA (30 min west of Philly)
Hey! Sorry for the delay, I didn't see this right away. Great posts, thank you for taking the time :)

As for the eye bolts... Yeah, Today Version of Rieferman knows exactly what you describe... Years Ago Version of Rieferman did not. Sigh. That's the trouble of being self taught - sometimes you don't learn everything in time. Good write up though as I hope others do learn this particular item in time as it will lead to better safety and results for them in their projects.
 
To avoid these ads, REGISTER NOW!

Hannibal Selector

Active member
Joined
Jul 4, 2015
Messages
30
Location
US Pacific Northwet (no, not a typo)
Ahh, yasss, the old "If I knew then what I know now"...
There are two types of people: those who admit to having
been there - and liars. :D

Split-rail tied in to powder-coated chain-link for your b-ball
court containment sounds like a good idea. I'm sure with your
eye, you'd find a way to make it look good. I've seen powder-
coat 'link in green as well as black, FWIW to ya.

I will throw this in: at 10 or so feet of height, footing it a bit
deeper would be cheap insurance. It's easy to underestimate
how much sail effect that stuff can have. I've seen standard
job-site fencing blow over more than once on a windy day. :eek:
 
OP
R

rieferman

Well-known member
Joined
May 18, 2009
Messages
2,586
Location
Collegeville PA (30 min west of Philly)
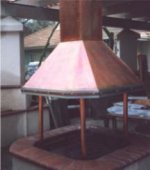
A page ago (post 88) I talked about the fire pit hood that I am interested in building.

Basically, similar to a kitchen hood that you'd see over a large commercial cooking area, or over a hibachi grill at a restaurant, I want something that will catch and funnel smoke from above a fire pit.

Our existing metal chimenea works great in terms of holding very nice fires and keeping smoke out of your face, but the fires are just too small to truly warm you up in the colder months. The exposed fire area is 360 degrees, but only 18" tall by about 20" wide. And, the fire area is raised about 18" off the ground, so the fire warmth only hits your knees and upward.

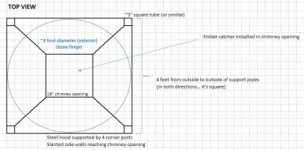
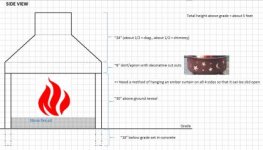
So, the hood concept would be installed over a larger circular design fire pit. This enables a much larger fire to be built, lowers the warmth closer to your ankles, and opens up the height and width of exposed heat radiation (to 48" wide x 30" tall).

A buddy of a buddy mentioned he'd be interested in quoting me for the work as a side job. Full time shops quoted me $2,000..... not gonna happen (although I'd be willing to spend significantly more than junk chimenea's which don't produce the results I'm seeking and wear out quickly).

I'm open to local GJ'ers that may be interested in a side job too.

Some rough specs I drew up, and an "inspiration" example picture are attached. Each square = 3".

Thoughts?

edit: Anyone know why my pics aren't working? They look like filenames instead of thumbnails...
 

Attachments

  • inspiration EXAMPLE.jpg
    inspiration EXAMPLE.jpg
    8 KB · Views: 139
  • Top View - each box is 3 inches.jpg
    Top View - each box is 3 inches.jpg
    20.9 KB · Views: 107
  • Side View - each box is 3 inches.jpg
    Side View - each box is 3 inches.jpg
    19.9 KB · Views: 91
Last edited:

Kevkx125

Well-known member
Joined
Dec 26, 2013
Messages
3,394
Location
DOUGLASSVILLE, PA
Hey rieferman I have a buddy who's a fabricator, I think he would be interested in the job and he is not that far from you he is in spring city.
 
OP
R

rieferman

Well-known member
Joined
May 18, 2009
Messages
2,586
Location
Collegeville PA (30 min west of Philly)
The second story of my barn is about 2/3 recreation room, with the other 1/3 being "attic" storage. I used all the excess materials I had on hand at the time to insulate and enclose the walls (I didn't do a super careful job, but it's functional) and then proceeded to throw tons of junk in there.

The basement of our house is another repository of junk. The issue there is that our basement is always somewhat damp, so I don't want stuff stored down there anymore.

So, yesterday I picked up materials to build a bunch of heavy duty storage shelves in the barn attic. Everything from the basement, and all the junk in the attic already, will be organized into the attic space so that I have an empty basement, and easy access to all the stored items.

The attic space also has a secondary work bench area that will become usable. I originally envisioned this work bench as my spot to figure out / plan plumbing and electrical work - two task types that I don't do frequently, but have materials on hand to accomplish most jobs.

Pics later

(and, Happy New Year!)
 

Hannibal Selector

Active member
Joined
Jul 4, 2015
Messages
30
Location
US Pacific Northwet (no, not a typo)
Just a shot in the dark re your hood project - are there any trade schools
in your area with a sheet-metal shop? Maybe an instructor or department
head would be willing to take it on as a class project for min $ on your end.
Or at the very least give you a little direction on where or how to seek out
the best deal among the vendors in your area. :dunno:

Would creosote build-up ever be likely to become an issue in your situation?
If so, does your design allow for easy (okay, less PITA) clean up?
And you've considered wind stability too, I assume? (Hey, it's an election
year - I can sound like a broken record if I want.:bounce:)
 

curdy

Well-known member
Joined
Mar 20, 2009
Messages
124
Location
Charlotte, NC
Hey Bob, we had a local sheet metal shop make a large stainless cap for our chimney. This was for the walk in kitchen chimney that was over 6'L and 2'W. Ita probably equal to more than half the metal you'll need and may have taken more labor with bending. That cost me $500 I believe. My tenant over in Malvern has a brake and could probably put one together for you at a reasonable price.
 
OP
R

rieferman

Well-known member
Joined
May 18, 2009
Messages
2,586
Location
Collegeville PA (30 min west of Philly)
Hey guys! Sorry for the delay in reply, for some reason my "subscription" to my own thread doesn't always notify me that someone has been here.

Kev - thanks for introducing me to Doug! What a cool guy.

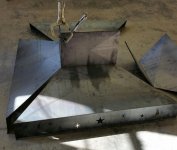
As background for everyone else, Doug built race cars for 20+ years and is as good as it gets on the welding and fabrication side of things. He decided to start up his own business, and thanks to Kevin's introduction, he is producing the fire pit hood based on my design.

He's using mild steel, I forget what gauge, but it's thick and sturdy. We haven't decided if I'll "season" it, or let it rust for rustic effect.

I went over the other day to see his shop and hang out a little bit. He patiently explained what each piece of equipment was for, showed me a car he's building for a client, and treated me to a cold beer too. Awesome guy.

Before I got there, I got to thinking that the scrap from the first series of cuts may easily be fashioned into the fire ring that will sit beneath the hood. I had a few design ideas, both aesthetic and functional. A quick sketch accompanied me on my Doug visit, and was added to the order after a quick conversation. Always good to meet good people.

Anyways, here's some of the work in progress pictures so far:
 

Attachments

  • bent.jpg
    bent.jpg
    120.4 KB · Views: 179
  • cut out.jpg
    cut out.jpg
    79.5 KB · Views: 182
  • materials.jpg
    materials.jpg
    135.6 KB · Views: 147
OP
R

rieferman

Well-known member
Joined
May 18, 2009
Messages
2,586
Location
Collegeville PA (30 min west of Philly)
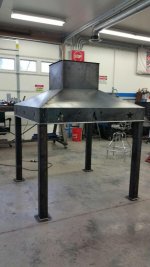
Doug sent me some progress pics this morning. Clamped up and welded now!!!

He's making the legs next. 3"x3" square tube with feet on the bottom. They slide into pockets in each corner.

Then, the fire ring for underneath.

COOL!
 

Attachments

  • clamped.jpg
    clamped.jpg
    62.4 KB · Views: 79
  • welded.jpg
    welded.jpg
    86 KB · Views: 84
OP
R

rieferman

Well-known member
Joined
May 18, 2009
Messages
2,586
Location
Collegeville PA (30 min west of Philly)
Thanks!!!

We'll have the hood here this weekend, and the fire ring the following weekend.

Right now, the legs set the hood at 36" above grade... I think we'll end up shortening to between 24-30" for best chimney draw, but it's easier to start long and trim than to find a metal stretcher.
 
OP
R

rieferman

Well-known member
Joined
May 18, 2009
Messages
2,586
Location
Collegeville PA (30 min west of Philly)
Above, in post 906, I mentioned the storage project in the 2nd story of the barn but never got around to posting pictures.

(Side note: We did achieve our goal of completely emptying our basement and our house attic.. with plenty of room to spare)

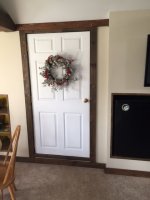
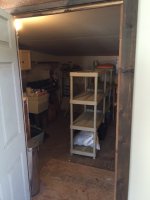
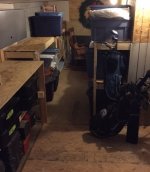
Basically, it's an L-shaped space that you enter from the finished recreation room.

A you enter, and to the left, I re-used some Rubbermaid storage shelves that were previously in the basement. A bunch of extra materials (old drawers, plywood shelves) create more storage.

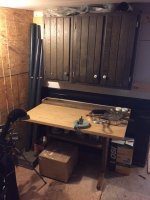
Center, some scrap plywood, and some free metal cabinets create my electrical/plumbing/HVAC work station. I don't do those tasks as frequently, so freeing up shop space downstairs makes sense.

To the right, I built 4 shelves that are each 10 feet long and sturdy enough for me to jump on. All my wife's holiday decorations, seasonal storage items, etc. etc. etc. fit here easily.

And a recycled set of cabinets and a scrapped together table create a paint area. Since this storage area is insulated (but not heated) is tends to stay above freezing no matter how cold it gets, so this is a good spot to store that sort of thing.

It ain't pretty, but the space is very functional, and I spent a grand total of about $150 on all of it.
 

Attachments

  • storage entry.jpg
    storage entry.jpg
    64.2 KB · Views: 93
  • storage left.jpg
    storage left.jpg
    66.6 KB · Views: 99
  • storage center.jpg
    storage center.jpg
    51.5 KB · Views: 112
  • storage right.jpg
    storage right.jpg
    54.1 KB · Views: 105
  • storage paint.jpg
    storage paint.jpg
    86.9 KB · Views: 102
OP
R

rieferman

Well-known member
Joined
May 18, 2009
Messages
2,586
Location
Collegeville PA (30 min west of Philly)
Double-post Friday!

Also, we signed our contract yesterday for a big home renovation.

- New siding
- New windows
- Chimney work
- Lower roof replacement
- Screened porch to sunroom conversion (although only one bullet in this list, this is a big one)
- Front porch railing re-do

AND, I started the fencing project mentioned recently. I have all old fencing down, materials have been delivered, and I begin digging holes this weekend.

FUN!
 
Last edited:
OP
R

rieferman

Well-known member
Joined
May 18, 2009
Messages
2,586
Location
Collegeville PA (30 min west of Philly)
I spoke with 3 contractors...

1) I know one guy's work very very well...
2) One was sort of a "control" selection - a larger / more corporate selection.
3) And the third was based on seeing his signs show up at several local houses repeatedly over the years.


I ended up going with #3 after visiting several of his other local jobs that are similar scope of work. He and I got along great, my wife feels comfortable with him, I liked his work, I love that locals in my area are using him on a repeat basis, his office is 2 miles from my home, and I liked his quality of work. His pricing was right in line with what I anticipated (I used to sell construction projects, so I usually have a pretty good feel for pricing) and in the same ball park as the other two quotes. In all, details checked out and the "gut feel" did too.

His crew is doing soup to nuts on this project (edit: except the chimney work). I am separately managing some of my own subs for pieces of the project not listed above (edit: e.g. electrical and HVAC).
 
Last edited:
To avoid these ads, REGISTER NOW!
Top Bottom