To avoid these ads, REGISTER NOW!

west of Philly - barn saving

OP
R

rieferman

Well-known member
Joined
May 18, 2009
Messages
2,586
Location
Collegeville PA (30 min west of Philly)
thanks for the comments guys! :beer:


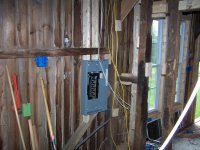
I'm not sure if everyone will be proud or disappointed in me... but, in any case, last night I decided to hire out the electrical work. My electrician friend did note that he was "very impressed" with my level of understanding, and my wiring diagram was on the money with just a few small upgrades on his part. He's just cutting me such an amazing deal for his work, and I'll still have plenty of grunt work like hanging boxes, trenching, glueing PVC together, drilling holes for him... Well, it just makes so much sense to pay him.

Ok, I'll give you a number.. For wiring the panel, and wiring the entire building (all outlets, all lighting).. About $300 labor (ended up being $500, still a deal! 08/24/09). We made up a supplies list that I'll be separately picking up (except a few items that he can get cheaper than home depot). I think that's an exceedingly good deal.

I'll watch and learn for future reference, and I've learned so much from reading already. But otherwise, end of July he's coming over to bang this out!

So, between now and then... rest, enjoy the summer, heal.

After electrical is in, I'll insulate and drywall, and then take the rest of the summer off. Do work in late Fall again when it's cool out.

edit: we also decided to put baseboard electric heat into the workshop as well as the exercise room. The space is small enough that this will work nicely and take the edge off in the winter.
 
Last edited:
To avoid these ads, REGISTER NOW!

heffneil

Well-known member
Joined
Apr 12, 2009
Messages
722
Location
Naples FL
I don't think anyone would be disappointed. I have recently learned that you have to pick your battles. The problem is I am not fighting any of them these days. For $300 how can you go wrong and you can probably sleep a little better at night knowing someone who does it for a living is doing the work. Sure you can read a book and do your best but there is nothing like experience!
 

Bull

Super Moderator
Joined
Dec 12, 2005
Messages
16,189
Location
MA
There's no shame in taking advantage of a great deal like that. As you said, in addition to having read, you will now be able to watch a pro do the work. That will give you an even better idea of how the job is done, so maybe for your next project, you might feel better tackling it. But, for that price, I'd just always let the electrician friend do the work!
 
OP
R

rieferman

Well-known member
Joined
May 18, 2009
Messages
2,586
Location
Collegeville PA (30 min west of Philly)
Cool, I feel even better about it.

I was over simplifying the job to match my skills.. And he's like "Dude, you definitely need to stagger the circuits here, and you need a 3-way over here, just think of the flow of how you'll use the space!" and the more we got into it, and then when he told me the deal he'd cut me, it was just a no brainer.

We'll be getting him his favorite case of beer, a batch of my wife's famous cookies, and having a little barbecue after the work is done. Friend pricing deserves friend treatment in all these other ways too. :thumbup:
 
OP
R

rieferman

Well-known member
Joined
May 18, 2009
Messages
2,586
Location
Collegeville PA (30 min west of Philly)
holy cow, buyer's remorse!

2+ hours at the depot last night.. I actually really like this particular home depot (in fact in the lowes vs. depot argument, I don't think there's a comparison.. depot, hands down). the employees are all pros working there to get benefits. And they just have a good culture - all really nice guys. I see them being nice even to the idiots and people that do stuff like pay someone else to mow their lawn. And they're especially nice to guys like me that have done their homework and are willing to listen and learn.

Anyhow, I bought all the electrical supplies and it was exhausting. Frank (the electrician on staff there) spent the entire 2 hours making sure I made the right choices and could find everything. He was totally unbelievable. I sent a gushing email to his boss this morning.

I got:
- 12-2 for receptacles
- 14-2 and 14-3 for lighting
- 2 new flourescant lights for exercise room (will re-use existing fixtures everywhere else)
- 15 amp receptacles (both electricians couldn't justify spending major $$$ on 20 amp receptacles.. they both independantly said they'd use really top shelf 15 amp recepts. in their own house even though it's a 20 amp circuit.. shrug)
- all switches, boxes, cover plates
- 125 amp homeline load center with 20 spaces and main shut off
- 2 gauge aluminum wire
- conduit and bends etc. for that wire
- 2 baseboard electric heaters (48 inches each.. gives me about 6500 btus in a space that needs about 5000) as well as a wall mount thermostat to control them.
- Some other stuff that I'm forgetting I'm sure

Spent $861. Ouch.
 

curdy

Well-known member
Joined
Mar 20, 2009
Messages
124
Location
Charlotte, NC
Have you looked into getting any 10% coupons for HD? They're not hard to get, and saving $86 isn't too shabby. The other option is to get a contractor account with them which comes with the same 10% discount. I never looked into it, but I have to imagine that you could certainly justify yourself as the contractor for your property. Look into it, couldn't hurt.
 
Last edited:

heffneil

Well-known member
Joined
Apr 12, 2009
Messages
722
Location
Naples FL
It sure does add up quickly! I go in for a light bulb and somehow spend $100!? In Delaware I like Lowes better. In Florida I like Home Depot but a particular one. It is cleaner, smaller and less rummaged through. Ultimately if there aren't good processes in place and good management to keep them in check then it one isn't better than the other across the board.

In Delaware the lowes had polished floor, white ceilings and bright white lights. The older Home Depots are all getting their floors polished and they are painting the ceilings white and replacing the fluorescent lights with high bay lights.
 

heffneil

Well-known member
Joined
Apr 12, 2009
Messages
722
Location
Naples FL
I think with a contractors account you have to spend a certain amount $2500 on a single order and then you get special pricing. You get it for 2 weeks after. After the 2 weeks you have spend another $2500. M<y buddy said he sometimes he gets 20% off items but sometimes you are better of with the 10% off coupons he said.

Neil
 

curdy

Well-known member
Joined
Mar 20, 2009
Messages
124
Location
Charlotte, NC
I think with a contractors account you have to spend a certain amount $2500 on a single order and then you get special pricing. You get it for 2 weeks after. After the 2 weeks you have spend another $2500. M<y buddy said he sometimes he gets 20% off items but sometimes you are better of with the 10% off coupons he said.

Neil

Interesting, I wouldn't be surprised if there is some sort of minimum as you mention. I wonder if there are different levels though. Again, probably worth asking.

Also, regarding the 15 vs 20 amp receptacles, I would agree that there's little need for more in areas like the exercise room...but your shop is a different story. There are a lot of 120V tools that draw 15 amps...and could trip the gfci recep. If you have 20 amp breakers and the right gauge wiring to the shop, put the 20 amp receps in.
 
OP
R

rieferman

Well-known member
Joined
May 18, 2009
Messages
2,586
Location
Collegeville PA (30 min west of Philly)
Hey guys, in case you don't bump into my separate thread on the 15 amp recpt / 20 amp circuit topic.. here's the link:

http://www.garagejournal.com/forum/showthread.php?p=524423#post524423


the long and short of it is that it is fine to do this except in circumstances where the circuit only feed a single dedicated outlet. In those instances, 20 amp recpt. Otherwise, 15 amp is fine.
 
OP
R

rieferman

Well-known member
Joined
May 18, 2009
Messages
2,586
Location
Collegeville PA (30 min west of Philly)
What a nice long weekend. The weather was beautiful, we had multiple camp fires, saw fireworks, took kids to the pool. It was just great. Back at work to recover from my time off! ha ha

Also, lots of barn work was squeezed in this weekend:
- got the entire second story cleared out and organized
- got the junk pit next to the barn cleared out into "Burn", "throw away", "keep" piles.
- Burned most of the "burn" portion in above mentioned camp fires. Mostly barn wood not worth saving, and cutoffs etc.
- Got garage door entry area graded so I can drive in nicely. It still needs a permanent solution but this will get me by for quite awhile
- Oh.. while doing that grading (by hand/shovel) I dug and installed drainage pipe too. Later, when I do the gutters on the building, all the water will eventually meet up and travel through this pipe, and then be directed out onto the street. Our yard is very wet due to underground springs, so we have a gravel field under the grass that helps the issue. During the rainy season, it's difficult to fight the issue. The barn is just above the yard, and the roof area that is dumping towards the yard pours about 500 gallons of water for each inch of rain that falls. That's a lot of water to give to an already-wet-from underneath clay soil area. So in the near future, all that water will instead go out to the street, which empties into a storm drain that replenished the creeks. Much better. Well, it will be much better.
- Got a temporary ramp in place by mower door so that I can get the mower in and out there.
- "boxed out" the barn in preparation for electrical work in a couple weeks. I'm going to be very busy on non-barn stuff (gasp!) for the next 2 weeks, so I needed to get that done. It's kind of cool to start feeling how the space is going to work, and little things like anticipating where I'll be able to plug stuff in is fun.

And, last night was hanging with my neighbor (long overdue too.. I've been so busy on the stupid barn, I don't see anyone these days) and he mentions he needs a nice tool box for his house. Has one in both of his trucks, in his wife's car, a full cabinet in his detached garage... but not one in the house. So, I trade him the nice red metal waterloo tool box with 2 drawers that I showed a few pages ago for a made in the USA craftsman set of drawers. He bought a 3 piece set years ago, and never used the middle set of drawers. Still brand new in the box. With a spare set of keys even. I'll post a real picture of them, but here's approximately what I got (just grabbed a picture from their website.. I think these are cheaper grade these days?)
 

Attachments

  • craftsman drawers.jpg
    craftsman drawers.jpg
    22.8 KB · Views: 137
OP
R

rieferman

Well-known member
Joined
May 18, 2009
Messages
2,586
Location
Collegeville PA (30 min west of Philly)
Relatively no barn work going on right now. Finished sqirrel proofing the 2nd story. Cutting and stapling hardware cloth = crappy work. That's really about it right now. Might do some siding patching over the next little while, but mostly taking it easy after months of pushing way too much on this. :)

edit: Oh, I forgot another poor man's job we finished the other night. Just a mini one but it was cool anyways. Some background.. One of my hobbies is that I'm a professional level hacky sack player. Yes, I understand it sounds really funny. We were featured at the X-Games, we've had players do half time shows for the Chicago Bulls, a friend of mine is sponsored by Pepsi in Europe etc. PM me and I'll send you a video if you don't believe it. Anyhow, I have an old Wham-O banner (they used to make hacky sacks in addition to the frisbee's that they still make) from a tournament I held years ago. I have two windows in the barn that face the neighbors house - they're always outside and I feel like they're constantly looking in at what I have going on, so I wanted to block their view.. Plus, those windows are always shut/locked, so no need to be able to reach them easily. These are the windows that are behind the yard tools storage and lumber storage from previous pictures that you saw recently. We simply cut the banner exactly in half, and it perfectly covers each window. The banner is white with a red logo, so light filters through it still, and the red logo looks like a cartoon drawing of fire. So each window from the outside now looks like there's a fire in it. Will take pics tonight and post.

It was just one of those "nice, perfect fit, perfect solution, zero cost" moments that makes you smile even though it wasn't a big deal.
 
Last edited:
OP
R

rieferman

Well-known member
Joined
May 18, 2009
Messages
2,586
Location
Collegeville PA (30 min west of Philly)
well, my daughter just had her 2nd birthday this past weekend. Great weather, and no barn work, lots of family and friends. :beer:


Now, back to reality. Here's my upcoming to do list until the electrical happens in two weeks:
- box around the beam in the exercise room so that when it’s drywalled later you will not be able to tell that the beam is crooked (it's sturdy as hell, I just want this one room to look straight).
- use the old wood siding that I saved to close in the two oddly placed windows on the side that faces the yard, and to close in the crappy gable windows too so I can instead install gable vents up a little higher.
- Build the rest of the storage shelves under the stairs
- Spray for hornets and ants and everything else
- finish the "cat house" (cat isn't allowed in the barn anymore.. he tends to "mark" his [MY] territory)
 

wrigh003

Well-known member
Joined
Mar 27, 2006
Messages
783
Location
Birmingham, AL
One of my hobbies is that I'm a professional level hacky sack player.

I would NEVER have guessed that. I used to love me some hacky sack in high school/ college. Wasn't very good, but could usually keep kicking one around without a drop for quite a while, given a couple other not-terrible people to kick with.

Fun game. Maybe I should teach my kids... :thumbup:
 
OP
R

rieferman

Well-known member
Joined
May 18, 2009
Messages
2,586
Location
Collegeville PA (30 min west of Philly)
ok ok, here we go :) here's a vid of my hobby. Let the sarcastic remarks begin ha ha

Bob the barn builder playing some mean hacky sack


edit: ok, some background info on the hacky hobby.

Basically, the sport began as a "kick a bean bag around in a circle at a Grateful Dead concert" type of pass time.

Over the years, following the lead of "freestyle frisbee", players started to learn to stop/stall/delay the ball and to do "dexterities" where you move around the ball during it's rise/fall.

Each trick, similar to skateboarding, has a difficulty rating of points. If you throw the ball into the air and do one dexterity, that's 1 point. If you move around it multiple times during a single rise/fall of the ball, that's more points. Etc.

I play at a relatively high level (especially for a 33 year old) compared to the world. Probably a top 100 player or so in the USA. Certainly top 10 in PA. In the video, all my tricks are 3 points or more (that's a standard that good players try for).

I started playing for fun at concerts etc. Eventually found there was more to it. In 1999 I had open heart surgery (that's another whole long story.. suffice to say I am 110%, no limitations now) and decided to really get into the sport as a fun way to rebuild my fitness levels. Haven't looked back since (other than to find the ball behind me).

If your kid is interested, have them check out www.footbag.org
 
Last edited:

dreamingmuscle

Well-known member
Joined
Dec 4, 2005
Messages
3,472
Location
Tryon Oklahoma
Just a quick thought on the electrical. Anywhere you plan on storing things, wood, tool boxes etc. Place the Recept boxes at least 4 feet off the floor. That way when you lean a piece a plywood or something against the wall you can still get to them.

Nice build BTW

Glen
________
GM Atlas engine history
 
Last edited:
OP
R

rieferman

Well-known member
Joined
May 18, 2009
Messages
2,586
Location
Collegeville PA (30 min west of Philly)
dreamingmuscle wrote:
Anywhere you plan on storing things, wood, tool boxes etc. Place the Recept boxes at least 4 feet off the floor. That way when you lean a piece a plywood or something against the wall you can still get to them.

Funny you should mention that... I picked 55 inches off the floor because in one spot I had plywood leaning against the wall, and I just picked a height that left enough room for that plus a margin of error... It felt comfortable so I used the same height for the others as well.

Great minds think alike... Although my wife has another version of that saying. :lol_hitti

and cyclopsblown34 wrote:
I'm assuming you manage to play with both hands empty.

Depends.. if I'm being serious, then yes, I play in athletic gear and without anything "fun" in my hands. But, there's plenty of time to just play for the hell of it. In which case anything goes :)
 
Last edited:
OP
R

rieferman

Well-known member
Joined
May 18, 2009
Messages
2,586
Location
Collegeville PA (30 min west of Philly)
I promise some pics by end of the weekend.

Yesterday, I ripped down the old out house. I saved the door and one of the horse shoes that was hanging above the door. The rest will be burned, not worth saving, lots of rot and nests.

Underneath was a mostly-filled pit. Only 2 feet deep by 4'x4' length/width. Might make an excellent dry well if I wanted to run a simple sink into some gravel in that location. Just for washing hands etc. Plan would be to use rain barrel somehow to accomplish that setup. Another day.

Capped the opening for safety purposes, painted my path for electrical (have to call the One-Call number today to be sure I'm ok to dig). Oh, that's why I ripped the out house down btw. I hated it, but also, the electrical is passing into the building right behind where it stood.

Inside, finished blocking between studs so I think I'll officially call all framing DONE.

This week, caulking and water proofing. This weekend electrical. Then drywall/plywood wall covering.

edit: oh, I forgot.. my next door neighbor/buddy borrowed a trencher from one of the dealers he sells equipment to. Nice, no $130 fee to rent one!
 
Last edited:
To avoid these ads, REGISTER NOW!

grt

Member
Joined
Jul 1, 2009
Messages
10
that is gona be one nice barn. i cant sand it when people tear down an old barn with a lot of character and slap up some lame square pole barn.
 
OP
R

rieferman

Well-known member
Joined
May 18, 2009
Messages
2,586
Location
Collegeville PA (30 min west of Philly)
Thanks grt! It's certainly easier to knock down and build new. But where's the fun in that? ha ha... (I laugh because this project has NOT been "fun" per se.. rewarding? yes definitely. But back breaking, getting stung by weird things, one hospital trip [from a badly infected vintage wood splinter], overwhelming, lonely... not fun really)

---
PA One Call signed off on our trench location, so we're good to dig tomorrow. The borrowed trencher is already waiting in the barn for us to do the work. Electrician friend is coming to start before the heat hits tomorrow. Starting at 7 a.m. Better not drink too much tonight!! ha ha.

Me and my neighbor/close buddy (who is the electrician's best friend since they were kids) will do trenching while electrician wires building. When we're done trencing and conduit and wire pulling outside, we'll head in to be the electrician's apprentices. Doing all the grunt work basically. He's charging me hourly at a friend rate so the more we do, the faster and cheaper it goes.

After he leaves, I'll only have lights/recepts in areas where I'm not putting up finish wall surfaces. So that means I need to bust my **** and get drywall etc. finished next week so we can finish the install in those rooms too.

pics soon i promise

--
oh, I don't think I mentioned yet that I finished bulking up the beam by the stairs the other night.. another neighbor in the construction industry wanted me to have the header beam point loaded down to the floor instead of just tacked to the side of the post. So I did that. He was right anyways.

I also built the 2nd shelf under the stairs. can't recall if I said that yet either. Bottom of that area is for full sheets of ply/drywall/whatever. New shelf I built is for cut offs of full sheets. Top shelf is for cut off sticks. Really is a convenient setup, I like it a lot so far. Good use of otherwise awkward space under the stairs.
 
Last edited:
OP
R

rieferman

Well-known member
Joined
May 18, 2009
Messages
2,586
Location
Collegeville PA (30 min west of Philly)
worked ridiculously hard today (could have used your help t vette! :) )

trench done, conduit done, coax also in that trench.. thanks to neighbor for getting the trencher, operating it, and being my coworker on all of the grunt work. electrician friend was over and we got so much done. He still needs to come back after I drywall etc. to finish up last stuff. But I learned so much and we accomplished so much.

still so much work to go. I'm so exhausted.

yes, pics soon, was too tired to even pick up the camera
 

thomask

Well-known member
Joined
May 28, 2009
Messages
354
Location
Sunshine State
rieferman: Spent the last hour enjoying your post from the very start. A great project and looks like you really enjoy learning new skills. You are not afraid to take on a great big project. Thank you for saving this building.

Over 20 years ago I also got an idea I could build my own house. Well had a friend do me some plans, pulled a permit (lots easier back then) and had a stack of lumber delivered to the lot after I hired the slab out. I figured I was past the point of no return. Had a great carpenter help layout the four outside walls the first weekend, then he asked me if I could handle it myself till trusses got there. I said ok. Finished the interior walls and he returned one Saturday to set all the roof trusses.

That was last day I saw him as he got busy on some big custom houses.

Seven months later the house was finished and I got my final CO. Had lots of support from friends and one great friend who was with me helping most every night and on weekends. I will always cherish the time my dad came up and was able to work with me.

Perfect no, rewarding yes, and I learned many lessons. Don't forget to thank the teacher that taught you how to read. Like you said there is so much out there in books. Knowledge is always worth sharing. I had an office job and building was really something I enjoyed.

Keep up the great work and will keep checking in on you.

GOOD LUCK, BE SAFE and ENJOY.:thumbup:
 
Last edited:
OP
R

rieferman

Well-known member
Joined
May 18, 2009
Messages
2,586
Location
Collegeville PA (30 min west of Philly)
Hey Thomas, thanks so much for your kind words and sharing your story of building. I think we all have the instinct to want to build something don't we? :)

--
finally some pics.. trenching, some electrical examples, panel, trencher, outhouse is gone now, lumber shelves (aka, the "everything shelves" right now)
 

Attachments

  • pics for daddy 005.jpg
    pics for daddy 005.jpg
    151.1 KB · Views: 1,121
  • pics for daddy 006.jpg
    pics for daddy 006.jpg
    152.5 KB · Views: 1,076
  • pics for daddy 007.jpg
    pics for daddy 007.jpg
    144.3 KB · Views: 1,053
  • pics for daddy 008.jpg
    pics for daddy 008.jpg
    142.8 KB · Views: 1,059
  • pics for daddy 009.jpg
    pics for daddy 009.jpg
    130.8 KB · Views: 1,024
  • pics for daddy 010.jpg
    pics for daddy 010.jpg
    147.2 KB · Views: 1,012
OP
R

rieferman

Well-known member
Joined
May 18, 2009
Messages
2,586
Location
Collegeville PA (30 min west of Philly)
Last night, got the coax run through the walls. Hooked up a small TV to test it out (works great). Also ran speaker wire through the walls, and mounted the satellite speakers in the workshop side (office will have 5 speaker surround sound, and two small speakers in workshop.. my stereo receiver allows me to play just the 5 speakers, just the 2 satellites, or all of them). Finished cleaning up and putting in all the wire staples. Ran the last leg of 14-2 for lighting on the garage side. Exhausted.

Taking tonight off, then HD trip for plywood, sheetrock, insulation, misc.
 
OP
R

rieferman

Well-known member
Joined
May 18, 2009
Messages
2,586
Location
Collegeville PA (30 min west of Philly)
last night, put up the first sheets of OSB on the outside walls of exercise room (using OSB in the workshop and garage side of the building for toughness, using sheetrock within the exercise room for a nicer finish). Got about 1/2 the work done. Cutting out for outlets is no fun with OSB. Labor intensive. As expected, since so many of the surfaces that I'm dealing with are 100+ years old and crooked, the whole process is pretty much a pain in the ***.

No more pics til all the walls are done :)
 
OP
R

rieferman

Well-known member
Joined
May 18, 2009
Messages
2,586
Location
Collegeville PA (30 min west of Philly)
osb done, insulation done, tightening up exterior siding/caulking sooooo much (1 dozen tubes used)/covering stupid window opening that shouldn't have been there in the first place done. drywall lift rented. gotta go, more work to do. so so so so so tired
 

bje31

Well-known member
Joined
Mar 21, 2005
Messages
202
Location
Western PA
Great project...glad to see something saved rather than destroyed...keep up the good work.
 
OP
R

rieferman

Well-known member
Joined
May 18, 2009
Messages
2,586
Location
Collegeville PA (30 min west of Philly)
well, I failed sort of. The goal this past weekend was to do whatever it takes to "finish" (finish except painting basically) the barn.

I worked
- 5 hours Thursday night
- 15 hours Friday
- 12 hours Saturday
- 10 hours on Sunday (was slowly losing steam)

But I still have some sheetrock to hang to be "finished". Most of it is done, maybe 2 sheets worth to hang still, and those are mostly odd shaped/around windows types of work. Time consuming, but not a lot of wall to cover. But still, it was a little depressing to go to bed last night without it done.

I decided to hire out the mudding. I can't lose any more of my life to this barn, so I'll lose some money instead! ha ha

For painting, we have a couple that we're friends with that are going to come over for pizza/beer and help us just bang it out.

I seriously can barely move. It hurts to type. Hurts to think really. I'm so effing sore.

pics still on hold til it's "done"
 

Bull

Super Moderator
Joined
Dec 12, 2005
Messages
16,189
Location
MA
Eagerly awaiting pics of the finished product. Take some Advil and beer...but not together, I suppose, for the aches!

I commend you for taking the time to do so much caulking. At one point, I started to caulk the gaps in the siding on my old barn, and gave up when I realized that I was going to be using cases of the stuff. You have more willpower than I do!
 

Old Moparz

Well-known member
Joined
Jan 21, 2005
Messages
1,171
Location
Newburgh, NY 12550
Nice work, I love old buildings, barns included. :beer:

I've been talking to a friend trying to convince him to fix his barn, but he gets overwhelmed at the thought of a project he can't visualize. He's had very little carpentry & home construction experience, so when he looks at a sagged beam or sinking wall, he wants to run. :lol:

His barn is equivelent to 3 storys & is in pretty good shape & only one corner has issues with some rotted wood. It hasn't sagged yet & he will need to do a similar repair to what you did by supporting the column with temporary bracing & such. His has a crappy loft inside that has 2x6's for floor joists that needs to go. I'm sure the loft flooring can be reused elsewhere.

I emailed him the link to this thread so he has some inspiration.
 
OP
R

rieferman

Well-known member
Joined
May 18, 2009
Messages
2,586
Location
Collegeville PA (30 min west of Philly)
will reply in more depth in the morning, just finished some more dry walling. Sooooo close to finishing that. In the meantime, just wanted to thank you guys for reading/sticking with me with a couple pics as a teaser for the finals coming up soon :) I hope you like it, and I hope the guy I hire to tape/mud is a genius!

edit: Oh, so the 1st pic shows the entertainment center area. The fridge will also go there. Big shelf for the TV and stereo. All the stereo components will be over there (you can see the wires for surround sound laying there, labeled). lots of recepts. exposed beam (old) exposed post (new)

2nd pic is further down that same wall, window with dedicated recept under it for window ac unit

3rd is my pride and joy. the original exterior wall of the barn with all woodwork exposed. recessed the drywall piece by piece using templates. note, my cross braces and posts will be aged and stained to match the old stuff later
 

Attachments

  • barn up to aug 3 024.jpg
    barn up to aug 3 024.jpg
    134 KB · Views: 1,039
  • barn up to aug 3 021.jpg
    barn up to aug 3 021.jpg
    138.5 KB · Views: 855
  • barn up to aug 3 020.jpg
    barn up to aug 3 020.jpg
    135.8 KB · Views: 934
Last edited:

mod22

New member
Joined
Jun 2, 2009
Messages
2
nice job ,I am also redoing an old barn , I 'll have to post some pictures up also, one good thing about those thick beams is that it makes a nice spot to build shelves into the wall to save on space , again nice job
 

Yonnee

Active member
Joined
Aug 6, 2008
Messages
38
Location
Beyond Cranbourne, Vic. Australia
MORE PICS, OR IT DIDN'T HAPPEN!!!:lol_hitti

Seriously, awesome job fella. Mostly, renovating can be more of a pain in the neck than building from scratch, but so much more satisfying when you're done. :thumbup: Keep up the great work. :beer:
 

shopnut

Well-known member
Joined
Feb 22, 2006
Messages
4,237
Location
Florida
will reply in more depth in the morning, just finished some more dry walling. Sooooo close to finishing that. In the meantime, just wanted to thank you guys for reading/sticking with me with a couple pics as a teaser for the finals coming up soon :) I hope you like it, and I hope the guy I hire to tape/mud is a genius!

That poor Taper/Mudder - that person is going to have some fun! The exposed beams will look great though.

Keep up the good work.
 
OP
R

rieferman

Well-known member
Joined
May 18, 2009
Messages
2,586
Location
Collegeville PA (30 min west of Philly)
my wife was making fun of me because I was saying last night "wow! shopnut visited my build thread and made a comment!". She just doesn't understand what a "garage celebrity is" (shopnut's build is one of my top 3 favorites) :thumbup:

seriously though, thanks for all the kind comments guys. I say it all the time, and will do it again: the little kudos along the way really help fuel the project.

Finished drywalling last night. Again, let's hope my mudder is a genius (and that he's still my friend after working this for me) because there was some really pita obstacles to work around in there. I took great pains to give him good joints to work with etc, but it's not gonna be perfect in a building like this. Guys that finish for a living are artists, I have faith!

Anyhow, here's probably the last pics you'll see before paint and organizing starts. I'm taking a little time off from building :beer:


1st pic = entry door area is drywalled now. Need to paint that door ultimately and re-do the muttons (sp?)

2nd = my pretty wife, 8th anniversary in a few days, in the workshop area.. obviously, just temporary counters etc.

3rd = the "shed" portion of my space.. aka "mower area".. there will be a big shelf above the mower for storing kids stuff, and there will be a potting bench along the left wall

4th = garage bay.. picture taken from standing in the mower area

5th = lumber storage area is really really useful

edit, also introducing my black lab "piggy"
 

Attachments

  • barn up to aug 5 drywall entry door.jpg
    barn up to aug 5 drywall entry door.jpg
    134.6 KB · Views: 1,534
  • barn up to aug 5 wife in new workshop 2.jpg
    barn up to aug 5 wife in new workshop 2.jpg
    141.1 KB · Views: 2,862
  • barn up to aug 5 osb walls in mower storage area.jpg
    barn up to aug 5 osb walls in mower storage area.jpg
    137.6 KB · Views: 1,802
  • barn up to aug 5 garage bay.jpg
    barn up to aug 5 garage bay.jpg
    141 KB · Views: 1,583
  • barn up to aug 5 lumber storage.jpg
    barn up to aug 5 lumber storage.jpg
    142.5 KB · Views: 1,418

thomask

Well-known member
Joined
May 28, 2009
Messages
354
Location
Sunshine State
well, I failed sort of. The goal this past weekend was to do whatever it takes to "finish" (finish except painting basically) the barn.

I worked
- 5 hours Thursday night
- 15 hours Friday
- 12 hours Saturday
- 10 hours on Sunday (was slowly losing steam)


I seriously can barely move. It hurts to type. Hurts to think really. I'm so effing sore.

pics still on hold til it's "done"

Rieferman, It will all pay off. Get a little R and R. You really want to be fresh toward the end on details. You have done so much in a short period.

Very proud of your work! :thumbup:

Thomas
 
To avoid these ads, REGISTER NOW!
Top Bottom