To avoid these ads, REGISTER NOW!

west of Philly - barn saving

To avoid these ads, REGISTER NOW!
OP
R

rieferman

Well-known member
Joined
May 18, 2009
Messages
2,586
Location
Collegeville PA (30 min west of Philly)
The recent heat wave finally proved to me that the 1-ton mini-split that have installed in our sun room is under powered for that application (so many windows amplifying the sun's effects)...

So, we have our HVAC guy coming out to swap in a 2-ton unit in the same location.

Which means, another motive that I had in mind gets served as well....

The old unit (which is only ~4-5 years young) is moving to the workshop. I have always had electric heater out there that does a nice job in the winter, but summer months have been pretty brutal out there. So we'll have some AC and supplemental heat too.

Install occurs Saturday.

Yay!
 
OP
R

rieferman

Well-known member
Joined
May 18, 2009
Messages
2,586
Location
Collegeville PA (30 min west of Philly)
New mini-split installed in sunroom is amazing. Old one will be installed in barn workshop shortly, and should have no problem keeping up with that smaller load. Nice!

Also honing in on the indoor sink design.

The main thing I'm trying to settle on now is how to reduce the amount of water-based finishes make it into my catch basins that I will be emptying manually.

This trap by Gleco is intended to catch heavier solids such as sand, clay. I'm wondering if paint will be "too light" and just wash past this trap.

Any thoughts on trying to separate/trap water-based finishes?

edit: maybe I need a product like this to clean the water afterwards....
 
Last edited:
OP
R

rieferman

Well-known member
Joined
May 18, 2009
Messages
2,586
Location
Collegeville PA (30 min west of Philly)
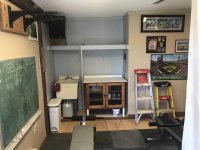
OK, so the paint room (and exercise room) has pretty much reached "final" / operational stage.

The curtain system is working nicely, along with some cardboard to protect the floor. Sets up or packs back away in about 60 seconds.

The "lazy susan paint cart" moves around very nicely, and I can swap out the legs (no tools needed) in about another 60 seconds if I want to make the cart taller or shorter based on the project that I'm finishing. I have plans to add removable extension wings on it too.

And now..........

We (almost) have off the grid water!

The 50 gallon tank will be here in about a week, and will go up on the right hand side of the heavy duty shelf that you see in the 3rd and 4th pictures. I left enough room above the tank that I can easily run my garden hose into the room to fill the tank.

(Edit: For those curious about strength of the shelf to hold 400 pounds of water... three sides of the shelf are into three studs each... middle joist on hangers on both sides... front joist [not full length so that I can wash my hands without bumping my head] in a joist hanger on one side and point loaded to the ground on the other)

The tank will gravity feed to the cold connection on the utility sink via a braided hose that I will strap to the shelf's support post/leg in the middle.

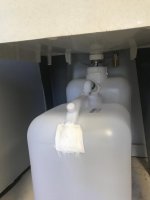
The drain empties into two 5 gallon containers that are placed in succession. When the first is full, a relief spout will then pour into the second container. I tested the setup in the back yard today and physics worked as physics should. Everything in the drain setup is zero-tool to setup / take down, and I also plumbed the first container to act as a sediment trap so that I only have to filter one of the two containers when emptying.

Next to the sink is an old IKEA stereo cabinet that has been working fine in that room for 10+ years, so I figured I'd just upgrade it on the cheap. I added legs to bring it up to counter top height, and also added a scrap of Azek to the top so that it will be easy to keep clean.

(Edit: Above the cabinet, we will be mounting a TV monitor to catch the game etc. and also so that I can watch woodworking vids from my laptop / phone / tablet while out there)

All that, and me and my kids can still use the central part of the room for exercise.

Not bad! This project (including spray equipment) cost about $500 total. Among my most Yankee Frugal projects yet! :)
 

Attachments

  • F327141E-5961-455F-A98B-EC16B27CD00E.jpg
    F327141E-5961-455F-A98B-EC16B27CD00E.jpg
    118.3 KB · Views: 161
  • 54B8ACEB-995E-4301-A079-9DD882092DA9.jpg
    54B8ACEB-995E-4301-A079-9DD882092DA9.jpg
    147 KB · Views: 157
  • FE14AE38-52D6-47B0-804C-7768BB5B5744.jpg
    FE14AE38-52D6-47B0-804C-7768BB5B5744.jpg
    137.5 KB · Views: 160
  • B07B7352-ED08-4F5F-969A-40CB8BA4E7BB.jpg
    B07B7352-ED08-4F5F-969A-40CB8BA4E7BB.jpg
    92.2 KB · Views: 148
  • A29396E9-9150-4FCF-8890-0A5825833313.jpg
    A29396E9-9150-4FCF-8890-0A5825833313.jpg
    34.2 KB · Views: 148
Last edited:
OP
R

rieferman

Well-known member
Joined
May 18, 2009
Messages
2,586
Location
Collegeville PA (30 min west of Philly)
Well, a fun/easy Saturday project in the shop turned out to be an example of "nothing's easy".

After the recent upgrades to the spray booth / exercise / cleanup station room, I was excited when the Amazon truck pulled up to deliver the flat screen TV and wall mount this past weekend.

I busied myself about getting it all setup and wired. Smooth process, things look great.

Final step... connect the coax and fire the TV up to watch some football as I continue the rest of my shop work. NICE.

But...

Oh....

Wait............

Doesn't work. ARGH!

Years ago, a buddy (Mr. Jim) and I directly buried some non-direct burial cable in the ground. He had it on hand for free, and that was the right price at the time. In my mind, I figured future version of me would handle it if this failed someday. After about 10 years of faithful service, it finally died (and I found myself cursing past me for my silly decision that saved me only $30).

So, my fun weekend of woodworking turned into a "properly running coax to the shop" project.

Inside the shop, I had to remember where I had the incoming coax junction connected. I found that in short order with minimal wall panel removal (shop OSB walls are installed with screws, so easy to remove). I did a test with new direct-burial coax cable, and found that all TV's in the barn now worked. Time for the install then.

Luckily, when installing our sidewalk (which cuts between the coax source at the house and coax connection in the barn) recently, I had the foresight to add conduit and a pull string underneath, so that one obstacle was easily handled.

Across the yard, I used a combination of shovels, edgers, and anything else I thought would help without causing too much disruption to the lawn to do a slit trench in my awfully stubborn clay with rock soil.

Under the porch, I came above ground and into conduit (to combat the brigade of bunnies that like to live under there and chew things), and then into the basement for the final connection.

All told, it ended up being a 5 hour project. You can't even tell where I slit trenched, and all wires are nicely secured and managed. TV's work again.

I was too tired to even take a picture :)
 
Last edited:
OP
R

rieferman

Well-known member
Joined
May 18, 2009
Messages
2,586
Location
Collegeville PA (30 min west of Philly)
Any morning where I don't need to rush to work for a morning meeting, I take my little dog for a walk up and around the nearby business park. The big dog stays home because she tires out too easily. LOL

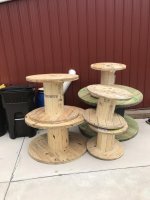
The walk takes me past a cable manufacturing building, and there are always huge spools sitting outside - a cool item to re-purpose into other projects.

The warehouse guys know me a little bit by now, waving, treats for the dog as I go past etc. So, when I told them about my side gig doing RER BarnWorks, they offered for me to take as many of the spools as I like on an ongoing basis.

I don't want my ONLY thing to be re-purposing and upcycling, but having some tables, clocks, and shelves made from reclaimed materials could be pretty cool.

Finished one so far.
 

Attachments

  • 0B99894E-03A2-4463-BB49-48A537CAAA87.jpg
    0B99894E-03A2-4463-BB49-48A537CAAA87.jpg
    74.6 KB · Views: 85
  • FC25B48F-9146-4D6F-AD75-8A16A4CB9B02.jpg
    FC25B48F-9146-4D6F-AD75-8A16A4CB9B02.jpg
    153.1 KB · Views: 97
  • BBB10365-5805-4A09-BC99-95B158FCE05E.jpg
    BBB10365-5805-4A09-BC99-95B158FCE05E.jpg
    104.7 KB · Views: 100

J-man67

Well-known member
Joined
Aug 10, 2012
Messages
218
Location
Delaware
Re: west of Philly - barn saving (tours on pages 14, 19, and FINAL tour on 35)

That spool table came out great! Nice connection score too!

Man, I'm looking at an older farm house and barn in Downingtown, PA this week. I've always hawked your post over the years and have enjoyed everything! The home we're and barn we're seeing needs a lot of work, but the property is everything we've wanted and we're confident we can make it into what we want. I'm going out with a structural engineer to make sure I have a solid base...to base my offer off of! I promise I won't copy every idea, but thanks to some of your pioneering, I'll be able to tackle more. With that...thanks for sharing! Everything you have touched is gold!

Sent from my SM-N975U using Tapatalk
 
OP
R

rieferman

Well-known member
Joined
May 18, 2009
Messages
2,586
Location
Collegeville PA (30 min west of Philly)
Hey J-man! Thanks for dropping a note in here, and the kind words too :)

By all means, please steal any tips / ideas and apply to your (potential) new place! Once you're in there, let me know and perhaps I can swing by at some point and help with the brainstorming.
 
OP
R

rieferman

Well-known member
Joined
May 18, 2009
Messages
2,586
Location
Collegeville PA (30 min west of Philly)
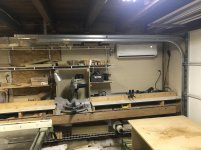
In other news, the mini-split has been installed in the barn workshop!

To recap... we had a mini-split in the sunroom of our house, but it was under-powered for the amount of heat that is generated by all the windows in that room. So, we moved it to my shop (and installed a bigger unit in the sunroom).

So far, I've just been running it non-stop at about 80 degrees cooling temperature, and then bumping it down when I'm out actively working. Just the humidity reduction alone has been a huge improvement! And as it gets down to a cooler temp, that's just luxurious compared to the sweat box I was used to.

There were a few really blatant air gaps in the shop that I tightened up last night to help the new system be more efficient, and I'll have to be very diligent about cleaning the filter on the mini-split (and also running my air cleaner way more often than before), but I think the shop really took a positive step forward!
 

Attachments

  • AEF746C5-19B9-4374-B0DE-AC0911095F80.jpg
    AEF746C5-19B9-4374-B0DE-AC0911095F80.jpg
    147 KB · Views: 121

Grizz1963

Well-known member
Joined
Jan 7, 2010
Messages
12,040
Location
Rochester, KENT. UK
These cable drums as we used to call them are great.

Years ago, I slit one open to get a slot, into which went a lovely shade tree, loosely, then closed it, and added legs, not in that order, around the tree, creating an awesome place for BBQ and picnics at home, without interfering with the tree at all.


I do like free materials.
 

colt zantop

Well-known member
Joined
Apr 20, 2006
Messages
5,422
Location
michigan
Any morning where I don't need to rush to work for a morning meeting, I take my little dog for a walk up and around the nearby business park. The big dog stays home because she tires out too easily. LOL

The walk takes me past a cable manufacturing building, and there are always huge spools sitting outside - a cool item to re-purpose into other projects.

The warehouse guys know me a little bit by now, waving, treats for the dog as I go past etc. So, when I told them about my side gig doing RER BarnWorks, they offered for me to take as many of the spools as I like on an ongoing basis.

I don't want my ONLY thing to be re-purposing and upcycling, but having some tables, clocks, and shelves made from reclaimed materials could be pretty cool.

Finished one so far.


Very cool! :thumbup:
 
OP
R

rieferman

Well-known member
Joined
May 18, 2009
Messages
2,586
Location
Collegeville PA (30 min west of Philly)
Thanks for dropping in guys! Love that idea of a tree growing through the spool!!

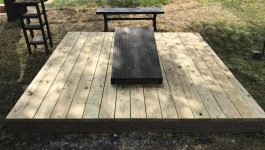
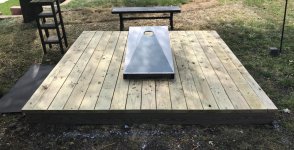
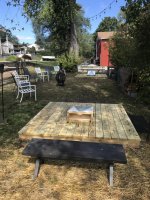
Here’s how the new ******** court looks.

Replaced version 1 of decks with really nice, bigger, and sturdier version. This will last 20+ years. Also used pieces of horse stall mats as protective covers. Durable and heavy so they won't blow away.

Tonight I’ll take a pic with the cafe lights on
 

Attachments

  • F8F23447-B5BB-4D01-97CF-05244D55F89B.jpg
    F8F23447-B5BB-4D01-97CF-05244D55F89B.jpg
    156.5 KB · Views: 90
  • 0259AB0B-22AC-4C4E-B44C-B81E63EE0447.jpg
    0259AB0B-22AC-4C4E-B44C-B81E63EE0447.jpg
    155.6 KB · Views: 85
  • 97512257-52E7-4DD6-ACA8-78DCDDBC13FA.jpg
    97512257-52E7-4DD6-ACA8-78DCDDBC13FA.jpg
    150.9 KB · Views: 98
OP
R

rieferman

Well-known member
Joined
May 18, 2009
Messages
2,586
Location
Collegeville PA (30 min west of Philly)
Started to use the sprayer and the spray booth this past week... Some success, some frustration... I'm learning the only way I know how (read/research/try/trial and error) and I'm sure I'll get better as time goes on.

Off grid sink update... I love the setup overall, and have proven with the frequent spray equipment cleaning that it's far better for my marriage to keep my mess in the barn....

But...

The drain buckets are leaking a bit when I dump lots of water in a hurry, and are also filling up far too fast. Need to noodle on options.
 
OP
R

rieferman

Well-known member
Joined
May 18, 2009
Messages
2,586
Location
Collegeville PA (30 min west of Philly)
For spraying, I thus far have learned:

- For latex paints, you really gotta thin the paint quite a bit else it splatters rather than atomizing... I didn't get good atomization yet, but I'm only practicing on some ******** boards so it's been fine

- If the project entails lots of masking and color changes, you might be better off with a roller or brush instead of spraying. In this case, I sprayed anyways for practice, but damn did I go through a lot of gun cleanup and painstaking masking of the projects

- Wear a respirator... I skipped it the first day, and the interior of my nostrils were white after, even though my vent fan system worked nicely overall

- Masking tape doesn't seal that well for crisp lines... I ended up pre-painting over the tape to purposely bleed the base color under and "seal" it... then painting my color coat. I need to figure out some better tape I think.


edit: I just finished my first attempt at using poly with the spray gun.. atomization achieved!!! which confirmed my "you really gotta thin latex paint" comment above.

edit 2: Also, I'll add... I need more light. So hard to see (as an example) clear poly as you spray it if there are shadows etc.
 

Attachments

  • spray painting.jpg
    spray painting.jpg
    147.1 KB · Views: 114
Last edited:
To avoid these ads, REGISTER NOW!
OP
R

rieferman

Well-known member
Joined
May 18, 2009
Messages
2,586
Location
Collegeville PA (30 min west of Philly)
Thanks Denny!

One more for the list... I need to clean the room where I spray... so dusty in there and it finds wet finish like a magnet. Ok for ******** test project, but not ok for my next project (a nice bench for local football organization, paying tribute to one of their longtime supporters who recently passed away)
 
OP
R

rieferman

Well-known member
Joined
May 18, 2009
Messages
2,586
Location
Collegeville PA (30 min west of Philly)
A friend of mine has been very involved with the local youth football organization for many years.

He was telling me about a longtime supporter of the program - the grandfather of one of the youth players. They called him "Ray Ray", and he would sit on his lawn chair near the corner of the end zone each weekend and watch all the kids' games. Some of the games featured his son (coaching) and grandson (playing), but he'd watch every game, rain or shine.

Sadly, Ray Ray passed away this year... :-(

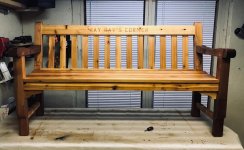
As a tribute, the football program placed a bench in his favorite spot, with a small engraving "Ray Ray's Corner" in the center of the upper rail on the backrest.

Sadly, the bench was a piece of junk.... and my friend saw this, and was not having it whatsoever.

This friend of mine shows up at my barn with the bench in the back of his truck. It's literally a Home Depot, screwed together, jalopy of a bench. The engraving is even lame.

He asks me if I can somehow save this bench.

No.

He asks me if I can build something fitting of the love the whole program has for Ray Ray.

Yes.

I show him my "design ideas" book and he quickly gravitates to a style of bench. I brainstorm some ideas for a nicer engraving. We pick Cedar as the wood for this project. I give him a rough $$ estimate.

And that's that.... my next RER BarnWorks project is underway!
 

Attachments

  • 0FAEFFA3-5083-4357-B640-9C7A1C94F6AD.jpg
    0FAEFFA3-5083-4357-B640-9C7A1C94F6AD.jpg
    87.2 KB · Views: 143
  • 60859F5C-CB9D-4FE3-902E-AAD1A7963CB2.jpg
    60859F5C-CB9D-4FE3-902E-AAD1A7963CB2.jpg
    106.4 KB · Views: 143
  • 068E6D60-A6EB-45F7-80C0-7E661FB684C9.jpg
    068E6D60-A6EB-45F7-80C0-7E661FB684C9.jpg
    112.7 KB · Views: 160
Last edited:
OP
R

rieferman

Well-known member
Joined
May 18, 2009
Messages
2,586
Location
Collegeville PA (30 min west of Philly)
Made a ton of progress over the past several days, but unfortunately will have to do one part of the build a second time...

I'm (loosely) following some Woodsmith plans, and their opinion (which I followed, and now disagree with) on how to set the back slats really over-complicated the process greatly, and I hate the results.

A large part of getting good at anything is being willing to admit a failed attempt, and give it another try.

(but still... damn it!)
 
OP
R

rieferman

Well-known member
Joined
May 18, 2009
Messages
2,586
Location
Collegeville PA (30 min west of Philly)
Wow, a lot has happened in 1 month...

About a day after the post above, my vintage Grizzly 1023 table saw suddenly made a horrible rumbling sound, which I soon learned meant that the arbor bearings were shot and needed to be replaced.

At about 500 pounds, the machine is not something you can just "bring in for service".... and given the 40+ year age of my machine, very few would know how to do so anyways. So, I busied myself about learning how to do such a repair... Endless reading, watching videos online, questions on forums etc.

Just when I was gaining on the task at hand, things went south in a hurry...

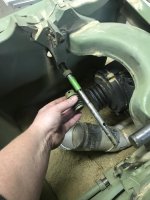
First, I broke the arbor bracket while trying to remove a stubborn bearing.

Second, I purchased a replacement arbor bracket, only to learn that it would not fit/mate with the adjoining worm gear.

Third, I purchased a replacement worm gear, only to learn that removing the shaft that the gear is affixed to takes a near act of god.

Fourth, I invented my own method of removing that shaft (YAY!) only to find that the old worm gear and new worm gear are affixed differently.

And... that brings me to current on that effort.


MEANWHILE.................

Neighbor friend told me awhile back that he had a nice saw (Grizzly G0691) at his place of business that had been very lightly used before they were forced by corporate headquarters to swap out for a SawStop instead - saw had less than a few hundred hours on it (and all of that was easy cutting of thin materials). They gave him the saw as a perk of being the boss for that site, and it's been sitting in temp controlled storage for about 2 years.

When I contacted him, he was willing to sell me the saw for a VERY fair price, and would help me load and transport it too.

So, I pulled the trigger on a new, bigger, better, saw... and we successfully moved it to my shop.

Then, I went about cleaning it up, tuning it, and getting it ready for use. I decided to change the belts which were a bit worn, and I rewired the switch and power cord. But otherwise, basically just general maintenance.


NOW....

Since the new saw is a bit bigger than the old one, I need to do some reorganizing of some equipment to ensure good "hallways" for foot traffic around the shop, and I'm going to build a new outfeed table for the saw while I'm at it.

And, I have to finish fixing the old saw so that I can sell it locally.


THEN...

Gotta finish that darn bench.
 

Attachments

  • C51239A8-7355-48F1-A1B8-69A0590A4CFF.jpg
    C51239A8-7355-48F1-A1B8-69A0590A4CFF.jpg
    148.2 KB · Views: 105
  • 62642AB9-A889-4C85-BA38-788F2300F09A.jpg
    62642AB9-A889-4C85-BA38-788F2300F09A.jpg
    137 KB · Views: 91
  • 3B9AC42D-FE61-46D5-BE59-72BA5A9D8AFD.jpg
    3B9AC42D-FE61-46D5-BE59-72BA5A9D8AFD.jpg
    83.3 KB · Views: 84
  • 833C2E7B-BB76-4635-AB08-224E0250F201.jpg
    833C2E7B-BB76-4635-AB08-224E0250F201.jpg
    106.1 KB · Views: 89
  • F615D0AB-EB2B-4FAC-BEAC-B484BCC779B1.jpg
    F615D0AB-EB2B-4FAC-BEAC-B484BCC779B1.jpg
    102.6 KB · Views: 97
Last edited:

Seagoon

Well-known member
Joined
Jan 23, 2014
Messages
859
Location
Scunthorpe. UK.
They tell me it's character building to encounter all these problems then overcome them.
Personally I think my character is built quite enough thank you very much so I'll have the easy fixes if nobody minds :)
 

Millcreekmadman

Well-known member
Joined
Sep 13, 2016
Messages
76
Location
Central PA
Dude! I love threads like these. Great work on all that you do! Just curious as to your thoughts on you initial post regarding the 10K budget. Did you find it unrealistic or were you able to keep it close?
 
OP
R

rieferman

Well-known member
Joined
May 18, 2009
Messages
2,586
Location
Collegeville PA (30 min west of Philly)
Hey! Sorry for the delay, I've been so busy in the shop.

So... budget... Let me think.

The original save was just about $10K. That included electrical, structural, concrete floor, closing in the walls on the first floor and having a usable shop and exercise room.

Later, we spent another $10K on steel siding, doors, windows.

The 2nd story work cost about $10K.

And I have about $5K into shop equipment.

My brain is probably missing a miscellaneous $5K somehow.

So... I'll say about $40K total for a 2 story structure with about 25x30 footprint, insulated, heated/cooled, woodworking shop, storage, exercise/spray booth room, and full rec room/bar. Not bad :)

Anything I do now, I consider the same as if I had any garage/shop/pole barn etc. Once you're "in and working" upgrades and maintenance happen with any structure.

---------

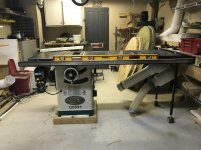
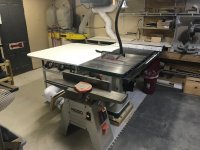
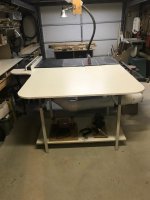
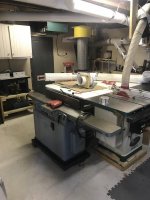
Finished setting up the new saw (Grizzly G0691 3HP cabinet saw with 50 inch rip capacity, left tilt blade, riving knife), and building a BIG outfeed table (which can also be an assembly table). I used a drafting table that I bought used as the base (adjustable height and built like a tank, so perfect for this purpose) and topped with a piece of melamine.

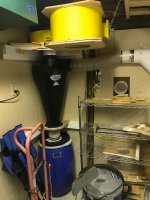
Also, while I had the shop torn apart, I pulled the trigger on a much bigger dust collector. I'm still in the process of setting up cyclone and some final tweaks, but I'll say this... small children, pets, tape measures... beware. This thing "*****" in a good way. Pics on that soon.
 

Attachments

  • new saw 2019.jpg
    new saw 2019.jpg
    138.5 KB · Views: 73
  • new saw 2019_2.jpg
    new saw 2019_2.jpg
    126 KB · Views: 67
  • new saw 2019_3.jpg
    new saw 2019_3.jpg
    68.1 KB · Views: 68
OP
R

rieferman

Well-known member
Joined
May 18, 2009
Messages
2,586
Location
Collegeville PA (30 min west of Philly)
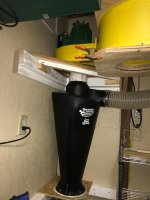
Whew! Redoing / optimizing dust collection (again!) was a beast of a task.

Most of the 6" PVC runs were in good shape, but I had to rework the drill press / planer / sanding station area, and also the main inlet. And, I used window flashing tape to seal all connections.

I also took apart the dust collector, to build a stacked cyclone setup. I'm still waiting for the .5 micron cartridge filter to arrive in the mail, but it's otherwise finished. Efficient footprint, and my air conditioning will stay in the shop AND be clean now too.

I also had to move the air cleaner as part of all this. Mission accomplished.

I should be back to woodworking by this time next week.

Happy new year GJ!!!
 

Attachments

  • cyclone 2.jpg
    cyclone 2.jpg
    89.5 KB · Views: 66
  • cyclone 1.jpg
    cyclone 1.jpg
    74.6 KB · Views: 72
  • new dust runs.jpg
    new dust runs.jpg
    95.6 KB · Views: 73
OP
R

rieferman

Well-known member
Joined
May 18, 2009
Messages
2,586
Location
Collegeville PA (30 min west of Philly)
While minor tweaks and adjustments have continued, I've been back in the shop working on projects (rather than the shop) again.

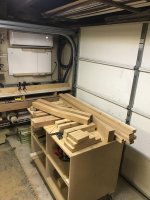
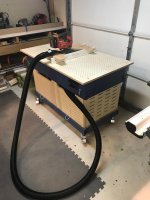
To finish the shop improvements, I built a new shop cart out of some panels gifted to me from a neighbor and my old garbage can tote. LOL. How's that for Yankee frugal?

The cart features a downdraft top that is connected to my dust collection system, casters able to lock the roll AND the swivel, a power strip for tool plug in, a removable "table top saver" system, and it houses a powerful shop vac and mini-cyclone for direct-connection to small-port handheld tools. VERY useful cart.

Oh, and I have also optimized the drill press, figured out dust collection at the sanding station, added precision fences on the miter saw, and about 10 other things.

In terms of getting back to work...

I finished the bench for the local youth football organizatin... AKA the bench that killed my old saw and kicked off the entire renovation process. Cedar, mortise and tenon joinery throughout, engraved to commemorate a longtime supporter of the organization that passed away last year.

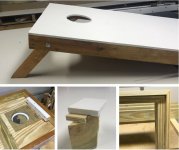
And I built a few very very very nice ******** boards (these aren't garden variety plywood boards... these are zero-bounce, Azek topped, stay-outside, professional boards) for a couple customers.

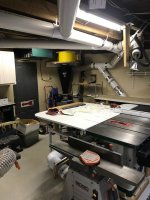
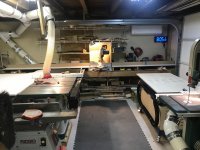
The shop is safer, more precise, and a joy to work in now. Well worth it.

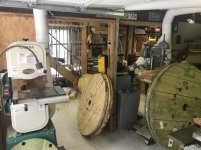
Some pics of the cart, shop tour, and recent projects.

:beer:
 

Attachments

  • bench.jpg
    bench.jpg
    155 KB · Views: 110
  • board construction.JPG
    board construction.JPG
    63.2 KB · Views: 99
  • shop tour 4.jpg
    shop tour 4.jpg
    154.1 KB · Views: 95
  • shop tour 3.jpg
    shop tour 3.jpg
    156.9 KB · Views: 101
  • shop tour 2.jpg
    shop tour 2.jpg
    151.8 KB · Views: 94
  • shop tour 1.jpg
    shop tour 1.jpg
    148.8 KB · Views: 95
  • cart.jpg
    cart.jpg
    85.3 KB · Views: 101
OP
R

rieferman

Well-known member
Joined
May 18, 2009
Messages
2,586
Location
Collegeville PA (30 min west of Philly)
My friends (who are my customers too in this case) picked up the tribute bench yesterday. They were visibly emotional about it, and it was a very touching moment.

This week they are going to deliver the bench to Ray Ray's widow, and they're anticipating hugs and tears (makes me tear up a bit thinking about it).

Really meaningful to me that I was trusted to be part of this gift.
 

Attachments

  • 314AF5EB-F1ED-4AFD-BE1F-CBE2F3E1CB65.jpg
    314AF5EB-F1ED-4AFD-BE1F-CBE2F3E1CB65.jpg
    159.3 KB · Views: 67
OP
R

rieferman

Well-known member
Joined
May 18, 2009
Messages
2,586
Location
Collegeville PA (30 min west of Philly)
My sanding station was long overdue for an upgrade.

My old unit was one that I had gotten for free somehow years ago, and it never tracked right/consistently, dust collection was lacking, and there was no disc installed anymore. Sold it in 10 minutes for $100, so that worked out nicely.

Disclaimer: While I'm not a huge HF fan, there's a time and a place in some instances... In any case, I am not willing to get into an argument about that topic, so if that's your interest please take it someplace else.

So.... I pulled the trigger on the HF (Central machinery) 6x48 sander. Here's the link. I paid $250, and others could probably get a better deal if you watch for sales. Note, the 20% super coupons don't work for some items at HF anymore.

I picked this unit because....
- From my research (woodworking forums, youtube etc.) it seems that this is a clone of many other well-reviewed items out there
- I found that woodworkers actually found this sander to be among the HF gems
- Given the price, how crappy my old sander was, how simple of a tool this is compared to others... it was worth rolling the dice

Anyways, putting the tool together was straight forward, yet somewhat time consuming. Probably took me 2 hours total (but then, I was customizing as I went). I found the tool to be quite substantial overall, and all parts went together exactly as instructed on the first try. First test run, the belt tracked dead on and didn't require any adjustments at all. Quiet and powerful compared to my old beast.

Others complained about the cheap miter gauge (that's legit, but minor gripe in my opinion) and the light-weight sheet metal stand (which I thought was fine, especially with the mods that I added, see below).

The switch used to be on the back, but it's on the front now, which I found to be a good change.

Note: Others have reported that grizzly parts may work interchangeably on this tool. I have not verified that myself, but just mentioning for those interested.


Modifications:
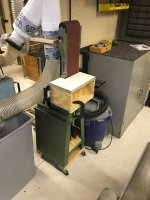
To the stand, I added a plywood shelf, and two 2x4 runners that allowed me to attach swivel/locking casters. These two changes improved the stand quite a bit, and I feel it's plenty sturdy for my usage needs.

The unit comes with just one aluminum tool rest / table, and I didn't want to have to swap it back and forth from belt to disc all the time. So I cannibalized the cast iron tool rest from my old sander, and was able to make it work. As per the note above, you could probably buy a grizzly tool rest and achieve the same result.

The disc sander comes with a plastic cover with a 1.5" (as I recall) port for dust collection. I wanted 4", so I cut a larger hole and affixed a 4" port that will accept flex hose.

The belt sander comes with a metal 2" (I think) port for dust collection. Again, I wanted 4", so I built a simple box that has a 4" port/gate on the back side. The underside of the box has some reference ledges that allow it to be quickly aligned on the tool rest / table, and I left a lip that accepts a c-clamp for holding it in place. Not the most elegant thing I've built, and it raises my work surface up a bit, but a ton of suction is nicely directed to the lower few inches of the belt.

I took the unit for a spin last night, with the dust collection hooked up... Wow, I can really shape materials effortlessly now, and the dust gets very nicely removed!!!

Some pics just before I connected the 4" flex hose to both sides of the unit.
 

Attachments

  • sander 1.jpg
    sander 1.jpg
    85.4 KB · Views: 84
  • sander 2.jpg
    sander 2.jpg
    87.9 KB · Views: 77
To avoid these ads, REGISTER NOW!
Top Bottom