ovilla
Well-known member
Introducing the QuickJack by Ranger Products!
I know many of you may have heard rumors that this way coming. Guess what? It’s finally here. For those of you not too familiar with Ranger Products go ahead and check them out and just know that their parent company (BendPak) has been in the lift business for a very long time now (45+ years).
Anyway, let me start by pointing out that my pics will show the lift with an earlier prototype name (just ignore that). Yes, I’ve had this lift in my possession for quite a while now, taking it to autocrosses, car shows, cruise nights, friend’s houses – ALL in the name of research. I was asked if I wanted to be a tester and of course I said “YES!!!”. Anyway, I’m taking the job seriously, doing various tests and offering up what I like and don’t like about the lift, and also collecting as much feedback as I can from others, which has been great. Everyone that sees this lift has been quite excited about it and rightly so. There’s just something so cool about being able to show up at the track (or a friend’s house) with tools AND a lift, especially one that will safely get you up in the air faster than it will take you to drag the jack over to your car.
Okay, let’s get started (in no particular order)!
How “portable” is this lift?
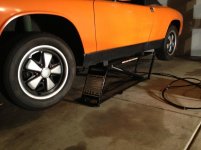
Extremely portable! Each ramp is very light and manageable, weighting only about 45 pounds per ramp and coming with short hydraulic lines with quick disconnects on each end. The weight of the power unit, which comes with a handle, and attached hydraulic lines is another 14 pounds. The ramps lay ridiculously flat (only about 3” tall when fully collapsed) and are only 5’ in total length (when collapsed). In the fully upright position the ramps are 46” long. The overall width of the ramps is 10.5” wide. You shouldn’t have any issue sliding these ramps under the lowest race car, Porsche, Honda, Vette, etc. or lowered hot rod.
Lifting Height/Capacity
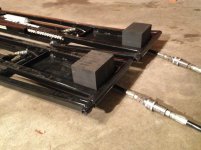
Up to 20+” of height and a 3,500 pound lifting capacity. This is mostly dependent on how you use/configure any of the 8 rubber blocks that come with the QuickJack, which also come in two different heights (3” and 1.5”). By the way, you might find that 20+” of height is actually too much – that was some of the feedback that I collected. Luckily, that’s been addressed (see next section below).
Mechanical lock(s)
My prototype unit only has ONE lock but don’t worry, the final version will have two. When the hydraulic cylinder is fully extended, you will be able to position the locking lever into place (and then lower the lift), at which point the top of the ramp will be at its full height extension of roughly 20+”, and will no longer be dependent on hydraulic pressure to keep it in place. Yes, you can also lift your car temporarily to whatever height you might need, but think safety first (and at least slide your wheel under the car). The addition of the 2nd locking point should give you plenty of locking options to work with.
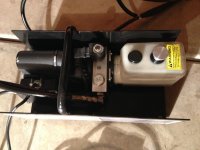
Power Unit
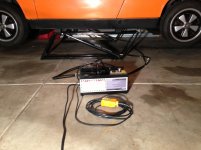
You have two choices! There’s a 110 and a 12V motor available. Both of these units are really small and only take up around two quarts of ATF or hydraulic fluid. Both units come with a 20’ remote cord that gives you plenty of cord to walk around your car and engage/disengage the locks. You’ll find that you petty much walk around holding the remote in your hand all the time (at least that’s why I’ve been doing). Anyway, the 110 motor drew between 9-11 Amps on my amp meter so you can easily run this on a 15amp circuit without blowing a fuse. You can also plug it into a big 1200 watt power inverter or run it off a small portable generator. The 12V unit will obviously run off your car battery and is not much slower than the 110 motor. So how fast does it lift a car? After you position the ramps into place, it will take roughly 10 seconds (with the 12V unit) to get your car fully up in the air. The 110 unit is just slightly faster, shaving just a second or two off that time. I recommend thinking carefully about how you intend to use your QuickJack. If you’re always going to be lifting something that has a good working battery, then 12V is the way to go. Then again, if you’re going to use it primarily in the shop for project cars and already have a decent power inverter or small generator to use as needed, then a 110 would be perfect.
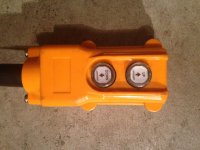
Hydraulic lines
The QuickJack comes with quick disconnects (think MaxJax!) in standard 15’ lengths, which should meet all of your needs. If you need something longer, I’m sure Ranger Products can accommodate your request. Anyway, the lines are really easy to connect/disconnect (no different than hooking up air tools). I actually found that they disconnect even easier than air lines and there’s no spill when you disconnect the lines. Now, when you go to connect them, and happen to pause a bit (or simply have an issue connecting them like one of the gals at the track did), then and only then, will you possibly spill a little fluid. No biggie, just add some more ATF or Hydraulic fluid (or both – depending on what you can source locally at the time).
Remote Control
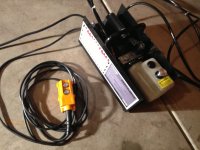
This is a nice industrial remote that fits comfortably in your hand and comes with a 20’ power cord. There’s plenty of cord to keep the remote in your hand as you walk around to engage/disengage the locking levers. The remote itself just has two buttons - UP and DOWN.
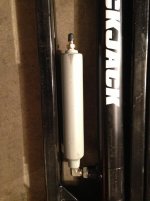
Grey air cylinders/canisters (what are those for???)
Next to each hydraulic cylinder/ram you will see a small air cylinder/canister with a Schrader valve on one end of it. This is why these are needed. The weight of your car will obviously allow the ramps to descend/collapse but what happens when the car is now resting on its wheels and you still need to fully collapse your ramps (a few more inches) so you can slide them out from underneath the car? Well, by initially filling these air cylinders with 50 PSI (Max) of air and then just using your lift going forward, you’ll always have enough air to force the hydraulic cylinder to fully compress itself - without needing the weight of a car now. Don’t worry about having to continually check the air pressure of these cylinders either. As part of the normal operation of the lift, the air cylinder is automatically being filled with air, during each use. I checked mine at the beginning and they’ve been holding air just fine.
How will you know if you’re under the 50 PSI capacity? Don’t worry, your QuickJack will let you know if you’re low on air. Yes, I tested for this scenario too by purposely bleeding my air cylinders all the way down to 5 PSI. Well, here’s what happens. The weight of your car will collapse the ramps down enough until your car is resting on its wheels. Then your ramps will come down a little more (maybe an inch or so but not much more). At this point you have two options, either fill the cylinders right now with 50 PSI (Max) or slide the ramp out from under the car (it will clear) and stand on the ramp so that your weight will now fully compress the ramp. Do one ramp and then the other (or position them side by side and stand on both at the same time – that’s what I did). Either way, just make sure you are also (always) pushing the DOWN button on your remote control so that the hydraulic valve is open and is letting ATF/hydraulic fluid return back to the reservoir tank.
Ramp Set Up (Ramp positioning and Rubber block placement)
Just want to point out a few things here. No, you do not drive your car onto the ramps like you do with other lifts. Remember that this is a portable lift and in order to keep the weight down, it was not designed to be used as a drive on ramp. You instead park your car wherever you want to work on it, and then position the ramps into place. There’s even little “arms” that will help you position the ramps perfectly under your cars pinch welds or under the frame. The supplied rubber blocks (4 of each type) come in 1 ½” and 3” heights and have little grooves to help you line things up and the blocks themselves can be positioned as close as 28 ¾” or as far apart as 43 ¾”.
Ramp Set Up (Planning for hydraulic lines and vehicle movement)
Just think of how you want to route your hydraulic lines. Out the front or back of the car is the easiest set up. Also, you will notice that when the ramps are fully collapsed they are 5’ long but when they are in the upright position they are 44” long. You need to plan for up to roughly 8” of movement of your vehicle (when in the fully upright position), either moving the entire car forward or backwards, based on how you have the ramps oriented.
Just remember this! Your car will always be lifted and moving towards the direction of the BIG WHITE STICKER on the ramps. If you can see/read the sticker, then the car will be lifting up and coming toward you. As the car is lowered, the BIG WHITE STICKER will collapse and fold away from you (along with the car). Make sure you plan for that roughly 8” of movement, especially if your car is close to a wall or garage door. If you find that you screwed up and are hitting the wall/door, just lower the ramps and flip them around and lift the car up again. The ramps are light and rest on round metal/plastic feet and slide really easily, without scratching up the ramps.
I know many of you may have heard rumors that this way coming. Guess what? It’s finally here. For those of you not too familiar with Ranger Products go ahead and check them out and just know that their parent company (BendPak) has been in the lift business for a very long time now (45+ years).
Anyway, let me start by pointing out that my pics will show the lift with an earlier prototype name (just ignore that). Yes, I’ve had this lift in my possession for quite a while now, taking it to autocrosses, car shows, cruise nights, friend’s houses – ALL in the name of research. I was asked if I wanted to be a tester and of course I said “YES!!!”. Anyway, I’m taking the job seriously, doing various tests and offering up what I like and don’t like about the lift, and also collecting as much feedback as I can from others, which has been great. Everyone that sees this lift has been quite excited about it and rightly so. There’s just something so cool about being able to show up at the track (or a friend’s house) with tools AND a lift, especially one that will safely get you up in the air faster than it will take you to drag the jack over to your car.
Okay, let’s get started (in no particular order)!
How “portable” is this lift?
Extremely portable! Each ramp is very light and manageable, weighting only about 45 pounds per ramp and coming with short hydraulic lines with quick disconnects on each end. The weight of the power unit, which comes with a handle, and attached hydraulic lines is another 14 pounds. The ramps lay ridiculously flat (only about 3” tall when fully collapsed) and are only 5’ in total length (when collapsed). In the fully upright position the ramps are 46” long. The overall width of the ramps is 10.5” wide. You shouldn’t have any issue sliding these ramps under the lowest race car, Porsche, Honda, Vette, etc. or lowered hot rod.
Lifting Height/Capacity
Up to 20+” of height and a 3,500 pound lifting capacity. This is mostly dependent on how you use/configure any of the 8 rubber blocks that come with the QuickJack, which also come in two different heights (3” and 1.5”). By the way, you might find that 20+” of height is actually too much – that was some of the feedback that I collected. Luckily, that’s been addressed (see next section below).
Mechanical lock(s)
My prototype unit only has ONE lock but don’t worry, the final version will have two. When the hydraulic cylinder is fully extended, you will be able to position the locking lever into place (and then lower the lift), at which point the top of the ramp will be at its full height extension of roughly 20+”, and will no longer be dependent on hydraulic pressure to keep it in place. Yes, you can also lift your car temporarily to whatever height you might need, but think safety first (and at least slide your wheel under the car). The addition of the 2nd locking point should give you plenty of locking options to work with.
Power Unit
You have two choices! There’s a 110 and a 12V motor available. Both of these units are really small and only take up around two quarts of ATF or hydraulic fluid. Both units come with a 20’ remote cord that gives you plenty of cord to walk around your car and engage/disengage the locks. You’ll find that you petty much walk around holding the remote in your hand all the time (at least that’s why I’ve been doing). Anyway, the 110 motor drew between 9-11 Amps on my amp meter so you can easily run this on a 15amp circuit without blowing a fuse. You can also plug it into a big 1200 watt power inverter or run it off a small portable generator. The 12V unit will obviously run off your car battery and is not much slower than the 110 motor. So how fast does it lift a car? After you position the ramps into place, it will take roughly 10 seconds (with the 12V unit) to get your car fully up in the air. The 110 unit is just slightly faster, shaving just a second or two off that time. I recommend thinking carefully about how you intend to use your QuickJack. If you’re always going to be lifting something that has a good working battery, then 12V is the way to go. Then again, if you’re going to use it primarily in the shop for project cars and already have a decent power inverter or small generator to use as needed, then a 110 would be perfect.
Hydraulic lines
The QuickJack comes with quick disconnects (think MaxJax!) in standard 15’ lengths, which should meet all of your needs. If you need something longer, I’m sure Ranger Products can accommodate your request. Anyway, the lines are really easy to connect/disconnect (no different than hooking up air tools). I actually found that they disconnect even easier than air lines and there’s no spill when you disconnect the lines. Now, when you go to connect them, and happen to pause a bit (or simply have an issue connecting them like one of the gals at the track did), then and only then, will you possibly spill a little fluid. No biggie, just add some more ATF or Hydraulic fluid (or both – depending on what you can source locally at the time).
Remote Control
This is a nice industrial remote that fits comfortably in your hand and comes with a 20’ power cord. There’s plenty of cord to keep the remote in your hand as you walk around to engage/disengage the locking levers. The remote itself just has two buttons - UP and DOWN.
Grey air cylinders/canisters (what are those for???)
Next to each hydraulic cylinder/ram you will see a small air cylinder/canister with a Schrader valve on one end of it. This is why these are needed. The weight of your car will obviously allow the ramps to descend/collapse but what happens when the car is now resting on its wheels and you still need to fully collapse your ramps (a few more inches) so you can slide them out from underneath the car? Well, by initially filling these air cylinders with 50 PSI (Max) of air and then just using your lift going forward, you’ll always have enough air to force the hydraulic cylinder to fully compress itself - without needing the weight of a car now. Don’t worry about having to continually check the air pressure of these cylinders either. As part of the normal operation of the lift, the air cylinder is automatically being filled with air, during each use. I checked mine at the beginning and they’ve been holding air just fine.
How will you know if you’re under the 50 PSI capacity? Don’t worry, your QuickJack will let you know if you’re low on air. Yes, I tested for this scenario too by purposely bleeding my air cylinders all the way down to 5 PSI. Well, here’s what happens. The weight of your car will collapse the ramps down enough until your car is resting on its wheels. Then your ramps will come down a little more (maybe an inch or so but not much more). At this point you have two options, either fill the cylinders right now with 50 PSI (Max) or slide the ramp out from under the car (it will clear) and stand on the ramp so that your weight will now fully compress the ramp. Do one ramp and then the other (or position them side by side and stand on both at the same time – that’s what I did). Either way, just make sure you are also (always) pushing the DOWN button on your remote control so that the hydraulic valve is open and is letting ATF/hydraulic fluid return back to the reservoir tank.
Ramp Set Up (Ramp positioning and Rubber block placement)
Just want to point out a few things here. No, you do not drive your car onto the ramps like you do with other lifts. Remember that this is a portable lift and in order to keep the weight down, it was not designed to be used as a drive on ramp. You instead park your car wherever you want to work on it, and then position the ramps into place. There’s even little “arms” that will help you position the ramps perfectly under your cars pinch welds or under the frame. The supplied rubber blocks (4 of each type) come in 1 ½” and 3” heights and have little grooves to help you line things up and the blocks themselves can be positioned as close as 28 ¾” or as far apart as 43 ¾”.
Ramp Set Up (Planning for hydraulic lines and vehicle movement)
Just think of how you want to route your hydraulic lines. Out the front or back of the car is the easiest set up. Also, you will notice that when the ramps are fully collapsed they are 5’ long but when they are in the upright position they are 44” long. You need to plan for up to roughly 8” of movement of your vehicle (when in the fully upright position), either moving the entire car forward or backwards, based on how you have the ramps oriented.
Just remember this! Your car will always be lifted and moving towards the direction of the BIG WHITE STICKER on the ramps. If you can see/read the sticker, then the car will be lifting up and coming toward you. As the car is lowered, the BIG WHITE STICKER will collapse and fold away from you (along with the car). Make sure you plan for that roughly 8” of movement, especially if your car is close to a wall or garage door. If you find that you screwed up and are hitting the wall/door, just lower the ramps and flip them around and lift the car up again. The ramps are light and rest on round metal/plastic feet and slide really easily, without scratching up the ramps.