To avoid these ads, REGISTER NOW!

Wilton Vise Disassembly Guide

DavidB

Well-known member
Joined
Feb 6, 2010
Messages
734
Location
Navarre, FL
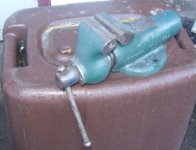
I picked up a Wilton No. 4 today from the flea market and disassembled it tonight. It has 4" wide jaws and weighs about 36 lbs if you're interested. Anyways, I thought I'd post the steps for taking one completely apart for others out there. I know there was a similar thread a while back but two are better than one.

Here's the vise.
Start.jpg


Step 1
The first step is to remove the jaw pads. If the screws are really stuck in there then spray them with your favorite penetrant. It's also helpful to remove the dynamic (moving) jaw from the body of the vise so you can hold them vertically. With the screws in the vertical position you can put more force on the screws and tap the screwdriver with a hammer if needed. Once you've removed the pads it should look like this.
Step1.jpg


Step 2
The next step is to remove the three screws that hold the screw retaining plate on.
Step2.jpg


Step 3
With the retaining plate out of the way you can remove the lead screw and set it off to the side.
Step3.jpg


Step 4
Next, remove the dynamic jaw by pulling it out of the front of the vise. It can be heavy on the larger models so don't drop it. If the dust cover is still in place on the back of the vise remove it now. It can be removed by inserting a wooden dowel through the nut inside of the vise body. Tap on the end of the dowel to slowly remove the cover. Once again, some penatrant may be helpful if it's stubborn.
Step4.jpg


Step 5
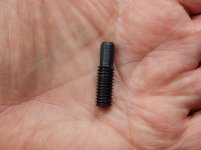
With the dust cover removed you can now see the back of the nut. While I'm calling it a nut, it's more of a tube with threads on the inside. It is held in the vise by one or two cross pins or on my larger model two machine screws (one on each side). If you have screws, it's easy to tell the difference because there is no way the heads of the screws can pass through the body. If you don't have screws, then find out if you have one or two pins. Use a punch or nail with a flat end to drive the pin in a little bit. Did the pin move out on the other side? If so, then you probably have one pin. Drive the pin through the body as shown in the picture. In my case my punch was not long enough, so I put a small nail in between the pin and the punch. If the pin didn't move on the other side then you probably have two pins. Try to drive one pin in until the other pops out and then drive the remaining pin backwards out of it's side of the vise. The pins may not completely line up so while you may be able to push one pin with the other you may not be able to completely drive it out. Once you get a little of the pin out you can grab it with pliers if need be.

Depending on the vise you may be able to see the pins when looking through the back of the vise. If you're uncertain, viewing from the back, line a ruler up with the top of the holes on the sides to see if the pins should run through the opening where the lead screw goes. If you have pins, you should be able to run a piece of wire in one hole and out the other side to make sure nothing is in there. No matter what style is used, go slow and don't force it.
Step5.jpg


Step 6
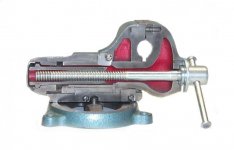
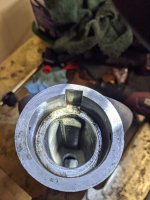
If you look into the body from the front you can see the nut.
Step6a.jpg


Use another block of wood and a hammer to drive the nut out through the back of the vise body.
Step6b.jpg


Once you've removed the nut, note that there is a slot on that the cross pin passes through. This slot should face down and must be oriented correctly when you reinstall the nut. On my larger Wilton there are two dimples on the sides of the nut for the machine screws to go into.
Step6c.jpg


Step 7
Depending on whether your model has a swivel base you may not need to perform this last step. To remove the swivel base, simply remove the two nuts that are used to lock the vise down.
Step7.jpg


Congrats, your vise is now fully disassembled.

Step8.jpg


Assembly is the reverse of the disassembly process. On some Wiltons, a date is stamped on the end of the bottom flat on the dynamic jaw. There's none on this one but there is one on my other wilton vise. Depending on what's written, this date is either when the vise was made or when the warranty expires. While it's apart be sure to degunk the sliding surfaces and lead screw. Then apply some grease or antiseize compound to these surfaces and the swivel base if you have one.

Hopefully, this will help you in your efforts to keep your vise in prime working condition!

David

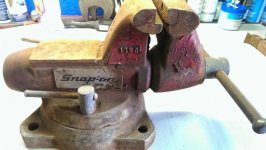
PS In case you're wondering about my other larger Wilton I reference several times, here it is.
2Vises.jpg
 
Last edited:
To avoid these ads, REGISTER NOW!

kc-steve

Well-known member
Joined
Jun 22, 2010
Messages
4,240
Location
Kansas City
Excellent info! Thanks David.

That dust cover on the back, someone mentioned I could replace mine with an engine freeze plug I think, is that correct?

BTW, your vise looks like it is really old, what year is that?

Steve
 
Last edited:
OP
D

DavidB

Well-known member
Joined
Feb 6, 2010
Messages
734
Location
Navarre, FL
Excellent info! Thanks David.

That dust cover on the back, someone mentioned I could replace mine with an engine freeze plug I think, is that correct?

BTW, your vise looks like it is really old, what year is that?

Steve

Yes, I've heard that mentioned as well though I'm not sure of the size needed. I'm not sure how old the vise it. I've looked for a date stamped into the bottom of the dynamic jaw but there is nothing there. That probably means something but I'm not sure what.
 

kc-steve

Well-known member
Joined
Jun 22, 2010
Messages
4,240
Location
Kansas City
Yes, I've heard that mentioned as well though I'm not sure of the size needed. I'm not sure how old the vise it. I've looked for a date stamped into the bottom of the dynamic jaw but there is nothing there. That probably means something but I'm not sure what.

The thing that made me think it is old is the unique casting design on the sides. Spongerich has one similar and he says his was stamped 1-46 making it one of the first if it is the warranty date (+5 years). Yours not having a date might pre-date his, ya think?

My own doesn't have that design but is stamped 9-46.

Actually both your vises have that unusual design. The patent was filed in Sept 1941 and wasn't approved until 1942. And thanks again for giving me the heads-up on the patent search a while back. :)

Steve
 
Last edited:
OP
D

DavidB

Well-known member
Joined
Feb 6, 2010
Messages
734
Location
Navarre, FL
The thing that made me think it is old is the unique casting design on the sides. Spongerich has one similar and he says his was stamped 1-46 making it one of the first if it is the warranty date (+5 years). Yours not having a date might pre-date his, ya think?

Actually both your vises have that unusual design. The patent was filed in Sept 1941 and wasn't approved until 1942.

Steve
That'd be very cool if true. My larger vise has "171" stamped on the bottom which I've taken to mean it's from Jan 1971. Could you detail what makes the casting on the sides unique?

Thanks,
David
 

kc-steve

Well-known member
Joined
Jun 22, 2010
Messages
4,240
Location
Kansas City
That'd be very cool if true. My larger vise has "171" stamped on the bottom which I've taken to mean it's from Jan 1971. Could you detail what makes the casting on the sides unique?

Thanks,
David

No problem. Here's my 3" with the date code 9-46. Notice the lack of the encircled text. I've seen many Wilton bullets like mine though.

Steve
 

Attachments

  • Wilton-01.jpg
    Wilton-01.jpg
    55.6 KB · Views: 263
  • Wilton-02.jpg
    Wilton-02.jpg
    89.4 KB · Views: 182
OP
D

DavidB

Well-known member
Joined
Feb 6, 2010
Messages
734
Location
Navarre, FL
No problem. Here's my 3" with the date code 9-46. Notice the lack of the encircled text. I've seen many Wilton bullets like mine though.

Steve

Ah I see now. FYI I look forward to when you get your webpage or post up on the History of Wilton. Hint Hint :bounce:
 

kc-steve

Well-known member
Joined
Jun 22, 2010
Messages
4,240
Location
Kansas City
Thanks, my dot com business has EXPLODED with new business in the last two weeks so I'm afraid that site will have to take a backseat temporarily. I'm guessing maybe a month or two more. :)

There is so much we still don't know about Wilton. The casting differences could be different models such as the Tradesman versus the Machinist, yours being a Machinist vise because they are more expensive and likely more rare. Just guessing though. :)

Steve
 

kc-steve

Well-known member
Joined
Jun 22, 2010
Messages
4,240
Location
Kansas City
That'd be very cool if true. My larger vise has "171" stamped on the bottom which I've taken to mean it's from Jan 1971. Could you detail what makes the casting on the sides unique?

Thanks,
David

The date code "1-71" doesn't match the casting that shows it was made in "Chicago." Wiltons were made in Schiller Park after 1957 or so.

I suppose it could be possible someone replaced the dynamic jaw, or it was in the factory for repairs in 1971. Who knows.

Steve
 

spongerich

Well-known member
Joined
Apr 17, 2010
Messages
2,339
Location
Monroe, NY
Well done.

Not to threadjack, but the rear cap on one of mine is dented up pretty badly.

I'm going to remove it and try to bang out the dents... my question is heat or no heat? I was thinking that heating up nice and hot would soften the metal and make it easier to get it round again. Is this a bad idea?
 

kc-steve

Well-known member
Joined
Jun 22, 2010
Messages
4,240
Location
Kansas City
Well done.

Not to threadjack, but the rear cap on one of mine is dented up pretty badly.

I'm going to remove it and try to bang out the dents... my question is heat or no heat? I was thinking that heating up nice and hot would soften the metal and make it easier to get it round again. Is this a bad idea?

There's actually a tool for that. It is a stainless steel disk (shrink disk) you attach to a grinder. Then use it to rub the surface heating it up and spraying it with soapy water to cool it down. The heating and cooling contracts the metal and smooths out the dents. However, on a convex surface, you would have to be fairly well experienced to do it well.

Steve
 
OP
D

DavidB

Well-known member
Joined
Feb 6, 2010
Messages
734
Location
Navarre, FL
Well done.

Not to threadjack, but the rear cap on one of mine is dented up pretty badly.

I'm going to remove it and try to bang out the dents... my question is heat or no heat? I was thinking that heating up nice and hot would soften the metal and make it easier to get it round again. Is this a bad idea?

Now worries on threadjacking. Mine is dented too and I'd like to know how to get the dent out. For a "dust cover" it is made of a lot thicker material than I'd have guessed.

Thanks! I'll link to this in my articles if that's ok with you...

Feel free to add this. It's your links that got me interested in vises is the first place! Trouble maker! :bounce:
 
To avoid these ads, REGISTER NOW!

autopts

Well-known member
Joined
Jul 4, 2009
Messages
2,268
I was buming around the net looking for a guide to confirm my 1780 was similar (it is). Thought this link might be relevant. Its a exploded diagram from grainger. Needs quicktime i think.

http://www.grainger.com/Grainger/rp...ART.GIF&IMG=9480GP4LT65PART.GIF&iw=800&ih=454


Will be restoring my 1780 after i finishing bending straps for my gas tank.


Here's some Wilton interchange trivia. The spindle and collar that goes into a 1780 is the same spindle and collar from their 500S. The base and ring for the 1780 is the same as what goes on Wilton's 600S. Their 1765 takes the 400S spindle set up with base only. The 1755 takes the 350 spindle and collar. Catch me while its still in my head!
 

b7labelle

Well-known member
Joined
Oct 14, 2012
Messages
665
Location
Michigan
Here's some Wilton interchange trivia. The spindle and collar that goes into a 1780 is the same spindle and collar from their 500S. The base and ring for the 1780 is the same as what goes on Wilton's 600S. Their 1765 takes the 400S spindle set up with base only. The 1755 takes the 350 spindle and collar. Catch me while its still in my head!

I'll keep that in mind when I'm looking for parts!

I borrowed a mobile sand blaster from a coworker. I hope to strip mine down and get some new paint on my vise before heading back to work in January :)
 
Last edited:

b7labelle

Well-known member
Joined
Oct 14, 2012
Messages
665
Location
Michigan
Another note worth sharing:

If your vise has 2 pins, DO NOT ASSUME one will drive the other out. Baaaaad assumption. My two pins were on slightly different axis, so I was stuck with a pin deep in the vise that I could not pull out, and the other pin was having nothing to do with budging. Ended up having to use a chisel to bend the pin in half, which ended up snapping off in the hole. That wasn't so bad since I could drive the last little bit into the vise, then remove it.

After getting the first pin removed I was able to use a thin punch, which I could stick through the 1st pin hole and offset it enough to set on the 2nd pin. Was able to drive the 2nd pin out after that.

In a little bit I will be going down to the local surplus steel supplier (ALRO) and look for some 1/4" round stock to create a replacement pin. The 2nd pin is in OK condition and I may reuse it.

Other than that...easy as cake..
 

TDITS

Active member
Joined
Aug 13, 2010
Messages
40
Location
Central Missouri
Instead of using a long dowel and hammer to knock the dust cover out the back use a short piece of dowel. Insert it in the screw socket, put the screw back in and start turning. It will push the dust cover out nice and easy. Those dust covers can be stuck in there pretty good sometimes.
 

dunstan

Well-known member
Joined
Sep 26, 2013
Messages
46
Location
San Francisco, CA
Thanks so much for posting these instructions. I'm taking apart my 1745 and am having trouble getting the dust cap off. Do you know if it definitely requires the same dowel method as yours?
 

dunstan

Well-known member
Joined
Sep 26, 2013
Messages
46
Location
San Francisco, CA
I'm going to post about my idiotic experience in taking off the dust cap of my 1745 and hope it saves another potential idiots out there three days of frustration.

So, first of all I stripped everything down until only the dust cap, nut (the tube with threads on the inside), and the cross pins remained. Then I inserted a wooden dowel through the nut and tried to tap out the dust cap. Nothing happened, except the wood ended up splintering where it impacted the dust cap. I scraped away the paint around the edges of the cap and soaked it with Kroil repeatedly for 12 hours. Then I tried again with the dowel, but again the wood splintered before the cap moved. So then I tried a piece of aluminum rod in place of the wooden dowel. All that happened there was that the dust cap started to develop a ******-like bump as the rod forced it out of shape, but the cap as a whole didn't budge.

Then I remembered someone had suggested placing a short piece of dowel into the nut and using the screw/handle to push it down and force the nut off that way. "I'll try that!" I thought. What happened at that point was that the dowel splintered, crushed, and jammed into every crevice of the threaded nut, and again, the dust cap didn't move at all. Now I had 5 inches of smashed up wood jammed at the end of the nut and no easy way to get it out.

I tried burning it out with a torch. That didn't work. I tried soaking it in lighter fuel and burning it out. That didn't work. Eventually I went and bought a long drill bit and alternated between drilling it out, scraping it out, soaking it, and wire-brushing it out, and finally, after a full day of that frustrating business, I managed to clear the last of it away.

At that point I called Wilton and asked their advice and they said "You don't need a dowel. Ensure the front jaw is off, then insert the screw/handle into the threaded nut and tighten it down. Since the front jaw has been removed there's enough length in the screw to reach the cap and push it off without damaging it."

20 seconds later I had the dust cap off and 20 second after that I started writing this.

I hope that helps someone else avoid the problems I experienced/made for myself.
 
Last edited:

marteck

New member
Joined
Nov 22, 2012
Messages
1
David; I have a No 4 Wilton dated 12/45 the moving jaw cast 840 and need the swivel base parts. Do you have the numbers cast into the two main parts from your early No 4? I see these on eBay with no dimensions and
have yet to get anyone to measure one that is near my dia. of 5 3/4". Your numbers would be a BIG help. Thanks alot, Jerome
 

oldldh

Well-known member
Joined
May 22, 2012
Messages
3,700
Location
Fairhope, AL
X-ray vision is a nice thing to have...


But these may be better...


These have been posted before, but they need to be here, me thinks...
 

Attachments

  • Wiltoncutaway4.jpg
    Wiltoncutaway4.jpg
    32.1 KB · Views: 175
  • wiltoncutaway5.jpg
    wiltoncutaway5.jpg
    63.3 KB · Views: 180
Last edited:

twertsy

Well-known member
Joined
Jan 5, 2014
Messages
6,726
Location
Reedville, VA
I got this vise yesterday. SO branded Wilton. My question is the pins in the rear that retain the "nut" for the screw. Mine has two, one of which appears to be peened on the inside. Is that correct? I got the "nut" out, but the one pin (the one that appears peened) is still inside the "nut tube." Just trying to see of that's correct or should both retaining pins come out?
 

Attachments

  • sovise.jpg
    sovise.jpg
    131.3 KB · Views: 83

zoomieport

Well-known member
Joined
Nov 21, 2011
Messages
1,803
Location
The Mall City
I got this vise yesterday. SO branded Wilton. My question is the pins in the rear that retain the "nut" for the screw. Mine has two, one of which appears to be peened on the inside. Is that correct? I got the "nut" out, but the one pin (the one that appears peened) is still inside the "nut tube." Just trying to see of that's correct or should both retaining pins come out?

I would remove that pin and go to True-Value Hardware and buy new "straight pins", if they don't have those then get "tapered pins", but make sure they are big enough diameter to hold the nut without impeding the main screw and trim the excess from the "outside" of the static assembly.
Just the way I've done it, I'm sure there are others that will help too!

Good Luck!:thumbup:
ZOOM
 

drivesitfar

Well-known member
Joined
Oct 23, 2013
Messages
36,004
Location
Pacific Northwest
Twertsy: RayH is a GJ member that shows us how he replaced his pins holding his Wilton bullet vise nut in place that have threads so you won't have to deal with punching the pins in an out again. his post is on the Vise Repair 101 thread and it's post #258. here's a picture of what it looks like so you can screw it in and out in the future if you do this method.

good luck
 

Attachments

  • attachment.jpg
    attachment.jpg
    139 KB · Views: 82
  • attachment1.jpg
    attachment1.jpg
    145.4 KB · Views: 74

macgee

Well-known member
Joined
Jan 11, 2014
Messages
2,834
Location
Sepulveda Pass, CA
Just went to look at this thread for a quick reference as I have to deal with rebuilding another bullet and photobucket strikes again with their major fail.

I really like Carla's idea (thank you Carla) and RayH post of how he implemented and altered the screws and his noted details of executing it. Very useful info.

Here's the link to the #258 post that Drives recommended us viewing:

https://www.garagejournal.com/forum/showpost.php?p=4237422&postcount=258

Also as Davidb recommended on page 1, view this thread for good photo's and good info dealing with removing the pins.

https://www.garagejournal.com/forum/showthread.php?t=95773


It's a shame that photobucket are preventing photo's to be shown. So many people are being effected in a bad way but that's for a very different thread.
`
 
Last edited:

motorhead1977

Well-known member
Joined
Mar 10, 2020
Messages
48
Location
North Georgia
I have a wilton cadet that I have partially disassembled. Everything is off except I cannot remove the dynamic jaws. It's STUCK closed. I've soaked it in evaporust, I've used liquid wrench, I'm currently using kroil and will continue until I run out of it. After that, I'm going to take it to a machine shop to see if it can be pressed out. I guess my question is, is it possible that the dynamic jaws is inserted crooked being that it's keyed? Any help would be appreciated.
 

Attachments

  • PXL_20201210_231628285.jpg
    PXL_20201210_231628285.jpg
    87.9 KB · Views: 32
  • PXL_20201216_002835428.jpg
    PXL_20201216_002835428.jpg
    93.3 KB · Views: 37

macgee

Well-known member
Joined
Jan 11, 2014
Messages
2,834
Location
Sepulveda Pass, CA
I have a wilton cadet that I have partially disassembled. Everything is off except I cannot remove the dynamic jaws. It's STUCK closed. I've soaked it in evaporust, I've used liquid wrench, I'm currently using kroil and will continue until I run out of it. After that, I'm going to take it to a machine shop to see if it can be pressed out. I guess my question is, is it possible that the dynamic jaws is inserted crooked being that it's keyed? Any help would be appreciated.

Bummer,

Sounds like your doing everything right. Two things I can recommend is to keep using Kroil with the dynamic jaw down and post vertically up, keep reapplying soaking it and let gravity do the work. Also flipping it over and doing the same. Its for sure not any overnight but more like two++ weeks. The issue can be is the post bonding to the static jaw body; there both long and its a lot of surface area touching each other/bonding that needs lots of penetrating, it will take a long time. Thats one way to attack it, another suggestion is heat. You could apply heat to the static jaw body, causing it to expand (some), the trick is to not get the dynamic jaw post heated up as it will also expand. One: you have to properly heat up, 2: find a pin drive/dowel large enough to bang out the the post out of the body. Yes, it could be bent by misuse and then cranked back into the body, jamming it, the Kroil will help less with this.

Final idea, is after letting it soak for a long time in Kroil as described above, reassemble the vise and try using the spindle screw thread to help open it. This would be my last ditch effort as it wont be good for the spindle nut, captive washer or the spindle threads, it could really load it up and not for the good. Vises are not design to expand, only compress jaws together.

I say soak for a long time like above (put is somewhere out of sight to help you forget about it), then heat the main body hot enough to make it expand and then hurry up and hammer the back of the post with a large diameter pin help to push it out.

Good luck

EDIT: Are the jaws totally closed touching each other? If vise is not bent and just bonded and still have a gap/space between jaws, you could try to compress it, it would only need a very small amount of movement to free up the bonding. It should then come loose and easier to pull out, its its bent, then you're just jamming it in more. Are the jaws properly lined up with each other, or are they crooked?
 
Last edited:

motorhead1977

Well-known member
Joined
Mar 10, 2020
Messages
48
Location
North Georgia
Bummer,

Sounds like your doing everything right. Two things I can recommend is to keep using Kroil with the dynamic jaw down and post vertically up, keep reapplying soaking it and let gravity do the work. Also flipping it over and doing the same. Its for sure not any overnight but more like two++ weeks. The issue can be is the post bonding to the static jaw body; there both long and its a lot of surface area touching each other/bonding that needs lots of penetrating, it will take a long time. Thats one way to attack it, another suggestion is heat. You could apply heat to the static jaw body, causing it to expand (some), the trick is to not get the dynamic jaw post heated up as it will also expand. One: you have to properly heat up, 2: find a pin drive/dowel large enough to bang out the the post out of the body. Yes, it could be bent by misuse and then cranked back into the body, jamming it, the Kroil will help less with this.

Final idea, is after letting it soak for a long time in Kroil as described above, reassemble the vise and try using the spindle screw thread to help open it. This would be my last ditch effort as it wont be good for the spindle nut, captive washer or the spindle threads, it could really load it up and not for the good. Vises are not design to expand, only compress jaws together.

I say soak for a long time like above (put is somewhere out of sight to help you forget about it), then heat the main body hot enough to make it expand and then hurry up and hammer the back of the post with a large diameter pin help to push it out.

Good luck

EDIT: Are the jaws totally closed touching each other? If vise is not bent and just bonded and still have a gap/space between jaws, you could try to compress it, it would only need a very small amount of movement to free up the bonding. It should then come loose and easier to pull out, its its bent, then you're just jamming it in more. Are the jaws properly lined up with each other, or are they crooked?


Yes, the jaws are completely closed. They are lined up pretty well. Thanks for the advice, that was my line of thinking also. I'm working on getting a 2in pin so I can knock it out. I'm going to keep feeding it kroil for another week then heat it up and hit it with a pin. Ill keep you posted. Thanks again
 
To avoid these ads, REGISTER NOW!
Top Bottom