Okay, so I was really confused and looked up each of those products you took a picture of and finally found the process mentioned on that Weathered Wood Accelerator to do that... My only thought is maybe some chemical in it reacts bad with poly so they suggest to use the varnish first.
"If you choose to topcoat with a Polyurethane, seal with Watco Laquer spray and then apply Varathane Polyurethane. Test in an inconspicuous area first. Some topcoats may continue to react with the Weathered Wood Accelerator affecting the final look."
The question on the lacquer under the poly. Well Jason and Drives, it may surprise you but I actually READ THE LABEL! I almost never follow directions because labels are for the inexperienced, right? Good thing I did because the directions state that if poly is the intended top coat then lacquer is needed before the poly. Not sure why but I am not one to argue, especially with a product I'm not familiar with. So there you go.

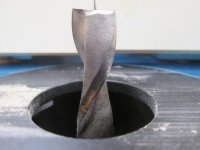
Forstner bits aren't really "high speed" hole makers, but they do make a nice final hole. A similar bit meant to be used in a hand drill for making quick holes is a "Self Feed Bit", it looks like a forstner with a few added bits on it... Downside is they are PRICEY!
A good quality auger bit of whatever length you need is the way to go if you are wanting to if you are wanting to make a lot of holes through some lumber for electrical or piping. Pricing is more reasonable and the auger design lets you go from board to board without stopping to clean out your bit. You might have better luck at a local Electrical or Plumbing supply store than the big-box ones.
A hole hog is a serious drill, that sucker has enough torque that if it binds and you are holding on too tight it can hurt you. You might get lucky finding and old one at a good price at a Pawn Shop. From all the negative reviews I don't think the new ones are made nearly as well... The design is so you can get between the studs of a framed up wall to drill out holes. If you don't have the space constriction and your current drills aren't stopping or bogging down then the hole hog won't net you and gain...
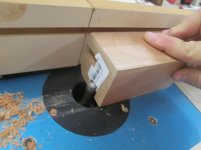
holes from 3/8 to and inch on this project for bolts and wires. i've got a few forstner bits and haven't used them for that. i use the Irwin bits that look like a mining drill sort of and the old school spade bits that are a bit easier (at least for me) to sharpen, but both are a not ideal. i'll get one of my forstner bits out today and give it a try if nobody else has one they like better.
yesterday drilling with a 7/8 Irwin wood bit you would have thought i was using a mortor drill bit and my drill is an almost brand new 1/2 inch Angle style milwaukee. i've always wanted to buy a HOLE HOG Milwaukee drill, but I have 2 of these angle drills both in like new condition, several 7.5 inch grinders and a Milwaukee hammer drill and that's not including those old school ones i have that will break your arm if the bit gets stuck or cockeyed.