To avoid these ads, REGISTER NOW!

Woodworking 101--Tools and Tips

jar944

Well-known member
Joined
Jul 26, 2010
Messages
5,912
Location
Northern VA
My current bench in my previous garage.


My more often than not previous bench in my old garage


And my current shop
 
To avoid these ads, REGISTER NOW!

jar944

Well-known member
Joined
Jul 26, 2010
Messages
5,912
Location
Northern VA
Nice shop Jar44. What kind of projects do you like to build?

Bret

Heh.. thats a interesting question. Most..err all of what Ive built has been finish carpentry/millwork, cabinetry or furnishings.

Really just knocking stuff off my home improvement list..until I sold my house and started over again with a bigger house and longer list


Last edited:

bj383ss

Well-known member
Joined
Sep 29, 2011
Messages
3,166
Location
TX
Wow Jar,

Very nice projects. Love the tool cabinet. I have plans for some wainscoting in our main hallway and around our kitchen island as well. Are these projects in the new house or the old house? Also recommend a Grizzly 2hp Dust Collector for your next tool purchase. Look forward to seeing more of your stuff.

Bret
 

1Garageman

Well-known member
Joined
May 12, 2009
Messages
4,417
Location
Columbus, Ohio
This is by far now my favorite spot on this website! Thanks for sharing all of the pictures of your great projects. I have so many more woodworking ideas now!
 

bj383ss

Well-known member
Joined
Sep 29, 2011
Messages
3,166
Location
TX
Hi Garageman. Please share some of your work or your workshop.

Bret
 

ALinCarolina

Well-known member
Joined
Dec 29, 2014
Messages
757
Location
NC Piedmont
Jar, I really like the router bit storage rack in the door, I'm gonna steal that idea.

Great to see some really nice woodwork on here. I'm a long time woodworker but a novice weldor/metal worker so I joined this forum to learn more about such things. Here is a shot of a drift boat I built a few years ago. Mostly teak.
 

Attachments

  • IMGP3892_resize.JPG
    IMGP3892_resize.JPG
    131.6 KB · Views: 118
  • IMGP4100_resize.JPG
    IMGP4100_resize.JPG
    138.7 KB · Views: 124

bj383ss

Well-known member
Joined
Sep 29, 2011
Messages
3,166
Location
TX
Jar, I really like the router bit storage rack in the door, I'm gonna steal that idea.

Great to see some really nice woodwork on here. I'm a long time woodworker but a novice weldor/metal worker so I joined this forum to learn more about such things. Here is a shot of a drift boat I built a few years ago. Mostly teak.

Wow that is an amazing boat. You have any other projects to share with us.

Bret
 

drivesitfar

Well-known member
Joined
Oct 23, 2013
Messages
36,007
Location
Pacific Northwest
McB: that hidden grinder mounting idea was maybe my favorite until i saw how to make a hitch mount. very cool design if you have room under your bench. BTW your new shop layout looks great and I bet a lot of the guys might like to see pictures of your $25 Block grinder you spent some time and money on to make it the Blockmeister. do you use the BM for wood projects too? nice work on that little cabinet. :thumbup:

Jar: nice looking shop and great projects that is for certain. please stick around to tell us how you make some of those cool projects if you have the time. :beer:

DON: if you start repairing and making wood stuff like you do steel you might need to make another PARTY GARAGE and i'm sure it would be amazing too. post up a few pictures of where you are with your wood shop and maybe one of the members might have some good ideas for you? also in case any of you haven't seen DON'S Party garage it might be one of the nicest garages on GJ and it's more like a museum, but work going on inside there daily if he's not picking up more cool stuff. thanks for stopping in maybe one of my favorite threads in the TOOLS SECTION.

MB: when you get some time i think we'll need to see more pictures of that mantle, your shop and some more cool stuff you make. WELL DONE SIR!!

GM: i agree post up what you've made or what tools you have and i have to also agree this thread gets my attention more than a few times during the day now.

ALL: i'm making a pallet/crate to ship a 150 pound vise across the US this morning so even my wood butchering skills might improve after learning a few tips from this thread.

cheers and have a great day everybody!!
 

Attachments

  • WP_20160513_004.jpg
    WP_20160513_004.jpg
    143.5 KB · Views: 126
  • WP_20160513_002.jpg
    WP_20160513_002.jpg
    142.2 KB · Views: 142
  • WP_20160314_009.jpg
    WP_20160314_009.jpg
    147 KB · Views: 170
  • WP_20160314_019.jpg
    WP_20160314_019.jpg
    142.3 KB · Views: 129
  • WP_20150728_003.jpg
    WP_20150728_003.jpg
    148.7 KB · Views: 139

drivesitfar

Well-known member
Joined
Oct 23, 2013
Messages
36,007
Location
Pacific Northwest
AL: did you actually build the YANKEE WORKSHOP on your property? looks like it with those wood doors. or is your name really NORM? i (we) would love to see your woodworking tools and shop if you care to share a few pictures.

AWESOME BOAT!!

ALL: i know a few of us watched NORM'S Yankee workshop so i wonder if he might stop in and post up a few pictures on this thread some day? i surely learned more than a few things from him back in the day.

cheers
 
OP
J

jimreed2160

Well-known member
Joined
Aug 7, 2016
Messages
3,589
Location
Tallahassee FL
Al--It is great to have another Tar Heel aboard--and from the Piedmont too! I grew up in Gastonia and still have red mud on my jeans. Welcome and kudos on the boat. We need more pictures of your work.

Drives--Outstanding packing for those special vises. Your extra care will ensure them a long work life.

I hope to post some basic plane work today for novices. Hope the advanced ww will bear with me. The heat pump failed and it got down to 61 inside last night during this cold wave. Brrr. I need shop activity to warm up.
 
OP
J

jimreed2160

Well-known member
Joined
Aug 7, 2016
Messages
3,589
Location
Tallahassee FL
Bench Planes
There is a group of planes called Bench planes. Why? Because they are designed to be used on a woodworking bench, of course. Here is a class photo of the Stanley Bailey bench plane line.

DSCN0925.jpg


Starting at the low end is the small #3. I omitted the 1 and 2 because they are collector items. Then there is the #4, #4 1/2, #5 1/4, #5, (forgot the #5 1/2), #6, #7, and the whopping big brother of all--the #8. Let's start with the #8. It is a jointer plane and its primary use is to true up edges of boards for glue ups (jointing). There is quite a size difference between the diminutive #3 and the massive #8.

DSCN0926.jpg


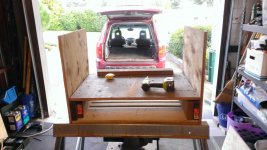
Here is a picture of the #8 with its electric counterpart.

DSCN0927.jpg


I like having both tools around so I can pick the one that is appropriate to the task. If I had to glue up a 6 foot maple tabletop, I would probably use the electric jointer because it is much faster. The handplane as jointer is good for low volume and for quiet. If you have a houseful of sleeping babies, your shop time is probably limited to quick sessions at night. In that case, the quiet handplane is your friend. The handplane also works best for narrow and short boards. The electric jointer raises the hair on my neck when it is in action. My cousin lost a part of his thumb in one. Those whirring blades are fast, sharp, and unforgiving. My dad called it the "beast of the shop." That is why I save mine for big, wide, long boards where my hands are safe.

So let's get this big boy #8 into action. Clamp your wood edge up on the bench and give it a good once over. Here is what I found.

DSCN0929.jpg


This furring strip is a little twisty and has two knots in it. Here is the knot at the end of the board.

DSCN0929.jpg


So what, you say, wood has knots. Yes it does, but handplane blades do not like knots. How would you like to go cruising along a soft board and encounter a hard knot? A knot is a great way to put a nick in your carefully sharpened blade. What to do? Get out your chisel and remove some of it. This is a glue up and a small void is not going to be a problem.

DSCN0930.jpg


It is much easier to get a nick out of a 1/4" chisel than a 2 3/8" handplane blade. If you gouge out wood where it shows, just glue in a scrap or fill the tiny void with epoxy. It will give your project a handmade look.

With the board prepped, we are ready to plane. I set my blade slightly above the mouth so it does not cut. Then I slide the plane along and turn the adjuster wheel. Once I feel it bite, I am ready. Wispy shavings are the best. I start the plane at one end and hold it level to the table. In this case, it took short shavings because the board had a few high spots. I also hold the plane at a slight skew because it slices better. It is kinda like slicing tomatoes where a slicing action works better that a chopping action. About 5-10 degrees of skew is fine.

After a few passes, the plane begins to take full length shavings. But these are narrow because the board has a twist. I stop once it takes a full length and full width shaving. That was about six or eight passes for this board.

Here is the final shaving.

DSCN0932.jpg


And here is the board sitting dead flat on the bench--ready for a glue up.

DSCN0933.jpg


So that is Stanley's largest bench plane in action. These #8 planes are not very common and I find them a little large for my taste. I really prefer the slightly smaller #7 size. But handplanes are like pickups--too large is never a problem.

As a beginning woodworker, I searched for lumber with good edges and tried to glue it up without a jointer. As you can guess, my early projects were hit and miss. Once I learned about jointing with a handplane, my projects made an Olympic size jump in quality. Getting an electric jointer from my buddy, Dan just made some projects a little easier. A common woodworking project is making a dining table for the family. Don't be shy if you lack tools. Just pick up a jointer plane, #7 or #8, and build your project. It is easy and you will be proud of your tight joints.
 

TerryH

Well-known member
Joined
Dec 8, 2012
Messages
2,248
Location
Springdale, AR
Nice planes and nice write up, Jim!! I have several that I've restored. I got hooked on Type 2 Bedrocks. :dunno: I've upgraded to aftermarket blades in all of them and spent a ridiculous amount of time tuning them. Amazing what one can do with a hand plane!!!

Sample of some of the restored planes...


Last edited:

ALinCarolina

Well-known member
Joined
Dec 29, 2014
Messages
757
Location
NC Piedmont
Thanks to all. I am in the process of building a new workshop/garage in anticipation of retirement in a few years so haven't done any major woodworking projects this year. I did help my son build some nice beehives this summer though:
 

Attachments

  • IMG_0901b.jpg
    IMG_0901b.jpg
    134.7 KB · Views: 80

ALinCarolina

Well-known member
Joined
Dec 29, 2014
Messages
757
Location
NC Piedmont
Jim: your shop looks great. I love Tallahassee. I lived there from 1977 to 1986. My business was up by Lake Jackson.

The beehives got copper flashing for the roofs. Not shown in those photos
 
OP
J

jimreed2160

Well-known member
Joined
Aug 7, 2016
Messages
3,589
Location
Tallahassee FL
Terry--Love your Bedrocks. They look brand new! Thanks for the pictures.

Al--Color coding the beehives looks like a great idea for telling them apart. Glad to hear you loved Tally. Small world.
 

jar944

Well-known member
Joined
Jul 26, 2010
Messages
5,912
Location
Northern VA
Wow Jar,

Very nice projects. Love the tool cabinet. I have plans for some wainscoting in our main hallway and around our kitchen island as well. Are these projects in the new house or the old house? Also recommend a Grizzly 2hp Dust Collector for your next tool purchase. Look forward to seeing more of your stuff.

Bret

All the projects i posted so far were in my previous house (just sold this past summer) I have a very long list for the new house as well, including a rather large (40 sheets of prefinished plywood) full kitchen build


I have the hf dc, I need to upgrade at some point. Running molding on my shaper fills it up way to fast


jar944

Well-known member
Joined
Jul 26, 2010
Messages
5,912
Location
Northern VA
My version of production tenon cutting using stacked rebate heads on a sliding shaper. Not really 101 since you need a shaper (and ideally a large one at that) but I thought some might find it interesting. These (5"~ 125mm)heads give a max tenon length of 1" and are not ideal but they work well anyway. Proper tennoning discs are 7 to 10 inches in diameter and can weigh 10s of pounds each


Its fast enough that you don't feel bad cutting them off to shorten a stretcher (or 16 stretchers in this case)

 
To avoid these ads, REGISTER NOW!
OP
J

jimreed2160

Well-known member
Joined
Aug 7, 2016
Messages
3,589
Location
Tallahassee FL
Jar--Thanks for those posts. We really cover the ww waterfront when we go from bench planes to 40 sheets of plywood and production tenoning. But all are part of the rich lore of ww. We will never run out of material.

Continuing with our bench plane introduction, I have a small project task to demo. Here is why you need bench planes for preparing lumber. I will also introduce another plane--the #40 scrub.

DSCN0934.jpg


For this demo I have selected a rough walnut board with a bow and have assembled the #7 bench plane along with the #40 scrub plane. The scrub plane has a cambered blade and a big mouth.

DSCN0935.jpg


The scrub plane is used to hog off wood using short strokes at 45 degrees to the grain. It aggressively pulls off chips and thick shavings.

DSCN0936.jpg


I used the scrub to take off the two high spots on the back side of the bow. This makes that side of the board flat against the bench.

DSCN0937.jpg


The next task is to attack the bow. The scrub plane made short work of that.

DSCN0939.jpg


This board had a wane at one end. I marked it with chalk so I could ignore it. Then I used the #7 to clean up the rough marks caused by scrubbing. After one pass, the shavings started to look nice.

DSCN0940.jpg


Here is one of the #7 shavings stretched out.

DSCN0941.jpg


At this point the board looks pretty nice. But it can get even better.

DSCN0942.jpg


It is time to bring out the big gun of smoothers--the #4 1/2. It is as wide as the #7 but it is much shorter. In addition, it has a high angle frog. Bench planes have 45 degree frogs and that works well for their purposes. But for smoothing hardwoods, a 55 degree frog works much better. It is a cross between slicing and scraping.

DSCN0946.jpg


And the shavings are divine.

DSCN0944.jpg


DSCN0945.jpg


The surface is like glass.

DSCN0947.jpg


And this is the result of our 20 minute workout.

DSCN0948.jpg


Preparing wood using handplanes is not difficult. In low volumes it is even fun. And quiet.

So don't avoid wood prep. Handplanes make it easy.
 

McBrownie

Well-known member
Joined
Mar 27, 2014
Messages
1,827
Location
Cleveland, OH
Nice planes and nice write up, Jim!! I have several that I've restored. I got hooked on Type 2 Bedrocks. :dunno:

For me, it's Type 11's. Same as you, I'm not really sure why. :lol_hitti I'm waiting for a No. 7 and No. 3 to be delivered. They will be added to my No. 4 and No 5. Along with a low angle block plane and I think it will meet my hand planing needs - at least for now. Or, until I take the plunge and buy real planes like Jim's LN's. Nice planes Jim!

For those who are not familiar with Stanley plane types, here is the rabbit hole. A wealth of information here. Enter at your own risk.

http://www.hyperkitten.com/tools/stanley_bench_plane/
 
Last edited:

KMScott

Well-known member
Joined
Feb 14, 2012
Messages
4,640
Location
Daufuskie Island, South Carolina
Jim very nice write up on the example using planes to flatten a rough cut board. I never took the time to learn and just use my Joiner. I am enjoying this thread. Gotta look for a Scrub Plane.
 

bj383ss

Well-known member
Joined
Sep 29, 2011
Messages
3,166
Location
TX
Wow Jim. At least I made slots for some more planes. Now I fell like I need to fill them. I do love my jointer but like you it makes a lot of noise and seems like the most dangerous tool I have. My grandpa lost his fingertip in the router making some trim boards. He had on gloves which is a big NO NO. Everytime I crank up a machine I think of him and Safety First. He was a guitar player and it was his left first finger he lost the tip of. He had to relearn the guitar after he had been playing for 40 years.

Jar thanks for sharing more pics. I have drooled over those shapers in the Grizzly catalog. You can make so many different things with it and most are a one pass kind of deal instead of 1/8" pass at a time through the router bit.

Al looking forward to seeing your new shop

And yes Jim you are right about never running out of material. No one has even brought up wood turning or using the scroll saw. Those are two other universes of Woodworking. Not to mention instrument making and carving.

Bret
 

ALinCarolina

Well-known member
Joined
Dec 29, 2014
Messages
757
Location
NC Piedmont
A buddy I fly fish with wanted a rack of some sort for his fly rods. I had some white oak around so made this holder. Not satisfied with the match of the quarter sawn top but it's what I had. Finished with Jeff Jewitt's 3 part Mission Oak stain method.


jar944

Well-known member
Joined
Jul 26, 2010
Messages
5,912
Location
Northern VA
Jar thanks for sharing more pics. I have drooled over those shapers in the Grizzly catalog. You can make so many different things with it and most are a one pass kind of deal instead of 1/8" pass at a time through the router bit.
Bret

I wanted a shaper for awhile, mostly i think because I never used one. One popped (3hp delta) up locally on Craigslist for and good price so I bought it. A few months later I just happened to check Craigslist before work and saw a 5hp grizzly tilting sliding shaper with power feeder for a insane price, so I picked it up as well.

In addition to single pass cuts, cutters *can* be cheaper than router bits. Knives for a euro block cutter head are about $14 each. One more benefit to a shaper over a router table is the cutter geometry. The large diameter has a better more tangential entry and exit angle. It results in a smother cut with less tearout.

Straight off the shaper, and smooth as glass


Europe block head testing various knife profiles.


WoodShopDisaster

Well-known member
Joined
Dec 5, 2014
Messages
75
Location
Long Island
Awesome to see a woodworking thread. I am in the process of moving and will finally have my own detached home shop soon. My old shop was at my parents house. I have yet to build a proper bench, and I have always fought against myself on every project because of that. A real bench is on my short list once we are settled in.
 

Attachments

  • IMG_2416.jpg
    IMG_2416.jpg
    135.7 KB · Views: 85
  • IMG_2423.jpg
    IMG_2423.jpg
    142.5 KB · Views: 69
  • IMG_2425.jpg
    IMG_2425.jpg
    142.6 KB · Views: 73
  • IMG_2430.jpg
    IMG_2430.jpg
    140.6 KB · Views: 74

ztorres

Well-known member
Joined
Sep 22, 2016
Messages
195
Location
Iowa
Not really wood working but started to put some siding on the shed I made. Initially I was going to put steel siding on but started pricing vinyl and realized that was a better option. Got the front done tonight.
5bf342704f9b8f4f6f88dfbd00374459.jpg
I may be the only one, but I doubt that, I hate daylight savings time. I didn't like it when I farmed and I don't like it now. Have next to no time to work outside.

Forgot I made a router cabinet this past week, been caught up with siding this shed and making a dresser for my wife for Christmas. But here is a pic.
fb534b41029ec097993389e61b11c589.jpg

Zach
 

Attachments

  • fb534b41029ec097993389e61b11c589.jpg
    fb534b41029ec097993389e61b11c589.jpg
    161.1 KB · Views: 2
  • 5bf342704f9b8f4f6f88dfbd00374459.jpg
    5bf342704f9b8f4f6f88dfbd00374459.jpg
    182.1 KB · Views: 4
Last edited:

cheechi

Well-known member
Joined
Feb 29, 2012
Messages
4,384
Location
Triad, NC
this thread has been a good read. So hand planes; can you suggest some good ones that can easily be had on ebay, sears, etc for.. well cheap for planes is subjective, but say $30-50 range? There are two mexico made block planes branded craftsman that get decent reviews, are either of them worthwhile?

I don't have now a thickness planer or jointer, may not have a need for either one actually but I have a Bosch electric handheld planer for things like doors/doorframes and misc things. Been thinking one or a few hand planes could give me some more depth than what I can do now.
 

drivesitfar

Well-known member
Joined
Oct 23, 2013
Messages
36,007
Location
Pacific Northwest
ZT: might i suggest putting up a few halogen lights for your outside work? i agree it's sort of depressing when it gets dark at around 4:00 now and wish they would eliminate Daylight savings time not that it would help that much.

nice job and is that vinyl siding?

ALL: so i needed to make a pallet/crate to ship a little 150 pound vise across the US to another GJ member. i don't make these often enough to have a great method down yet, but i do make them stout. i also maybe because of this thead wore my ear protection all day today while i used my miter saw, worm drive and impact driver.

not pretty compared to all the cool stuff, but i was working with wood today. i also try and build pallet/crates out of material i have on hand, but i haven't charged a member for shipping materials yet. i bet i put in 100 screws in these. i ran out of screws and energy and daylight so will finish it up tomorrow and drop it off at Fastenal.

cheers
 

Attachments

  • WP_20161121_028.jpg
    WP_20161121_028.jpg
    141.7 KB · Views: 84
  • WP_20161121_026.jpg
    WP_20161121_026.jpg
    137.2 KB · Views: 76
  • WP_20161121_014.jpg
    WP_20161121_014.jpg
    148.2 KB · Views: 81
  • WP_20161121_001.jpg
    WP_20161121_001.jpg
    83.4 KB · Views: 73
  • WP_20161121_005.jpg
    WP_20161121_005.jpg
    147.6 KB · Views: 78

ztorres

Well-known member
Joined
Sep 22, 2016
Messages
195
Location
Iowa
Drives:
It is vinyl siding. I actually picked up a nice LED work light today. The issue is that I put it behind the garage for security and weather so the garage blocks all of my lights


Zach
 

ztorres

Well-known member
Joined
Sep 22, 2016
Messages
195
Location
Iowa
Drives:
Interesting concept I've never seen that.
8c81d86099729fa9845f58abd0a28724.jpg
This is what I picked up, it lights it up really well


Zach
 

Attachments

  • 8c81d86099729fa9845f58abd0a28724.jpg
    8c81d86099729fa9845f58abd0a28724.jpg
    81.6 KB · Views: 1

drivesitfar

Well-known member
Joined
Oct 23, 2013
Messages
36,007
Location
Pacific Northwest
ZT: i've used the one(S) you bought too and i think i might own 4 or 5 double light versions still. the JR. Wobbler works great and easy to move and you don't burn yourself if you forget to grab the right spot. plus you don't have to spend anytime leveling it. i need a new bulb in mine which i think is about $30 and i'll have to get one now that it's getting dark so early.

good luck with your project. is vinyl siding fairly easy to install cause i've never installed it or taken any off? i think it's just screwed on isn't it? any prep or just tar paper behind it?
 

ztorres

Well-known member
Joined
Sep 22, 2016
Messages
195
Location
Iowa
Drives:
For a shed I didn't put any backing or paper behind it, you could and it wouldn't be an issue. You're right it's mainly just screwing/nailing in the siding. A lot of it is setting up the corner pieces, j-channel for under the roof and around doors/windows/obstacles. Then starter piece. Relatively cut and dry and doesn't take too much effort. One thing I've notice a lot of people forget to do is leave some gap on the outsides and you shouldn't tighten the siding or trim down tight because it will expand and contract with heat and cold, respectively.


Zach
 

SteveL

Well-known member
Joined
Jan 14, 2005
Messages
760
Location
St. Louis, MO
Here is a setup photo of a featherboard in action. It keeps the piece from moving sideways to the left as it rides along the fence and is pushed along with user made push stick.

DSCN0912.jpg


(Safety officer note: Blade guard was removed for photo.)

Just a point of observation on the way you have the feather board set up...... The feathers should not be past the beginning of the blade as it will tend to close the freshly cut wood on the waste side back in to the blade potentially causing a kick back. The photo below shows the proper way to set up a feather board on a table saw as all you are trying to do is keep the work piece in contact with the fence. I had 13 stitches and a new tooth finding out the hard way.
 

Attachments

  • image.jpeg
    image.jpeg
    46.4 KB · Views: 66

turbowoodworker

Well-known member
Joined
Mar 18, 2012
Messages
3,531
Location
Apex NC
Cheechi,
The best place to buy planes are antique stores, believe it or not. They think they are cute, but Stanley's and others can be had for $10-40 depending on size. They are usually beat up and dirty. Just make sure all the parts are there and the sole is flat. I bring a small straight edge with me. The antique people don't realize they are still usable. And you can haggle.

New foreign planes ( Woodriver, etc) well you get what you pay for. The other end of the spectrum is Lie-Nielsen that start at $200 and rocket from the.
A good middle of the road new plane, Veritas, Lee Valley Tools are good but in the $150 and up range.

So your best bet in your price range is used USA made.
 
To avoid these ads, REGISTER NOW!
Top Bottom