To avoid these ads, REGISTER NOW!

Woodworking 101--Tools and Tips

BMR24

Well-known member
Joined
Oct 2, 2017
Messages
234
Location
Rocky Mountains Colorado
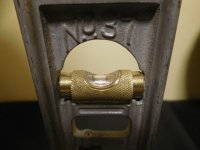
Nice vise Chrisinmish, are those maple jaws?
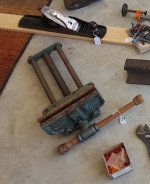
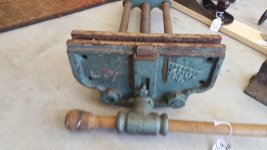
While we are on the subject of woodworking vises, I found a record 52 a while back and I'm itching to get it on my workbench. Are these any more valuable with the original paint? Usually worth woodworking tools I like to clean them up but leave the original finish in tact, but this blue is a bit much. If it will effect the value of the vise I'll leave it, but if not then another color is in order.
More importantly, what does everyone like for jaw faces? My current vise has pine- my thought being that it wouldn't marr the workpiece, but I hear a lot of people use a hardwood. Any thoughts are appreciated.
 
To avoid these ads, REGISTER NOW!
OP
J

jimreed2160

Well-known member
Joined
Aug 7, 2016
Messages
3,589
Location
Tallahassee FL
BMR--They have a saying over on the vise threads--"Your vise, your color choice." I say clean it up and paint it to suit your fancy. I like to file down the casting marks and any sharp edges before I paint. As for the jaws, most ww seem to use scraps at hand. I have seen everything from packing crates and door trim to flooring. Some prefer softer woods but I like hardwoods. The theory is that softer woods are easier on your project but I never clamp to leave marks. If hardwood jaws leave marks on your project, you are doing something wrong.

So get that Record fixed up and mounted. I used one for awhile and really liked it. Is yours a quick release?
 

BMR24

Well-known member
Joined
Oct 2, 2017
Messages
234
Location
Rocky Mountains Colorado
Jim, yes it is, it's also in almost new condition, when I first saw it I thought it was a newer made in China model it looked so new, but it says right on the front "made in England". This one will be an improvement to my Morgan 300, which I plan to use as a tail vise for now
 

EOC_Jason

Well-known member
Joined
Jun 25, 2012
Messages
11,388
Location
Bentonville, AR
Man that reminds me, I need to restore & mount my old woodworking vise... It would only come in handy like several times a week... :lol:

Too many projects...
 

CRSINMICH

Well-known member
Joined
Aug 15, 2015
Messages
2,397
Location
Southeastern Michigan
jim: One of the last things I needed was another hammer but I had to buy that one for the low price of $5 because, 1) It was copper, 2) It's from England, and 3) It has THOR embossed on it!

BMR: Thanks! Yes it is maple - Hard Maple - frickin' hard maple. Here's a shot of the completed faces after going over them with a freshly sharpened scraper and with 2 coats of BLO. Congrats on the Record 52. That is a sweet ww vise. I vote for original finish. Record blue is their trademark. GJ member Fretters has mentioned the actual name of the color but I forget now.

EOC: Go for it. Get it mounted. What are you waiting for? You know all the cool guys are doing it. What brand of vise is it?
 

Attachments

  • Finished jaw faces (2).jpg
    Finished jaw faces (2).jpg
    93.5 KB · Views: 44

EOC_Jason

Well-known member
Joined
Jun 25, 2012
Messages
11,388
Location
Bentonville, AR
EOC: Go for it. Get it mounted. What are you waiting for? You know all the cool guys are doing it. What brand of vise is it?

It's a big old American Scale... Ignore the price tags, I got these on half-price day... :)

You can see the big old Stanley No. 6 above it for some sense of scale...
 

Attachments

  • 20170423_133153.jpg
    20170423_133153.jpg
    104.9 KB · Views: 75
  • 20170423_133206.jpg
    20170423_133206.jpg
    98.3 KB · Views: 63
OP
J

jimreed2160

Well-known member
Joined
Aug 7, 2016
Messages
3,589
Location
Tallahassee FL
Sargent #81

Sometimes a woodworker needs to enlarge a groove just a tad and a screaming router seems to be overkill. Maybe it is a drawer bottom groove or a panel style. Well, ww of yore would turn to their trusty side rabbet plane. They rejoiced when the metallic plane days arrived because this type of plane needed metal to grow smaller.

Of course, grain can be tricky, especially when you are trying to take off a whisper of a shaving in a small place. Stanley first offered their line of side rabbets just before 1900. They made the #98 for one direction and the #99 for the other. Preston and later Record combined both directions in one plane and Sargent copied that clever design. The front guide comes off for bullnose work.

If you ever come across one, pick it up. They are handy little planes. This one is patented 1914. I got it cheap because it was missing the blades. That was an easy fix for me because I had a waiting pair of #98/99 blades in the heat treating box and they were a perfect fit.
 

Attachments

  • DSCN5823.jpg
    DSCN5823.jpg
    150.6 KB · Views: 59
  • DSCN5824.jpg
    DSCN5824.jpg
    153.7 KB · Views: 56
  • DSCN5825.jpg
    DSCN5825.jpg
    136.5 KB · Views: 56
  • DSCN5826.jpg
    DSCN5826.jpg
    148.2 KB · Views: 62
OP
J

jimreed2160

Well-known member
Joined
Aug 7, 2016
Messages
3,589
Location
Tallahassee FL
Bedazzling a saw

I dress for battle when I take to the yard jungle around my house. That means heavy pants and a LONG sleeved shirt to minimize skin allergies along with a boonie cap to keep the sun off my delicate skin. Since I live in Florida, this battle dress means that I start sweating the minute I step outside. After a few minutes of sawing trees and shrubs, my age diminished brain heats up and gets mushy. I keep thinking that one day I will throw the saw down somewhere and forget it.

So having time on my hands today, I decided to bedazzle my yard saws. But I used duck tape instead of pop rivets. And I have lots of available duck tape, or as we call it here in north Florida, "redneck aluminum".

If the saw is on the ground, it should be instantly visible. Even hanging in the shop, they tend to stand out. Mission accomplished.
 

Attachments

  • DSCN5842.jpg
    DSCN5842.jpg
    149.5 KB · Views: 57
  • DSCN5841.jpg
    DSCN5841.jpg
    150.1 KB · Views: 53
  • DSCN5843.jpg
    DSCN5843.jpg
    148.8 KB · Views: 53

drivesitfar

Well-known member
Joined
Oct 23, 2013
Messages
36,007
Location
Pacific Northwest
JIM: nice idea on putting a little color on the hand saws. I love how sharp they are, but dang they are hard to find a good place to store them.

i'm actually using my Ryobi 18v chain saw for some of the bigger stuff now and if you keep the blade sharp on it you can practically cut logs.

thanks for all the tutorials!!
 

rlitman

Well-known member
Joined
Oct 18, 2010
Messages
24,593
Location
Long Island
Jim: some great ideas. And does anyone else see coral snake colors in those handles? (note I am a life long mid-westener)

Well, now that you mention it, I do.

My wife had a set of pruners with black handles that kept getting lost. I spiral wrapped the handles with red electrical tape. They look like a candy cane, but you can't lose them.
 
OP
J

jimreed2160

Well-known member
Joined
Aug 7, 2016
Messages
3,589
Location
Tallahassee FL
rlit--I like the candy cane idea. Will have to use that next time. Probably less alarming than the coral snake look. :shocking:

Drives--Storage can be an issue. They need to be out of the way but close enough to find. And those sharp teeth can do a number on soft skin. I have to put everything back in the EXACT spot or I will never find it again. So I drilled some long sheetrock screws into the lumber rack and hang them on the front with their teeth facing back. I can see the handles now that they are bedazzled.
 

rlitman

Well-known member
Joined
Oct 18, 2010
Messages
24,593
Location
Long Island
rlit--I like the candy cane idea. Will have to use that next time. Probably less alarming than the coral snake look. :shocking:...

The other thing I've done, is cover stuff in reflector tape. I have a black reflective tape that I've wrapped my point-n-shoot camera in (that thing used to disappear on a table). In ordinary lighting, the tape blends into the black camera body. But turn on a flashlight, and the tape pieces on all 6 sides pop out bright white.

Candy cane has unique advantages. I think it has something to do with the diagonal stripes, and the unnatural way they catch your eyes. All hi-viz schemes I am familiar with try hard to stay away from natural colors and shapes. But the visual contrast of your saw wraps is certainly effective in a natural way. You just independently solved a problem that evolution already solved before you. ;)

I own one bow saw, and it came with a snap-on plastic blade cover. If that were lost or broken, I'd probably make a replacement out of kydex.
 

jar944

Well-known member
Joined
Jul 26, 2010
Messages
5,911
Location
Northern VA
I made a couple transom windows the other night.
 

Attachments

  • 20180227_204825-2656x1494.jpg
    20180227_204825-2656x1494.jpg
    84.7 KB · Views: 79
  • 20180228_151534-2656x1494.jpg
    20180228_151534-2656x1494.jpg
    92.9 KB · Views: 74
  • 20180227_185424-2656x1494.jpg
    20180227_185424-2656x1494.jpg
    115.2 KB · Views: 73
  • 20180227_182515-1494x2656.jpg
    20180227_182515-1494x2656.jpg
    67.4 KB · Views: 72
  • 20180227_191306-2656x1494.jpg
    20180227_191306-2656x1494.jpg
    147.1 KB · Views: 72

56vette461

Well-known member
Joined
Jan 13, 2013
Messages
492
Location
Northern California
If I put tape or markings on yard tools, I find them. If I let them stay dutifully naked metal and they are lost in the clutter, then no yard work honey, I can't find where the kids left the tools. Then back to the shop to play. :shocking::rocker:
 
To avoid these ads, REGISTER NOW!

CRSINMICH

Well-known member
Joined
Aug 15, 2015
Messages
2,397
Location
Southeastern Michigan
AUGER FILE​
I recently got an auger file and yesterday I played with it for an hour or so. It's surprisingly easy to sharpen auger bits. While it could be done with a regular file, the auger file has some features that make the job faster and safer. First, it is tapered so it can be used on different sized bits. Second, If you look closely you'll see that one tapered end has teeth and the other is smooth. It has safe faces but there are teeth on the edges. The end with teeth has safe edges. Having safe edges and faces is helpful because a bit could be nearly ruined if the wrong part of it is filed.

Most, but not all, of the filing is done on the upper part of the cutting edge. Some filing is done on the inside of the spur. NEVER file the outside of the spur. The diameter of the bit will be made smaller and no matter how sharp the cutting edges are, the bit will struggle to do its job.

The most surprising thing I learned about auger bits is how important the tapered lead screw is. It is supposed to pull the bit into the wood so that he cutting edges will shave off some wood and the flute (or flutes) will remove the shavings. None of that will happen if the lead screw is not sharp, is bunged up, or missing. The screw will wallow out the hole it's in and you'll have to rely on brute force to push the bit through the wood. Good luck with that! (Coincidentally, Brute Force & Ignorance is a favored technique)

Auger bits can be had for little more than pennies at garage sales etc. As long as the lead screw is in good shape, the bit will be useable with a little TLC. They are surprisingly fast and effective especially when boring deep holes.

That is NOT the same bit in both pictures. I included the second one to show a lead screw that's in good shape.
 

Attachments

  • Auger file (2).jpg
    Auger file (2).jpg
    57.7 KB · Views: 58
  • Auger file (1).jpg
    Auger file (1).jpg
    109.5 KB · Views: 66
Last edited:

CRSINMICH

Well-known member
Joined
Aug 15, 2015
Messages
2,397
Location
Southeastern Michigan
CR--good post.

ez: Thanks! I try to keep in mind that this thread is Woodworking 101. That's not all that hard since I'm fairly 101 myself. I used a brace and bit to bore the dog holes in my bench when I mounted that tail vise. It was surprising how well they worked especially in spongy, springy fir. When I found out how easy it was to sharpen auger bits I was even more pleased.
 
Last edited:
OP
J

jimreed2160

Well-known member
Joined
Aug 7, 2016
Messages
3,589
Location
Tallahassee FL
CRS--When I was a kid, I had access to my dad's handsomely outfitted workshop. The only rule was that I was strictly forbidden from using any of the power tools. :( The only exception was my grandfather's bandsaw which I inherited when I was 11. So I was a big time user of auger bits. I would put the handle on my chin so I could hold the workpiece and crank the brace. My results were spotty because some the bits were dull. So you can bet that the first time I saw an auger bit file in a catalog I snatched it up. It is a real lost art tool. Thanks for the pictures.
 
OP
J

jimreed2160

Well-known member
Joined
Aug 7, 2016
Messages
3,589
Location
Tallahassee FL
Stanley #149 gauge

I found this in a box of random plane stuff and have never seen another. It is a Stanley #149 plane blade gauge. I guess Stanley sold these to schools. It gauges the plane bevel at 25 degrees, which is very optimistic for those soft and flimsy Stanley blades. I mostly use my brass gauges but sometimes use the one I made from plywood. 30 degrees is my preference.
 

Attachments

  • DSCN5857.jpg
    DSCN5857.jpg
    146.4 KB · Views: 46
  • DSCN5858.jpg
    DSCN5858.jpg
    148.2 KB · Views: 44
  • DSCN5859.jpg
    DSCN5859.jpg
    115.4 KB · Views: 53
  • DSCN5860.jpg
    DSCN5860.jpg
    130.6 KB · Views: 50
  • DSCN5861.jpg
    DSCN5861.jpg
    147.8 KB · Views: 51

jar944

Well-known member
Joined
Jul 26, 2010
Messages
5,911
Location
Northern VA
jar: That's some delicate and demanding work. I don't know a mullion from a muntin but it looks like you do. Well done! Do you do glazing too?

Thanks. I've done a bit of glazing, not all that much though. I find window and door construction interesting and challenging for the technical details.

44--good job.

Thanks

Jar--Top notch work. I love transoms.

Thanks I'm a big fan of them myself. These were built to be active with bottom hinges. That didn't happen though as swmbo wasn't a fan. I have a couple more I need to still build.

I LOVE that! I really want to install a center pivot transom window over an interior doorway. Maybe one day when I have the time...

They are not all that hard (or time consuming actually) you should give it a try.

That door sure is looking good!

Thanks I'm happy with how it's turning out.
 
OP
J

jimreed2160

Well-known member
Joined
Aug 7, 2016
Messages
3,589
Location
Tallahassee FL
Stanley #37

It is called a "Carpenter's Level" and was made by Stanley from about the 1880s until 1962. A level is a fundamental building tool and Stanley made dozens of different types in a wide range of sizes. This one is plated steel with brass fittings. The vials have protective covers so it could be carried safely in a tool box. The length of 9" was long enough to check level on framing and trim but short enough to fit into a leg pocket. This one looks brand new.

I could have used it yesterday when I was working on a landscaping project, but I took my lighted bullet level instead. I am sure it will find work on another project soon.
 

Attachments

  • DSCN5863.jpg
    DSCN5863.jpg
    110.8 KB · Views: 38
  • DSCN5862.jpg
    DSCN5862.jpg
    116.3 KB · Views: 40
  • DSCN5864.jpg
    DSCN5864.jpg
    134.4 KB · Views: 32
  • DSCN5866.jpg
    DSCN5866.jpg
    104.7 KB · Views: 34

CRSINMICH

Well-known member
Joined
Aug 15, 2015
Messages
2,397
Location
Southeastern Michigan
Bob: Have fun but you might want to look at some You Tube videos before you start sharpening. It is easy to sharpen them but it's also easy to bung it up. Start practicing on bits you don't care about too much. Remember to check the lead screw threads.

jim: I have the 6" version of that level and I did use it just a few days ago.
 

Bob Heine

ALLIANCE MEMBER
Joined
Oct 24, 2009
Messages
10,705
Location
Boca Raton, Florida
WooHoo! You will be amazed at how well a properly sharpened auger bit works!
Jim, you started me down this rabbit hole with sharp planes. Because of my mini-disaster beveling that walnut plug bit holder on the table saw, I used my Stanley No. 78 on the pine drill/countersink holder. I still haven't cleaned up the shavings -- they make me smile.
attachment.php

Bob: Have fun but you might want to look at some You Tube videos before you start sharpening. It is easy to sharpen them but it's also easy to bung it up. Start practicing on bits you don't care about too much. Remember to check the lead screw threads.
Thanks CRS, I will definitely do that. I spent some time watching a few plane iron sharpening videos and they were very helpful, especially the one Paul Sellers made.

I did run into a problem with my Waltham plane. After cleaning and surfacing, I put some boiled linseed oil on the base, let it dry for a day and set it on my shelf. I wiped Tung oil on the shelf days earlier and thought I was good to go. When I went to use the plane, it was stuck to the shelf like I had used super glue. I'm going to use 3-in-1 oil on the plane bases from now on.
attachment.php
 

Attachments

  • Plug Cutter Rack 8.jpg
    Plug Cutter Rack 8.jpg
    132.8 KB · Views: 35
  • Plane Shelf 8.jpg
    Plane Shelf 8.jpg
    82.3 KB · Views: 373

CRSINMICH

Well-known member
Joined
Aug 15, 2015
Messages
2,397
Location
Southeastern Michigan
Jim, you started me down this rabbit hole with sharp planes. Because of my mini-disaster beveling that walnut plug bit holder on the table saw, I used my Stanley No. 78 on the pine drill/countersink holder. I still haven't cleaned up the shavings -- they make me smile.
attachment.php


Thanks CRS, I will definitely do that. I spent some time watching a few plane iron sharpening videos and they were very helpful, especially the one Paul Sellers made.

I did run into a problem with my Waltham plane. After cleaning and surfacing, I put some boiled linseed oil on the base, let it dry for a day and set it on my shelf. I wiped Tung oil on the shelf days earlier and thought I was good to go. When I went to use the plane, it was stuck to the shelf like I had used super glue. I'm going to use 3-in-1 oil on the plane bases from now on.
attachment.php

Both tung oil and BLO dry to a hard finish. 3-in-1 will be much better for the sole. That's what Paul Sellers uses. Watch his video on making a Rag In A Can oiler. Nice 78 you have there. I just finished rehabbing one.
 
Last edited:
OP
J

jimreed2160

Well-known member
Joined
Aug 7, 2016
Messages
3,589
Location
Tallahassee FL
Bob--I like the way you story your planes. As you have discovered, BLO is not the best treatment for soles. I like mine nekkid. Then I store them like yours only on untreated wood. The soles stay clean and fresh that way. I think it is because planes in an unheated space rust mostly through condensation and the wood prevents most of that.

I think the #78 is a real treasure and is underappreciated. Maybe it is because most of them in the wild are missing their depth stop or their fence--both essential parts. But if it has all of its parts, the #78 is a handy plane to have.
 

cheechi

Well-known member
Joined
Feb 29, 2012
Messages
4,384
Location
Triad, NC
just a heads up guys, if you like cherry then for the short term you're in luck. it seems that HD is getting rid of every stain in cherry. Gel stain, gallon pails of minwax, the little tiny cans even, as well as cherry danish oil. I also happened to pick up a thing of plastic wood for $2 or so.
 
OP
J

jimreed2160

Well-known member
Joined
Aug 7, 2016
Messages
3,589
Location
Tallahassee FL
Eye candy

Patternmaker tools. I come across these every once in awhile. Seems like foundry workers of yore got to pour their own stuff at the end of a slow shift and the patternmakers made router planes. This one is a replica of an early Stanley #71 1/2 router. The base is bronze or brass and the handles are aluminum. Someone did a good job.

It is finished off with a handmade cutter that is held in place with a genuine Stanley collar and screw. Rust free here in north Florida.
 

Attachments

  • DSCN5868.jpg
    DSCN5868.jpg
    148 KB · Views: 49
  • DSCN5872.jpg
    DSCN5872.jpg
    150.7 KB · Views: 47

CRSINMICH

Well-known member
Joined
Aug 15, 2015
Messages
2,397
Location
Southeastern Michigan
MAKING AUGER BITS​
For those of you who, like me, can't get enough of a trivial thing - here is a link to a 5 minute You Tube video about making auger bits. I always wondered how the tapered lead screw was threaded. I was surprised at the answer.

 
To avoid these ads, REGISTER NOW!
Top Bottom