To avoid these ads, REGISTER NOW!

Woodworking 101--Tools and Tips

drivesitfar

Well-known member
Joined
Oct 23, 2013
Messages
36,007
Location
Pacific Northwest
JIM: Another interesting tool. i know you like using hand tools maybe more than power tools, but wouldn't a compound miter saw eliminate the use for this guillotine type miter tool.

ALL: so most or maybe all of you didn't like the old wood pile i posted. i personally did and just wasn't able to buy it that day. as FIREWOOD it's probably 2 cords and maybe $400 worth if cut up in 18 inch lengths. personally i'd use this kind of material to build something like maybe some butcher block tops (of course a bit of work involved) or maybe just a shed or something else.

i would like to learn more about any type of wood and how you take it from raw to lumber and from lumber to a project as any of you have time to share what you know.

cheers and here's a few good words that have worked for thousands of years.
 

Attachments

  • dde75806bde9b06224764539ad1c8e7d.jpg
    dde75806bde9b06224764539ad1c8e7d.jpg
    28.7 KB · Views: 62
  • confucius-quote.jpg
    confucius-quote.jpg
    44.8 KB · Views: 73
  • confucius-quote-on-patience.jpg
    confucius-quote-on-patience.jpg
    34.2 KB · Views: 64
  • life-is-simple-we-insist-making-complicated-confucius-quotes-on-simplicity-580x480.jpg
    life-is-simple-we-insist-making-complicated-confucius-quotes-on-simplicity-580x480.jpg
    29.7 KB · Views: 60
To avoid these ads, REGISTER NOW!

CRSINMICH

Well-known member
Joined
Aug 15, 2015
Messages
2,397
Location
Southeastern Michigan
Jim: I had one of those guillotines, a Lion, in my shop for about 15 years and only used it a half dozen times. Every time I went into the shop I could feel it's presence waiting... patiently waiting. My fingers would recoil at the thought of those SHARP blades. Finally last spring I decided to get rid of it. I basically gave it to someone who was starting a picture framing business. During the exchange it got me at last. I probably should have had a stitch or two.

DISCLAIMER: This post was not ghost written by Stephen King.
 
Last edited:

trainer

Well-known member
Joined
Nov 28, 2005
Messages
2,019
Location
Northern Ontario, Canada
I spent yesterday making rp doors and drawer fronts for.a.kitchen reface. 29 panels for 25 doors and drawers, so a router table was the way to go. There's an online tool at hingmy.com to calculate the parts for raised panel doors .
 

Attachments

  • 20161205_104304.jpg
    20161205_104304.jpg
    134.8 KB · Views: 106
  • 20161205_104320.jpg
    20161205_104320.jpg
    136.3 KB · Views: 104
Last edited:

CRSINMICH

Well-known member
Joined
Aug 15, 2015
Messages
2,397
Location
Southeastern Michigan
Walnut Mantle Clock

Talking about the Lion Miter Trimmer must have jogged my memory. I remembered that I originally bought it to make this clock. If you look closely at the 2nd picture showing the molding details you'll see the dentil molding going horizontally along the bottom. It also wraps around onto the sides. I made that molding using a basic box or finger joint jig. The tricky part was getting the spacing correct so that the last tooth on the left and the last one on the right were full teeth. The 45 degree miter goes along both outside edges. The next two pictures show the walnut burl veneer and a detail of the door and arch. I think that I got the height proportions incorrect but this was one of those projects that ate up way too much of my time and I wasn't about to redo it.
 

Attachments

  • Mantle Clock door and arch detail.jpg
    Mantle Clock door and arch detail.jpg
    146.1 KB · Views: 82
  • Mantle Clock walnut burl detail.jpg
    Mantle Clock walnut burl detail.jpg
    140.3 KB · Views: 81
  • Mantle Clock molding detail.jpg
    Mantle Clock molding detail.jpg
    146.5 KB · Views: 88
  • Mantle Clock full frontal.jpg
    Mantle Clock full frontal.jpg
    147.9 KB · Views: 88
Last edited:
OP
J

jimreed2160

Well-known member
Joined
Aug 7, 2016
Messages
3,589
Location
Tallahassee FL
Trainer--Nice job on those doors. It would sure take a long time to do those with handplanes. Thank you, Mr Router.

CRS--Those trimmer blades are ready to bite. Sorry to hear they got their revenge on your finger. At least you got a nice clock out of the relationship.

To all--visit a local sawmill. There is almost always one nearby. Smaller operations are usually friendlier to woodworkers. I have found that most sawyers tend to jabber. That's good because they know a lot about wood. When I lived in Atlanta, our ww club would organize bus day trips to NC sawmills. These trips were always a blast and very educational.
 
OP
J

jimreed2160

Well-known member
Joined
Aug 7, 2016
Messages
3,589
Location
Tallahassee FL
Wood moisture
Water and wood are bound together in a tight relationship that is constantly in flux. Kinda like an old girlfriend I had--she would leave and then come back.

Here is a chart I found. It shows average moisture content of wood vs relative humidity.

RH Moisture %
0 0
25 5
50 9
75 14
99 20-30

It is important to note that wood is hygroscopic, which means that it wants to absorb water. Given the right temp and RH, wood will absorb water and swell (insert jokes here). Change the conditions and wood will relinquish that same moisture.

The wise ww always allows for wood movement. Wood that is allowed to move is happy. Wood that is tightly bound is sad. Happy ww projects last forever. Sad projects crack and warp.
 

turbowoodworker

Well-known member
Joined
Mar 18, 2012
Messages
3,531
Location
Apex NC
Jim,

Two things come to mind with your recent post, Jim. One is wood movement. I grew up in Southern California where the humidity is a minimal then I moved to Arizona where the humidity is nonexistent then I had the opportunity to move to North Carolina. Oh boy was at a change. Many of the things that I built early in my career in Phoenix did not have wood movement and humidity in mind when I built it. Those pieces have paid the price in varying degrees.

Maybe I should post pictures of some results because they can be striking. I hate pointing out mistakes but these are not really subtle.

What was very interesting is that my workbench in my shop was built with humidity and wood movement in mind. I followed all the principles. I used loose tendons without glue. I used T bolts and groove and a dadoes without glue. And still my tabletop grew 3/16" from the 7% humidity of Arizona to the astronomically higher humidity of North Carolina.

I should show some pictures of the dovetail's that popped on my workbench some time. I don't think they can be repaired but the workbench functions properly and that is about all I need.

The second thing is your comment about sawyers. I recently had the opportunity to walk a portion of my in-laws land, forested land. We spent 3 hours climbing through and over some amazing property. I learn more in those 3 hours then I did in any botany class in college. And yes sawyers can talk.
 

trainer

Well-known member
Joined
Nov 28, 2005
Messages
2,019
Location
Northern Ontario, Canada
Its also a good idea to buy your lumber well before you need it and let it get used to the humidity levels in your shop. My current project is made of kiln dried 1x12 white pine which can move in interesting ways.
 
OP
J

jimreed2160

Well-known member
Joined
Aug 7, 2016
Messages
3,589
Location
Tallahassee FL
Woodworking vise
It seems that many of my workshop projects lately have been vise cleanups and not woodworking related. Here is a crossover--a vise FOR woodworking. I picked up two Morgan woodworking vises from a school auction. Now one of them is cleaned up.

DSCN1072.jpg


Morgan Chicago vises were made from 1929-1947. This one needs some wooden jaw inserts and I need to smear a bit of white paint on the lettering. This vise was originally painted battleship grey and then baptized in buttermilk yellow. I picked that paint out of the raised letters with dental tools.
 

Boatman53

Well-known member
Joined
Dec 17, 2013
Messages
137
Location
Mid coast maine
I've got three of those trimmers and would be willing to part with one if someone was interested.
I use them mostly fitting trim on boat interiors. Always odd angles and no dust, just chips to clean up.
Jim
 

turbowoodworker

Well-known member
Joined
Mar 18, 2012
Messages
3,531
Location
Apex NC
Yesterday I posted some pictures of my godfather's carving tools that were left for me. I thought you might enjoy a couple of pictures of some homemade tools that were in the case as well. I'm pretty sure my godfather did not make these. He was a part of a group of carvers that met at a high school or community center once a week and he probably inherited them before passing them along to me.

You can see they are made from old American made files purpose built for their new task.
 

Attachments

  • IMG_8172.jpg
    IMG_8172.jpg
    146.2 KB · Views: 81
  • IMG_8173.jpg
    IMG_8173.jpg
    139.5 KB · Views: 71

turbowoodworker

Well-known member
Joined
Mar 18, 2012
Messages
3,531
Location
Apex NC
Not exactly fine woodworking but this week I was inspired (in part by this thread and the need to get my rifles where they wouldn't be damaged) to build a means of displaying a couple of my Pennsylvania long rifles.

So I came up with this idea of using a mahogany base with soldered copper uprights. I know that copper tube is hardly proper "period" for these 1780 rifles but I am so tired of the traditional deer antler look that I had to do something different. And I got to learn how to solder copper. Just be glad it isn't full of hot water in your walls.

I suppose this post should be in the "What did you do in your garage today" thread but there is a wood base and the riflees are wood, so there.
 

Attachments

  • IMG_8187.jpg
    IMG_8187.jpg
    128.8 KB · Views: 114
  • IMG_8151.jpg
    IMG_8151.jpg
    142.5 KB · Views: 102
  • IMG_8135.jpg
    IMG_8135.jpg
    131.9 KB · Views: 104
  • IMG_8184.jpg
    IMG_8184.jpg
    138.8 KB · Views: 104

turbowoodworker

Well-known member
Joined
Mar 18, 2012
Messages
3,531
Location
Apex NC
And speaking of Fine Woodworking, I just got the Feb 2017 (WTF) issue in the mail. For those interested in fine furniture and techniques (Drives), there are some really good articles this issue. For instance, how to make custom scrapers from old saw blades and other materials. Pages back,Jim and I had discussion about home made beading scrapers; well here is a full article on how to do it.

There are also articles on turnings, picking hinges, strong tenons, etc. I'll stop lest you think I'm getting a commission. But it is my favorite WW magazine.
 

drivesitfar

Well-known member
Joined
Oct 23, 2013
Messages
36,007
Location
Pacific Northwest
Jim: i think i know why you avoided my question about using a compound miter saw instead of the guillotine that you and a few other quality Woodworkers use. you get a finished product with the guillotine similar to planing where a compound miter gives you an edge to finish even if you have an expensive blade.

maybe i'm learning the difference between WOODWORKING and WOOD BUTCHERING? :bowdown:

thanks for the lessons especially on wood moisture and nice work on that vise.

Turbo: great post on cutting the joints so they can move. i always thought that was shoddy or poor craftsmanship when i didn't see a tight joint. of course there are different woods and different tolerances for every project so maybe some of the shoddy work was shoddy, but now i know why and what to look for. WFT stands for something we use a lot in describing old tools and pretty sure it's not the name of the magazine so what is the actual name of the woodworking magazine you mentioned? also I'm guessing they have a website?

nice work on the copper and it's much easier to do without standing on your head in a crawl space. looks great from my chair and those guns look too nice to shoot.

Trainer: looks like you did more than a days work there. is that a shaper or a router? speaking of these two what is the main difference cause i own maybe 4 routers and have never owned a shaper? so i know that if you are putting hardwood flooring in your home you need to have the wood delivered and sitting in your home for a week or two to acclimate before installing so do you do that with kitchen cabinetry and furniture too?

Boatman: if i was set up i'd PM you about your extra guillotine, but from the sounds of it even if you know how sharp they are you can still hurt yourself. have you shown us pictures of your shop yet cause i remember the car/boat and a couple other posts you made where your skills are amazing?

CRS: so you made the clock from scratch? looks great from my shair. WELL DONE!!

ALL: speaking of acclimating do i need to worry about MDF joints moving when i'm cutting the trim around my door today? does MDF move much or at all? i was just planning on using my miter saw that has a decent blade on it and caulking in the edges. i did buy a couple square corners (forgot what they are callded) for the tops instead of doing 45 degree cuts like i have for years so should be a fairly simple job after i get the surface prepped and remove the old caulk and wood from the prior wood molding.
 

Craptain

Well-known member
Joined
Apr 18, 2013
Messages
4,028
Location
Tampa Bay FL
Drives. The magazine that Turbo referred to is called "Fine Woodworking" check it out online. I have been a subscriber for years. I think WTF was that the latest edition is February and here we are only just into December.

Sent from my SM-G900T using Tapatalk
 

CRSINMICH

Well-known member
Joined
Aug 15, 2015
Messages
2,397
Location
Southeastern Michigan
Drives: Yeah I made the case and all the moldings myself. Selecting the clockworks was a trip down another rabbit hole. Bezels and faces and pendulums - Oh My!
 
Last edited:

CRSINMICH

Well-known member
Joined
Aug 15, 2015
Messages
2,397
Location
Southeastern Michigan
Universal Trimming Machine​

I was going through an 1897 Chas. Strelinger catalog this morning and I ran across this ad. It seemed timely. I actually saw one like this at an estate sale once. It had foot operated blades and NO guards of any kind. Since I was still sporting a bandage on the wound I got from the Lion Trimmer, I kept my distance.
 

Attachments

  • 1897 Universal trimmer ad Strelinger catalog.jpg
    1897 Universal trimmer ad Strelinger catalog.jpg
    145.9 KB · Views: 73
Last edited:

turbowoodworker

Well-known member
Joined
Mar 18, 2012
Messages
3,531
Location
Apex NC
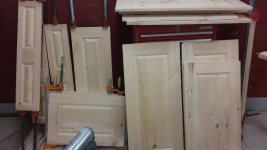
Drives: "looks great from my chair and those guns look too nice to shoot."

I would counter, "They shoot too nice to just sit pretty!"

Drives, I want to clarify something if I am reading your post correctly.

Concerning wood movement, the outward appearance of the joint needs to be perfect and tight. A loose appearing joint or one with gaps is amateurish. Come see some of my early pieces, those that are still together that is. It is the inside where the movement is needed to prevent warping and cracking. That statement is way oversimplified, see below.

A loose joint is cosmetically distracting and likely weak. We strive for the observer to not really see the joint line. For instance, if the shoulder of a mortise and tenon joint is loose, or there is space there where the cheek meets the crosspiece, the mortise is weak and could fail if stressed as in a chair.

Let me try to describe wood movement as I learned it. I went to a class taught by Kelly Mehler (TS guru). He used a handful of drinking straws to illustrate the orientation of wood fibers. Some of the parallel fibers are actually vessels for carrying water and nutrients in the living plant (remember xylem and phloem?).

The drinking straws illustrate how the fibers run parallel as in a solid wood board. Add or remove water content and the fibers swell or contract. That is what happens in the Southeast when the humidity changes from summer to winter. The fibers swell or contract along the parallel lines.

So a board that is six feet long but 3 inches wide, will swell along the direction 90* to the fiber direction---the 3 inch width becomes 3 1/16". My 40 inch maple and walnut top grew 3/16" on each side! But there is almost no growth in the length.

MDF is powdered wood and resin . Plywood and OSB has fibers at random or varying orientation, therefore there is less directional movement.

So this principle needs to be considered in designing wood furniture made with solid wood, less so with all ply or MDF.
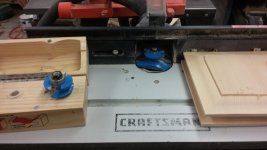
Example:

Jim had a great tutorial on sliding dovetails. When you use a dado or sliding dovetail made of solid wood, you must understand and consider the stresses placed on the woods that will be joined at 90*. This is especially important when gluing up wide panels. If the wide panels grow or shrink, no problem UNLESS you have fixed or glued the panel along its entire width to the other cabinet or table support pieces. A sliding dovetail 90* to a wide panel will cause the panel to crack or explode if glued all the way across the width. The strength of a sl dovetail is mechanical and one may only add glue at one end (not both ends) or in the middle of the panel.

There are all sorts of strategies to overcome this ranging from the old board and batten (the wide boards are only fixed loosely by the cross piece, batten) to the loose tenon (NOT a loose tenon joint but a rounded tenon in a slightly oversized mortise, oversized only enough to accomodate a good glue surface), to bread board table ends (where the table end keeps the wide board flat and together but is held with glue only in the center of the wide panel or held on by loose oversized screw holes or pins.

This also influences the basics of joinery from a strength standpoint. A **** joint is terribly weak. Think of the drinking straws. Try to join two handfulls of straws end to end. That is a **** joint. Now join them side to side. Probably a lot stronger. That is why **** joints fail, and why miter joints, a modified but joint, fails. The glue is joining air rather than substance.

So how do you make a **** or miter better?
Well you could "size" the glue joint. This is a wierd term meaning that you put glue on the fibers' ends and let it partially dry, clogging the pores, then add another layer of glue to hold the joint. This is called "sizing".

Or better, put a solid or hardboard spline in the joint. This gives more side surface area. Or create a mortise and tenon where the cheeks are **** joints (weak) and the shoulders are long joints with great glue surface area. That is why, when you see crush tests (?correct term?) of different types of joints, the M&T is superior in strength, followed closely by the loose tenons and the biscuit or double biscuit joint.

I am a bad typist and have a short attention span so this is oversimplified. I bet there is a lot on the Google Search to explain this better than I but this is my attempt at explaining the concept. I know others will chime in and correct my generalizations.

I hope this helps.
 

turbowoodworker

Well-known member
Joined
Mar 18, 2012
Messages
3,531
Location
Apex NC
Craptain is right. February in December?? WTF?

Drives, your corners are called rosettes and your MDF trim will be fine indoors.

Again sorry for the long winded post.
 
To avoid these ads, REGISTER NOW!

drivesitfar

Well-known member
Joined
Oct 23, 2013
Messages
36,007
Location
Pacific Northwest
Turbo: I loved the long winded post as you call it and i'll have to re read it several times to maybe even get close to putting it in my sub conscious thinking when making something.

also anytime you are able to post up a few pictures of either your own or others projects showing what you are talking about that works even better cause a lot of us are visual.

thanks for taking the time to explain it and i'm sure this could be talked about a lot more just like ORGANIC can be talked about a lot in my (our) GET HEALTHY thread i started over a year ago.

Craptain and Turbo: thanks for the 411 on the magazine.

CRS: i think i like that cutter on a stand almost as well as a vise on a stand. thanks for posting it and you are probably wise for not buying it if it's really that sharp. nice job again on the clock and funny post about the rabbit hole.

ALL: it's still not light out here yet, but since i woke up at 3am i'm about caught up with GJ's threads so i'll grab a bite and hopefully without interuptions i'll finish my little front door project today except for paint.
 

turbowoodworker

Well-known member
Joined
Mar 18, 2012
Messages
3,531
Location
Apex NC
Drives,
I will try to get pics up but I have a very unusual work schedule that keeps me away from my home computer for about 16 hours or more a day. Good news is that it is only one week a month where I am challenged and not able to get pictures taken and loaded (DSL). So being long winded is easier than posting pics, at least this week. I'll get some up but it may be next week.
 

drivesitfar

Well-known member
Joined
Oct 23, 2013
Messages
36,007
Location
Pacific Northwest
Turbo: do what you can and long winded works great for now. thanks for taking the time to teach and help me (us).

yes, that darn WORK does get in the way of our GJ or WOODWORKING FUN and discussions.

cheers
 

trainer

Well-known member
Joined
Nov 28, 2005
Messages
2,019
Location
Northern Ontario, Canada
Trainer: looks like you did more than a days work there. is that a shaper or a router? speaking of these two what is the main difference cause i own maybe 4 routers and have never owned a shaper? so i know that if you are putting hardwood flooring in your home you need to have the wood delivered and sitting in your home for a week or two to acclimate before installing so do you do that with kitchen cabinetry and furniture too?
It's an inexpensive router table and a really crappy craftsman fixed base router.
The bits are 1/2" shank 3 piece set that I got on Ebay.

Doors are made production-run style by figuring the sizes of parts for each door using an online calculator.
From that I make a cut list and cut the parts to size on the table saw
Then I set up the raised panel bit and run all the panels.
Next setup is the end-grain profile on the rails, followed by the long profiles on the rails and stiles.
Then glue-up until I run out of clamps
It goes quickly because I only need to set the router up for 3 different operations.
I've also got a craftsman moulding head that goes on a table saw or radial arm saw and I have the cutters for rp doors, but its a pretty intimidating setup from a safety standpoint.

The panels have a 1/4" gap in their slots and are installed without glue so they can expand and contract happily.

The doors are glued end-grain rails to cross-grain stiles. The width of the joint is relatively small so wood movement isn't really a factor there under normal conditions.

By letting the lumber stabilize in the heated shop, hopefully it will be near the mid-point of its normal range of movement and wont shrink or swell after its assembled.
 

Rickss96

Well-known member
Joined
Sep 23, 2010
Messages
455
Location
SoCal
Two things come to mind with your recent post, Jim. One is wood movement. I grew up in Southern California where the humidity is a minimal then I moved to Arizona where the humidity is nonexistent then I had the opportunity to move to North Carolina. Oh boy was at a change. Many of the things that I built early in my career in Phoenix did not have wood movement and humidity in mind when I built it. Those pieces have paid the price in varying degrees.

Maybe I should post pictures of some results because they can be striking. I hate pointing out mistakes but these are not really subtle.

Here's a link with pictures of the problems that can occur with wood movement, scroll down to the bottom at "Conclusion":
http://www.thisiscarpentry.com/2016/11/11/dressing-up-roll-up-doors/

And this was done by a guy with experience who made allowances for movement! BTW it's a good article with lots of how-to pictures on how he made wood panel roll-up garage doors. His website has many other articles we all may be interested in.

Turbo won't find this DSL-friendly though...

-Rick
 

cbacres

Well-known member
Joined
May 28, 2010
Messages
5,998
Location
SW Florida
When I got out my bar clamps for the picture this morning, I ran across this one that belonged to my dad. It is a 48" I beam clamp. He was a horsetrader (literally) so there is no telling how he came to have it. I just know that it was in his shop as early as the 1950s and I used it later for some of my projects.

DSCN0862.jpg


I looked at it a little more closely this time. It is in almost factory state--in spite of years of crud and dust. The japan finish is mostly intact and the cheap red handle is almost untouched. It was well made and has "Cin't Tools" cast in it along with patent numbers and a circle "H". A little help from Mr Google revealed that it was made by the Cincinnati Tool Company and was designed by Mr Hargraves (circle H). He obtained 11 patents from 1915--1935, mostly for clamps. The company changed its name in 1925 to Hargrave Company. So this clamp was made sometime after 1915, but before 1925. Cool.

Jim, I have a handful of simlar clamps like that, I'll have to look for makers marks. I haven't seen any until you posted up. Great clamps, I've had mine for close to 30 years but are rusty from this s Florida weather.
Guess I'll have to look tonight.
 

turbowoodworker

Well-known member
Joined
Mar 18, 2012
Messages
3,531
Location
Apex NC
Rick,

Thanks for posting all that. His shop is cool and his tutorial was great. It is impressive when, as you pointed out, even an experienced guy, who seems very aware of moisture content and wood movement, still has problems.

I guess I will walk around my house taking pictures of bad wood movement examples for everyone to laugh at. That's OK I've got thick skin. I think that my circumstance of moving from extremes like AZ to NC should be instructive. It represents an outlier but it also exemplifies how more careful planning and execution might have avoided some of my mistakes.

Rick:beer:
 

turbowoodworker

Well-known member
Joined
Mar 18, 2012
Messages
3,531
Location
Apex NC
"Turbo won't find this DSL-friendly though..."

-Rick

So Rick, it seems I come to work for three reasons:

1. I need the money

2. I need the rest I get away from my kids

and 3. The internet is way faster at work!!!

:rocker:
 

trainer

Well-known member
Joined
Nov 28, 2005
Messages
2,019
Location
Northern Ontario, Canada
A thickness planer will pay for itself very quickly. Here's some 1x10 white pine before and after shots. I bought this in a lot of "outs" from a local mill. It was 7/8 thick and cleans up nicely to 3/4 finished thickness. I got an entire half ton truck load for the price of a few boards at a normal lumber store.
 

Attachments

  • 1481046692935402951226.jpg
    1481046692935402951226.jpg
    135.8 KB · Views: 117
  • 1481046527490-1733117229.jpg
    1481046527490-1733117229.jpg
    140.5 KB · Views: 98

drivesitfar

Well-known member
Joined
Oct 23, 2013
Messages
36,007
Location
Pacific Northwest
Trainer: thanks for the details on your cabinet work it helps me (us) a lot. i also agree that buying lumber in the rough in running it through a planer is the way to go. so far i haven't used my big 12 inch Dewalt planer, but i've got more than a few cedar boards to run through and stain this winter/spring/summer while i'm building a fence and deck. i might ask for help when i start using mine cause i've only used it a couple times.

Turbo: Pics would be great when you have some time to take and post them.

Rick: thanks for the link and i'll check it out later.
 

CRSINMICH

Well-known member
Joined
Aug 15, 2015
Messages
2,397
Location
Southeastern Michigan
Drives: If you don't already have a hand held metal detector you might want to invest in one before you run very much wood through your planer - especially if it's as rough as the wood in the pile you posted the other day. One nail will ruin your day and your knives.
 

drivesitfar

Well-known member
Joined
Oct 23, 2013
Messages
36,007
Location
Pacific Northwest
CRS: any idea on which one to buy? great tip. first 1000 or 2000 or so board feet will be cedar fresh from the mill out of the forest. you are right though if i did get a nail or screw on an old board running through it wouldn't be pretty or cheap to fix.

thanks
 
OP
J

jimreed2160

Well-known member
Joined
Aug 7, 2016
Messages
3,589
Location
Tallahassee FL
Trainer--Thanks for the production tips. Planning and organization really helps when you move to high volume ww. And those lunchbox planers can pay for themselves. My dad coerced me into being his planer monkey one summer. The added bonus was the summer NC heat. With no dust collection and no ear protection, I was worn down quickly. I hope you provide your helper with ear muffs.

Rick--That guy looks like a seasoned ww but I question his engineering. Gluing large wood panels to steel looks like a disaster from the get-go. Shoulda used some sort of clamps or expandable fasteners. Heck, I use Z clamps on all tops because I am afraid of cracks. Even use them on small bedside table tops. Remember the first rule of woodworking--Wood moves. Constantly. Get used to it. Plan accordingly.

CBA--You might find a hidden jewel in those clamps. Check them out.

CRS--Spot on re: metal. It will ruin your day as well as your planer knives. That is why sawmills have big expensive metal detectors/xrays/sonic devices at the start of their processing. They don't care about the knives and blades so much as they need to avoid the downtime for repairs.
 
OP
J

jimreed2160

Well-known member
Joined
Aug 7, 2016
Messages
3,589
Location
Tallahassee FL
Coffin Smoother
Some people are a little put off by the name, but it worked for the ww of yore. It does LOOK like a coffin. You can call it smoother but whatever you call it, you need one. Here is one that sits on my user shelf.

DSCN1073.jpg


Many of these were sold as kits. The ww could buy the metal pieces and furnish his own wood. I guess many craftsmen had downtime in their production schedules back then. This one looks like it was user built by a very sophisticated user. It came from some part of the UK and was probably put together sometime from 1880-1910. This ww was diminutive because he had small hands. My little finger feels left out.

The bed is short but wide. Here it is beside the Stanley lineup.

DSCN1074.jpg


That's a #4 1/2 on the left, coffin in the middle, and a #4 on the right.

Here are the planes in reverse order.

DSCN1076.jpg


Here is a shot of the mouth. It is very tight. Look closely and you can see interrupted metal where the blade is laminated. It is about 3/16 thick and has a substantial chipbreaker.

DSCN1077_1.jpg


And just how tight is the mouth?, you ask. Well, pretty tight. I was able to shove a piece of newspaper in there.

DSCN1078.jpg


Our project today is a rough sawn cherry board.

DSCN1079_1.jpg


Here is what I peeled off the small high end spot.

DSCN1080_1.jpg


DSCN1083.jpg


I wiped it down with turps for a better look. Take my word for it, that spot is as smooth as a baby's ****.

DSCN1082.jpg


The coffin smoother is a finishing plane. It has a tight mouth because it takes short, wispy shavings. Using a plane like this shows you how those ww of yore were able to turn out such magnificent products with just a few tools. And using a plane like this is just plain fun.
 
OP
J

jimreed2160

Well-known member
Joined
Aug 7, 2016
Messages
3,589
Location
Tallahassee FL
Turbo--I agree with you--no need to spend big bucks to find a nail. Back in the day I used a little kid's science tool I got at Wallyworld. It worked great. Best $12 I ever spent.
 

turbowoodworker

Well-known member
Joined
Mar 18, 2012
Messages
3,531
Location
Apex NC
Not sure about proper etiquette on this forum, but pointing you all to BJ383SS's build thread is of great importance today. On post #463 he shows some fantastic versions of crosscut sleds.

Crosscut sleds improve both accuracy and safety on the table saw. Many better WWs consider the building of a good CC sled as the first and most important set of cuts made on the new TS. I strongly agree, but my sleds, while quite functional, are not near the works of art and function shown by BJ383SS.

Maybe if you all agree, we can coax him to post those pictures on this thread for completeness.

:beer:
 
To avoid these ads, REGISTER NOW!
Top Bottom