To avoid these ads, REGISTER NOW!

Woodworking 101--Tools and Tips

derosa

Well-known member
Joined
Oct 19, 2010
Messages
1,078
Location
Oceanside, NY
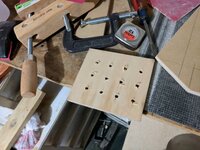
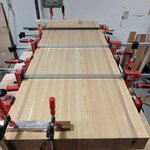
rrich1-- looking good and flat. Good luck on the final glue up getting it as close as possible.

jimreed-- I gave up on pawn shops around here, they either have lots of well picked through junk or everything is priced to near new. Too hot or too cold makes having a shop a rough thing, you can look but you can't enjoy, I tried putting mine in the barn but from the end of dec through the end of march it was impossible to work out there for more then an hour without freezing, come the heart of summer it could get too hot to work in the middle of the day but in my case that was july/aug. Just have to grab the time when the weather, wife, and kids allow.
 
To avoid these ads, REGISTER NOW!

cheechi

Well-known member
Joined
Feb 29, 2012
Messages
4,384
Location
Triad, NC
rich
those are some **** boards, and basically no knots. That's going to be a nice benchtop.

derosa
even though you didn't show any 'before' interior photos I assume that was a full gut & restore type of job? or just the wall coverings, in & outdoors with the rest intact?

jim is your issue lack of AC, lots of windows, lack of insulation, some combination of all? Is it an attached garage? some of the photos look like that way. In south FL my grandmother had a 2car with a single door, depending the time of year and amount of stuff put away there was room for 2 cars to park with shelves/walkway on either side, but it was tight on the far side so generally it was a 1 car parking. They had some kind of 'garage carpeting' set up that didn't seem to mind getting wet as it ended right on the edge of where the garage door front hits concrete. with one window, that carpet, and the door a bright colour it was really not so bad in 90-100 F temps.
 

drivesitfar

Well-known member
Joined
Oct 23, 2013
Messages
36,007
Location
Pacific Northwest
JIM: sounds like insulation and maybe a window AC unit might be in your future?

Derosa: when Jim mentioned the Pawn score at 0-2 he was talking about his Chess piece PAWN he's having an issue making on his lathe. i haven't been in a pawn shop in a while, but i do see guys on this garage sale thread have some luck so i guess it depends on the area and when you stop by. here's a link to the garage sale thread that you might take a peek at if you have some time to see all the STUFF these guys find.

http://www.garagejournal.com/forum/showthread.php?t=348891

best of luck with the move and potential sale or maybe renting of your little home you just restored.

RR: i'm a sucker for a great looking workbench so best of luck and keep posting up pictures with lots of details as you have time.
 

derosa

Well-known member
Joined
Oct 19, 2010
Messages
1,078
Location
Oceanside, NY
Cheechi-- it was a full gut, all the windows but 2 had been smashed, the copper had been looted along with the furnace and ducting, the wiring was still fused with with knob and wire. All the walls were spaced to 5.5" for r19, every window had to have a frame built, they just nailed trim to the inside and outside of the windows to hold them in place.

Drivesitfar-- I'd seen the attempts earlier in the thread but just didn't put 2 and 2 together.
 
OP
J

jimreed2160

Well-known member
Joined
Aug 7, 2016
Messages
3,589
Location
Tallahassee FL
My garage is attached--about 24x24 with a 4x8 shed off the rear. It is insulated and there are two windows on one side and two single doors on the front. Front doors are uninsulated aluminum and a little drafty but the trim seals keep out varmits. I have a dehumidifier set at 59% humidity and it seems to keep the rust at bay. If things get unbearable I might consider popping in a window unit.

But if I juggle projects I can stay busy. October through April is prime shop time and summer is good for yardwork and inside house projects. For example, this morning I had to cut brush. This half acre city lot was a jungle when we moved in but I have tamed it a little at a time.

It just means that I have to be more selective about my ww projects. Those low return projects like the chess pawn will probably drop off the list until fall.
 

rrich1

Well-known member
Joined
Oct 7, 2015
Messages
793
Jimreed, Derosa, Cheech and Drives it:

Thanks. Got the boards planed down to 3 5/8". With it being 5 pieces I think I will do this in two glue ups. I'll do two sets of 2 leaving one out. This will give me 3 pieces for a final glue up. The three pieces will also allow me to plane then again if needed for some reason before the final glue up.ess pieces to try and keep flat the better. See if this pic has a little more light. 4e53e911dcc84a752b4027090109862f.jpg
Any recommendations on dog holes locations? I wish I had planned for a built in wagon vise. I'm sure I could retro fit one later. Adding a tail vise with a added bench dog seems the easiest right now.
Sent from my Pixel XL using Tapatalk
 

Attachments

  • 4e53e911dcc84a752b4027090109862f.jpg
    4e53e911dcc84a752b4027090109862f.jpg
    260.7 KB · Views: 1

drivesitfar

Well-known member
Joined
Oct 23, 2013
Messages
36,007
Location
Pacific Northwest
RR: i'll comment on the vise and here's a pattern vise i like if you don't want a standard or quick release wood vise. this one is still sold new and mine is maybe 40 years old made in Taiwan. it's an EMMERT KNOCK OFF so if you can find the real Emmert that has all it's pieces even better.

you might not need or ever use all the angles this AMT pattern vise has to offer, but it's there if you need it and you can install on most any bench and since you haven't put the legs or any cabinets under your top yet you've still got time to plan for this one.

here's the video of a new one getting installed by a kid that in my opinion still has a lot to learn, but was able to install it ok.

http://www.highlandwoodworking.com/patternmakerswoodworkingvise.aspx

best of luck with the bench build!!
 

Attachments

  • 00S0S_1xcNFopag7o_600x450.jpg
    00S0S_1xcNFopag7o_600x450.jpg
    48.9 KB · Views: 44
  • WP_20150720_003.jpg
    WP_20150720_003.jpg
    140.1 KB · Views: 49
  • WP_20150720_007.jpg
    WP_20150720_007.jpg
    101.6 KB · Views: 45
  • WP_20150720_009.jpg
    WP_20150720_009.jpg
    108.8 KB · Views: 43
  • WP_20150720_008.jpg
    WP_20150720_008.jpg
    115.3 KB · Views: 47
  • WP_20150720_004.jpg
    WP_20150720_004.jpg
    94.3 KB · Views: 48
  • 00H0H_2IxohrDo1uQ_600x450.jpg
    00H0H_2IxohrDo1uQ_600x450.jpg
    54 KB · Views: 53

drivesitfar

Well-known member
Joined
Oct 23, 2013
Messages
36,007
Location
Pacific Northwest
JIM: i'm sure if you need ideas or have the time you'll get the AC and heat issues figured out in your garage.

good luck and hope you can whip up a pawn piece in an hour some morning later this week to knock that off the to do list. and to show us all that it can be done since you've had some problems.
 

My Old Tools

Well-known member
Joined
Jun 4, 2014
Messages
5,435
Location
Hamrick Lake, TX
RR: i'll comment on the vise and here's a pattern vise i like if you don't want a standard or quick release wood vise. this one is still sold new and mine is maybe 40 years old made in Taiwan. it's an EMMERT KNOCK OFF so if you can find the real Emmert that has all it's pieces even better.

you might not need or ever use all the angles this AMT pattern vise has to offer, but it's there if you need it and you can install on most any bench and since you haven't put the legs or any cabinets under your top yet you've still got time to plan for this one.

here's the video of a new one getting installed by a kid that in my opinion still has a lot to learn, but was able to install it ok.

http://www.highlandwoodworking.com/patternmakerswoodworkingvise.aspx

best of luck with the bench build!!

Yep, the old Emmerts are the bomb. I like the turtlebacks myself.
 

Attachments

  • IMG_0171.jpg
    IMG_0171.jpg
    141.5 KB · Views: 81
Last edited:

ez-duzit

Well-known member
Joined
Jun 24, 2013
Messages
5,096
Location
Marina del Rey
1--If you aspire to become a pattern maker or carver of wooden animals (for example), then you might think about adding a pattern maker's vise. In over 40 years as a professional woodworker and boat builder I cannot recall ever once needing such a cumbersome monstrosity. A simple woodworker's vise however you will find extremely handy. Also the typical vises one finds built into a cabinet maker's workbench.

I'll attach a photo which shows my ancient Craftsman ww vise (I bought new) as well as my small cabinet maker's bench with its vises. Of course I also have a large metal working vise plus others for milling machine and drill press use.

shop-7_zpsugsm9fca.jpg
 

cheechi

Well-known member
Joined
Feb 29, 2012
Messages
4,384
Location
Triad, NC
I don't know to tell you anything but the width of your usable vise screw for dog holes. if it's a 6" and you can open it 5" before it starts to tilt and be uneven or wobbly, I would do it at 5"

I don't know if there is a 'right' way but that's the way I was taught.
 
OP
J

jimreed2160

Well-known member
Joined
Aug 7, 2016
Messages
3,589
Location
Tallahassee FL
I don't know to tell you anything but the width of your usable vise screw for dog holes. if it's a 6" and you can open it 5" before it starts to tilt and be uneven or wobbly, I would do it at 5"

I don't know if there is a 'right' way but that's the way I was taught.

That sounds like good advice. Here are my benches. The vintage home made bench has dog holes spaced at 6".

DSCN3005.jpg


While the Ulmia is closer to 4".

DSCN3006.jpg


And while the Ulmia has two rows of dogs.

DSCN3007.jpg


I have rarely used the dogs on the far side. I guess I would use them more if I had room to put the bench in the middle of the room.
 
OP
J

jimreed2160

Well-known member
Joined
Aug 7, 2016
Messages
3,589
Location
Tallahassee FL
jr--why did you install the feet so far inboard from the edge?

My first thought was to turn some feet and have them exposed. But the original piece was made from old furniture parts and I thought the feet might change the look too much. In the spirit of the original piece, I decided to make it look like it was floating. My miscalculation was spotting the feet while the box was buttoned up.
 

rrich1

Well-known member
Joined
Oct 7, 2015
Messages
793
Jimreed- how far in are the bench dogs. I have got the top into three pieces right now. I left one side by itself so if I wanted to put some bench dogs in it would be a lot easier to get to the drill press. The 5 inch spacing seems to be good.

Sent from my Pixel XL using Tapatalk
 
OP
J

jimreed2160

Well-known member
Joined
Aug 7, 2016
Messages
3,589
Location
Tallahassee FL
Jimreed- how far in are the bench dogs. I have got the top into three pieces right now. I left one side by itself so if I wanted to put some bench dogs in it would be a lot easier to get to the drill press. The 5 inch spacing seems to be good.

On the home made bench, the dogs are 2" from the side. On the Ulmia, the dog holes are 1 1/2" from the side. I do a lot of plane work on the Ulmia and I like the 1 1/2" spacing. It is easier to work when the project is near the edge.
 
OP
J

jimreed2160

Well-known member
Joined
Aug 7, 2016
Messages
3,589
Location
Tallahassee FL
Physics--it's not just a good idea, it is the LAW.

I thought that might be a good lead in to an update on the continuing saga of the pawn. I consulted Mr Google and discovered that long and thin turnings are prone to breaking because of harmonic vibrations. There are formulae for determining this effect and there are remedies for mitigating the effect. I used a long stick because I wanted to make several and pick the best one. This turned out to be a poor strategy as it increased the harmonic effects. Short and stout is the way to go.

So I chucked up the broken walnut and performed some test cuts. The shorter piece seems to be holding up much better.

DSCN3016.jpg


But now I have another issue. The walnut is turning out a bit rough. I know that sharper tools would help that but it is still rougher than I want. My next attempt will be another short stubby piece of ebony. So the saga continues.

It is rainy today and that means quality shop time in the cool weather. My ww has been diverted lately because I am cleaning up another vise. It is not ww related but is a pretty interesting project.

DSCN3014.jpg


This is an old Parker #22 vise that I have been working on. Today I wiped it down with acetone and applied a coat of BLO for rust protection. My plan is to paint it in a few weeks once the BLO is dry. Then there will be a ww project as I build a wooden base so it can be mounted.
 

Autonomous

Well-known member
Joined
Dec 26, 2015
Messages
66
So keeping up with loose router bits in the plastic case was becoming a pain, but I came up with a cheap, classy solution.

I don't know if you guys have a "Spec's" near you, but in Texas it is a huge liqour store with specialty items like fine cheese, caviar, and a walk-in humidor.

Since they sell so many cigars, they have a pile of cigar boxes for $1.50 each. I love cigar boxes.

So, I grabbed this for a buck-fitty:82e26241437f80fecbe69b66e9bbcf3d.jpg

Then I grabbed this from the scrap bin: ba71f4c8d19c5fff36299582e86e92a2.jpg

Did a little drilling: 7f5fc4ee100c915dbb02a7dc2d317c97.jpg

And ended up with this: 92485a3f7fc890aafb76dfab2b2e59a7.jpg

Now I just need to collect a few more bits as needed.

Sent from my Pixel XL using Tapatalk
 

Attachments

  • 92485a3f7fc890aafb76dfab2b2e59a7.jpg
    92485a3f7fc890aafb76dfab2b2e59a7.jpg
    86.3 KB · Views: 1
  • 7f5fc4ee100c915dbb02a7dc2d317c97.jpg
    7f5fc4ee100c915dbb02a7dc2d317c97.jpg
    89.2 KB · Views: 1
  • ba71f4c8d19c5fff36299582e86e92a2.jpg
    ba71f4c8d19c5fff36299582e86e92a2.jpg
    91.2 KB · Views: 1
  • 82e26241437f80fecbe69b66e9bbcf3d.jpg
    82e26241437f80fecbe69b66e9bbcf3d.jpg
    94.9 KB · Views: 1

ztorres

Well-known member
Joined
Sep 22, 2016
Messages
195
Location
Iowa
Well it's been a week since I got stitches and the doctor said I should avoid getting my cut too dirty. So I have two projects that I completed. Recently my older brother has been talking about making his own knives, and I thought I'd try to make some myself. So I started by ordering a mini hunter knife kit and a hatchet kit from woodcraft. I wanted to see how handle making went before I went a lot further.
39814bb5d1d1d60ed4b75fe271fbc0be.jpg
This is the mini hunting knife I made handles for. I used some bloodwood for the scales, and just finished it with a simple poly wipe on. It turned out really nicely in my opinion.
95cae6e1340ceb00142786f14074639a.jpg
e526dae3cdf1130efaacb3d389aeef9f.jpg
Then there was the hatchet. I initially had two scales made out of Ironwood for this but had a hole blow out on one side. So I made the second scale out of some scrap Jabote I had laying around. I really like this, but it definitely showed me that if I wanted to do more tools like this I'd need a better vise to hold my work while I made the rounded edges, or an oscillating spindle sander. Overall I really liked how these turned out and may make some more and make my own blades.
 

Attachments

  • e526dae3cdf1130efaacb3d389aeef9f.jpg
    e526dae3cdf1130efaacb3d389aeef9f.jpg
    495.2 KB · Views: 0
  • 95cae6e1340ceb00142786f14074639a.jpg
    95cae6e1340ceb00142786f14074639a.jpg
    525.5 KB · Views: 0
  • 39814bb5d1d1d60ed4b75fe271fbc0be.jpg
    39814bb5d1d1d60ed4b75fe271fbc0be.jpg
    452.7 KB · Views: 1
To avoid these ads, REGISTER NOW!

drivesitfar

Well-known member
Joined
Oct 23, 2013
Messages
36,007
Location
Pacific Northwest
Auto: great idea and use of those cool old wood cigar boxes. as you get a lot of bits i've seen a few handy guys that just drilled holes in a 2x4 and made it a shelf above their workbench.

Z: best of luck with the healing and good to see it hasn't stopped your enthusiasm

JIM: i think you are on to something and maybe even a shorter piece? also if you get close to the right size can different grits of sandpaper maybe take the wood down smoother to the finished size? good luck
 
OP
J

jimreed2160

Well-known member
Joined
Aug 7, 2016
Messages
3,589
Location
Tallahassee FL
Auto--Great idea on bit storage. I made a few drilled sticks for random bit storage but your box is much more elegant. Now you just need more bits. :thumbup:

Zach--Good news on the healing and good luck finding a vise or two to help out. I like your knife and hatchet projects. I made some knives about 40 years ago and one of them is still in use. My handles are pretty crude and not near as nice as yours. Good job!

Drives--Yes, physics insists that I go stubby if I am going that thin. I think the ebony will look nicer, even though it is harder to turn.
 

derosa

Well-known member
Joined
Oct 19, 2010
Messages
1,078
Location
Oceanside, NY
Auto- I've got a couple cigar boxes laying around, I've used them for storing pen kits and morticer pieces. Never thought of this though I've thought of similar. Since I have a spare box I'm stealing this idea.
 

R_einan

Well-known member
Joined
Aug 29, 2016
Messages
461
Location
Eastern WA
Not exactly wood working, but a couple organizers I made up to make bits easier to access and inventory.
 

Attachments

  • IMG_2146.jpg
    IMG_2146.jpg
    128.3 KB · Views: 83
  • image.jpg
    image.jpg
    131.7 KB · Views: 90

rrich1

Well-known member
Joined
Oct 7, 2015
Messages
793
Slow progress pic warning. Got the three pieces planed for the last time and cut to length. Got them at 5'2". Gives me a little extra room over 5 ft and gives me some leeway if I need to get the edges into square. There are 2 knots on the end that would go away if I cut it to 5ft. 8b2df952db819412d38cedbab0b1720f.jpg

Sent from my Pixel XL using Tapatalk
 

Attachments

  • 8b2df952db819412d38cedbab0b1720f.jpg
    8b2df952db819412d38cedbab0b1720f.jpg
    94.5 KB · Views: 1

rrich1

Well-known member
Joined
Oct 7, 2015
Messages
793
Good looking table there. Planned finish?
Not sure. Its Jay Bates' design table and he just mentioned on a new video that he used danish oil on his. I love the look of his and might go that route. Any suggestions?


I might hold off on the bench dog holes right now. I do have the kreg jig kit for hinges and I I think I could use that to get straight holes.

Sent from my Pixel XL using Tapatalk
 
Last edited:
OP
J

jimreed2160

Well-known member
Joined
Aug 7, 2016
Messages
3,589
Location
Tallahassee FL
R einman--Nice organizers. Appropriate for a woodshop since they are made of wood.

rrich1--Your benchtop is looking great. I recommend a coat of BLO for the top. It is what I use annually. 1/3 BLO and 2/3 turpentine. It helps keep glue from sticking.
 

cheechi

Well-known member
Joined
Feb 29, 2012
Messages
4,384
Location
Triad, NC
tung oil on pine is always nice.

R einman I have made a few of those guys for step drills, countersinks, etc odd things that I need all together but not most of the time. I bet that must have been fun/painstaking to do the drills though. Did you have to make more than one or did you wind up getting it all in the right order in the first attempt?
 
OP
J

jimreed2160

Well-known member
Joined
Aug 7, 2016
Messages
3,589
Location
Tallahassee FL
Garland mallets

I picked up a pair of Garland mallets because I need a soft basher that will not leave marks. Plastic hammers would not last long beating on vises and metal hammers will crack them. I hate to use my good cabinetmakers mallets because it will dent the faces. To date, I pick up sticks from the scrap pile but that seems too primitive.

DSCN3022.jpg


The mallet on the right looks brand new. The PO replaced one rawhide end with copper (!) and the other with oak. I cleaned it with Simple Green and hung it on the wall o hammers.

DSCN3023.jpg


The second one is like many things that come to my shop. It is in pitiful shape.

The SG treatment removed grease and brought out the green paint. But the rawhide is beat to a nubbin. Should not be too hard to replace.

DSCN3024.jpg


DSCN3025.jpg


So I put it in the vise for some surgery.

DSCN3026.jpg


This stuff is really messy.

DSCN3027.jpg


But it is indeed rawhide. You can see the circular wrapping.

DSCN3028.jpg


I used a beater chisel to dig it out. By the way, rawhide is tough.

DSCN3030.jpg


OK. One side is clean, but the chisel rolled its edge.

DSCN3031.jpg


Now I know to start in the middle and just unroll it. Second face goes much quicker.

DSCN3032.jpg


This stuff is tough.

DSCN3033.jpg


I could have soaked it but then it would turn into a slimy mess like a dog chew toy. This was way more fun.

The PO beat it hard and the sides are caved in a bit in places. I will grind the sides smooth and then make some hickory inserts. Then I will have a wooden basher that I can destroy.
 

rrich1

Well-known member
Joined
Oct 7, 2015
Messages
793
Got 2 of the three glued up. I finished putting the last coat of clear on some bookcases before I got to the bench. Hopefully get the bookcases finished tomorrow and out of the way. Oak ply edges with red oak and stained cherry. Backs and bottom kick plate will get put on tomorrow. b6a41e4920b3e0b0308d0d0a4d4a6cb0.jpga95413c6b75e7cd17b9573a6e9962509.jpg

Sent from my Pixel XL using Tapatalk
 

Attachments

  • b6a41e4920b3e0b0308d0d0a4d4a6cb0.jpg
    b6a41e4920b3e0b0308d0d0a4d4a6cb0.jpg
    103.8 KB · Views: 0
  • a95413c6b75e7cd17b9573a6e9962509.jpg
    a95413c6b75e7cd17b9573a6e9962509.jpg
    252.2 KB · Views: 0

cheechi

Well-known member
Joined
Feb 29, 2012
Messages
4,384
Location
Triad, NC
I like that bookshelf and especially the stain. is that a 'wet' photo or is that the actual finished stain colour?

side note totally worthless commentary. For short bookshelves, I generally tend to put heavy things on the top , typically books that don't fit within the shelves but big glass or stone display items etc. Having the top shelf overlap the side walls probably wouldn't make a huge difference in the capacity but would make some, but no bookshelf plans work that way. I know why bookshelves are made the way they are but it still always bothered me one minor difference in the cut list could give results that would make the difference worth it.

unless this is a 'one sheet' plan of course. Either way not a criticism of you or your work its really nice looking.
 

R_einan

Well-known member
Joined
Aug 29, 2016
Messages
461
Location
Eastern WA
tung oil on pine is always nice.

R einman I have made a few of those guys for step drills, countersinks, etc odd things that I need all together but not most of the time. I bet that must have been fun/painstaking to do the drills though. Did you have to make more than one or did you wind up getting it all in the right order in the first attempt?

I did a linen shelf for a bathroom in our last house out of pine, using tung oil and poly to finish, turned out very nice.

Not too bad on setting up the drills, and I did manage to make it without skipping one. :thumbup:

Rrich, book shelf looks very nice, I like that coloring on the red oak.
 
Last edited:

drivesitfar

Well-known member
Joined
Oct 23, 2013
Messages
36,007
Location
Pacific Northwest
RR: your bench is coming along nicely and looking forward to seeing more progress pictures.

Jim: i've got one of those hammers with the old rawhide or leather in mine too that isn't in great shape. i didn't know you could swap the leather for copper, lead or wood. thanks

also is your Reed 1c your go to vise? i like the Reed C series vises maybe better than any of the vises i own and i own a few.

ALL: have a great day in your woodshops or outside if it's not raining like it is here in the GREAT (wet) PNW.
 

rrich1

Well-known member
Joined
Oct 7, 2015
Messages
793
The pic of the bookcase was about an hour after a 3rd coat of armor seal semi gloss. They were built to my sister in law's specs for her books. I'll get an assembled pic later.

Got the last section of the top glued on. I tried but wasn't able to get rid of a lip during the glue up. The first glue up turned out really well. c1178e3b43d459fc9e2c2fdaa872d9d1.jpg

Sent from my Pixel XL using Tapatalk
 

Attachments

  • c1178e3b43d459fc9e2c2fdaa872d9d1.jpg
    c1178e3b43d459fc9e2c2fdaa872d9d1.jpg
    83.4 KB · Views: 0
OP
J

jimreed2160

Well-known member
Joined
Aug 7, 2016
Messages
3,589
Location
Tallahassee FL
Drives--True that the Reed 1C is one of my favorite working vises. Here is a shot of its latest mission.

DSCN3038.jpg


The PO bashed both heads and deformed the metal around the cup. I needed to grind it down to make a better mating surface for the new sacrificial heads. There was waaaay too much deformation to repair. I just took it back a little and made better edges.

DSCN3039.jpg


Here is a before of head #2.

DSCN3040.jpg


I have plenty of hickory on hand and it should make a great head. It will take three pieces to make a 1 3/4" head.

DSCN3041.jpg


DSCN3042.jpg


The next task is to square it up and turn a cylinder. Stay tuned.
 
OP
J

jimreed2160

Well-known member
Joined
Aug 7, 2016
Messages
3,589
Location
Tallahassee FL
So now I feel like the dog just ate my homework. I was in the shop this morning and devised a way to make some very tiny quarter round moulding for the sewing box.

BUT

Photobucket has been unavailable today. It comes up for awhile, asks for multiple logins, and then goes back to sleep. Sorry for the inconvenience as I know everyone is breathless with anticipation. :willy_nil :willy_nil

I will give their hardworking IT staff more time to make everything right. More pictures tomorrow if they get lucky. :dunno:
 
To avoid these ads, REGISTER NOW!
Top Bottom