To avoid these ads, REGISTER NOW!

Woodworking 101--Tools and Tips

OP
J

jimreed2160

Well-known member
Joined
Aug 7, 2016
Messages
3,589
Location
Tallahassee FL
Trim for desk

Today I decided to work on the desk trim--specifically the trim for the fall front slides. I need thin cherry and I know just where to go.

DSCN3454.jpg


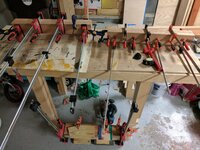
My workbench has two rails that hold the legs together. I made a plywood box that fits inside and is held on by clamps. It makes a nice storage area for my handscrews AND my thin cherry stock. Remember the lighter board in the picture? It is a piece of birdseye maple and it left quite an impression on the cherry board underneath.

DSCN3455.jpg


All of us ww know that American cherry is phototrophic. That means that it responds to light. Cherry is pink when it is cut but it darkens to a sweet reddish brown over time because of exposure to light. It is ok for our trim because areas that have been in the dark will "catch up" with the areas around them, leaving no permanent marks.

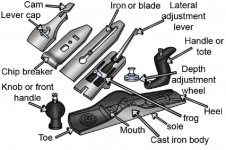
First I need a straight and smooth edge. For this I will use my Bedrock #603.

DSCN3457.jpg


Then I need to rip a 3/4 inch piece. But my bandsaw fence gets in the way when I lower the blade guide. No problem--I can add a parallel piece of scrap between the fence and the guide.

DSCN3459.jpg


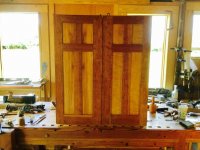
After I plane the edge of this piece, I tried it in place. It fit OK but looked a little bland so I decided to run a string down the middle for some visual interest. BUT how to determine the middle?

DSCN3461.jpg


I guess there are many ways to skin that cat but I decided to do a Texas Fold 'em. I cut a strip of card the exact width of the trim and then folded it in half.

DSCN3462.jpg


DSCN3464.jpg


It was quick and easy.

DSCN3465.jpg


At the end of all this work, I was roasting in the shop. More shopwork later.
 
To avoid these ads, REGISTER NOW!
OP
J

jimreed2160

Well-known member
Joined
Aug 7, 2016
Messages
3,589
Location
Tallahassee FL
Vise

I just acquired this vise. Not that I need another but I could not resist.

DSCN3451.jpg


DSCN3452.jpg


DSCN3453.jpg


There are no markings but I have seen them referred to as Sheldon vises. That company made desks and ww benches for schools. This certainly looks like it was made to hold up to student abuse. Heavy and unbreakable. My guess is that it was made sometime between the teens and thirties. I threw it on the clean up pile.
 

ez-duzit

Well-known member
Joined
Jun 24, 2013
Messages
5,094
Location
Marina del Rey
...First I need a straight and smooth edge...

DSCN3457.jpg


Then I need to rip a 3/4 inch piece. But my bandsaw fence gets in the way when I lower the blade guide. No problem--I can add a parallel piece of scrap between the fence and the guide.

DSCN3459.jpg


...

In the 1st photo, showing setup for edge planing, clamping the workpiece in the vise would be much more stable.

In the 2nd photo, simply raise the blade guide to clear the fence when ripping narrow pieces.
 

Teenager with old tools

Well-known member
Joined
Jun 3, 2015
Messages
595
Location
riverside california
Some nice work guys I haven't done much woodworking between all the camping trips my mom planned this summer and building my fishing rod spare time has been scarce. Hope to have my rod done this week so I can get back to somewpodworking. Got a ramelson set of 6 palm carving chisels think I'm gonna make a desk organizer and do some carving work on it


Sent from my iPhone using Tapatalk
 

Bigmichaelkim

Active member
Joined
May 5, 2017
Messages
38
Hi all. New hand tool woodworker here. I just splurged on a veritas mk 2 honing guide so that I can easily complete the sharpening process with no headaches so I can go back to woodworking as soon as possible.

I am currently looking into a set of diamond backed stones, from DMT a picture is included. Is this a good set of stones? And while I am aware of the potential to set off a firestorm, what would you say is the best sharpening method for a beginner? I currently am using sandpaper on glass but am in look for a solution that is more permanent. 5244ac52f008db54335e5d197d8049d9.jpg


Sent from my iPhone using Tapatalk
 

Attachments

  • 5244ac52f008db54335e5d197d8049d9.jpg
    5244ac52f008db54335e5d197d8049d9.jpg
    294.9 KB · Views: 2

Craptain

Well-known member
Joined
Apr 18, 2013
Messages
4,027
Location
Tampa Bay FL
Big Mike, that is a very good selection of 'stones'. I have the same ones myself. However your current method is as good as any. In fact better in some ways. One of the benefits of using sandpaper is the size of the sheet. This gives you space to get good strokes with the blade. The biggest thing to remember is to work through the grades to achieve the final edge. For the beginner, and I consider myself still a beginner, don't worry too much about the mirror finish. That comes with time and you will probably not see the difference yet. Oh and sandpaper is only the first step, as you will move on to finer grades of wet abrasive papers. My mantra for sharpening is little and often, or keep the edge rather than re-creating the edge. Flatten the back occasionally (even rareley) and hone the bevel often. The Veritas guide is great but I don't usually use a guide for the quick hone.
Finally, we now know who you are so you don't have to remind us that you are new to woodworking. We were all there once.

Sent from my SM-G900T using Tapatalk
 
OP
J

jimreed2160

Well-known member
Joined
Aug 7, 2016
Messages
3,589
Location
Tallahassee FL
BigM--I gotta agree with the Craptain as I am a sandpaper user. You can get good (and inexpensive) aluminum oxide (AO) sandpaper at Walmart. It lasts a long time.

As for the diamond stones, I think they have a learning curve. I had a set like that one early in my ww career. They cut well and worked for me on a few sharpenings. Then there was the day that I got too ham fisted and scraped all the diamonds off. I was pretty efficient and cleaned up the stone before I knew what was happening. So the diamond hill still looks pretty tall from here. :willy_nil YMMV
 

R_einan

Well-known member
Joined
Aug 29, 2016
Messages
461
Location
Eastern WA
So, I have decided that I want to cut the legs for my endtable build with a taper. They are slightly rectangular (2 1/4 x 1 9/16) and I want to taper them so the bottom on the leg is square. Now to research taper jigs and figure out if buying a prebuilt unit or building one is the best course of action. Any thoughts?
 

ez-duzit

Well-known member
Joined
Jun 24, 2013
Messages
5,094
Location
Marina del Rey
Re--make and refine a pattern, then transfer it to each leg, by knife, pencil or router. I never use a taper jig. If you have a bandsaw simply cut to a line and then plane to remove saw marks. With a long enough fence on a table saw you can just use a block of scrap (the thickness of the required taper) to angle the workpiece away from the fence.
 
OP
J

jimreed2160

Well-known member
Joined
Aug 7, 2016
Messages
3,589
Location
Tallahassee FL
R--I am with EZ on this one--it is how I make square taper legs. In fact, I have made dozens of them. I make a pattern and trace it on the legs. Then I cut oversized with the bandsaw and plane the legs into submission. Here is the detail:

1. Square up the stock. Make sure they are all exactly square and are the same size. If they vary in size then your side pieces will not fit squarely.

2. Make up a pleasing taper pattern. Play with cardboard (it's cheap) until you find something you like. Make sure the tops are square and start the taper BELOW the skirt.

3. Keep the outsides square and only taper the two inner sides.

4. Trace the pattern for both cuts. Be sure to mark your legs. Trace the pattern large so you can plane to the exact taper.

5. Cut the taper on a tablesaw or bandsaw.

6. Remove the saw marks with a plane or with your motorized jointer.

Small differences in size will not be visible. Good luck.
 

R_einan

Well-known member
Joined
Aug 29, 2016
Messages
461
Location
Eastern WA
Thanks for the direction, unfortunately I have not acquired a band saw so I'm limited to the table saw and miter saw. Making a pattern is a good thought, I will start with that and see what looks best.
 

Bigmichaelkim

Active member
Joined
May 5, 2017
Messages
38
Thanks guys. I actually used the guide today and a piece of glass to get my bevel mirror shiny and hopefully super sharp. One issue that I am having is when I am setting up my plane, is that after set up the lateral adjustment knob becomes really tough to adjust, spinning it so that the blade begins to come out seems very tough to do, doesn't seem like it should be this hard. Am I setting up the hand plane wrong? I am following the directions on how to videos online and was wondering if anyone else was having issues as well.


Sent from my iPhone using Tapatalk
 

rrich1

Well-known member
Joined
Oct 7, 2015
Messages
793
Thanks guys. I actually used the guide today and a piece of glass to get my bevel mirror shiny and hopefully super sharp. One issue that I am having is when I am setting up my plane, is that after set up the lateral adjustment knob becomes really tough to adjust, spinning it so that the blade begins to come out seems very tough to do, doesn't seem like it should be this hard. Am I setting up the hand plane wrong? I am following the directions on how to videos online and was wondering if anyone else was having issues as well.


Sent from my iPhone using Tapatalk
I would loosen the bolt for the lever cap just a little bit then try it. The cap doesn't have to so tough to tighten down. Also some oil on the adjustment knob threads.

Sent from my Pixel XL using Tapatalk
 

CRSINMICH

Well-known member
Joined
Aug 15, 2015
Messages
2,397
Location
Southeastern Michigan
Bigmichael: You may need to adjust the frog of your plane backwards a little. You'll find a small screw under the depth adjustment knob. Turning the screw counter-clockwise will move the frog backwards and of course the reverse is true too. If the frog doesn't move with a moderate amount of torque you will probably have to loosen the two screws holding the frog to the body of the plane. You don't want them to be loose just looser. Turn your screwdriver until the screw turns a little and then retighten it slightly. If you get the pressure right you'll be able to move the frog backwards or forwards using the adjusting screw without having to take the plane apart again.

I've posted this Stanley plane anatomy drawing before. This time I added an exploded view of a Record plane because the frog adjusting screw is shown more clearly.
 

Attachments

  • Hand plane exploded view.jpg
    Hand plane exploded view.jpg
    123.7 KB · Views: 44
  • plane anatomy annotated.jpg
    plane anatomy annotated.jpg
    89.6 KB · Views: 52
Last edited:

Bigmichaelkim

Active member
Joined
May 5, 2017
Messages
38
Bigmichael: You may need to adjust the frog of your plane backwards a little. You'll find a small screw under the depth adjustment knob. Turning the screw counter-clockwise will move the frog backwards and of course the reverse is true too. If the frog doesn't move with a moderate amount of torque you will probably have to loosen the two screws holding the frog to the body of the plane. You don't want them to be loose just looser. Turn your screwdriver until the screw turns a little and then retighten it slightly. If you get the pressure right you'll be able to move the frog backwards or forwards using the adjusting screw without having to take the plane apart again.

I've posted this Stanley plane anatomy drawing before. This time I added an exploded view of a Record plane because the frog adjusting screw is shown more clearly.


Thanks a lot. I think I fixed that issue.

However, my plane iron blade is seriously out of square. I assumed if I set the correct angle on my mk 2 honing guide and set up the plane blade correctly that I could use 120 grit sandpaper to get down to square. Despite two hours of sharpening on 120 grit sandpaper with the honing guide I am still hopelessly far from square. Will my method eventually get my plane iron square? I currently do not own a bench grinder so I was thinking maybe using more abrasive paper can make shorter work of the plane iron material so that I can get my iron square as soon as possible. I am so close to getting that paper thin shaving that I feel is so satisfying! Yet so far. Here is picture of my blade and chip breaker as well, just in case that needs maintenance too, any suggestion would be welcome. Thanks in advance e54aa5a9e22cd13f89038299c2b36f61.jpg


Sent from my iPhone using Tapatalk
 

Attachments

  • e54aa5a9e22cd13f89038299c2b36f61.jpg
    e54aa5a9e22cd13f89038299c2b36f61.jpg
    894.5 KB · Views: 1

CRSINMICH

Well-known member
Joined
Aug 15, 2015
Messages
2,397
Location
Southeastern Michigan
Bigmichael: I'm glad you got your issue taken care of but you might still want to keep frog placement in mind. It can help you attain wispy shavings. In effect, moving the frog makes the mouth of the plane open or close. You want to have a fairly closed mouth when planing hardwoods and a more open mouth when working on softer woods. I wouldn't worry about that too much until you get the plane tuned up and get some practice with it.

As far as sharpening goes we're in the area of personal preference. I use a Tormek and can get a scary sharp polished edge but even so I have to keep an eye on squareness. Just make sure that you flatten the back of the iron and keep working at it. You'll find a method that works for you eventually. Good luck.
 
Last edited:
OP
J

jimreed2160

Well-known member
Joined
Aug 7, 2016
Messages
3,589
Location
Tallahassee FL
BigM--Sorry to see that blade out of square and two hours on sandpaper sounds like enough torture to make you silly. :willy_nil

Any abrasive method can make your blade square but a grinder is the way to go. Minimum is 6" and you should replace the coarse wheel with a white or pink stone. A decent 6" grinder is about $50 and a 6" pink stone is about the same.

With a proper setup, you can square your blade. Keep water handy for frequent dunkings. Use the remaining gray wheel to grind your blade square. Do it at 90 degrees and dunk frequently to keep the steel from heating up. Yes I know that running your sharp edge straight into the wheel will hurt. But that is the way to do it. Squaring the thin edge heats it too much and it will lose its temper.

Go slow and you will be fine.
 

Autonomous

Well-known member
Joined
Dec 26, 2015
Messages
66
I'm borderline OCD: I don't have to count cracks or do the light switch 3 times to avoid tragedy, but I NEED square things to be square.

To correct a bad blade I have used my Swanson square to draw a line dead center down the middle of the blade, then a line across the blade just above the bevel, at the point where taking the least amount of work will make it truly square.

I flip the square left and right to make sure the sides are true, and if not I leave the middle line and use it as reference.

I square it up in the jig tight. Then I use the red 3M sandpaper, 80 grit, then 200, 320 etc, because it is super tough and down wear out quick like the grey paper. If you are square and the bevel isn't, you will only be grinding off the bad edge. It goes a lot quicker.

Do 80 until it is square, then move up the grits like normal.

Sorry if this is more of an essay, but it works well, and you only have to do it once!

Sent from my Pixel XL using Tapatalk
 
To avoid these ads, REGISTER NOW!

rrich1

Well-known member
Joined
Oct 7, 2015
Messages
793
I squared up my blades with sand paper. Took a while with the veritas jig but it worked. Put on a podcast and listen away.

Sent from my Pixel XL using Tapatalk
 

rrich1

Well-known member
Joined
Oct 7, 2015
Messages
793
My youth pastor asked me a week ago if I could build a gaming table. Never have but told him if he helped I'm sure I could. After looking for plans we decided on the WW guild build plans. I took him to our local wood store and he "rightly" decided on cherry for the wood. Gout our 8/4 picked out and we're able to start on it yesterday. Got the legs cut it and glued up. I will most likely finish shaping them today. I'll take donations for more clamps. 1431f43dcfd79be9a0c1fde7489c4d0e.jpg

Sent from my Pixel XL using Tapatalk
 

Attachments

  • 1431f43dcfd79be9a0c1fde7489c4d0e.jpg
    1431f43dcfd79be9a0c1fde7489c4d0e.jpg
    116.2 KB · Views: 1
OP
J

jimreed2160

Well-known member
Joined
Aug 7, 2016
Messages
3,589
Location
Tallahassee FL
Secretary desk trim

OK. It is monsoon season here in N Florida and we are getting rain almost every day. The grass is going nuts. I went out this morning to knock some of it down but had to stop frequently and scrape the wet grass from the mower deck. It really cuts into my woodworking time.

But I did manage to get in some work on the trim. Remember that I am making trim for the desk supports. Here is the hole.

DSCN3468.jpg


The support slides out of the slot on the left. I need trim for the support end grain and for the piece beside it. They need to match up with the decorative panel to the right. I used my stringing router to put a simple slot down the middle of each and then I used a #4 bench plane to chamfer both corners where they meet.

DSCN3469.jpg


That was pretty easy. Here is the mock up.

DSCN3467.jpg


It is looking pretty good to me. Now I need to sand the pieces, stain them, and hit them with a little poly.

It will be good to get by this woodworker's block. I never decided how to do this trim and that was one of the barriers to finishing the project. BUT once I started the ideas were flowing. Note to self: keep moving and the ideas will come. Don't get caught up in analysis paralysis. :willy_nil
 

Marctrees

Well-known member
Joined
Mar 5, 2015
Messages
6,265
Location
TX/LA border - Toledo Bend
I have almost given up on setting up hand planes.

I still sometimes read and try, not often.

I have tremendous patience for many shop things, but somehow not for planes.

Or the high level of fine sharpening required.

Porter Cable 3x21 is my hand plane. Marc
 
Last edited:

Modern Garage

Well-known member
Joined
Mar 26, 2015
Messages
583
Location
Southern Minnesota
Jim, I'm looking at the secretary trim pieces you grooved and it sounds like the intent is to finish them as is so the groove is the visual interest, but I'm wondering, if you were going to set a contrasting wood inlay into the grooves how would you cut such a small thin strip to fit? I've looked at decorative inlays in furniture and wondered. It seems too thin for regular hand tools - or is that the point - it's so thin and shallow that it can be fitted with a razor knife for instance?
Joe
 
OP
J

jimreed2160

Well-known member
Joined
Aug 7, 2016
Messages
3,589
Location
Tallahassee FL
Marc--Sorry to hear about your bad handplane experience. It does take a little tuning but the rewards are great. One problem is that there are many cheap bench planes around. Block planes are more forgiving and are usually easier to set up. Remember that all the work is done by the blade--the body just positions the blade properly and holds it in place.

If you have a good plane, post some pictures and we can all give you some pointers. Otherwise, keep lighting up the Porter Cable.
 

Bigmichaelkim

Active member
Joined
May 5, 2017
Messages
38
I squared up my blades with sand paper. Took a while with the veritas jig but it worked. Put on a podcast and listen away.

Sent from my Pixel XL using Tapatalk


How long was this podcast exactly? Haha Because man I set the veritas jig up to accept my plane iron at a 25 degree angle and ground away at a 60 grit sandpaper and it still isn't square. I don't mind the work but if I continue grinding away using jig properly will it eventually become square? I am trying to understand the logic behind this. I will continue grinding and please correct me if I am wrong will the sanpaper tear away at the slightly higher side while tearing away less from the lower side to eventually get the whole plan iron square? Could I set a different angle to make the process of squaring up the blade faster?

And regarding sandpaper, when do I know if it is no good and I need to replace it? Can I just dust away the steel collecting on the top as dust and continue grinding? I feel like I am wasting a lot of sandpaper, do I just hear and listen to the point where the sandpaper doesn't sound like it's cutting and then ditch it?


Sent from my iPhone using Tapatalk
 

R_einan

Well-known member
Joined
Aug 29, 2016
Messages
461
Location
Eastern WA
Cut the taper in 2 legs today, while the other two legs are drying from the glue up. Came out pretty close, 1/16 different at the foot. Made a taper jig from a 2x6 and a hinge. Has a little flex, which I would guess was the minor difference. I just tapered the long side, as these legs are rectangular, I'm not sure if I want to try and taper the other direction because the angle would be so shallow and I'd be cutting through 2 1/4 inches of walnut.
 

Attachments

  • IMG_2263.jpg
    IMG_2263.jpg
    142.6 KB · Views: 32
  • IMG_2264.jpg
    IMG_2264.jpg
    142.7 KB · Views: 35
Last edited:

ADNICK

Well-known member
Joined
Feb 6, 2017
Messages
45
Location
Comfort TX
New tool cabinet, not finished but at least it can hang on the wall while I'm working on it....

Went from vertical storage of planes to shelfs, can get almost twice the number of planes in a smaller cabinet than i was using before.

Also changing my long hand saw storage to the back of the cabinet, saves on space and works well.


Cherry and maple, about 40" high by 32" wide, with the doors it's almost 14" deep.


Have some mock up inner doors but the real ones are gonna take a bit of time.

The chest will have a base that's 60" wide by 12" tall and 11" deep, with 2 rows of drawers. The base will sit on legs kinda in the floating fashion, still working on that....

Regards to all,
Andy
 

Attachments

  • IMG_0867.jpg
    IMG_0867.jpg
    146.8 KB · Views: 92
  • IMG_0865.jpg
    IMG_0865.jpg
    145.5 KB · Views: 92
  • IMG_0866.jpg
    IMG_0866.jpg
    138.5 KB · Views: 83
  • IMG_0852.jpg
    IMG_0852.jpg
    144.5 KB · Views: 79
  • IMG_0850.jpg
    IMG_0850.jpg
    144.9 KB · Views: 79

ez-duzit

Well-known member
Joined
Jun 24, 2013
Messages
5,094
Location
Marina del Rey
AD--sure like your tool cabinet better than the Craftsman roll-away cabinet in which mine are stored. But I have other priorities and unfinished projects preventing me from building shop cabinets.
 

rrich1

Well-known member
Joined
Oct 7, 2015
Messages
793
How long was this podcast exactly? Haha Because man I set the veritas jig up to accept my plane iron at a 25 degree angle and ground away at a 60 grit sandpaper and it still isn't square. I don't mind the work but if I continue grinding away using jig properly will it eventually become square? I am trying to understand the logic behind this. I will continue grinding and please correct me if I am wrong will the sanpaper tear away at the slightly higher side while tearing away less from the lower side to eventually get the whole plan iron square? Could I set a different angle to make the process of squaring up the blade faster?

And regarding sandpaper, when do I know if it is no good and I need to replace it? Can I just dust away the steel collecting on the top as dust and continue grinding? I feel like I am wasting a lot of sandpaper, do I just hear and listen to the point where the sandpaper doesn't sound like it's cutting and then ditch it?


Sent from my iPhone using Tapatalk

it all depends on how out of square you are. once you set the angle in the jig and have the blade in, let it rest on the table. One side of the blade should be on the table and the other side should be up in the air. To help give you a visual mark, make a straight light across one side of the blade or use permanent marker. I think I used 100 grit paper. It will take a while but you will get there.

Are you putting adequate pressure on the blade when going back and forth? Give the paper a feel, if it doesn't seem to have the same grit anymore switch to a different spot or get a new paper.


AD-Nice cabinet!
 

Craptain

Well-known member
Joined
Apr 18, 2013
Messages
4,027
Location
Tampa Bay FL
How long was this podcast exactly? Haha Because man I set the veritas jig up to accept my plane iron at a 25 degree angle and ground away at a 60 grit sandpaper and it still isn't square. I don't mind the work but if I continue grinding away using jig properly will it eventually become square? I am trying to understand the logic behind this. I will continue grinding and please correct me if I am wrong will the sanpaper tear away at the slightly higher side while tearing away less from the lower side to eventually get the whole plan iron square? Could I set a different angle to make the process of squaring up the blade faster?

And regarding sandpaper, when do I know if it is no good and I need to replace it? Can I just dust away the steel collecting on the top as dust and continue grinding? I feel like I am wasting a lot of sandpaper, do I just hear and listen to the point where the sandpaper doesn't sound like it's cutting and then ditch it?


Sent from my iPhone using Tapatalk

What you are doing will eventually get you there. But it is not necessarily the best way. When it is so far from square it really saves time to grind it square first. SLOWLY! and without letting it get to hot, so quench often. Then, still on the grinder, start re-making the bevel, then go back to the sand paper to finish off. However, it looks as if your iron has already been well used and it might be time to find a replacement.
 

ADNICK

Well-known member
Joined
Feb 6, 2017
Messages
45
Location
Comfort TX
AD--sure like your tool cabinet better than the Craftsman roll-away cabinet in which mine are stored. But I have other priorities and unfinished projects preventing me from building shop cabinets.


Understand....when I built this shop promised myself not to do any other projects than shop accessories.

Well that was 2 years ago, shop is not finished and just now getting to the tool cabinet :lol_hitti


Thanks for the compliments guys,
Andy
 
OP
J

jimreed2160

Well-known member
Joined
Aug 7, 2016
Messages
3,589
Location
Tallahassee FL
Jim, I'm looking at the secretary trim pieces you grooved and it sounds like the intent is to finish them as is so the groove is the visual interest, but I'm wondering, if you were going to set a contrasting wood inlay into the grooves how would you cut such a small thin strip to fit? I've looked at decorative inlays in furniture and wondered. It seems too thin for regular hand tools - or is that the point - it's so thin and shallow that it can be fitted with a razor knife for instance?
Joe

I used the stringing router just to scratch an incised line. It was handy and did a great job for what I needed. Normally the stringing router is used for --wait for it--stringing. The cutters make a squared off shallow trench. Next you need some thin veneer stock of contrasting wood and you need a stringing cutter. It looks like the tool that cuts leather straps. Kinda like a handle with an adjustable blade. Set it at the stringing width, like 1/16", and pull the veneer through it to make a piece that is 1/16 wide. Then you apply glue and use your flat headed mallet to send the veneer strip home.
 
OP
J

jimreed2160

Well-known member
Joined
Aug 7, 2016
Messages
3,589
Location
Tallahassee FL
Andy--That is a great tool cabinet. You do nice work.

BigM--As for sandpaper, I use mine for finishing. I do all of my heavy lifting on a grinder with a fine pink wheel. The sandpaper is used to take out imperfections and polish the edge. As I use the paper it gets finer but still seems to cut well. For me, the 220 grit is too coarse anyway so I am happier when it wears a bit. The really fine 800 paper is used for the last kiss. I think my 800 paper lasts about a year and I work on lots of blades. The 220 gets changed every month or so.

But the sandpaper moves from the sharpening table to the cleanup table. Paper worn out from sharpening is still pretty good for removing rust from tools.
 

ADNICK

Well-known member
Joined
Feb 6, 2017
Messages
45
Location
Comfort TX
Thanks Jim, BTW

I'm looking for a hide glue double boiler (pot) don't have an extra in your stash you'd be willing to part with?

Andy
 

Craptain

Well-known member
Joined
Apr 18, 2013
Messages
4,027
Location
Tampa Bay FL
Thanks Jim, BTW

I'm looking for a hide glue double boiler (pot) don't have an extra in your stash you'd be willing to part with?

Andy

I would like one too. Meanwhile I use a mini crockpot that happens to be close to the right temperature.
 
To avoid these ads, REGISTER NOW!
Top Bottom