Desk trim
I guess I am the only person in the world who likes the badge and I don't like it enough to make it for real. The only thing to do is continue with trim. I need a piece that is about 35 inches long and 1 x 1/2. Here is the stock I found.
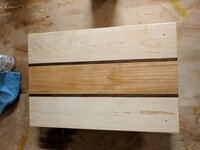
The picture shows the rough board along with two pieces of trim stretched out to about 36". OK then, gnawing this trim will make some sawdust.
The first order of business is to trim it to length. I will make the trim about 40" so I have some room at each end. Time to dust off my sawbench. If you do not have one of these, you should. It was made for handsaws but works for powered saws just fine.
The box at the end is my board "Bud". Sawbenches like this were commonly used by house carpenters during the late 19th and early 20th centuries. My addition is the little offcut stand. My dad liked to build things and he always recruited me as his (sometimes willing) assistant. I frequently found myself holding offcuts while he crosscut framing pieces. He always called me "Bud", so when I found myself in need of an assistant, I made one.
So I marked the cut with a square and got ready to cut. The sawbench is made low so you can use your foot to hold the board in place. This works really well with handsaws.
And Bud keeps the offcut from binding.
I used my #7 to level the board on both sides so I could use one against the table saw fence.
And a few rips later, I had my trim.
I will finish the post later. My kitty is crawling all over me looking for love. Must attend to that before she blows a fuse.