To avoid these ads, REGISTER NOW!

Woodworking 101--Tools and Tips

OP
J

jimreed2160

Well-known member
Joined
Aug 7, 2016
Messages
3,589
Location
Tallahassee FL
New (old) project

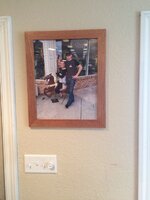
You long time readers may remember the old sewing box that I was working on.

DSCN4459.jpg


DSCN4460.jpg


So far I have made a drawer that replaced the pincushion, put feet on the bottom, and replaced missing trim on the small drawers. Remaining projects are to replace missing trim on larger drawers and make 1/2 of a missing rosette on the end.

DSCN4461.jpg


Last time my daughter was here I showed it to her and she really lit up so I put it on the todo list. My new projects need to clear out room in the shop and this fragile thing really takes up too much flat surface space. So guess what zoomed to the top of the list?

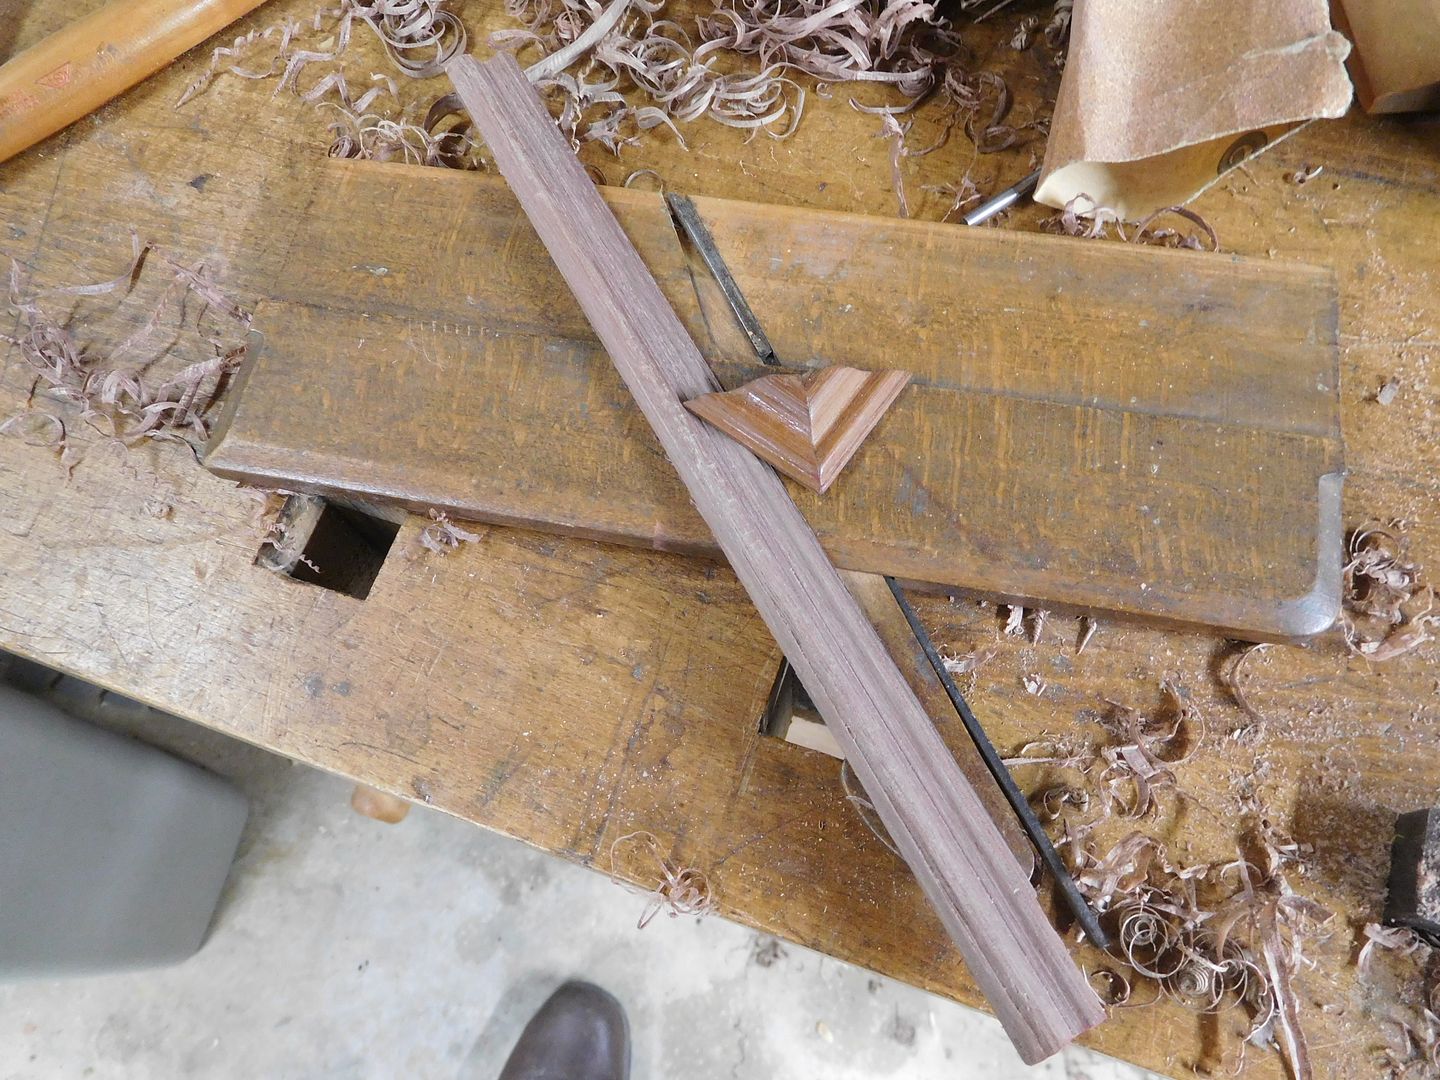
I started this project like I start most--dig in the scrap pile--in this case I needed a walnut stick.

DSCN4464.jpg


And I got a chance to try out my new (to me) pair of H&R planes. Years back I bought a partial set of Crow H&Rs from Patrick Leach. It is a nice high pitched set but was missing some of the smaller ones. Well as luck would have it, he found a pair of #2s and I grabbed those. It seems to be just the right size for this small piece of trim.

DSCN4466.jpg


DSCN4465.jpg


The planes are in good shape and needed only a little touch up. Of course, the round had a small back bevel as many H&Rs do. Craftsmen of yore did not have time to sharpen the profile so many of them just put a back bevel on the blade. Ugh. The way to sharpen H&R profiles is to use thin sandpaper on the sole of the matched plane and drag the bevel down the sole. For example, I needed to touch up the hollow bevel so I stretched sandpaper over the sole of the round and just drug the blade down a few times.

So I worked over the walnut using the H&Rs along with a Stanley #92 and finally got a match. Sorry for the poor photo.

DSCN4468.jpg


Then I cut it free.

DSCN4469.jpg


Here is the first trial fit.

DSCN4470.jpg


And here they are after fitting with the glue drying.

DSCN4474.jpg


DSCN4475.jpg


Next comes the finish and then I can tackle the rosette.
 
To avoid these ads, REGISTER NOW!

ztorres

Well-known member
Joined
Sep 22, 2016
Messages
195
Location
Iowa
Just finished a picture frame for my wife.
954ff4f782357caa748507f6ae8e68e5.jpg
Made from cherry I had left over from another project. I definitely remember why I don’t like miters, I always have issues with them coming together properly.


Sent from my iPhone using Tapatalk
 

Attachments

  • 954ff4f782357caa748507f6ae8e68e5.jpg
    954ff4f782357caa748507f6ae8e68e5.jpg
    315.1 KB · Views: 0

drivesitfar

Well-known member
Joined
Oct 23, 2013
Messages
36,007
Location
Pacific Northwest
ZT: your cherry frame and picture looks great and i bet your bride will approve more tool purchases now too.

one thing that might help is squaring up your miter saw if you haven't already. here's a YouTube video that explains it or i'm sure there are others that might be quicker if you don't have 5 or 6 minutes, but it's the first one i clicked on maybe cause i own that saw.

speaking of which i noticed i'm about 1 degree off and i need to adjust mine before i cut and build something else, but that mailbox stand wasn't crucial to be exact like your picture frames are.


good luck and again nice work!!
 

cheechi

Well-known member
Joined
Feb 29, 2012
Messages
4,384
Location
Triad, NC
zach that is a nice frame. Way better than what I've done in the past.

Jim, a few questions.

can you discuss your thought process for choosing hickory vise inserts? Especially your thoughts about hard vs soft vs leather lined jaws.


that's a pretty close cut on the table saw without a sled or jig. How close do you generally go before you decide you're in no man's land? I typically stop at about the 1" range unless no other tool can do it, but that's arbitrary.
 
OP
J

jimreed2160

Well-known member
Joined
Aug 7, 2016
Messages
3,589
Location
Tallahassee FL
zach that is a nice frame. Way better than what I've done in the past.

Jim, a few questions.

can you discuss your thought process for choosing hickory vise inserts? Especially your thoughts about hard vs soft vs leather lined jaws.


that's a pretty close cut on the table saw without a sled or jig. How close do you generally go before you decide you're in no man's land? I typically stop at about the 1" range unless no other tool can do it, but that's arbitrary.

Well I have never had a problem with damaging wood in a wood vise. My bench has beech faces and my Parker smooth jaw vise has steel jaws. Hickory is durable and I have lots of it around. But 90% of my work is end grain holding with bench dogs.

As for cuts, I do not encourage others to work without a guard or splitter. My ts technique is unconventional. I cut small things and even brass (with an appropriate blade). But I am careful and use a 24" push stick. I also turn off the saw after each cut. That spinning blade is scary and I guess that is why I like to use my planes more than my TS.
 

R_einan

Well-known member
Joined
Aug 29, 2016
Messages
461
Location
Eastern WA
Just finished a picture frame for my wife.
954ff4f782357caa748507f6ae8e68e5.jpg
Made from cherry I had left over from another project. I definitely remember why I don’t like miters, I always have issues with them coming together properly.


Sent from my iPhone using Tapatalk

Good looking frame, Zach!

Try cutting matching miters from the opposite side of the blade, if you are only 1 or less degree off they will still meet up at a perfect 90 and nobody will see one degree. Without adjusting the saw that is. Just cut the opposing angle on the other side of the blade.
 

Attachments

  • 954ff4f782357caa748507f6ae8e68e5.jpg
    954ff4f782357caa748507f6ae8e68e5.jpg
    159.4 KB · Views: 0
Last edited:
OP
J

jimreed2160

Well-known member
Joined
Aug 7, 2016
Messages
3,589
Location
Tallahassee FL
Good looking frame, Zach!

Try cutting matching miters from the opposite side of the blade, if you are only 1 or less degree off they will still meet up at a perfect 90 and nobody will see one degree. Without adjusting the saw that is. Just cut the opposing angle on the other side of the blade.

Good tip. It should correct an imperfect adjustment.
 

Teenager with old tools

Well-known member
Joined
Jun 3, 2015
Messages
595
Location
riverside california
Swing: i've got some metal cabinets with the same sort of gap as your old library cabinets and i used several materials to fill them. that said if you are just going to store round bottles of booze and wine in yours those gaps would be PERFECT so the bottles won't roll around if the drawers open and close ok.

JIM: glad to hear your inventory specialist was notified of your over purchases of your wood vises. :D

i've probably got a few wood vises that need spiffing up or that are missing DOGS so I for one appreciate the posts on how you fixed your old Desmond.

Teen: i'm guessing you are leaving for the NAVY soon now so wishing you the best and hope you are able to get on line and at least keep learning and maybe commenting as you have time. did your brother sign up so he can see the pictures and maybe ask questions or post some of his projects yet?
Gonna set him up an account on Thursday morning. I found out I leave next wednesday. So I've got one last project before I go. I picked up walnut moulding to make a picture frame for the flag I have hanging on my wall. One piece had a knot and broke a bit so the pics are of fixing that but the piece doesn't look like it lines up perfectly so may just cut and glue in a full section of leftover instead of just a piece of what was cut on the first cut for the angle.c84646f04630069c5a8816e8a7486858.jpgce7e0c6512df9bfa7851865b06d3327d.jpg88c8708324909d256d295626e7554d11.jpgd891ab68b6591b59c71f7f97b96cd1a5.jpg

Sent from my P027 using Tapatalk
 

Attachments

  • 88c8708324909d256d295626e7554d11.jpg
    88c8708324909d256d295626e7554d11.jpg
    51.8 KB · Views: 0
  • d891ab68b6591b59c71f7f97b96cd1a5.jpg
    d891ab68b6591b59c71f7f97b96cd1a5.jpg
    74.1 KB · Views: 0
  • c84646f04630069c5a8816e8a7486858.jpg
    c84646f04630069c5a8816e8a7486858.jpg
    61.2 KB · Views: 0
  • ce7e0c6512df9bfa7851865b06d3327d.jpg
    ce7e0c6512df9bfa7851865b06d3327d.jpg
    75 KB · Views: 0
OP
J

jimreed2160

Well-known member
Joined
Aug 7, 2016
Messages
3,589
Location
Tallahassee FL
Teen--We will miss your posts. Good luck in your new venture.

I love the walnut and especially your patch! Once the finish is on it will be hard to spot. Good save.
 
OP
J

jimreed2160

Well-known member
Joined
Aug 7, 2016
Messages
3,589
Location
Tallahassee FL
More moulding

So I cut the other trim piece today for the rosette. It was simple H&R work with some help from Stanley #92. Didn't take many pictures, but here is the finished stick.

DSCN4476.jpg


And the finished rosette.

DSCN4477.jpg


I finished up by getting out my dust collection system.

DSCN4478.jpg


I need to apply some shellac and this one will be done.
 
OP
J

jimreed2160

Well-known member
Joined
Aug 7, 2016
Messages
3,589
Location
Tallahassee FL
When they cut down the big walnut trees in the 19th century, the wood was red like mahogany. Newer steamed walnut finishes brown. I like to add red or orange to it so it looks vintage. Thinned Red Mahogany Minwax works well. Today I am using amber shellac and it has enough yellow/orange in it to match the vintage pieces on my project.
 
OP
J

jimreed2160

Well-known member
Joined
Aug 7, 2016
Messages
3,589
Location
Tallahassee FL
PHOTOBUCKET

I got another ransom note from PB this week. They cancelled my plan and I am not paying again. Looks like my pictures will be gone in 30 days. Time to find another hosting service.
 

drivesitfar

Well-known member
Joined
Oct 23, 2013
Messages
36,007
Location
Pacific Northwest
TEEN: i like the dark brown color of Walnut so maybe a clear might work well too. if you have a few scraps to try out the different colors or clear to see which ones you like for yourself that might be the answer.

if your little brother joins have him post up on this thread or tell us his handle so we can sort of help him if he might need some while you are in the NAVY.

teach him how to write posts and attach pictures and also let him know all people on the internet or GJ are not nice so he needs to grow a little thick skin to help avoid getting his feelings hurt.

best of luck on your new adventure!!

JIM: i've seen many many good sawdust systems just using a shop vac if you might want me to post up a few links, but i have to say a broom and clean benches does have it's appeal. it's just the fine dust that doesn't do any of us any good.

ALL: i'm setting up racks like they use at Home Depot and Costco in my backyard to get ready to stack up fresh cut clear cedar from the mill that i'll be getting next week for my new fence and deck job next spring/summer. i wish i had the space to store it inside, but using spacers and tarps it seems to do ok up here in the PNW so crossing my fingers this bunch of cedar will.
 

drivesitfar

Well-known member
Joined
Oct 23, 2013
Messages
36,007
Location
Pacific Northwest
JIM: even though all my cedar still needs to be planed i do not put my wet wood on my steel racks and I use plenty of 1x2's for spacers. i think i use about 5 per 8 foot section under each row if i have enough or for every 2 boards if i'm running short.

thanks though for the reminder and letting others know that sometimes the best wood stored wrong or not carefully won't survive.

ALL: do any of you store milled cedar or wood outside and do you paint the ends to keep it from cracking?
 

turbowoodworker

Well-known member
Joined
Mar 18, 2012
Messages
3,526
Location
Apex NC
I came home to find the new Fine Woodworking Tools and Shops edition in my mailbox. It is a yearly extra issue that should be available in bookstores soon. I've mentioned previously my admiration for all things from Taunton Press but this issue is worth the wait.

There are some really good articles on topics that we have tried to address in this fine thread. "Build a Better Workbench" complete with the draw bore technique I so poorly explained a number of pages ago. "Tune your Table Saw", "Heating and Cooling your Shop" is a nice primer on minisplits, and a number of other good articles.

Pick this one up. I think you'll enjoy it.:beer:
 
To avoid these ads, REGISTER NOW!

hpw

Well-known member
Joined
Oct 7, 2007
Messages
989
I came home to find the new Fine Woodworking Tools and Shops edition in my mailbox. It is a yearly extra issue that should be available in bookstores soon. I've mentioned previously my admiration for all things from Taunton Press but this issue is worth the wait.

There are some really good articles on topics that we have tried to address in this fine thread. "Build a Better Workbench" complete with the draw bore technique I so poorly explained a number of pages ago. "Tune your Table Saw", "Heating and Cooling your Shop" is a nice primer on minisplits, and a number of other good articles.

Pick this one up. I think you'll enjoy it.:beer:

I subscribe to Fine Homebuilding and yes they do have a quality product
 
OP
J

jimreed2160

Well-known member
Joined
Aug 7, 2016
Messages
3,589
Location
Tallahassee FL
Fine WW has kept up a quality product for a long time. I was a charter member and still have a pile of the old ones around. It is fun to go back to the 80s and see how things have changed in the market.

Here is the final shot of my sewing basket project. It is ready for delivery.

DSCN4480.jpg


Time for a new project.
 
OP
J

jimreed2160

Well-known member
Joined
Aug 7, 2016
Messages
3,589
Location
Tallahassee FL
Throwbacks

Since I have PB until the end of the month, I can post a few older projects before they get lost in the ether. Here is a shot of Barbie tables I made for a slew of granddaughters back in 2009. Cherry.

Picture371.jpg


And here is one from one of my last blademaking runs. I did a batch of blades for those HF planes.

Picture004.jpg
 
Last edited:
OP
J

jimreed2160

Well-known member
Joined
Aug 7, 2016
Messages
3,589
Location
Tallahassee FL
More pictures

At one time I tried to conquer the world of chamfer shaves. Here is a group I sold to my ww buddies. The front one is a Preston. The middle once are Stanley and the green one is a Kunz. Guess what? The green one did not work very well.

Picture024.jpg


Rare action shot of a Stanley #196 curved rabbet.

Picture045.jpg
 
OP
J

jimreed2160

Well-known member
Joined
Aug 7, 2016
Messages
3,589
Location
Tallahassee FL
Project

Here is a hatrack I made for one of my kids.

Picture137.jpg


Carefully bending a lateral lever back into place.

Picture175.jpg


This is a fuzzy picture but it shows how I built a frame for the router so I could flatten a tree stump round. It was later used as a wedding cake stand.

Picture193.jpg


Picture191.jpg


Picture207.jpg
 
OP
J

jimreed2160

Well-known member
Joined
Aug 7, 2016
Messages
3,589
Location
Tallahassee FL
How I sharpen cutters for my dowel machine.

Picture211.jpg


A group of Windsor beaders.

Picture246.jpg


Here is the Barbie table prototype.

Picture248.jpg


Stanley door mortise plane.

Picture256.jpg


Interesting Japanese hammer I rehabbed and a Japanese chisel I made a handle for.

Picture293.jpg


Storage closet project. Pine and birdseye maple.

Picture324.jpg
 

drivesitfar

Well-known member
Joined
Oct 23, 2013
Messages
36,007
Location
Pacific Northwest
Jim: i woke up to a ton of pictures showing some of your projects and old planes so you were busy this morning. I can't seem to close my Photobucket account (I haven't actually tried very hard to yet), but can't you cut and paste your old pictures from PB back to your computer?

ALL: i didn't hear if any of you store milled wood outside so do you? also do you paint the ends of the boards to avoid cracks on 2 by and 1 by cedar? or just paint hardwoods? or do you stain the ends?

have a great day learning how to be a woodworker and not a wood butcher and sounds like there are some good books and magazines and youtube videos besides this thread to learn new methods too.
 

R_einan

Well-known member
Joined
Aug 29, 2016
Messages
461
Location
Eastern WA
Sorry drives, I have only stored construction lumber out doors, and never did much with it other than make sure it wasn’t directly contacting the ground and cover it from the weather. But that also isn’t freshly milled material.
 
OP
J

jimreed2160

Well-known member
Joined
Aug 7, 2016
Messages
3,589
Location
Tallahassee FL
Angle divider

I was sitting in my recliner Sunday evening relaxing with the kitties and The Queen when I checked my email and saw that the mailman had dropped a surprise in the box. So I flip flopped out to the street and found a nice gauge. It is a thread gauge for both SAE and metric of common small size screws and bolts. I found a use for it just today.

DSCN4481.jpg


DSCN4482.jpg


DSCN4483.jpg


I found this old General #835 angle divider on the shelf in the office and with the help of Mr Goofle, discovered that it was missing a piece on the toe. There is a tapped hole that is used to secure a cross member that is missing. My gauge said the required bolt was a #10-32 so I hustled over to ScrewNutBoltLand. I felt like a fool when I bought these sets years ago. It was a spur of the minute mail order thing that was extravagant at the time. Never thought I would treasure them through the years. Kudos to the procurement department.

DSCN4485.jpg


DSCN4484.jpg


Fits like a champ.

DSCN4486.jpg


DSCN4487.jpg


So I rushed into the grinding room to look for steel stock. Of course there is lots of new stuff on the walls. Multiple sizes. But I first scoured the floor and found the exact thing I needed.

DSCN4489.jpg


It had raggedy and nasty edges. And the face you see is the GOOD side. Here is the other.

DSCN4490.jpg


But a little grinding and filing got it worked up just fine.

DSCN4491.jpg


Then I needed a hole. I smeared a spot with a marker so I could scribe the centerline. That is when I discovered that it was 6 1/8" long. I was eyeballing it from the pictures and it looked OK. But I ground the tip so it would be even and easier to mark.

DSCN4492.jpg


So you know the drill--punch and drill. I had it secured in a woodscrew and the drill press grabbed it out and spun it around. Lucky for me that I always keep my hands away and was able to avoid a nasty cut.

It took a little more grinding and filing to make it fit snug but here is the money shot.

DSCN4493.jpg


There was still some dark rust even though I cleaned it up during the fitting. After I was done, I dunked it in the Evaporust tank for an overnight spa treatment. It sure is nice to have a dedicated area for that. I keep a small luncheon meat container full of EV just for small parts. Handy.
 

chrislehr

Well-known member
Joined
Apr 10, 2009
Messages
1,704
Location
Portland, OR
I like the growth chart ruler! Did you use any tricks for the numbering?


Measured very carefully. Made a router jig to do the v grooves of three different lengths.

c71e18e48b97f7604817c610ac58d7ed.jpg

It clamps onto the board. The adjusting handle allows you to change to a different depth. I did longest to shortest so i risked less overcutting.
 

Attachments

  • c71e18e48b97f7604817c610ac58d7ed.jpg
    c71e18e48b97f7604817c610ac58d7ed.jpg
    927.8 KB · Views: 2

drivesitfar

Well-known member
Joined
Oct 23, 2013
Messages
36,007
Location
Pacific Northwest
Chris: I love the RULER you made for the kid's height and my mom still has pencil marks on her kitchen door jamb she won't ever paint over that are still readable in pencil after 55 years. good idea and i wish we would have done something like that for our 5 kids.

also if you have more pictures of your raised bed garden you made that would be great cause i've never seen an elevated one.

thanks

JIM: don't go for NEW STOCK on the shelf when you can just check the floor first. :lol_hitti
 

ez-duzit

Well-known member
Joined
Jun 24, 2013
Messages
5,096
Location
Marina del Rey
Tap & die sets normally come with a thread gage which can be used on both male and female threads. Also the taps and dies themselves can be used to check for thread size.
 

R_einan

Well-known member
Joined
Aug 29, 2016
Messages
461
Location
Eastern WA
Made some sawdust today, and got a good bit of the way along on the coffee table for my cousin. Got the legs tapered, the apron lap joints cut, and got everything dry fitted. I’m contemplating breaking the edges on the legs with a 1/4 round over bit before glue up, just to soften the corners a little.
 

Attachments

  • BED341EC-04C2-4367-B6D9-74DA1A7675EB.jpg
    BED341EC-04C2-4367-B6D9-74DA1A7675EB.jpg
    20.6 KB · Views: 61
  • 554666E4-2F86-4609-81A8-DCE9C6708142.jpg
    554666E4-2F86-4609-81A8-DCE9C6708142.jpg
    23 KB · Views: 66
  • 68058CB9-9127-4A8F-8609-171104194737.jpg
    68058CB9-9127-4A8F-8609-171104194737.jpg
    13.2 KB · Views: 64
  • 149B3A58-9C7A-4B04-A571-6FA54E48E48E.jpg
    149B3A58-9C7A-4B04-A571-6FA54E48E48E.jpg
    24 KB · Views: 60

ztorres

Well-known member
Joined
Sep 22, 2016
Messages
195
Location
Iowa
Does anyone have a router cnc? I’ve been researching these extensively lately, and I was wondering if anyone here had some experience.


Sent from my iPhone using Tapatalk
 

chrislehr

Well-known member
Joined
Apr 10, 2009
Messages
1,704
Location
Portland, OR
Chris: I love the RULER you made for the kid's height and my mom still has pencil marks on her kitchen door jamb she won't ever paint over that are still readable in pencil after 55 years. good idea and i wish we would have done something like that for our 5 kids.

also if you have more pictures of your raised bed garden you made that would be great cause i've never seen an elevated one.

thanks

Thanks but it will be a bit. Rainy season just stared and make building a PITA. Just sealed it all up and will pick back up the next dry days.

The base is all cedar 4x4 and 2x4. I hope it holds the weight OK! :)
 
To avoid these ads, REGISTER NOW!
Top Bottom