You are using an out of date browser. It may not display this or other websites correctly.
You should upgrade or use an alternative browser.
You should upgrade or use an alternative browser.
Woodworking 101--Tools and Tips
- Thread starter jimreed2160
- Start date
OP
jimreed2160
Well-known member
Gas--Nice project!
EOC_Jason
Well-known member
Gas, please post a pic of the top of the vanity once you get it finished, I would really like to see how that part turned out too.
Gasgt1
Well-known member

OP
jimreed2160
Well-known member
Gas--You just showed us why we all NEED a hammer drill. 
OP
jimreed2160
Well-known member
Table top
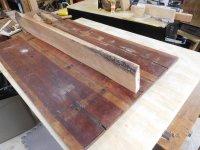
Well I really liked the bow tie idea but cooler heads have prevailed. Thanks to all for your comments. However neat the bow ties might be, I agree that they would be distracting on this simple piece of furniture. So now I am working on a rear reinforcement plate. Bonus is that it should be an easier fix. My assessment of the other logmatch piece shows an unstable crack in the same place so it needs help also.
My new plan is to rout a rectangular pocket with the crack in the middle. I think 2-3 inches of width and six or seven inches of length should contain the crack and provide enough strength to stabilize it. If the pocket starts about 1/2" from the edge, it will be invisible from above. That will preserve the look of the top.
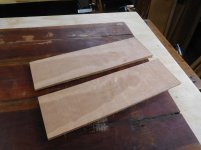
I found a rough cherry board and cut a good section out of it to begin with. Then I resawed it on the bandsaw to give me 2 pretty decent 5/8" boards.
Well I really liked the bow tie idea but cooler heads have prevailed. Thanks to all for your comments. However neat the bow ties might be, I agree that they would be distracting on this simple piece of furniture. So now I am working on a rear reinforcement plate. Bonus is that it should be an easier fix. My assessment of the other logmatch piece shows an unstable crack in the same place so it needs help also.
My new plan is to rout a rectangular pocket with the crack in the middle. I think 2-3 inches of width and six or seven inches of length should contain the crack and provide enough strength to stabilize it. If the pocket starts about 1/2" from the edge, it will be invisible from above. That will preserve the look of the top.
I found a rough cherry board and cut a good section out of it to begin with. Then I resawed it on the bandsaw to give me 2 pretty decent 5/8" boards.
Attachments


drivesitfar
Well-known member
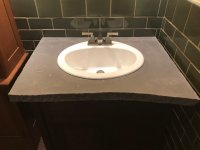
GAS: there isn't one part of the new bathroom vanity that isn't AWESOME. 
i know this isn't a WOODWORKING QUESTION, but you showed all the effort you did to make the hole in the flagstone and the 3 sides look perfectly straight so would you mind telling me (us) how you SNAPPED them to look so good?
great work
Jim: sorry i can't send you and Craptain any snow.
good luck on that old table top and nice decision (I hope).
turbowoodworker
Well-known member
Jim,
Concerning dutchmen/bowties: I generally refrain from telling people on the Internet what their tastes should be. But I am in agreement with most of the other posters that the bowties were distracting in your particular project. I feel that bowties are very complementary to a large crack in Nakashima-styled furniture with live edges etc. Just my two cent, Internet opinion, but thanks for all your postings as I find them inspiring.
Rick
ALLFAST
Well-known member
Jim,
It doesn't have the lateral adjustment. Is this a certain year for that feature? Maybe pre 1915 ?
I'm still trying to find info about the Unions.
It doesn't have the lateral adjustment. Is this a certain year for that feature? Maybe pre 1915 ?
I'm still trying to find info about the Unions.
OP
jimreed2160
Well-known member
Jim,
It doesn't have the lateral adjustment. Is this a certain year for that feature? Maybe pre 1915 ?
I'm still trying to find info about the Unions.
Well Stanley introduced the lateral adjustment lever in 1885 and others copied after that.
My info shows the Union company started in 1880 making metal things. Sometime around 1900 they acquired the Birmingham plane company and started making transitional and metallic planes. They were purchased by Stanley in 1920.
So your pre-lateral was made sometime after 1900 and sometime before 1920. My guess is that your plane will be a solid user.
OP
jimreed2160
Well-known member
Turbo--Thanks for speaking up. I appreciate all opinions even when it seems to cloud the water. A careful planning cycle usually results in a superior result.
Drives--I really appreciate your offer of snow, but respectfully will pass. It was 55 degrees in my shop today. After a short session, I had to get under my binkie and nap it out.
Drives--I really appreciate your offer of snow, but respectfully will pass. It was 55 degrees in my shop today. After a short session, I had to get under my binkie and nap it out.
Last edited:
Gasgt1
Well-known member
GAS: there isn't one part of the new bathroom vanity that isn't AWESOME.
i know this isn't a WOODWORKING QUESTION, but you showed all the effort you did to make the hole in the flagstone and the 3 sides look perfectly straight so would you mind telling me (us) how you SNAPPED them to look so good?
Thank you
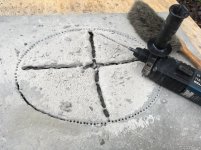
I learned (the hard way) to support the stone for clean breaks.
First, mark out the desired size on both sides.
I used an angle grinder to score the lines maybe 1/8 or so deep, both front and back.
Next, I clamped pieces of 4x4 right at the edge of the scoring on both the top and bottom.
A couple of solid raps with a rubber hammer snapped them clean.
I found that I needed support on both sides or the break would flake back across the unsupported face.
Alchymist
Well-known member
GAS: there isn't one part of the new bathroom vanity that isn't AWESOME.
i know this isn't a WOODWORKING QUESTION, but you showed all the effort you did to make the hole in the flagstone and the 3 sides look perfectly straight so would you mind telling me (us) how you SNAPPED them to look so good?
great work
Jim: sorry i can't send you and Craptain any snow.
good luck on that old table top and nice decision (I hope).
Hand cut a lot of flagstone (also called Pennsylvania blue stone) as a youngster. My father would open a quarry and cut stone for a living, and as a 13-14 year old I would work summers with him. Cutting the stone was all done by hand up until some larger quarries started using gas powered stone saws. Ours was all hand cut, and consisted of a scoring tool, snap pins, a hammer, and a tool called a pitch. Straight cuts with 4 or more inches each side of the cut were usually scored and snapped, using the snap pins. Smaller edge widths were removed with the pitch by making multiple passes with the pitch and hammer along the back of the stone in line with the score marks. Scoring was done with a hand made tool consisting of a 1/2" piece of round CRS about 2 feet long, with a rectangular piece of carbide silver soldered into a notch on each end. Still have most of my father's old tools.
OP
jimreed2160
Well-known member
Alchy--Great skills to pick up as a kid. When I was that age I had an inside job. But it was working at my Dad's vet hospital and among other things I ran the ***** lab. 
Wish I had been in the quarry with you.
Wish I had been in the quarry with you.
drivesitfar
Well-known member
Gas: thanks for taking the time to write out your method and for me at least it's nice to know that now.
again great job on the cabinets and the flagstone top with the sink in it was just a very nice bonus.
ALCHY: if you want to post up a few pictures of your tools i don't think the Woodworking guys would mind and thanks for the stories. I grew up cutting roads in the mountains and still have a few memories over 55 years later when i was 6 sitting on my gramps lap while he drove his D9 on some pretty steel hills/mountains.
ALL: hope you all have a great 2018
OP
jimreed2160
Well-known member
Stanley 67 shave
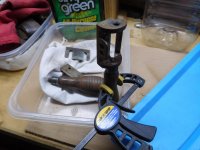
It is still a little chilly in the shop so I found a little rehab project to work on. What I found was an uncommon tool--a Stanley 67 spokeshave. Stanley made these from 1897--1941. It has removable rosewood handles and both a rounded base and a straight base. It can be used as a rabbeting shave with the accessory fence.
Unfortunately, these small parts are often missing. The fence is rare. This particular shave has only the rounded base. In addition, the shave is pretty rusty. There was good news and bad news on the cleanup. First the bad news--one of the handles is stuck. I will give it some Liquid Wrench and say a little prayer. On the good news front--the owner engraved his name on the back of the blade. It is a Vee logo blade and they were common around WWI. Scratched on the back is:
"Wm MacAuley 1916"
I think it is nice to find a name because it personalizes the tool. I have quite a few vintage tools but only a few that are personalized. Most of those are family tools. So it seems Mr. MacAuley was proud of his spokeshave. I am sure he would be happy to see that it is being cleaned up and cared for.
Attachments


ez-duzit
Well-known member
G1--natural stone and wood is a great combination.
ALLFAST
Well-known member
Jim thanks for the info. The seller said it was a great daily driver.
ALLFAST
Well-known member
Jimreed, It was me that sent you that CL ad to the insane handplane collection last week. That must be a cool and $$$$ place to visit !
Gasgt1
Well-known member
Hey Jim,
I like the looks of that Stanley 67.
I may have to keep my eye open for one of those in my rust hunts")
I like the looks of that Stanley 67.
I may have to keep my eye open for one of those in my rust hunts
Alchymist
Well-known member
Alchy--Great skills to pick up as a kid. When I was that age I had an inside job. But it was working at my Dad's vet hospital and among other things I ran the ***** lab.
Wish I had been in the quarry with you.
Father and older brothers taught me a lot of useful stuff.Dad made a lot of his tools for the quarry, and it stuck with me. Made all my turning tools for woodworking, and some tooling for my metal lathe & mini mill.
Gas:
ALCHY: if you want to post up a few pictures of your tools i don't think the Woodworking guys would mind and thanks for the stories. I grew up cutting roads in the mountains and still have a few memories over 55 years later when i was 6 sitting on my gramps lap while he drove his D9 on some pretty steel hills/mountains.
May take a couple pics tomorrow, but it'll be in the cold! Tools dad bought were a hammer or two, his pitch, a chisel, carpenter's square, and some small wedges. The rest he made. He would buy a length of flat CRS for a straight edge to guide the scoring tool ,and when it started to wear too much he would make it into snap pin handles. Don't think I have any of them now, but they were simple - take a length of the flat stock and weld a 4" or so piece of 1/2" round cross-ways on one end. When wanting to snap a stone on a score line that was some distance from the edge, several of these would be inserted under the stone so they were under the score line, then stand on one edge of the stone with a foot on each side of the score line. Rise up on the toes, and drop weight back on the heals to crack the stone along the score line.


drivesitfar
Well-known member
IM: probably depends what you are going to use it for. want to give a few more details and maybe get a better answer?
if it was taller i'd probably make it into a vise or anvil stand, but this is the Woodworking 101 thread so guessing you might want to make a big bowl or some slabs?
my guess (WAG) is that the bark will keep it from drying to fast and cracking and will also be a lot easier to take off when it's dry, but i'm certainly willing to hear what others have to say.
IM: probably depends what you are going to use it for. want to give a few more details and maybe get a better answer?
if it was taller i'd probably make it into a vise or anvil stand, but this is the Woodworking 101 thread so guessing you might want to make a big bowl or some slabs?
my guess (WAG) is that the bark will keep it from drying to fast and cracking and will also be a lot easier to take off when it's dry, but i'm certainly willing to hear what others have to say.
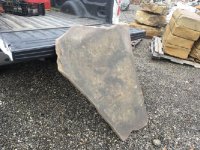
My wife wanted a this to be the coffee table base and put a oval or round glass on top. I was going to remove the bark and then bring into the living room to dry and use as a coffee table first. once it fully dries in a year or two than I'll finish it up. I don't mind cracks and I think it will give it some character. It's 16 inch slab and 33 inch wide.
ptgarcia
Well-known member
I think I'd remove the bark. I have a few chunks of pine from a few trees which were removed in my office complex. I set them in the yard on bricks with the bark still on and a couple of them started to rot under the bark. I've since removed the bark on all pieces and they seem to be drying out better. And this is in sunny SoCal, by the way.
BMR24
Well-known member
That bark will make a mess in your living room
bubinga
Well-known member
seal the exposed ends so it don't dry too quick and check. (crack)
R_einan
Well-known member
After the roaring success of my previous coffee table and interest expressed by a friend that runs a shop to put one on his sales floor, I am making another modified version. This one is African Mahogany and Curly Maple, both of which I found for a good price: $5.99/bd ft for the mahogany and $6.50/bd ft for the maple. I am removing the full border and just doing contrasting breadboards, along with a more narrow (8/4) leg in a shaker style. I’m tracking my time on this one to have a better idea of how much really goes into a piece like this. So far I’m at about 6 hrs.
Attachments


OP
jimreed2160
Well-known member
IM--I would take the bark off. It retains moisture and may have bugs. It surely does have fungi spores and they love the moisture. Hack most of it off with a hatchet or use chisels and a drawknife. Let it dry in the garage for a year or so before you bring it in. If it dries too quickly, you will hear a loud crack in the middle of the night.
R--I'll bet the second table goes quicker than the first. Good luck.
All--I was graced today with a visit from Shortykorte. It is always a real treat to have a shopbuddy drop by. Thanks for the visit, Shorty!
R--I'll bet the second table goes quicker than the first. Good luck.
All--I was graced today with a visit from Shortykorte. It is always a real treat to have a shopbuddy drop by. Thanks for the visit, Shorty!
bubinga
Well-known member
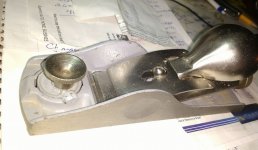
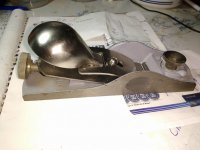
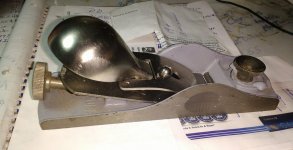
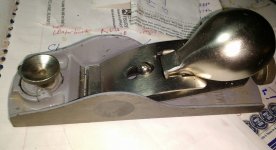
Picked up this mint craftsman (probably made by Stanley,) low angle block plane, for $20.00 shipped of e bay.
Its fine as is, but I'm going to polish the bottom and sides just for something to do.
Its fine as is, but I'm going to polish the bottom and sides just for something to do.
Attachments


ez-duzit
Well-known member
b--that looks good, with the adjustable throat.
OP
jimreed2160
Well-known member
Bub--Good score on a really handy plane. Low angle block rocks.
OP
jimreed2160
Well-known member
Light stand
OK, so it is not exactly woodworking--but it IS working in the woodworking shop. And everyone needs light when they work.
Earlier in the week, ShortyKorte came by on a WIP inspection tour. We discussed the fate of my old halogen work light. Close inspection revealed two broken bulb mounts. I voted for surplus but clever Shorty recommended repurposing.
Since it is 51 degrees in the shop today, my time there is limited. I decided to work on the light. The plan was to remove the guts and replace them with my new CAT light from Costco. The old light came apart easily and ten years of shop dust was quickly removed. I pondered how to attach the new light. It is rechargeable and I wanted to find a way to mount it but have it easy to remove for recharging. Well, sometimes luck is your friend. In use, the old halogen light gets really HOT. So hot, in fact, that there is a handle for moving it around. Turns out that the CAT light stand hooks securely over the old handle. Easy-peasy.
It is an outstanding way to start 2018--getting by with a little help from my friends. Thanks, Shorty. This year is already looking bright!
Attachments


EOC_Jason
Well-known member
Putting this gun cabinet converted to shelves back together today after stripping & re-staining it... Still have to install the glass doors on front and a few bits of misc hardware, but it's getting close to finally being done and I can get it out of my garage and clean everything up.
The shelf jig I got at Menards made super quick work out of drilling the holes in the wood to make the shelves adjustable. I'm going to get a lot of use out of that in some future projects for sure!
The shelf jig I got at Menards made super quick work out of drilling the holes in the wood to make the shelves adjustable. I'm going to get a lot of use out of that in some future projects for sure!
Attachments

OP
jimreed2160
Well-known member
EOC--Good job on the conversion. That will make a nice bookshelf.
bubinga
Well-known member
b--that looks good, with the adjustable throat.
Bub--Good score on a really handy plane. Low angle block rocks.
Thanks Guys."Picked up this mint craftsman (probably made by Stanley,)" The cast adjuster for the mouth says made by Sargent. Stanley stuck with their pressing with a pin design.
woodworking is pretty much my main hobby, that and tool collecting, restoring tools and machines, like a lot of us do.
Sargent made good tools too I think. Another difference I noted, is the blade feed screw, "lead-screw" type of deal, just had right handed threads, and just kind of "idles" on the part that advances the blade.
(not sure of the name right off)
I wonder how it's made, thinking it's pressed together?
(The shaft/leadscrew that is attached to the adjusting knob)
see picture.
pfaustus, are you seeing "Sargent" On My plane,
as I am missing it.
EDIT TO ADD,
As Stanley used a left and right thread, worked kind of like a turnbuckle.
Attachments

Last edited:
EOC_Jason
Well-known member
Thanks! Got the doors put on too... Just need to get some magnetic latches tomorrow and it will be DONE!
EOC--Good job on the conversion. That will make a nice bookshelf.
Attachments

turbowoodworker
Well-known member
Nice job on converting that gun case. Looks good.
turbowoodworker
Well-known member
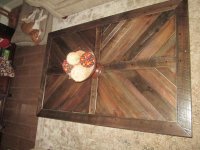
I thought I would post a few pictures of the coffee table I built for my wife for Christmas.
The base is poplar M&T joined to turned cherry legs from Rockler. The base finish is stain then successive coats of red, black and white paint that was then distressed at the wear points and coated with several coats of clear.
The top is salvaged oak from the in laws' farm building (an old chicken house). I think it is red oak but it is difficult to tell as it was really weathered and dirty. I chose a ship lapped herring bone pattern. Then the top was reweathered with a Varathane product needed as the wood changed colors after planing and milling. Topped it off with some lacquer then polyurethane.
I think it turned out OK and the wife likes it.