To avoid these ads, REGISTER NOW!

Woodworking 101--Tools and Tips

beelsr

Well-known member
Joined
May 6, 2007
Messages
1,324
Location
NE PA, USA
None of my Kregs to date have glue because I did not think it would be worth the effort. I'll bet the Kreg strength tests show that glue brings little to the table. **** to side does not appear to be the best marriage. But I guess I need to test that theory.

end-grain gluing is something that most everyone gets wrong. i typically do a 50-50 mix of glue-water to "size" the end-grain, give it a minute or two to do its job and then hit it with the coat of glue.

i wonder if any of the testing done on kreg joints has taken this into consideration? I kind of doubt it.

@JBH - I've used Fisch tools before but not these. I wouldn't hesitate to use their stuff, it's all been good German tooling before.
 
To avoid these ads, REGISTER NOW!
OP
J

jimreed2160

Well-known member
Joined
Aug 7, 2016
Messages
3,589
Location
Tallahassee FL
JBH--I have not used those particular bits but they look like they would do a good job. I used to hang out at HH when I lived in Atlanta and they are known for selling quality stuff.

Beel--Good points on end grain gluing. Now that I have time on my hands I have been letting the glue sit for a few minutes before I clamp. I have been surprised at how some wood just soaks it up and starves the joint. In that case, I just reapply and spread until it stabilizes. There is a little more squeeze out on my joints lately but I think they are stronger. Woodworking has a way of teaching us patience.
 

CRSINMICH

Well-known member
Joined
Aug 15, 2015
Messages
2,397
Location
Southeastern Michigan
SQUARE RACK​
(The rack is actually rectangular)​
This is one of the first things I mounted on the wall behind my bench. Having squares within easy reach is a real timesaver. It's made this from scraps of walnut and beech. It doesn't show in the photo but the blades of each square fit into shallow grooves in the beech hangers. It's nice to have a set of Lufkins handy. (Notice that both combination squares still have their scribes.)
 

Attachments

  • Square rack (1).jpg
    Square rack (1).jpg
    101.1 KB · Views: 112
Last edited:

rrich1

Well-known member
Joined
Oct 7, 2015
Messages
793
Hamper is 99% done. Bought some canvas to make a liner. Will have the mother in law sow it up this weekend. Since I chamfered the inside corners it will give nice mounting spots for the push button snaps. IMG_20180404_112349_863.jpgIMG_20180404_112349_866.jpgIMG_20180404_112349_862.jpg

Sent from my Pixel XL using Tapatalk
 

rrich1

Well-known member
Joined
Oct 7, 2015
Messages
793
Had some time to kill so yesterday I made some coasters. Got them sanded and rounded the edges over today. Still needs finish. Cherry, walnut, and maple. IMG_20180404_121806.jpg

Sent from my Pixel XL using Tapatalk
 
OP
J

jimreed2160

Well-known member
Joined
Aug 7, 2016
Messages
3,589
Location
Tallahassee FL
rrich--The hamper turned out nice. I am glad to see you chamfered the inside corners. I think modern ww have forgotten how useful chamfering is. It is a lost art of design.
 

royce

Well-known member
Joined
Jun 22, 2014
Messages
3,103
Location
fairbanks ak
SQUARE RACK​
(The rack is actually rectangular)​
This is one of the first things I mounted on the wall behind my bench. Having squares within easy reach is a real timesaver. It's made this from scraps of walnut and beech. It doesn't show in the photo but the blades of each square fit into shallow grooves in the beech hangers. It's nice to have a set of Lufkins handy. (Notice that both combination squares still have their scribes.)

Really fine squares and rack.
Well done

Royce
 
OP
J

jimreed2160

Well-known member
Joined
Aug 7, 2016
Messages
3,589
Location
Tallahassee FL
Stanley #71

Back when tools were art, Stanley offered this version of their popular #71 router plane. This one is a type 4 or 5. Those were offered from 1892-1901.
 

Attachments

  • DSCN6225.jpg
    DSCN6225.jpg
    148.5 KB · Views: 62
  • DSCN6228.jpg
    DSCN6228.jpg
    154.8 KB · Views: 58

CRSINMICH

Well-known member
Joined
Aug 15, 2015
Messages
2,397
Location
Southeastern Michigan
Larry: Your bench top can be flattened with hand planes. As a bonus, you'll get a full upper body workout. Winding sticks like EZ recommended will be helpful. Paul Sellers has two You Tube video series about building benches using only hand tools. You might want to watch the ones that show him flattening the tops. He also has a video about making winding sticks. Good luck.
 

scarrylarry

Well-known member
Joined
Jun 26, 2010
Messages
494
Location
West Coast of Canada
Larry: Your bench top can be flattened with hand planes. As a bonus, you'll get a full upper body workout. Winding sticks like EZ recommended will be helpful. Paul Sellers has two You Tube video series about building benches using only hand tools. You might want to watch the ones that show him flattening the tops. He also has a video about making winding sticks. Good luck.

Thank You CRSINMICH !
scarrylarry
 
OP
J

jimreed2160

Well-known member
Joined
Aug 7, 2016
Messages
3,589
Location
Tallahassee FL
Larry--I agree with CRS. This is a good project for handplanes. Just remember to sneak up on your finished surface. Handplanes work best when they are set to take whisper like shavings. Thin shavings give you more control and are less likely to cause tearout and splinters. Just take it slow with multiple passes and you will be surprised at how quickly the shavings pile up. Good luck.
 
OP
J

jimreed2160

Well-known member
Joined
Aug 7, 2016
Messages
3,589
Location
Tallahassee FL
This is OK for smoothing. But, for flattening the bench top, don't waste your time. Use a scrub plane, if you have one. Otherwise set what you have for an aggressive cut.

Well this is where we have to agree to disagree. Our poster is new to handplanes and probably does not own a specialty plane like a scrub. The nature of his questions lead me to believe he has very little handplane experience. I stand by my advice to make thin shavings. I have coached dozens of novice plane users and the most common mistake is taking large shavings.

You need a really sharp blade to get thin shavings. This advice encourages the novice user to attend to the blade by adjusting and sharpening it until thin shavings are the result. And two thin shavings always beat a thick and splintery one.
 

scarrylarry

Well-known member
Joined
Jun 26, 2010
Messages
494
Location
West Coast of Canada


Ezduzit and Akalian I have an electric router that I have never used and I have seen some Youtube videos on using this router method but would need to research it more. The surface that I am using to work on this laminated 2x4 workbench top is a folding legged plywood table about 6 feet long 28 inches wide, not the best and a bit wobbly with the weight of the laminated 2x4's 16 of them on edge making it 24 inches wide and 10 feet long . I only have the workbench top assembled so far as described above. No frame built yet as I'm not sure if I want the whole workbench butted up against the wall in the garage or actually bolted to the garage wall. I have to figure out how I would even plane the top and have the plywood table hold steady while I'm planning it. Just want to get the workbench top flat first then work on the frame it will sit on . Thinking of a frame like "cevairwerks" posted and BuffetFan placed in the Build a Workbench vs Buying one thread. I need to start posting pictures but deciding which image hosting site to use as Photobucket is hopeless .
scarrylarry
 
Last edited:

scarrylarry

Well-known member
Joined
Jun 26, 2010
Messages
494
Location
West Coast of Canada
Larry--I agree with CRS. This is a good project for handplanes. Just remember to sneak up on your finished surface. Handplanes work best when they are set to take whisper like shavings. Thin shavings give you more control and are less likely to cause tearout and splinters. Just take it slow with multiple passes and you will be surprised at how quickly the shavings pile up. Good luck.

Thanks for your reply Jim ! I'm not sure what I'm going to try and do to level the workbench top either plane it or router it . I really need to post pictures of things like the project and the planes I have etc. !
scarrylarry
 
Last edited:

scarrylarry

Well-known member
Joined
Jun 26, 2010
Messages
494
Location
West Coast of Canada
Here's a setup I used to level out the base legs of a project. The setup is simple. In your case you can just bolt angle iron, or even some milled stock to the side of the table and make a sled to hold the router.

Easy, peasy.

.

Akalian I looked at the picture . What I'm confused about is do the boards/rails you have on top of the sawhorses that the router sled is sitting on need to be level on each side of the project ? I would think so or the work you are trying to flatten would not be level . I'm I right on this ? I guess I need some angle iron or flat non bowed wood that will sit above either side of the workbench top wick is the width of the height of the 2x4's on edge 3 1/2 ". Also what are those boards/rails you have on top of the sawhorses made of ,looks like wood with an aluminum frame ? Do you buy those like that . You see right now I have no angle iron or true flat and not bowed lumber to use as rails . Dimension lumber at the lumber yard is never true . Sorry to all of you for the run on but I want this to turn out and I'm not a carpenter or cabinet maker just a wane be DIY wood worker
Thanks
scarrylarry
 

CRSINMICH

Well-known member
Joined
Aug 15, 2015
Messages
2,397
Location
Southeastern Michigan
larry: Don't get hung up trying to figure out a way to flatten the top. Pick a way that suits your tools and skills. I've used my 2x4 laminated top for over 20 years and it has been fine even though, when I went over it this morning with a cabinet scraper, I discovered - GASP - high spots! For most people's uses dead flatness is just not that critical.

Here's a picture of a cabinet scraper in case you don't know what I'm talking about. They're very useful and fairly cheap but far down the list of hand tools to buy when you're getting started. Not too far down though.
 

Attachments

  • Stanley #80 cabinet scraper 3-10-18 (1).jpg
    Stanley #80 cabinet scraper 3-10-18 (1).jpg
    55.4 KB · Views: 35
To avoid these ads, REGISTER NOW!

drivesitfar

Well-known member
Joined
Oct 23, 2013
Messages
36,007
Location
Pacific Northwest
ALL: I'm wondering if any of you have plans and/or pictures of a favorite cedar picnic table you've built or seen? my daughter would love one for her backyard for summer meals this year at her new home and i'm thinking that might be a good Bday present to make her.

I tend to like the ones with the benches separate from the table, but i'm looking for ideas if any of you have favorites please post them if you have time to.

thanks
 
OP
J

jimreed2160

Well-known member
Joined
Aug 7, 2016
Messages
3,589
Location
Tallahassee FL
Larry--I like EZs idea of sawhorses. For years I used an assembly bench that consisted of a solid core commercial door that was on a set of sawhorses. I even mounted a Wilton woodworking vise on one corner. It served me well.

Drives--Mr Google is yer friend. I googled "picnic table plans" and the display immediately filled with plans and pictures. With all of that cedar you have I am sure you can overbuild something that will last for generations.
 
OP
J

jimreed2160

Well-known member
Joined
Aug 7, 2016
Messages
3,589
Location
Tallahassee FL
New project

OK. Not everything is fine furniture. Sometimes you just need an extra shelf in the pantry. But small projects does not mean that you cannot have fun in the shop.

Some of my most satisfying projects are those that come from the scrap bin. This project is no exception. I found a perfect sized piece of plywood beside the scrap bin. When I worked on the assets team at IBM, I often saved shipping crate plywood from the dumpster. This piece had been used in some shop furniture and now its third life will be a pantry shelf. The only issues are glue, nails and a few holes.

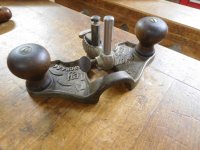
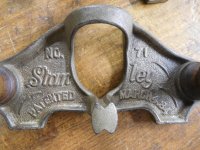
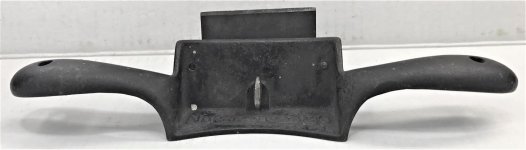
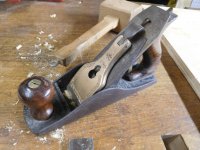
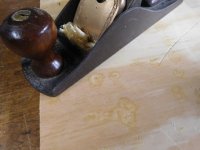
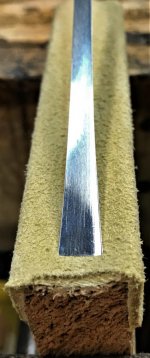
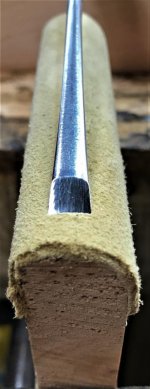
I started by removing the shot brad nails. They were very brittle but I was able to pull them out carefully with a vise grip. Two dozen nails later, I was ready to tackle the glue. For this task, I chose my go to #4 plane. It is a customized type 11 #4C. I made a new knob from walnut. It is a hybrid--not low and not tall--just a JR special that just fits my hand. Then I made a blade for it. Most Stanley blades are 1/16" thick. Mine is 3/32". It is thick enough to make a difference but still small enough to fit the adjuster without modifications. And then there is the bling. I found a brass lever cap and had it engraved by my ww buddy, Catherine. This plane has a tight mouth and is perfect for small smoothing tasks.

I set the blade for whisper shavings and took to the glue. It skimmed the glue right off the surface of the plywood, leaving just a glue shadow. Who says you cannot plane plywood?!?
 

Attachments

  • DSCN6337.jpg
    DSCN6337.jpg
    151.7 KB · Views: 49
  • DSCN6338.jpg
    DSCN6338.jpg
    128.7 KB · Views: 44
  • DSCN6339.jpg
    DSCN6339.jpg
    130.6 KB · Views: 45
  • DSCN6330.jpg
    DSCN6330.jpg
    111.2 KB · Views: 47
OP
J

jimreed2160

Well-known member
Joined
Aug 7, 2016
Messages
3,589
Location
Tallahassee FL
Project continued

This shipping crate plywood had three holes in it. They did not matter when it was shop furniture but I knew seeing daylight through the shelf would drive me crazy. So I found some dowel pieces to plug the holes. Unfortunately the dowel was a little small. Not wanting to crank out three inches of custom dowels, I decided to trick it into compliance with a thin shop rag.

I cut the dowels to length and covered them with scraps from recycled skivvies. Everything was smeared with glue and hammered home. The bottom side looks great but the top side will need trimming. I will use the #4C to level them out once the glue dries. The shelf will be over six feet in the air so a little stain will make my repairs invisible.
 

Attachments

  • DSCN6332.jpg
    DSCN6332.jpg
    119.4 KB · Views: 38
  • DSCN6333.jpg
    DSCN6333.jpg
    76.6 KB · Views: 33
  • DSCN6334.jpg
    DSCN6334.jpg
    103.2 KB · Views: 35
  • DSCN6331.jpg
    DSCN6331.jpg
    117.1 KB · Views: 38
  • DSCN6335.jpg
    DSCN6335.jpg
    114.9 KB · Views: 41
OP
J

jimreed2160

Well-known member
Joined
Aug 7, 2016
Messages
3,589
Location
Tallahassee FL
Project continued more

I decided that clipping the corner of this shelf would enhance its appearance. So I trotted out my multipurpose combination square for assistance. All I need is a 45 degree cut so most of these attachments are unnecessary. The first task is to strip it down.

The shelf is 24 inches wide and 18 inches deep. The most pleasing cut to my eye was at 6 inches so I made a six inch mark and then used the 45 degree bevel edge as a guide.

I will wait for the glue to dry so I can trim the dowels. Then I will add edge trim and supports.
 

Attachments

  • DSCN6340.jpg
    DSCN6340.jpg
    134.4 KB · Views: 39
  • DSCN6341.jpg
    DSCN6341.jpg
    135 KB · Views: 38
  • DSCN6342.jpg
    DSCN6342.jpg
    130.2 KB · Views: 37
OP
J

jimreed2160

Well-known member
Joined
Aug 7, 2016
Messages
3,589
Location
Tallahassee FL
Project glue up

The glue was dry so I used my #4 plane to take down the waste on the three dowel plugs. The fix worked well and they vanished into the plywood grain.

Time to use more tools. The current task is to add trim to the shelf. I sliced off the corner at 45 degrees. Geometry tells us that if we slice off a right angle corner at 45 degrees then each angle is 45 degrees. So half of that is 22.5, which is marked on the chop saw. But what if the angle is not so convenient? Then we might have to use our Stanley #30 angle divider. I tried it out and it is correct. Now that I know how to use it, I will find other occasions where it may come in handy.

I cut the trim and shot it with a few brads. Time for more glue to dry.
 

Attachments

  • DSCN6343.jpg
    DSCN6343.jpg
    113.4 KB · Views: 50
  • DSCN6346.jpg
    DSCN6346.jpg
    121.4 KB · Views: 44
  • DSCN6347.jpg
    DSCN6347.jpg
    129.9 KB · Views: 45
  • DSCN6348.jpg
    DSCN6348.jpg
    146.8 KB · Views: 49
OP
J

jimreed2160

Well-known member
Joined
Aug 7, 2016
Messages
3,589
Location
Tallahassee FL
Redneck air scrubber

So I have been using my redneck air scrubber for about ten days now when I am in the shop. Those of you following at home will remember when I duck taped a fine particle furnace filter to an inexpensive HD fan and hung it upside down from the garage door opener hanger.

Well, it is starting to get dark with wood dust particles. I can tell a difference when I am running the saws. Unless this thing goes belly up in the next month or so, I am calling this one a success. If you can make an acceptable air scrubber for less than dinner out, then all of you filterless dudes out there needs one of these. It sure beats nothing.
 

Attachments

  • DSCN6349.jpg
    DSCN6349.jpg
    105.1 KB · Views: 50

EOC_Jason

Well-known member
Joined
Jun 25, 2012
Messages
11,388
Location
Bentonville, AR
I was always wondering what came of that... Good to know it works.

Though now with the warm weather, I just make all my messes out in my driveway... :lol:

Redneck air scrubber

So I have been using my redneck air scrubber for about ten days now when I am in the shop. Those of you following at home will remember when I duck taped a fine particle furnace filter to an inexpensive HD fan and hung it upside down from the garage door opener hanger.

Well, it is starting to get dark with wood dust particles. I can tell a difference when I am running the saws. Unless this thing goes belly up in the next month or so, I am calling this one a success. If you can make an acceptable air scrubber for less than dinner out, then all of you filterless dudes out there needs one of these. It sure beats nothing.
 

CRSINMICH

Well-known member
Joined
Aug 15, 2015
Messages
2,397
Location
Southeastern Michigan
CUSTOM STROP​
Here's a quick, but important, project made from scraps of wood and leather. It's a strop customized for a #3,8 fishtail gouge. I'm going to be doing some simple relief carving and the only thing I know about it at this point is that the tools have to be extremely sharp and they have to stay sharp while in use. As you can see, one side of the strop is convex and the other is concave. (Yet another use for hollows and rounds.) Just after I took these photos I applied some honing compound. The gouge was sharp when I started but after only 10 strokes on each side the improvement was astounding.
 

Attachments

  • Strop for #3,8 gouge (5).jpg
    Strop for #3,8 gouge (5).jpg
    92.6 KB · Views: 43
  • Strop for #3,8 gouge (2).jpg
    Strop for #3,8 gouge (2).jpg
    61.8 KB · Views: 51
  • Strop for #3,8 gouge (3).jpg
    Strop for #3,8 gouge (3).jpg
    50.5 KB · Views: 50

drivesitfar

Well-known member
Joined
Oct 23, 2013
Messages
36,007
Location
Pacific Northwest
Jim: would you mind taking and posting another picture of the back of your homemade filtering system? i'm not sure how you taped it to the fan? do you put the fan on high or do tell how it's working? great idea.

CRS: nice looking homemade tool!!
 

PelicanPines

ALLIANCE MEMBER
Joined
Apr 30, 2014
Messages
38,107
Location
New Jersey, USA, Earth, My own reality
Gonna steal your STROP design. I'm going to continue the leather on the side as well... to give a flat surface strop as well.

The dowel shimmed out with used skivvies was great as well. I always find lining up the grain as you did is key to a good visible dowel fix. My shop teacher in junior HS drilled that into us. Grain... it's all about the grain in everything you do.

My uncle was a cabinet maker who was also into grain big time... whenever he made raised panel doors... in order to eliminate end grain on the top and bottom of the raised panel insert... he picture framed the plank to match the revel of the panel so all the cut edges were cut with the grain.
 

PelicanPines

ALLIANCE MEMBER
Joined
Apr 30, 2014
Messages
38,107
Location
New Jersey, USA, Earth, My own reality
Subscribed to Mary May after watching one of her sharpening vids...

My uncle was wack serious. Made the display cabinets for the African exhibit at the Museum of Natural History in NYCity... also did repair work for several cathedrals. As he explained it... woodworking never made me any big money... make sure you have a real trade if you are going to be a cabinet maker.
 
OP
J

jimreed2160

Well-known member
Joined
Aug 7, 2016
Messages
3,589
Location
Tallahassee FL
My uncle was a cabinet maker who was also into grain big time... whenever he made raised panel doors... in order to eliminate end grain on the top and bottom of the raised panel insert... he picture framed the plank to match the revel of the panel so all the cut edges were cut with the grain.

I have never seen that on antique furniture but it solves one of the big problems of raised panels. I have cut many with handplanes and the cross grained top and bottom can be a problem to get right without tearout. It really depends on the wood. On large panels like those used in doors, this tip looks like it would really save some time. Clever guy, your uncle.
 
OP
J

jimreed2160

Well-known member
Joined
Aug 7, 2016
Messages
3,589
Location
Tallahassee FL
Jim: would you mind taking and posting another picture of the back of your homemade filtering system? i'm not sure how you taped it to the fan? do you put the fan on high or do tell how it's working? great idea.

The original post was on P. 222
https://www.garagejournal.com/forum/showthread.php?t=344153&page=222

I switch it on HIGH when I enter the shop and turn it off when I leave. And I only use it when I am running motorized tools, which is not often. Most of my sessions are two hours or less so the motor does not see really high duty.
 

drivesitfar

Well-known member
Joined
Oct 23, 2013
Messages
36,007
Location
Pacific Northwest
JIM: i just clicked on the link and it didn't work for me. maybe cause I have my personal settings for GJ set at 100 post per page which you and others might consider doing cause it's a lot easier to read fast moving threads or a good thread you haven't seen before.

what post # is your filtered fan on this thread might be easier for me and others to find?

thanks for the Google tip on the cedar picnic benches and i'm sure I can maybe even make a plan myself and just wondered if others here had made one they like the look and like using.

have a great day all!!
 

Bob Heine

ALLIANCE MEMBER
Joined
Oct 24, 2009
Messages
10,705
Location
Boca Raton, Florida
JIM: i just clicked on the link and it didn't work for me. maybe cause I have my personal settings for GJ set at 100 post per page which you and others might consider doing cause it's a lot easier to read fast moving threads or a good thread you haven't seen before.

what post # is your filtered fan on this thread might be easier for me and others to find?

thanks for the Google tip on the cedar picnic benches and i'm sure I can maybe even make a plan myself and just wondered if others here had made one they like the look and like using.

have a great day all!!
Drives, here's the post [#4430]:
https://www.garagejournal.com/forum/showpost.php?p=6965297&postcount=4430
 
To avoid these ads, REGISTER NOW!
Top Bottom