To avoid these ads, REGISTER NOW!

Woodworking 101--Tools and Tips

rrich1

Well-known member
Joined
Oct 7, 2015
Messages
793
I like that drill holder and I'm jealous a little, the Milwaukee version of that drill still isn't available in the states.
Have you tried ordering it from Amazon UK? I've ordered from overseas before with no issues.

Sent from my Pixel XL using Tapatalk
 
To avoid these ads, REGISTER NOW!

rrich1

Well-known member
Joined
Oct 7, 2015
Messages
793
Chest of drawers and night stand update.

I planed the case smooth at the joints and then planed the drawer fronts to the case front. I also installed the drawer runners prior to planning the drawer front down. I sanded to 120 so far to give myself a good surface to measure for the drawer pulls. I drilled for those today and installed the pulls for now. Up next is more sanding to 180 or 220. I also need to fix a small chip out on the front rail that occurred when planing.

I also mounted some grizzly lumber racks. These are just like the portamate but at half the price. $26 instead of $45 (Amazon price). I placed one above my miter station to take advantage of the wasted space. I placed another one where my other lumber storage was basically replacing it. That will be for smaller pieces.

I also picked up some Lee valley goodness. Now I actually need to drill dog holes into my bench. The only thing that has been stopping me is where to place the dog holes. 9cb8f3123d4d4464522aa29fa0a1bbd7.jpg7e116875c4bfba5bb814d56e291f77ca.jpgc277b622bb4139921807b201c6296a67.jpgad1489e4155ea05a3c4324202d84fc3d.jpgb1ff66a97e9f1175782a5214c0c0fcf3.jpg1fe3c65aa3976694c80778b85b9e6ff6.jpg

Sent from my Pixel XL using Tapatalk
 

Attachments

  • c277b622bb4139921807b201c6296a67.jpg
    c277b622bb4139921807b201c6296a67.jpg
    89.6 KB · Views: 1
  • 7e116875c4bfba5bb814d56e291f77ca.jpg
    7e116875c4bfba5bb814d56e291f77ca.jpg
    165.2 KB · Views: 1
  • 9cb8f3123d4d4464522aa29fa0a1bbd7.jpg
    9cb8f3123d4d4464522aa29fa0a1bbd7.jpg
    151.5 KB · Views: 1
  • ad1489e4155ea05a3c4324202d84fc3d.jpg
    ad1489e4155ea05a3c4324202d84fc3d.jpg
    89.2 KB · Views: 1
  • b1ff66a97e9f1175782a5214c0c0fcf3.jpg
    b1ff66a97e9f1175782a5214c0c0fcf3.jpg
    77.8 KB · Views: 1
  • 1fe3c65aa3976694c80778b85b9e6ff6.jpg
    1fe3c65aa3976694c80778b85b9e6ff6.jpg
    119.6 KB · Views: 1

cheechi

Well-known member
Joined
Feb 29, 2012
Messages
4,384
Location
Triad, NC
Have you tried ordering it from Amazon UK? I've ordered from overseas before with no issues.
Every once in a while i look both at amazon.uk and amazon.de but I haven't found a seller that would ship this to the US. Haven't looked in a while though.

I actually would like to ask if anyone would be willing to do me a favour;

I bought a Sargent 409 in decent shape, but with no knob. I don't have any measurements of what the knob should be, other than the base of the knob appears to be 1-1/4" dia on the base. From what I have read a knob for a Stanley #4 would probably fit or be able to be easily modified. I don't really care that it's exactly the same size or shape or style, from the photos on the page it appears to be a taller knob than most Stanleys I have held but that's about 5 or 6 in total. If anyone is willing to turn one out of a suitable hardwood, I'm not really picky about which. If you want to PM me with a cost including shipping.

Mine appears to be a type 4 as it looks like the one here and I don't mind if the knob is just as simple as the one in the photos on this page; I don't have the screw for it so if you would be willing either to countersink or give me an inset flat for a washer depending on what type of screw I can find (so far can't find what threads the body has, hoping to find someplace that has #12 and #14 machine screws I can try with it).

I was hoping I could find a drawer pull or piece of stair/baluster I could butcher for this but all the usual hardware places I go don't have anything suitable. Thanks in advance.

edit: It's a 409 plane. I can't read my own writing. This photo is the closest to mine of those available.
Sargent-Number-409-Smooth-Plane-13.jpg
 
Last edited:

rrich1

Well-known member
Joined
Oct 7, 2015
Messages
793
Drilled dog holes into my workbench. I used the layout based off of Shannon Rogers recommendation. I put a slight round over on the holes.

I also made a hole in one of the legs for the veritas quick clamp. I made the hole deeper than needed and then using a hole saw I made a plug. I drilled a hole for a magnet and pressure fit it into the plug. I then super glued the plug in. This allows for very easy removal and placing it back. http://www.renaissancewoodworker.com/guide-to-workbench-dog-hole-placement/. c5a4caeff94e8b1eb11fd1b29649f510.jpg2fd5971937bf37c1ab74b79be29b4271.jpg6694ea4e23e40b5150cd6988c3a8c524.jpgea25cd78ba7eaecfcac2ac21a3524e15.jpg

Sent from my Pixel XL using Tapatalk
 

Attachments

  • c5a4caeff94e8b1eb11fd1b29649f510.jpg
    c5a4caeff94e8b1eb11fd1b29649f510.jpg
    101.1 KB · Views: 1
  • 6694ea4e23e40b5150cd6988c3a8c524.jpg
    6694ea4e23e40b5150cd6988c3a8c524.jpg
    76.8 KB · Views: 1
  • ea25cd78ba7eaecfcac2ac21a3524e15.jpg
    ea25cd78ba7eaecfcac2ac21a3524e15.jpg
    90.8 KB · Views: 1
  • 2fd5971937bf37c1ab74b79be29b4271.jpg
    2fd5971937bf37c1ab74b79be29b4271.jpg
    72.3 KB · Views: 4

jar944

Well-known member
Joined
Jul 26, 2010
Messages
5,905
Location
Northern VA
Finally got some finish on these file cabinet panels. They were fumed for 30 hours, then sprayed with red mahogany trans-tint dye to correct the color tone and finally two coats of watco Danish oil in medium walnut.
 

Attachments

  • 20181028_200851.jpg
    20181028_200851.jpg
    80.4 KB · Views: 81
  • 20181025_173710.jpg
    20181025_173710.jpg
    66.9 KB · Views: 66
  • 20181028_200332.jpg
    20181028_200332.jpg
    103.5 KB · Views: 63
  • 20181029_171640.jpg
    20181029_171640.jpg
    96.8 KB · Views: 68

rrich1

Well-known member
Joined
Oct 7, 2015
Messages
793
Filing cabinet look good.


that bench is so beautiful. Is it all pine or just most?
It's southern yellow pine with hickory strips for accent. Run down the middle of the legs and match in the top. The leg chop is laminated pine and hickory Pics when I got it all completed. b3af442319371e3014dfe2bc1fad26e9.jpgdd27628bfb28000fd6477e6eb49ca4ae.jpg

Sent from my Pixel XL using Tapatalk
 

Attachments

  • b3af442319371e3014dfe2bc1fad26e9.jpg
    b3af442319371e3014dfe2bc1fad26e9.jpg
    102.1 KB · Views: 1
  • dd27628bfb28000fd6477e6eb49ca4ae.jpg
    dd27628bfb28000fd6477e6eb49ca4ae.jpg
    111 KB · Views: 1

jar944

Well-known member
Joined
Jul 26, 2010
Messages
5,905
Location
Northern VA
Drilled dog holes into my workbench. I used the layout based off of Shannon Rogers recommendation. I put a slight round over on the holes.

I also made a hole in one of the legs for the veritas quick clamp. I made the hole deeper than needed and then using a hole saw I made a plug. I drilled a hole for a magnet and pressure fit it into the plug. I then super glued the plug in. This allows for very easy removal and placing it back. http://www.renaissancewoodworker.com/guide-to-workbench-dog-hole-placement/. c5a4caeff94e8b1eb11fd1b29649f510.jpg2fd5971937bf37c1ab74b79be29b4271.jpg6694ea4e23e40b5150cd6988c3a8c524.jpgea25cd78ba7eaecfcac2ac21a3524e15.jpg

Sent from my Pixel XL using Tapatalk

That is some nice looking CVG SYP on a great looking bench
 

Attachments

  • ea25cd78ba7eaecfcac2ac21a3524e15.jpg
    ea25cd78ba7eaecfcac2ac21a3524e15.jpg
    89.6 KB · Views: 1
  • 6694ea4e23e40b5150cd6988c3a8c524.jpg
    6694ea4e23e40b5150cd6988c3a8c524.jpg
    75 KB · Views: 1
  • 2fd5971937bf37c1ab74b79be29b4271.jpg
    2fd5971937bf37c1ab74b79be29b4271.jpg
    71.1 KB · Views: 1
  • c5a4caeff94e8b1eb11fd1b29649f510.jpg
    c5a4caeff94e8b1eb11fd1b29649f510.jpg
    99 KB · Views: 1

rrich1

Well-known member
Joined
Oct 7, 2015
Messages
793
Just amazing to to me seeing that much pine with no knots.
I think there was 3-4 knots in all of the wood I had. It was purchased from my hardwood store so it was probably higher quality. If you look hard at the bottom front right leg you can see a knot. A second one is underneath at the end but you can't see it in the pic.


Had to fix some tear out on the top right front joint of the chest of drawers. I chiseled it smooth then glued a patch on. After the glue dried I planed and sanded it smooth. While not a perfect repair job it is definitely better than missing wood.

Today I also put sanding sealer on the night stand and chest of drawers. Nice to see a glimpse of the colors together prior to finish.

All that's left is to sand it and apply the coats of finish. I am going to spray them with general finishes Enduro var. It's a water based poly that is supposed to give the appearance of an oil based poly. 67ac320729bfa532b509599845e37a64.jpg52f262bad705c90aead9c541c0b19bc1.jpg2967cf4b8f1ec8037b3fd7b196d43fbd.jpg595dc9a97d7d0fa5741e3a3b00db0253.jpg2b69033ff8bd65b728cc34501ac4e632.jpg

Sent from my Pixel XL using Tapatalk
 

Attachments

  • 595dc9a97d7d0fa5741e3a3b00db0253.jpg
    595dc9a97d7d0fa5741e3a3b00db0253.jpg
    92.1 KB · Views: 1
  • 2967cf4b8f1ec8037b3fd7b196d43fbd.jpg
    2967cf4b8f1ec8037b3fd7b196d43fbd.jpg
    61.2 KB · Views: 0
  • 52f262bad705c90aead9c541c0b19bc1.jpg
    52f262bad705c90aead9c541c0b19bc1.jpg
    59.3 KB · Views: 0
  • 67ac320729bfa532b509599845e37a64.jpg
    67ac320729bfa532b509599845e37a64.jpg
    43.1 KB · Views: 0
  • 2b69033ff8bd65b728cc34501ac4e632.jpg
    2b69033ff8bd65b728cc34501ac4e632.jpg
    91.5 KB · Views: 0

rrich1

Well-known member
Joined
Oct 7, 2015
Messages
793
Aiansly: I really need/want a 4 1/2.


Made a make shift spray booth this week. I attached the plastic sheeting to the garage door rails. I used a box fan to push air out of a window and used my air filtration as well. This worked surprisingly well. I used cloth drop cloths for the floor to keep from slipping from the over spray.


My initial plan was to use General finishes water based Enduro var poly on the chest of drawers and nightstand. That idea was later shot down after I found out it can't be applied over shellac and sanding sealer. I sealed everything with sanding sealer. I tried spraying the bottom of one drawer with the Enduro var and it orange peeled really bad. Luckily I had some arm r seal left over from the gaming table build. I did 2 coats of semi gloss and finished it with one coat of satin today.

This was my first time using my Fuji semi pro 2 hvlp. I was very happy with the sprayer. I cleaned it after every use. I definitely preferred to spray the water based over the oil based poly (fumes). Initially had the syphon cup but purchased the gravity cup as it tool up less room in the hand. I was also hoping to get the shorter drying times of the water based poly instead of the longer dry time of oil based. After each coat I let it cure for 24hrs and sanded with a 400 grit sanding block. Then resprayed. 7 drawers takes up. Lot of room so it took a little longer than Initially wanted. But it is done now. Now to wet sand and buff! 44dcfeba848f519da359bf747e223978.jpg7f224f92ca6734b2032c1b7617a7eea3.jpgde73bb686558247a988dd0178c8aed2d.jpg

Sent from my Pixel XL using Tapatalk
 

Attachments

  • de73bb686558247a988dd0178c8aed2d.jpg
    de73bb686558247a988dd0178c8aed2d.jpg
    135.3 KB · Views: 0
  • 7f224f92ca6734b2032c1b7617a7eea3.jpg
    7f224f92ca6734b2032c1b7617a7eea3.jpg
    78.2 KB · Views: 0
  • 44dcfeba848f519da359bf747e223978.jpg
    44dcfeba848f519da359bf747e223978.jpg
    113.3 KB · Views: 2

Ainsley

Well-known member
Joined
Jun 12, 2014
Messages
557
Location
Ontario, Canada
I’ve had my Fuji semi pro for about 5 years now and love the thing! Just wait until you start using some pre-cat lacquer, you’ll wonder how you used anything else before! I like the ML Campbell stuff
 

ez-duzit

Well-known member
Joined
Jun 24, 2013
Messages
5,094
Location
Marina del Rey
My present project is a ~25" x 59" table for a yacht. Material is doubled 3/4" teak plywood with 1-1/2" solid teak edge. Splines are 1/4" x ~1" Baltic birch ply cut on a 45* angle to the grain. No fasteners--only WEST epoxy glue.

One long edge and two corners had been installed in one glue-up. The rest of the splines and edge were done in this glue-up. Outside corner radius will finish at 6". And the edge will receive a 3/4" bullnose.

#1 photo shows the splines glued in. #2 shows spline detail. #3 shows the lengths I often go through to do an assembly with no fasteners.


To avoid these ads, REGISTER NOW!

cheechi

Well-known member
Joined
Feb 29, 2012
Messages
4,384
Location
Triad, NC
I like file cabinets and those look really nice.

I've been considering getting the purple HF gun for stain & poly. I have a 33 gal in the garage and a 6 gal in the basement where most of the ww gets done. the volume of projects I do probably wouldn't justify purchasing the fuji but it's nice to know when I make a mess of everything what I should have bought.
 

jar944

Well-known member
Joined
Jul 26, 2010
Messages
5,905
Location
Northern VA
I like file cabinets and those look really nice.

I've been considering getting the purple HF gun for stain & poly. I have a 33 gal in the garage and a 6 gal in the basement where most of the ww gets done. the volume of projects I do probably wouldn't justify purchasing the fuji but it's nice to know when I make a mess of everything what I should have bought.

I have the fuji mini mite 4 and have never regret the inital cost. I use it a lot spraying dye stain, shellac, water borne paints and lacquer.

I have a 60gallon 165psi 2 stage compressor and the self contained turbine systems are just less to deal with.
 

Ainsley

Well-known member
Joined
Jun 12, 2014
Messages
557
Location
Ontario, Canada
Dry fitting the base frame. (Upside down obviously) three drawers will be on the front side and a small bookshelf style headboard. Just need a few more long clamps before glue-up.


rrich1

Well-known member
Joined
Oct 7, 2015
Messages
793
Finished! Three coats of arm r seal (2 semi gloss and 1 satin). Finished by wet sanding with 600 grit and buffed with paste wax and 0000 steel wool. Shown next to the hamper I made back in March. dd7eda885e9e9f62df39b3bacbfaca9a.jpg7037e13efa9f10bbef43a91095fbfb02.jpgcdb3c45841deef93b1d4525f8c861e66.jpgc330aac1ff2dcc02f10386b598b75af5.jpg55d4534132f0b0dabf1f95c6cb5a7d8b.jpge20b344643b015d1f3433b7a09e19c64.jpg27a3ace350145c2d3598b97a45937cdd.jpg32d32c22d8eb05b88d3d51b1ab22c549.jpg7df6801f1782acdef8d4b873c315d672.jpg

Sent from my Pixel XL using Tapatalk
 

Attachments

  • 32d32c22d8eb05b88d3d51b1ab22c549.jpg
    32d32c22d8eb05b88d3d51b1ab22c549.jpg
    68.6 KB · Views: 2
  • 7df6801f1782acdef8d4b873c315d672.jpg
    7df6801f1782acdef8d4b873c315d672.jpg
    61 KB · Views: 0
  • e20b344643b015d1f3433b7a09e19c64.jpg
    e20b344643b015d1f3433b7a09e19c64.jpg
    68.2 KB · Views: 0
  • 55d4534132f0b0dabf1f95c6cb5a7d8b.jpg
    55d4534132f0b0dabf1f95c6cb5a7d8b.jpg
    79.5 KB · Views: 0
  • c330aac1ff2dcc02f10386b598b75af5.jpg
    c330aac1ff2dcc02f10386b598b75af5.jpg
    85.3 KB · Views: 0
  • cdb3c45841deef93b1d4525f8c861e66.jpg
    cdb3c45841deef93b1d4525f8c861e66.jpg
    56 KB · Views: 0
  • 7037e13efa9f10bbef43a91095fbfb02.jpg
    7037e13efa9f10bbef43a91095fbfb02.jpg
    64.3 KB · Views: 0
  • dd7eda885e9e9f62df39b3bacbfaca9a.jpg
    dd7eda885e9e9f62df39b3bacbfaca9a.jpg
    66.4 KB · Views: 0
  • 27a3ace350145c2d3598b97a45937cdd.jpg
    27a3ace350145c2d3598b97a45937cdd.jpg
    75.9 KB · Views: 0

turbowoodworker

Well-known member
Joined
Mar 18, 2012
Messages
3,522
Location
Apex NC
Some really nice projects here lately. Nice work and thanks for posting.

EZ, can you share how you constructed your curved moldings? I see you will finish with a bullnose after glue up.

Thanks to all, Rick
 

ez-duzit

Well-known member
Joined
Jun 24, 2013
Messages
5,094
Location
Marina del Rey
1--that turned out very well.

t--I made patterns from 1/2" plywood, which I used with a pattern follower bit, routing ~3/16" deep with a hand-held router. Then I saber sawed off the excess, leaving ~1/8"+ of material to remove with a long pattern follower bit on the router table. I did this for inside and outside radii, which then required very minimal hand work to fit. The spline grooves were cut using a 1/4" slotting cutter; the corner pieces were slotted before cutting them out of the board, to avoid handling small, individual pieces.
 

ez-duzit

Well-known member
Joined
Jun 24, 2013
Messages
5,094
Location
Marina del Rey
A couple photos with the table shaped and installed. The radius'd corners were shaped using a handheld router with pattern follower bit. The solid edging was first surfaced using a card scraper to get it flush with the veneered plywood. Then a 3/4" carbide round-over bit was used to produce the bullnose to match existing features on the 106' yacht.

Hydraulic pedestals allow it to be lowered to make up a bed. Someone else will do the varnish, carpet, etc.


Last edited:

JJ99SS

ALLIANCE MEMBER
Joined
Dec 19, 2014
Messages
187
This is an awesome thread. I absolutely loved taking wood shop. I took three years of it in Jr High as an elective. I loved working on the lathe the most. Almost lost a digit running a piece of lumber the wrong way in a planer(?). Fun stuff. Our teacher Mr. Loeb was missing a finger as well. We learned a bit of drafting too. In fact my mother still has a little cracker holder I made for her. My Dad's army Medals are in a little shadow box I made.

I would LOVE to wood work again but have no space for all the necessary tools and benches. One day I'd love to get a separate shop on some property. I have lots of mechanics tools and very few woodworking...
 

ScottsGT

Well-known member
Joined
Jan 1, 2014
Messages
4,883
Location
Lake Wateree, SC
@JJ99SS
I guess I shouldn’t complain about working out of my garage and using benchtop tools. I often wake up in cold sweats from a nightmare where I live in a tiny house with no garage or workshop.
 
OP
J

jimreed2160

Well-known member
Joined
Aug 7, 2016
Messages
3,589
Location
Tallahassee FL
JJ--Welcome to the thread. Please don't get discouraged by your lack of space. I grew up using my dad's woodshop that was chuck full of tools. But when I went out on my own my first place was a one bedroom apt in married student housing. The 3x5 front porch was my shop and my tools consisted of some screwdrivers, a coping saw, a square, and a 3/8" chisel. My ww stock was cut offs scavenged from a dumpster. But I managed to hack out several projects to include a hand carved chess set and TWO grandfather clock kits.

Woodworking gets in your blood and lack of space can be overcome by using your unlimited imagination. Follow your passion and make some shavings. Good luck.
 

Bob Heine

ALLIANCE MEMBER
Joined
Oct 24, 2009
Messages
10,703
Location
Boca Raton, Florida
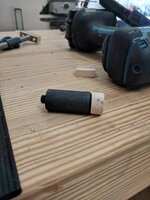
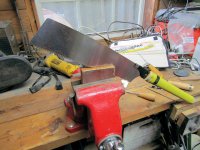
I have been working on cars and doing yard work for the past few weeks and missed my shop time. While putting stuff away in the workshop I knocked over one of my mini planes for the umpteenth time. It just missed going off the edge of the bench so I stopped cleaning up. I found a scrap of wood that would make a base as well as a strip that would make some sides for a tray. After I cut the base to length and width on the radial arm saw, I realized the 3/4" thick base was too thick. Rather than plane it down I used the Japanese pull saw to split the piece in half.

attachment.php


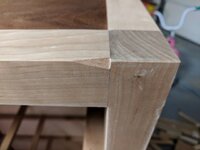
I coulda, woulda, shouda carefully measured the side pieces and made precise box joint cuts. After all, I have a mini box joint template for the Porter Cable jig but this isn't a piece of furniture and I don't want to be too attractive or SWMBO might appropriate it. Eyeballed the cuts.
attachment.php


The base was a former broken side of a stool for the sewing machine. It had been "antiqued" so I planed off the paint. I also planed off the other side and left some plane marks.
attachment.php


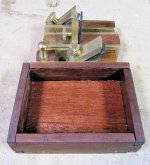
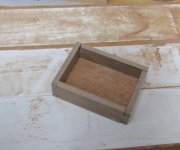
Grabbed the glue bottle and then thought better of it. I used up 8 tiny finishing brads and pressed them home with the vise (better than seventeen hammer marks). Rather than sandpaper on blocks, I smoothed the tray with pressure sensitive adhesive sanding strips stuck to a piece of shelving (120-, 220-, and 400-grit). Flipping the tray to do the sides, top and base on the paper was easier than clamping the tray and sanding with blocks. The 120-grit at the top did most of the work, as evidenced by the amount of dust.

attachment.php


I have a squeeze bottle of Boiled Linseed Oil in the shop so I just gave it a quick coat. In a few days (more likely weeks) I'll give it more attention.
attachment.php


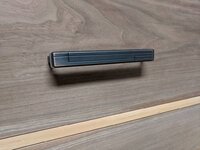
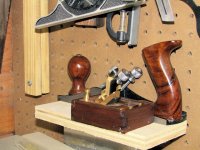
The mini planes fit perfectly.
attachment.php


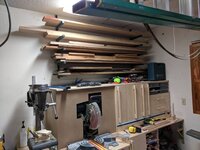
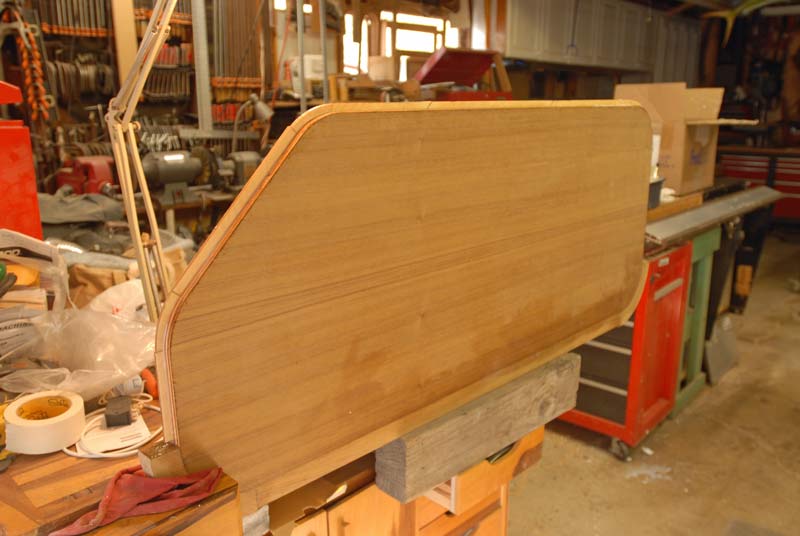
I don't have a permanent spot for the tray but there's room on the pegboard shelf that holds the Harbor Freight plane.
attachment.php


This is pretty crude work but I wanted to post it for those who don't have a shop full of power woodworking tools. This whole two hour project could have been done with simple hand tools (Japanese saw, 1/4" chisel, 1/16" drill bit, tack hammer). I only used the radial arm saw because it's there.
 

Attachments

  • Plane Box 6.jpg
    Plane Box 6.jpg
    62.7 KB · Views: 577
  • Plane Box 7.jpg
    Plane Box 7.jpg
    103.9 KB · Views: 579
  • Plane Box 5.jpg
    Plane Box 5.jpg
    129.8 KB · Views: 579
  • Plane Box 2.jpg
    Plane Box 2.jpg
    60.1 KB · Views: 576
  • Plane Box 3.jpg
    Plane Box 3.jpg
    106 KB · Views: 578
  • Plane Box 1.jpg
    Plane Box 1.jpg
    108.5 KB · Views: 584
  • Plane Box 4.jpg
    Plane Box 4.jpg
    73.9 KB · Views: 581
To avoid these ads, REGISTER NOW!
Top Bottom