
You are using an out of date browser. It may not display this or other websites correctly.
You should upgrade or use an alternative browser.
You should upgrade or use an alternative browser.
Woodworking 101--Tools and Tips
- Thread starter jimreed2160
- Start date

ez-duzit
Well-known member
j--those turned out very well.
OP
jimreed2160
Well-known member
Jar--Nice doors. I like the thickness. Much of the primitive furniture I have worked on was made of extra thick stock and I liked the look. Some of my projects have 5/4 tops, etc. Kinda adds a nice sturdy touch.
CRSINMICH
Well-known member
jar: Those are some stout door frames. What kind of cabinet will they go on? The jig you used in the video was great.
jar944
Well-known member
Thanksj--those turned out very well.
Jar--Nice doors. I like the thickness. Much of the primitive furniture I have worked on was made of extra thick stock and I liked the look. Some of my projects have 5/4 tops, etc. Kinda adds a nice sturdy touch.
I prefer the deeper profile, since I feel it's really noticeable that they are different than standard off the shelf units (as if the beaded inset look wasn't enough in and of itself). The other thing I do is try to gang as many boxes to one face frame to not leave any visible seams/joints between cabinets. Again just a small thing but something I notice.
Thanksjar: Those are some stout door frames. What kind of cabinet will they go on? The jig you used in the video was great.
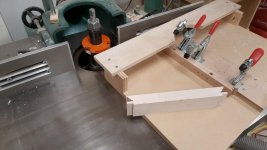
These specific doors are going in a hall tree/ mudroom bench off the pantry I built last year.
As for the coping sled, it's just some 3/4 mdf, scrap ply and some knock off destako clamps. It's a loose copy of a commercial version I saw somewhere. The top "rail" rides against the fence since my shapers don't have a miter slot.
Attachments


OP
jimreed2160
Well-known member
Jar--Very nice work.
Catfishdan
Well-known member
Great work on that box CRS...
Practice makes perfect right?
.....................................................................................
Can anybody here give me some suggestions about how to make this brand new hammer handle look more appropriate and better match the head?
This hammer head came from the estate of my father’s father. Since I am 70 y.o., this is definitely an old hammer.
I’m thinking of passing it down to my grandson who is now only 4. (maybe not for a few more years though...)
The new handle was installed by a great guy, fellow GJ member d42jeep.

I like to burn new handles slightly with a torch to bring out the grain, then coat them in BLO.
jar944
Well-known member
Jar--Very nice work.
Thanks
OP
jimreed2160
Well-known member
Shift--Sorry I missed your hammer. I often rehandle heads and the look is sometimes not pleasing. Old head and spanking new wood looks inappropriate. The real cure is throw the hammer into a toolbox and use it. But you can mitigate the shock with light stain and BLO. I like Minwax cherry and Special Walnut.
NickTheGreat
Well-known member
This is a fun thread. Should keep me busy for a couple of days!
OP
jimreed2160
Well-known member
Plane storage
Big ones are hard to store. I had these under a workbench but they were collecting lots of dust. So I moved them into one of my new tool chests where they fit just fine.
#8--The iron is full width and is used for jointing.
#8--This iron is cambered slightly and is used to clean up behind my scrub.
#6--Fore plane used after scrub.
LN#7C--My favorite plane. I use this for jointing and for fine work after scrubbing. The blade has relieved corners so it does not dig in if lateral adjustment is just slightly off.
Attachments

acer66
Well-known member
Yes, looks very good also like the floor.
HenryAZ
MEMBER EMERITUS
Most pictures of planes I see them stored like this, with the blade down. I was taught (25 years in custom millwork) to lay planes on their sides, to protect the iron's edge. I suppose just for storage, with an appropriate soft surface to lay them on, upright would be ok. But I always using mine, and laid them on their side, and stored them in a workbench drawer with just a plywood bottom. Any thoughts on this?Plane storage
Last edited:
rlitman
Well-known member
Most pictures of planes I see them stored like this, with the blade down. I was taught (25 years in custom millwork) to lay planes on their sides, to protect the iron's edge. I suppose just for storage, with an appropriate soft surface to lay them on, upright would be ok. But I always using mine, and laid them on their side, and stored them in a workbench drawer with just a plywood bottom. Any thoughts on this?
With a wooden or other “soft” drawer bottom, edge down is safest. You don’t want to plane a finger or have the iron hit another plane frame.
Last year, I made kydex sole covers for my smaller planes so I can toss them in a tool bag and bring them places.
Clear lacquer (nitro) then put it by a window and it’ll age in the sun by itselfGreat work on that box CRS...
Practice makes perfect right?
.....................................................................................
Can anybody here give me some suggestions about how to make this brand new hammer handle look more appropriate and better match the head?
This hammer head came from the estate of my father’s father. Since I am 70 y.o., this is definitely an old hammer.
I’m thinking of passing it down to my grandson who is now only 4. (maybe not for a few more years though...)
The new handle was installed by a great guy, fellow GJ member d42jeep.
tymbo
Well-known member
Most pictures of planes I see them stored like this, with the blade down. I was taught (25 years in custom millwork) to lay planes on their sides, to protect the iron's edge. I suppose just for storage, with an appropriate soft surface to lay them on, upright would be ok. But I always using mine, and laid them on their side, and stored them in a workbench drawer with just a plywood bottom. Any thoughts on this?
I have been waiting for someone to bring this up. I was taught the same thing!

hsvtoolfool
Well-known member
While using the plane, yes lay them on their side
to avoid dulling the blade. Also, don't drag the plan
on the back stroke while planing. Tilt the plane a bit
to the side so the blade clears the work on the back
stroke.
Retract the blade depth while storing and lay it flat
in a secure place. For long term storage, I loosen the
level cap screw a little so the cap-iron isn't under tons
of pressure. It only takes a moment to re-tune the
plane next time.
OP
jimreed2160
Well-known member
Plane storage
If you are looking for controversy, plane storage is a great place to start. Everyone has strong opinions on this subject. It is complex issue because there are so many variables. Rather than join up sides, I will add some observations.
To begin with, wooden planes have their own set of needs. I have found it best to relieve the wedges on woodies after projects. My experience with hundreds of wooden planes is that they fare badly in storage. Blades rust, cheeks blow out, wedges get stuck, etc. When I finish a project, I loosen the wedges before I put my planes back in storage. My user woodies are stored in plastic tool boxes and kept inside the house. It works for me.
Here in Florida, metal planes rust. My experience with hundreds of vintage metal planes is that storing them with the sole down seems to protect the sole from excessive rust. But some planes have terribly pitted soles from downside storage. Some of them look like they were stored in dirt. So it depends on what the sole is in contact with. I got a rust line on a LN plane because it was sitting on a glue joint. My guess is that it was caused by condensation. Plane soles sitting on wood hardly ever rust but blades exposed to condensation do.
Trial and error will lead the way for each craftsman to decide what works best in his particular shop.
ez-duzit
Well-known member
...Retract the blade depth while storing and lay it flat in a secure place...
You're fooling.
My planes are stored ready to use. Just pick it up and use it.
rlitman
Well-known member
You're fooling.
My planes are stored ready to use. Just pick it up and use it.
I'm with you. I haven't got time to fool around completely resetting my iron every time I need it. A little tweak here and there is fine, but retracting it every time I put it away; no way.
Bob Heine
ALLIANCE MEMBER
Jim, I've had good luck storing my planes on wooden shelves with a shallow groove where the iron protrudes.Plane storage
Plane soles sitting on wood hardly ever rust but blades exposed to condensation do.
Trial and error will lead the way for each craftsman to decide what works best in his particular shop.
Attachments

Blue Frog
Well-known member
I've been away for a couple of months - we had an unpleasant visitor on 10/10 that took away most of our infrastructure and I finally had internet reconnected again today.
I've missed you guys! It's good to see all the items that you're working on.
Blue
I've missed you guys! It's good to see all the items that you're working on.
Blue
OP
jimreed2160
Well-known member
Blue--Welcome back. That storm was a big hit. Hope you are recovering well.
HenryAZ
MEMBER EMERITUS
I guess that points out one aspect of plane storage. Are they a "collection", or are they daily "users". Mine were all daily users, so they were ready to go, on their sides. If I were keeping a collection, I would probably use one of the other methods suggested here.My planes are stored ready to use. Just pick it up and use it.
M_George
Well-known member
Plane storage
If you are looking for controversy, plane storage is a great place to start. Everyone has strong opinions on this subject. It is complex issue because there are so many variables. Rather than join up sides, I will add some observations.
To begin with, wooden planes have their own set of needs. I have found it best to relieve the wedges on woodies after projects. My experience with hundreds of wooden planes is that they fare badly in storage. Blades rust, cheeks blow out, wedges get stuck, etc. When I finish a project, I loosen the wedges before I put my planes back in storage. My user woodies are stored in plastic tool boxes and kept inside the house. It works for me.
Here in Florida, metal planes rust. My experience with hundreds of vintage metal planes is that storing them with the sole down seems to protect the sole from excessive rust. But some planes have terribly pitted soles from downside storage. Some of them look like they were stored in dirt. So it depends on what the sole is in contact with. I got a rust line on a LN plane because it was sitting on a glue joint. My guess is that it was caused by condensation. Plane soles sitting on wood hardly ever rust but blades exposed to condensation do.
Trial and error will lead the way for each craftsman to decide what works best in his particular shop.
I would also advise cleaning the plane before storing it. I've seen many planes that had wood left between the cap iron and blade that became pitted. Once they get pitted it's nearly impossible to get them sharp again.
OP
jimreed2160
Well-known member
I would also advise cleaning the plane before storing it. I've seen many planes that had wood left between the cap iron and blade that became pitted. Once they get pitted it's nearly impossible to get them sharp again.
Good tip. Shavings and chips do seem to attract rust. But sharpening is just removing metal. For pitting, you have to remove to the level of the pits. I would use "frustratingly time consuming" instead of "nearly impossible". Especially vexing when you realize that you caused the mess in the first place. As mama admonished, there are many good reasons to be tidy.
jar944
Well-known member

OP
jimreed2160
Well-known member
Nice work.
raskal
Well-known member
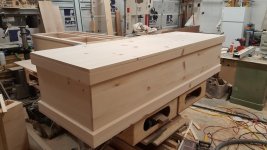
That is exactly what a coffin should be imo. I'm amazed at what funeral homes charge for one
NickTheGreat
Well-known member
That's really nice. I heard a podcast about a fellow who built his coffin with his father. It was a really touching story. He wrote a book about it that I may try to read sometime.
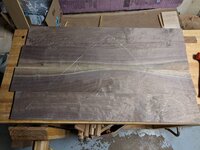
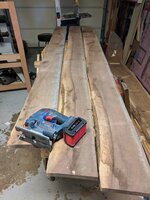
So a few things have happened in the last month.
1st we had our 3rd child, Lincoln Blaine.
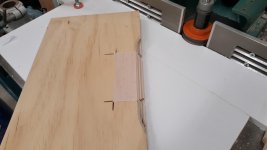
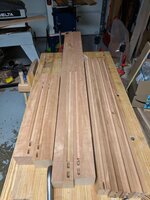
2nd I started on my Owens bed to match his chest of drawers and nightstand. This will be a twin size storage bed. I milled the lumber and laminated the pieces for the legs to make them thicker. I borrowed a friend's domino and used that for the joinery of the head and foot boards. I then picked out some walnut boards from my pile and rough cut them to length. They are wider than my jointer so I made a rabbet cut. I then used a sled to run them through the planer. I still had the domino so I used it to help align the panels in glue up. worked great as it let them nearly perfectly flat. Lastly I routed the groove for the walnut panels. Maybe tomorrow I can get the panels out of clamps and sand them down in the drum sander. Christmas stuff today.


Sent from my Pixel XL using Tapatalk
1st we had our 3rd child, Lincoln Blaine.
2nd I started on my Owens bed to match his chest of drawers and nightstand. This will be a twin size storage bed. I milled the lumber and laminated the pieces for the legs to make them thicker. I borrowed a friend's domino and used that for the joinery of the head and foot boards. I then picked out some walnut boards from my pile and rough cut them to length. They are wider than my jointer so I made a rabbet cut. I then used a sled to run them through the planer. I still had the domino so I used it to help align the panels in glue up. worked great as it let them nearly perfectly flat. Lastly I routed the groove for the walnut panels. Maybe tomorrow I can get the panels out of clamps and sand them down in the drum sander. Christmas stuff today.
Sent from my Pixel XL using Tapatalk
Attachments
-
 93519a038f5d41d8f35f82c8b55c22df.jpg82.8 KB · Views: 3
 -
 2bba86e5592b7ba1f5e87386994f8e7b.jpg109.2 KB · Views: 0
 -
 5ad2435a04fabf5971f50a02edfe78e2.jpg99.2 KB · Views: 0
 -
 902c7894e750b4594f78cf3f98ce1372.jpg106.2 KB · Views: 0
 -
 83215e875841bd51cabefe15e5a34e3c.jpg107.2 KB · Views: 0
 -
 299df82f17c9fefe5a647a2d5e36a507.jpg109.1 KB · Views: 0
 -
 d84f2838bd1f4a1c3737d6176ec40b21.jpg103 KB · Views: 0
Congratulations!So a few things have happened in the last month.
1st we had our 3rd child, Lincoln Blaine.
2nd I started on my Owens bed to match his chest of drawers and nightstand. This will be a twin size storage bed. I milled the lumber and laminated the pieces for the legs to make them thicker. I borrowed a friend's domino and used that for the joinery of the head and foot boards. I then picked out some walnut boards from my pile and rough cut them to length. They are wider than my jointer so I made a rabbet cut. I then used a sled to run them through the planer. I still had the domino so I used it to help align the panels in glue up. worked great as it let them nearly perfectly flat. Lastly I routed the groove for the walnut panels. Maybe tomorrow I can get the panels out of clamps and sand them down in the drum sander. Christmas stuff today.
Sent from my Pixel XL using Tapatalk


Eric
Attachments
-
 d84f2838bd1f4a1c3737d6176ec40b21.jpg101.4 KB · Views: 0
 -
 299df82f17c9fefe5a647a2d5e36a507.jpg106.4 KB · Views: 0
 -
 83215e875841bd51cabefe15e5a34e3c.jpg105.1 KB · Views: 0
 -
 902c7894e750b4594f78cf3f98ce1372.jpg103.1 KB · Views: 0
 -
 5ad2435a04fabf5971f50a02edfe78e2.jpg97.7 KB · Views: 0
 -
 2bba86e5592b7ba1f5e87386994f8e7b.jpg106.7 KB · Views: 0
 -
 93519a038f5d41d8f35f82c8b55c22df.jpg80.5 KB · Views: 1
CRSINMICH
Well-known member
rrich: Congratulations all around! I am impressed with the quality of your work, including the bed, but what really impressed me was that you were able get so much woodworking done with a newborn and two other children around. Your wife is a saint! Don't lose sight of that. You're a lucky guy.
Last edited:
ez-duzit
Well-known member
1--congratulations.
Duker
Well-known member
So a few things have happened in the last month.
1st we had our 3rd child, Lincoln Blaine.
2nd I started on my Owens bed to match his chest of drawers and nightstand. This will be a twin size storage bed. I milled the lumber and laminated the pieces for the legs to make them thicker. I borrowed a friend's domino and used that for the joinery of the head and foot boards. I then picked out some walnut boards from my pile and rough cut them to length. They are wider than my jointer so I made a rabbet cut. I then used a sled to run them through the planer. I still had the domino so I used it to help align the panels in glue up. worked great as it let them nearly perfectly flat. Lastly I routed the groove for the walnut panels. Maybe tomorrow I can get the panels out of clamps and sand them down in the drum sander. Christmas stuff today.
Sent from my Pixel XL using Tapatalk
Congrats on the new addition to the family!! When we got our third child we could no longer play man on man and had to shift to zone defense! Three will keep you busy! Have a Merry Christmas!
Sent from my iPad using Tapatalk Pro
Bob Heine
ALLIANCE MEMBER
Rrich1, Congratulations! Now you have to make sure Lincoln gets birthday presents that have no connection to Christmas. And no excuse like "we got you a bigger present to cover both events."
Bob Heine
ALLIANCE MEMBER

slodat
ALLIANCE MEMBER


ez-duzit
Well-known member
s--looks like you had some difficulty with fitting the finger joints.