To avoid these ads, REGISTER NOW!

Woodworking 101--Tools and Tips

cdsloop

Well-known member
Joined
Jul 28, 2015
Messages
88
Location
Central North Carolina
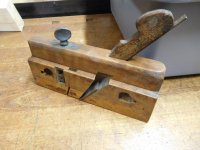
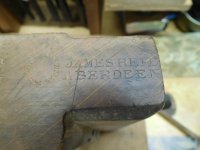
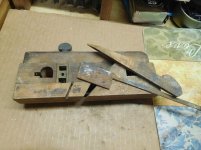
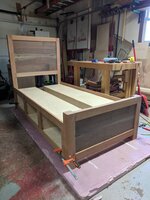
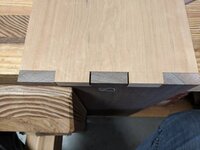
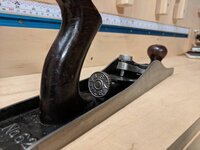
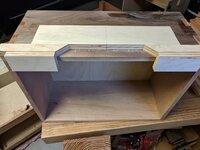
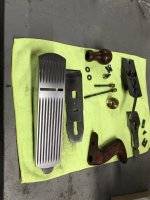
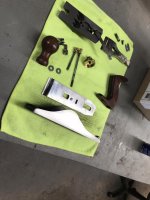
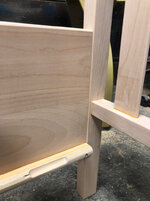
Hello, all. Over the last couple of weeks I have read this thread from front to back. Needless to say, I am quite impressed with the quality of work displayed here and the willingness to share in your vast experience. I have been on a ww kick as of late, in the midst of my other hobbies and work. My latest project completed was an end table dog kennel that I finished up last week. In order to complete that, I needed to tune up several of my tools, and fabricate some much needed jigs that have been on my list for some time. I did a complete table saw tune-up, which included new arbor bearings, pulley, and belt. Once that was complete, I was able to knock out a table saw sled modeled after the one that King's Woodworking made in his YouTube video. Currently I am building a drill press table with a fence and storage drawers, as well as a finger joint jig for my router table. I'm hoping to finish up the finger joint jig this evening so I can make my bride a quick trinket box for Valentine's Day. I'll try to remember to take some pictures tonight so I can contribute to the thread. Thanks for all of the advice that all of you have been willing to share!
 
To avoid these ads, REGISTER NOW!

cdsloop

Well-known member
Joined
Jul 28, 2015
Messages
88
Location
Central North Carolina
Greetings, Turbo. I live in rural Rowan County, about 45 minutes north of Charlotte. I had hoped to have my box joint jig finished this evening, and run a set of test panels. But when I looked again at what I glued up on Friday, I realized that I had used a 1/2" router bit instead of the 3/8" that I really intended to use. So I had to make another fence plate for the jig. The glue is drying now. But here's what I have done so far.
IMG_20190212_002217.jpg
Once I got the fence plate glued up, I started on the drill press table again. It's made of 2 pieces of 3/4 plywood that I had left over from another project. I glued them together, and then added a piece of 1/4" MDF on top. All that will be screwed to a 1-1/4" plate that I glued up out of scrap 2x4's. The main purpose of the plate was to give clearance for the table crank to rotate. I will band it with oak 3/4 boards, install t-slots for the fence, and build 4 drawers for underneath for bit storage. The drawers are the main reason for building the box joint jig.
IMG_20190212_001932.jpg
Here's my sled modeled after the one King's Woodworking built.
IMG_20190212_002023.jpg
And here's the end table kennel I finished up last week for the wife and the newest addition to the family.
IMG_20190204_224757.jpg IMG_20190204_224734.jpg
Not nearly as impressive as many of the projects I have seen in this thread, but I make do with the old equipment and space that I have. Happy sawdusting!
 
OP
J

jimreed2160

Well-known member
Joined
Aug 7, 2016
Messages
3,589
Location
Tallahassee FL
CD--Welcome to the thread. Always good to hear from someone from back home. I grew up just down the road in Gastonia. You live in a great area for local hardwoods (walnut & cherry, especially). The kennel/coffee table is clever and a nice place to keep your fur baby out of trouble.
 
OP
J

jimreed2160

Well-known member
Joined
Aug 7, 2016
Messages
3,589
Location
Tallahassee FL
Cleanup surprise

My cleanup continues and I have moved most of my handplanes from inside the house to the shop. Yesterday I moved three book boxes of woodies and I had time to look at them today. Imagine my surprise when I picked up 1/2 of a very old sash plane. It was made by James Reid of Aberdeen! Maybe my long lost cousin from the old country. Who knows? Mr Google says he was making planes around the time of the US Civil War.

The piece I have is the skew rabbet half. The front muntin profile is missing as is the shoe of the depth adjuster. There is boxwood boxing on the sole.

Cleaned up well with turpentine and a little scrubbing. I waxed it and honed the blade. Yes, it does work but this one is destined to be a shop mascot.
 

Attachments

  • DSCN8477.jpg
    DSCN8477.jpg
    152.8 KB · Views: 86
  • DSCN8474.jpg
    DSCN8474.jpg
    148 KB · Views: 87
  • DSCN8472.jpg
    DSCN8472.jpg
    118.2 KB · Views: 85
  • DSCN8471.jpg
    DSCN8471.jpg
    147.9 KB · Views: 91

R_einan

Well-known member
Joined
Aug 29, 2016
Messages
461
Location
Eastern WA
Spent some of today working on a pair of planes that were my great grandfather’s, one is a Stanley no. 3, type 15 (circa 1930-1933) and the other is a Siegley No. 7 jointer of almost 22 in. The Siegley was made prior to ‘26 and is a StS model with a corrugated sole. I glass bead blasted them to remove all the rust and chipped paint then worked on repolishing the reference faces (sides and soles) before I spray them.
 

Attachments

  • 79551C58-CEE1-4214-A76C-A5B9B9780247.jpg
    79551C58-CEE1-4214-A76C-A5B9B9780247.jpg
    124.2 KB · Views: 87
  • B3C7CEBC-1976-4742-81BD-989EA9D93E28.jpg
    B3C7CEBC-1976-4742-81BD-989EA9D93E28.jpg
    82.7 KB · Views: 88

R_einan

Well-known member
Joined
Aug 29, 2016
Messages
461
Location
Eastern WA
Thanks Jim, I’m stuck at work today so not really any progress will be made, but I did source a reasonably local company that will refinish the Stanley’s lever-cap in bright nickel for me.
 

cdsloop

Well-known member
Joined
Jul 28, 2015
Messages
88
Location
Central North Carolina
Better late than never, but I got my wife's Valentine's Day gift sanded and ready for finish tonight. (Disclaimer: I did have it put together, and it contained a bottle of nice perfume on Valentine's Day.) This was my first time making anything with finger joints. Finger joints were made with my homemade jig with the router.
IMG_20190218_222608.jpg
IMG_20190218_222624.jpg
IMG_20190218_222655.jpg
 

CRSINMICH

Well-known member
Joined
Aug 15, 2015
Messages
2,397
Location
Southeastern Michigan
SMALL PARTS JIG​
I needed to cut a 3/16" X 3/16" groove at the top and bottom edge of four sides of a box. The grooves will hold the bottom of the box and a sliding top. It was a job for a Stanley #45 fittted with a 3/16" blade and the depth stop set at 3/16". It would have been a simple job if the wood was thicker than 7/16". It wasn't. I decided to make a Small Parts jig so that the Stanley's fence would have something substantial to register against to keep the groove consistent.

I cut rabbet along one edge of an 18" section of 1 X 2 (using a Stanley #78.) which was then cut into sections of various lengths. I screwed the pieces onto the top of a 3/4" X 24" piece of MDF which had a factory edge. The rabetted pieces acted like toe clamps and held the workpiece tight to the flat face of the MDF. The edge of the workpiece was carefully alligned along the factory edge of the MDF. Once the jig was clamped to the bench between a tail vise and a dog I was ready to groove.

To make a long story slightly shorter, all I had to do was insert the workpiece, tighten the clamps, then use the #45 to cut the groove. The workpiece was then rotated 180 degrees to cut the groove on the opposite side. I finished all 8 grooves in less than 10 minutes - once I had the jig made.

If I did this kind of operation fairly frequently, I'd take the time to make a jig with moveable fences and toggle clamp hold-downs.

The wood was white oak and the groove you see in the picture had to be cut against the grain. I should have taken the time to remove the shreds before I took the picture.
 

Attachments

  • Small parts jig (1).jpg
    Small parts jig (1).jpg
    146.6 KB · Views: 56
  • Small parts jig (2).jpg
    Small parts jig (2).jpg
    150 KB · Views: 53
  • Small parts jig (3).jpg
    Small parts jig (3).jpg
    86.9 KB · Views: 63
  • Small parts jig (4).jpg
    Small parts jig (4).jpg
    109.1 KB · Views: 56
Last edited:
OP
J

jimreed2160

Well-known member
Joined
Aug 7, 2016
Messages
3,589
Location
Tallahassee FL
CRS--Clever solution. Once you have the workpiece fastened down, the plane work is pretty easy. I generally use dogs for holding and use the side of the bench for reference. But sometimes that just does not work.
 

CRSINMICH

Well-known member
Joined
Aug 15, 2015
Messages
2,397
Location
Southeastern Michigan
CHECK YOUR SQUARES
If you look at the first picture of my previous post you'll notice a pencil line perpendicular to the factory edge of the MDF. I don't remember why I did that but it gave me an idea. I tested the squareness of the Lufkin combination square I used to draw the line. I held the square with the handle pointing to the left then drew the line. Next, I flipped the handle to the right and checked to see if the pencil line still was in line with the blade. It was. It was so quick and simple that I tested all of the squares in my shop. They all worked correctly but it was worth the time to test the accuracy of an important shop tool.


I saw Norm Abrams do this years ago on This Old House.
 
Last edited:
OP
J

jimreed2160

Well-known member
Joined
Aug 7, 2016
Messages
3,589
Location
Tallahassee FL
CRS--Good tip on checking a square. It also works on levels--just turn it around 180 degrees and you should see the same reading. I also like your tip of checking all the shop tools. One time I picked up a level from my collector pile and assumed it was calibrated. BUT it was not as I found out much later.
 

HenryAZ

MEMBER EMERITUS
Joined
Sep 18, 2012
Messages
1,054
Location
South Congress AZ
CHECK YOUR SQUARES
If you look at the first picture of my previous post you'll notice a pencil line perpendicular to the factory edge of the MDF. I don't remember why I did that but it gave me an idea. I tested the squareness of the Lufkin combination square I used to draw the line. I held the square with the handle pointing to the left then drew the line. Next, I flipped the handle to the right and checked to see if the pencil line still was in line with the blade. It was. It was so quick and simple that I tested all of the squares in my shop. They all worked correctly but it was worth the time to test the accuracy of an important shop tool.


I saw Norm Abrams do this years ago on This Old House.

This of course assumes that edge of the MDF (or whatever material) is perfectly straight for a valid test.
 

rrich1

Well-known member
Joined
Oct 7, 2015
Messages
793
New shop upgrade! A used 1.75 PCS came up at my wood store on consignment and it was too good to pass up. I sold my delta contractor saw in a day on FB marketplace. Finally got the SS last week after 3 weeks of not having a saw. Weather and other factors kept pushing back me from getting the saw. Since then I got the drawers made up for the storage bed I've been working on. Tomorrow I plan to start gluing the drawers up.

During the box joint process I managed to cut on the wrong sides of the line for the middle cuts. This left me some gaps. I had left over stock from cutting the pieces down to the right height. I put those through the drum sander and glued them on. Shouldn't be able to tell once they are planed, sanded, and finish is applied. 8b6716c6cb4c5bb0d9869848a9e5d5f5.jpgbc91693d7bee3f3895d0ddc89c855c3d.jpgf0cfd3d51247bd08d10f67adfb414877.jpg186738d76bc9d07d182acdd321c72dc2.jpg1494b1c7e04a12340c57d40f4f62d6bf.jpgc8e19ac0512bffe25ef1b41e1cbbf709.jpg25c724902622c13b9ff7feec19339f6a.jpg

Sent from my Pixel XL using Tapatalk
 

Attachments

  • 25c724902622c13b9ff7feec19339f6a.jpg
    25c724902622c13b9ff7feec19339f6a.jpg
    84.8 KB · Views: 1
  • c8e19ac0512bffe25ef1b41e1cbbf709.jpg
    c8e19ac0512bffe25ef1b41e1cbbf709.jpg
    57.3 KB · Views: 0
  • 8b6716c6cb4c5bb0d9869848a9e5d5f5.jpg
    8b6716c6cb4c5bb0d9869848a9e5d5f5.jpg
    92.4 KB · Views: 0
  • bc91693d7bee3f3895d0ddc89c855c3d.jpg
    bc91693d7bee3f3895d0ddc89c855c3d.jpg
    87.9 KB · Views: 0
  • f0cfd3d51247bd08d10f67adfb414877.jpg
    f0cfd3d51247bd08d10f67adfb414877.jpg
    96.5 KB · Views: 0
  • 186738d76bc9d07d182acdd321c72dc2.jpg
    186738d76bc9d07d182acdd321c72dc2.jpg
    94.3 KB · Views: 0
  • 1494b1c7e04a12340c57d40f4f62d6bf.jpg
    1494b1c7e04a12340c57d40f4f62d6bf.jpg
    57.1 KB · Views: 0
To avoid these ads, REGISTER NOW!

rrich1

Well-known member
Joined
Oct 7, 2015
Messages
793
Restored a 1909-1912 Stanley LAJ plane. It is in excellent condition with no cracking of the sole or tote. It cleaned up really well. Thinking of selling it but not sure. I didnt mess with the tote or knob as they are in great shape. 1058518d31c2ba1aea570aef58ac0b18.jpg93429df3019267b26770ebb4df8c4341.jpg267f81ec57cf22140ccd3a0c8f81e3bc.jpg8425a426cac653c0cfaac3150492663b.jpg76004414ea1cdfbf2106e7a35ab03555.jpg389fc51ab4f0ea8130c991c12983a9e6.jpgf0a15630cf13986253c556b1ea87f25f.jpgadfc930cc2542413564501f25a8cc430.jpgcb8ac8c62864d4921be2e3854fe11515.jpg

Sent from my Pixel XL using Tapatalk
 

Attachments

  • 1058518d31c2ba1aea570aef58ac0b18.jpg
    1058518d31c2ba1aea570aef58ac0b18.jpg
    62 KB · Views: 0
  • 93429df3019267b26770ebb4df8c4341.jpg
    93429df3019267b26770ebb4df8c4341.jpg
    65.9 KB · Views: 0
  • 267f81ec57cf22140ccd3a0c8f81e3bc.jpg
    267f81ec57cf22140ccd3a0c8f81e3bc.jpg
    67.3 KB · Views: 0
  • 8425a426cac653c0cfaac3150492663b.jpg
    8425a426cac653c0cfaac3150492663b.jpg
    68.4 KB · Views: 0
  • 76004414ea1cdfbf2106e7a35ab03555.jpg
    76004414ea1cdfbf2106e7a35ab03555.jpg
    69.4 KB · Views: 0
  • 389fc51ab4f0ea8130c991c12983a9e6.jpg
    389fc51ab4f0ea8130c991c12983a9e6.jpg
    60.7 KB · Views: 0
  • f0a15630cf13986253c556b1ea87f25f.jpg
    f0a15630cf13986253c556b1ea87f25f.jpg
    61 KB · Views: 0
  • adfc930cc2542413564501f25a8cc430.jpg
    adfc930cc2542413564501f25a8cc430.jpg
    63.2 KB · Views: 0
  • cb8ac8c62864d4921be2e3854fe11515.jpg
    cb8ac8c62864d4921be2e3854fe11515.jpg
    76.8 KB · Views: 0

Craptain

Well-known member
Joined
Apr 18, 2013
Messages
4,028
Location
Tampa Bay FL
That saw is a beautiful addition to your shop rrich1. While I would love the saw, I really don't have the space for it.
Nice job on the plane too. That's also something I don't have. But also don't have enough use to justify it.

Sent from my SM-G930T using Tapatalk
 

ez-duzit

Well-known member
Joined
Jun 24, 2013
Messages
5,095
Location
Marina del Rey
1--the SS is quite a nice upgrade from that contractors saw. Someone near me has a SS for sale near me, in case anyone wants one. I have 2 Unisaws, a contractors saw and a small tilting table saw already, so don't have space.
 
OP
J

jimreed2160

Well-known member
Joined
Aug 7, 2016
Messages
3,589
Location
Tallahassee FL
rrich--Good save on your dovetail. Only you will know about it. AND also a good job on the #62. Those are hard to find in good condition. I'll bet it is a good user. One of my favorite planes is my LN #62.
 

rrich1

Well-known member
Joined
Oct 7, 2015
Messages
793
Ez- I'm pretty excited about the saw. The delta contractor I had from Lowe's really was a great saw but the extra rip capacity will be nice along with all the other stuff.

Jim- thanks. The 62 made the smoothest shavings I had ever got from a plane.

Today I got the box joints planed down. I'm leaving the ends u til they are all glued up so I don't blow out the back side. My veritas block plane made easy work to flatten them down.

After those were done I had to make a jig to make the recess for the hand pulls. I decided not to go with exposed hardware because I didn't want to bust/bruise any shins. Also didn't want them used as a step and break the drawer fronts. The recess matches the hamper so it ties all of the pieces together. I used both a top and bottom bearing flush trim bit to route out the recesses. 9a88bf43c888a54275a6ff57b9e99c5c.jpg71489a0113a5b6b0d7fe6ed6adf00d3e.jpg016da252a7c5935dd9dc6cbd672e3840.jpg34f7848e2bd30be7633b5c8457afdd49.jpgac19411695ef0870076011e54e5985a1.jpg9ac1197bd03efb05d01f16a80592fa92.jpg

Sent from my Pixel XL using Tapatalk
 

Attachments

  • 9ac1197bd03efb05d01f16a80592fa92.jpg
    9ac1197bd03efb05d01f16a80592fa92.jpg
    108.9 KB · Views: 1
  • 9a88bf43c888a54275a6ff57b9e99c5c.jpg
    9a88bf43c888a54275a6ff57b9e99c5c.jpg
    106.2 KB · Views: 1
  • 71489a0113a5b6b0d7fe6ed6adf00d3e.jpg
    71489a0113a5b6b0d7fe6ed6adf00d3e.jpg
    51.4 KB · Views: 1
  • 016da252a7c5935dd9dc6cbd672e3840.jpg
    016da252a7c5935dd9dc6cbd672e3840.jpg
    70.8 KB · Views: 1
  • 34f7848e2bd30be7633b5c8457afdd49.jpg
    34f7848e2bd30be7633b5c8457afdd49.jpg
    75 KB · Views: 1
  • ac19411695ef0870076011e54e5985a1.jpg
    ac19411695ef0870076011e54e5985a1.jpg
    91.4 KB · Views: 2

R_einan

Well-known member
Joined
Aug 29, 2016
Messages
461
Location
Eastern WA
Made some headway on my plane restorations. The new knobs and totes came in and I finished initial flattening if the Stanley no. 3. The Siegley needs some more work before I am ready to spray them and finish polishing the sides and soles. Here are a couple in progress shots of the Stanley.
 

Attachments

  • 2E04EE7F-9773-4BDA-ABE7-060C65529FE2.jpg
    2E04EE7F-9773-4BDA-ABE7-060C65529FE2.jpg
    91.4 KB · Views: 90
  • 3F556B24-6714-46AB-8BAC-C8FDF0485B21.jpg
    3F556B24-6714-46AB-8BAC-C8FDF0485B21.jpg
    78.9 KB · Views: 80
  • 43AA0C6D-1024-4FBD-9CE2-F0797C68F91A.jpg
    43AA0C6D-1024-4FBD-9CE2-F0797C68F91A.jpg
    60.9 KB · Views: 77
OP
J

jimreed2160

Well-known member
Joined
Aug 7, 2016
Messages
3,589
Location
Tallahassee FL
rrich--That sure is pretty walnut.

R--I really enjoy your progress shots and admire your patience. Unless I am reworking a tote, I never spent more than an hour on a rehab.
 

rrich1

Well-known member
Joined
Oct 7, 2015
Messages
793
Now I remember that I hate gluing up box joints [emoji1787]. First two drawers are epoxied up and in clamps. Helpful tip: DNA cleans up excess epoxy extremely well. Leaves essentially no cleanup for later. 5c760cffdfa084db46f8ada4b4818d1a.jpg1556aa2c27c89c494b8506040be51a01.jpg

Sent from my Pixel XL using Tapatalk
 

Attachments

  • 5c760cffdfa084db46f8ada4b4818d1a.jpg
    5c760cffdfa084db46f8ada4b4818d1a.jpg
    136.6 KB · Views: 0
  • 1556aa2c27c89c494b8506040be51a01.jpg
    1556aa2c27c89c494b8506040be51a01.jpg
    120.3 KB · Views: 0

rrich1

Well-known member
Joined
Oct 7, 2015
Messages
793
I like acetone for this.
That would be my preferred choice and recommended by Total Boat but I apparently used all of mine. Using both I haven't seen a difference in the end.

Sent from my Pixel XL using Tapatalk
 
Last edited:

R_einan

Well-known member
Joined
Aug 29, 2016
Messages
461
Location
Eastern WA
rrich--That sure is pretty walnut.

R--I really enjoy your progress shots and admire your patience. Unless I am reworking a tote, I never spent more than an hour on a rehab.

As they were my great grandfathers, I’m restoring them to ‘like new’ condition, or at least as close as I can get. There are a few spots where the rust was deep enough I won’t even try and remove enough material to erase. But they are relatively few considering the 80-100 year old age of these. It is making my dad happy to see them coming along and I’m sure he will be delighted when they are completed. Though he isn’t getting them back!:bounce:
 

ez-duzit

Well-known member
Joined
Jun 24, 2013
Messages
5,095
Location
Marina del Rey
1--acetone seems more effective to me and evaporates extremely quickly. Because alcohol takes awhile to evaporate, it can dilute the epoxy and run along surfaces you do not want contaminated.
 

chrislehr

Well-known member
Joined
Apr 10, 2009
Messages
1,704
Location
Portland, OR
Could use some input on current project.

I am in the last throes of assembly on a bed. Adding the rail mounting hardware now, and... well, poor planning on my part, but where one screw and one "recess" for the rail hooks goes is right near/around a glued up mortise/tenon in the headboard.

I am really hoping it won't weaken the joint, but I'm pretty concerned it will.

Anyone have any experience here? They are 1.5" brass screws into beech if it makes a difference. The lower rail of the headboard it the M/T that will be impacted.
 

rlitman

Well-known member
Joined
Oct 18, 2010
Messages
24,591
Location
Long Island
Could use some input on current project.

I am in the last throes of assembly on a bed. Adding the rail mounting hardware now, and... well, poor planning on my part, but where one screw and one "recess" for the rail hooks goes is right near/around a glued up mortise/tenon in the headboard.

I am really hoping it won't weaken the joint, but I'm pretty concerned it will.

Anyone have any experience here? They are 1.5" brass screws into beech if it makes a difference. The lower rail of the headboard it the M/T that will be impacted.

Can you post a sketch of the problem?

When worried about the screw pulling out, I've turned to threaded inserts (be sure to differentiate between the ones made for hardwood, and the ones made for soft wood).

You're using BRASS screws for the rail attachment? That seems like a bigger problem to me.
 

chrislehr

Well-known member
Joined
Apr 10, 2009
Messages
1,704
Location
Portland, OR
Can you post a sketch of the problem?


When worried about the screw pulling out, I've turned to threaded inserts (be sure to differentiate between the ones made for hardwood, and the ones made for soft wood).


You're using BRASS screws for the rail attachment? That seems like a bigger problem to me.


I powered through it. 909873e49255a1538fcb7b7497b53c51.jpg


This was the problem area. The mortised in hardware has screws and a void right in front of my mt.
5fbaca1a60ac18ddb75900b7d582b357.jpg
 

Attachments

  • 909873e49255a1538fcb7b7497b53c51.jpg
    909873e49255a1538fcb7b7497b53c51.jpg
    665.4 KB · Views: 0
  • 5fbaca1a60ac18ddb75900b7d582b357.jpg
    5fbaca1a60ac18ddb75900b7d582b357.jpg
    700.6 KB · Views: 2

rlitman

Well-known member
Joined
Oct 18, 2010
Messages
24,591
Location
Long Island
Ah, I get it now. That's looks really sharp.

Anyway, if the mortise and tenon were well fitted and well glued, I'd only expect the screw to hold better in that area than elsewhere. i.e. I wouldn't sweat it.
 

chrislehr

Well-known member
Joined
Apr 10, 2009
Messages
1,704
Location
Portland, OR
Ah, I get it now. That's looks really sharp.

Anyway, if the mortise and tenon were well fitted and well glued, I'd only expect the screw to hold better in that area than elsewhere. i.e. I wouldn't sweat it.


Thanks. Yea. I had no creaks or cracks drilling and screwing and routing that area so i think im good.
 

CRSINMICH

Well-known member
Joined
Aug 15, 2015
Messages
2,397
Location
Southeastern Michigan
BARENTS' EXPEDITION​
Some woodworking tools have remained essentially unchanged for a very long time.

Willem Barents was a noted polar explorer who searched for a Northeast passage from Europe to the Pacific. On his final voyage in 1596 his ship became iced in and the crew was forced to overwinter on a small island where they built a crude shelter. Most of the crew survived but Barents didn't. In 1871 the remains of the shelter were discovered. The tools that were found are now in the Rijksmuseum in Amsterdam. The last photo shows a cabinet from the same period. It was not made in an impromptu shelter on an Arctic island.

I took these pictures on a family vacation. Taking photographs through glass is tricky and, apparently, I don't know the tricks.
 

Attachments

  • DSCN0103.jpg
    DSCN0103.jpg
    149.5 KB · Views: 94
  • Barents' Tools (2).jpg
    Barents' Tools (2).jpg
    105.9 KB · Views: 86
  • Barents' Tools (3).jpg
    Barents' Tools (3).jpg
    123.9 KB · Views: 87
  • Barents' Tools (4).jpg
    Barents' Tools (4).jpg
    75.9 KB · Views: 90
  • Barents' Tools (5).jpg
    Barents' Tools (5).jpg
    105.5 KB · Views: 89
  • Barents' Tools (6).jpg
    Barents' Tools (6).jpg
    101 KB · Views: 88
Last edited:
To avoid these ads, REGISTER NOW!
Top Bottom