To avoid these ads, REGISTER NOW!

Woodworking 101--Tools and Tips

Robbie B

Well-known member
Joined
Jun 24, 2014
Messages
1,320
Location
Sunny side of hell
The faceframe to end panel corners are miters (lock or just straight 45degree).

The Face frames are still the same width on the corners, the side panels are glued at the miter then when assembled glued to the box.

View media item 105539
View media item 100346


Well I was feeling proud about finishing my raggedy rabbit hutch tonight then I saw your miters. [emoji2359]
 
To avoid these ads, REGISTER NOW!

Robbie B

Well-known member
Joined
Jun 24, 2014
Messages
1,320
Location
Sunny side of hell
Show off the hutch.

(hangs head in shame)f2bc4be1fa55931866323680886cddd7.jpg

Here it is. It took me forever to get it built. Since It got so hot out it was impossible to stand being in my building. When I started last night at 8:30 is was 99*. My next project is a chicken coop. Some how we’ve ended up starting a small farm during all this COVID ****. Still ain’t sure how that happened.
 

Attachments

  • f2bc4be1fa55931866323680886cddd7.jpg
    f2bc4be1fa55931866323680886cddd7.jpg
    87.3 KB · Views: 2

jar944

Well-known member
Joined
Jul 26, 2010
Messages
5,912
Location
Northern VA
(hangs head in shame)f2bc4be1fa55931866323680886cddd7.jpg

Here it is. It took me forever to get it built. Since It got so hot out it was impossible to stand being in my building. When I started last night at 8:30 is was 99*. My next project is a chicken coop. Some how we’ve ended up starting a small farm during all this COVID ****. Still ain’t sure how that happened.


Looks good.

Working in high heat makes everything miserable.
 

Robbie B

Well-known member
Joined
Jun 24, 2014
Messages
1,320
Location
Sunny side of hell
Looks good.

Working in high heat makes everything miserable.


Thanks. Yeah the heat makes it rough.. My job is maintance in a dye house. It’s 20* warmer in there on average than what it is outside. These last few weeks have been miserable and then coming home and trying to work on this too has been a hard sale to myself. [emoji23]
 

turbowoodworker

Well-known member
Joined
Mar 18, 2012
Messages
3,529
Location
Apex NC
Padauk is wonderful wood. It is pretty hard but machines well. Be careful of the fine dust as it can be irritating to your skin and probably your lungs too. Good DC is key.
I wish it stayed the bright red orange when first cut but it mellows quickly to a dark maroon brown.
What kind of project do you have planned?
Coincidentally, I was just in the shop inspecting some stock of padauk that I plan to use for a dart board cabinet. Good luck.
Rick
 

turbowoodworker

Well-known member
Joined
Mar 18, 2012
Messages
3,529
Location
Apex NC
The UV resistant polys at least in my experience are a little more hype than substance. I’ve used it on padauk with little difference over standard polyurethanes.
Usually the color starts changing within a few days, Long before my projects are typically ready for final finish.
 

rlitman

Well-known member
Joined
Oct 18, 2010
Messages
24,594
Location
Long Island
The UV resistant polys at least in my experience are a little more hype than substance. I’ve used it on padauk with little difference over standard polyurethanes.
Usually the color starts changing within a few days, Long before my projects are typically ready for final finish.


Perhaps it’s not a UV thing. Oxidation?
I know that the UV inhibiting urethanes protect the purple in purple heart.
 

turbowoodworker

Well-known member
Joined
Mar 18, 2012
Messages
3,529
Location
Apex NC
No, you are correct, it is oxidation that causes the immediate color changes. I was responding to the question about finishes preventing color change. Some of the UV products do protect woods like cherry from changing over time. But padauk will lose its orange in a couple of days.
Thanks for pointing that Rlitman, as it is an important distinction.
I made an entire bedroom set of padauk, seven pieces, twenty years ago. They are all a nice brown with hints of pinks and orange.
 

d.mcfarland

Well-known member
Joined
Jun 18, 2012
Messages
6,566
Location
Western PA
New on the left vs. old on the right. The original bamboo slats probably still would do their job for years, but they were deteriorating.

attachment.php
 

Attachments

  • IMG_1890.jpg
    IMG_1890.jpg
    170 KB · Views: 523

mcdye

Well-known member
Joined
Sep 22, 2016
Messages
240
A newbie to woodworking, got the inspiration to start with a headboard, thanks to GJ. Wife wants a white distressed look, hello google. Think she might agree to expanding our tool set. Used my dads 40 yr old Craftsman's a table saw and kreg pocket hole (first new tool). Alot to learn.
 

Attachments

  • headboard.jpg
    headboard.jpg
    127.3 KB · Views: 74

turbowoodworker

Well-known member
Joined
Mar 18, 2012
Messages
3,529
Location
Apex NC
I need some help with a typical F...Up. I was impatient waiting for hinge hardware to arrive and got ahead of myself. The result is a mistake that I would appreciate help with.

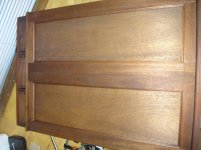
I am building a dart board cabinet and all was going well until I realized that I had glued the dart holders on opposite ends of the plain sawn cathedral grain ply of the doors. The plan was to have the flames obviously facing the same direction. Well, they aren't so I need to find a way to remove one of the dart holders and replace at the other end of the door (one side only).

Important considerations:
Doors are cope and stick 4/4 mahogany with 1/4" ply panel. They are stained but uncoated (no varnish, poly, oil yet). The dart holders are 1 1/2" by 7 3/4", glued with Original Titebond, no fasteners.

My question is, anybody have ways or tricks to loosen the Titebond to remove the dart holder? It is about 72 hours set. My concern is that the thin 1/4 ply will be damaged then I'm making two new doors. Damaging the dart holder, while not desirable, is not a deal killer.

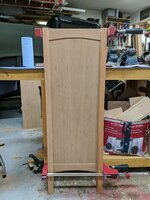
Photos show the dart holder made with a Kreg step drill and jig, the doors as they are supposed to look (symmetric and bookmatched), and the doors as they sit-WRONG.

And no I can't live with the cathedral/flames pointing in different directions. Be gentle, I'm kicking myself with both feet.
Thanks.
Rick
 

Attachments

  • DSC00714.jpg
    DSC00714.jpg
    146.4 KB · Views: 80
  • DSC00715.jpg
    DSC00715.jpg
    148.1 KB · Views: 71
  • DSC00716.jpg
    DSC00716.jpg
    148 KB · Views: 81

ALinCarolina

Well-known member
Joined
Dec 29, 2014
Messages
757
Location
NC Piedmont
If I am understanding, the panels are opposite directions. Instead of moving the holders can you remove one panel and flip it. I assume the panels are floating and not glued. I think I would try cutting the lip of the dado on the inside of the door just down to the 1/4" panel. Then reinstall and add cleats to the back to hold it in attached with 23 ga pins. You could probably cut the wood with a Dremel, veneer saw, or some type of the Japanese pull saws.
 

turbowoodworker

Well-known member
Joined
Mar 18, 2012
Messages
3,529
Location
Apex NC
Al, thanks for the reply. I thought about that but the cleat is a problem. Since this door will be open as much as it is closed, it is not your typical cabinet door where the inside appearance is not so important. It is a floating panel though.

What about this: As you suggest, cut the inside dado lip, reverse the panel, and reglue the 3/16" lip back in place. It might not be so noticeable, but I am trying to think of the best way to cut the lip. Maybe a knife on a straight edge? Eve the thinnest kerf will lose enough material to make it noticable. Thinking out loud.
 

turbowoodworker

Well-known member
Joined
Mar 18, 2012
Messages
3,529
Location
Apex NC
EZ,
Let me try to make it a little clearer. Sorry for the poor pics, but think of a bookmatched panel. What I have done by gluing on that dart holder, is to oriente one bookmatch door panel 180* from the other.
The door will function, but the grain pattern is no where near a match. that is what I need to fix.

I know you do a lot with boats and teak, maybe you have some tricks. But again I think you once said you work mostly with epoxy. There has to be a way around old style Titebond.
 
To avoid these ads, REGISTER NOW!

ez-duzit

Well-known member
Joined
Jun 24, 2013
Messages
5,096
Location
Marina del Rey
t--the photos do not make it clear how/where the dart storage is attached. How about planing away the dart storage and removing the glue using a card scraper?
 

turbowoodworker

Well-known member
Joined
Mar 18, 2012
Messages
3,529
Location
Apex NC

ALinCarolina

Well-known member
Joined
Dec 29, 2014
Messages
757
Location
NC Piedmont
I bet you could make new cleats the size of the one removed plus the thickness of the kerf. Just glue like you say then with no brads.
I've made about every mistake in the book and remember having to replace a hole, gouge, or chipped edge with cutting a small piece in. As long as the grain is parallel and of course using scrap from the same board, it hides pretty well.
Cutting the holders off along with a 1/32 or so piece of the rail would work too. Good Luck. Be sure to let us see the outcome.
 

txlonghorn1989

Well-known member
Joined
Feb 27, 2017
Messages
2,786
Turbo, I don't know if you've ever checked out Sawmill Creek but they've got a Neanderthal Haven forum (hand tool woodworking) and their Power Tools forum where there is a lot of knowledgeable folks. You might consider checking those out. I was thinking the same thing EZ said. Cut that dart holder away down to as close as you can get it with a hand saw, recip saw or even a router like you suggested. Then use a hand/block plane to get it further down to the panel and then a scraper. Good luck!
 

turbowoodworker

Well-known member
Joined
Mar 18, 2012
Messages
3,529
Location
Apex NC
Thanks all. I took EZ's suggestion and ten mins with the old #5 Stanley brought it flat to the stiles. Next I will set the router up (tomorrow) and finish off to nearly flush, then a little more handwork.

I will say that I tried the heat gun, a wide chisel and a wide putty knife. The heat gun maybe softened the PVA a bit, but not convincingly. I stopped when I became worried about slamming through the 1/4 ply.

So thanks all. I think it will be fixed tomorrow and I will post either an update or the finished product.
 

ez-duzit

Well-known member
Joined
Jun 24, 2013
Messages
5,096
Location
Marina del Rey
Just be patient when you get to the glue line and let the card scraper sneak up on removing the last traces of glue without damaging the veneer.
 

HenryAZ

MEMBER EMERITUS
Joined
Sep 18, 2012
Messages
1,054
Location
South Congress AZ
Just be patient when you get to the glue line and let the card scraper sneak up on removing the last traces of glue without damaging the veneer.

This is important. If there is any trace of the glue remaining, it will show up immediately when you apply your finish. I might even do a very light sanding with a very fine grit behind the scraper work.
 

rrich1

Well-known member
Joined
Oct 7, 2015
Messages
793
Working on a chest of drawers for my youngest. Made of cherry. So far so good. I just glued the two sides together yesterday. Will work on web frames next. All the rails received a curve on them. The back has a vertical stretcher running down the middle for extra support. e69231f9e325a64f8f7ffe673d7f8147.jpg3579b009b3096bba338331088debae91.jpg507b5aea738613142f3dc3471af1479a.jpg

Sent from my Pixel 3 XL using Tapatalk
 

Attachments

  • 3579b009b3096bba338331088debae91.jpg
    3579b009b3096bba338331088debae91.jpg
    611.9 KB · Views: 3
  • e69231f9e325a64f8f7ffe673d7f8147.jpg
    e69231f9e325a64f8f7ffe673d7f8147.jpg
    620.2 KB · Views: 1
  • 507b5aea738613142f3dc3471af1479a.jpg
    507b5aea738613142f3dc3471af1479a.jpg
    434.2 KB · Views: 1

orangeblood

Well-known member
Joined
Dec 7, 2016
Messages
297
Location
Texas
Working on a chest of drawers for my youngest. Made of cherry. So far so good. I just glued the two sides together yesterday. Will work on web frames next. All the rails received a curve on them. The back has a vertical stretcher running down the middle for extra support. e69231f9e325a64f8f7ffe673d7f8147.jpg3579b009b3096bba338331088debae91.jpg507b5aea738613142f3dc3471af1479a.jpg

Sent from my Pixel 3 XL using Tapatalk

Mr Krenov would be pleased
 

Attachments

  • 507b5aea738613142f3dc3471af1479a.jpg
    507b5aea738613142f3dc3471af1479a.jpg
    117.8 KB · Views: 1
  • 3579b009b3096bba338331088debae91.jpg
    3579b009b3096bba338331088debae91.jpg
    165.3 KB · Views: 1
  • e69231f9e325a64f8f7ffe673d7f8147.jpg
    e69231f9e325a64f8f7ffe673d7f8147.jpg
    175.6 KB · Views: 2

rrich1

Well-known member
Joined
Oct 7, 2015
Messages
793
Thanks everyone.

It's actually another wood whisperer guild project. Faster for me to build/modify plans than make my own. Lol. Still learning designing of furniture as well.

Ez- thanks. It was my grandfather's '31 AA. Been getting it back into running shape. Luckily it was kept very well.
Sent from my Pixel 3 XL using Tapatalk
1457e90767a802459c11010943f7f9b9.jpg
 

Attachments

  • 1457e90767a802459c11010943f7f9b9.jpg
    1457e90767a802459c11010943f7f9b9.jpg
    800.4 KB · Views: 5
Last edited:

Rockil

New member
Joined
Aug 20, 2020
Messages
4
Location
Billings mt
I love dovetails ill get some of my bench that i made every thing is dovetailed main frame drawers. here is a box i made for now
 

Attachments

  • IMG_0014.jpg
    IMG_0014.jpg
    109.9 KB · Views: 129
  • IMG_0017.jpg
    IMG_0017.jpg
    151.8 KB · Views: 107
  • IMG_0018.jpg
    IMG_0018.jpg
    149.9 KB · Views: 127
  • IMG_0020.jpg
    IMG_0020.jpg
    129.1 KB · Views: 114
To avoid these ads, REGISTER NOW!
Top Bottom