To avoid these ads, REGISTER NOW!

Woodworking 101--Tools and Tips

Woody1320

Well-known member
Joined
Sep 27, 2017
Messages
164
Location
Southeast Michigan
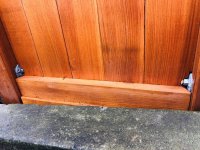
I've got a question for those more knowledgeable than I when it comes to woodworking. The wife wants a tray for our ottoman, and I've got the wood to build it (I picked up some pine for the material). The plan is to make it 28 by 28 inches, so there will be 8 pieces along the bottom. I plan on using 1/4 inch dowels and wood glue to join the slats along the bottom. The wood is 3/4 inch thick nominally. I also picked up a couple Bessey 36 inch clamps to hold it all together once the bottom is assembled. Is there a better way to do so? The goal is to have a design similar to the attached picture.
 

Attachments

  • 20201231_151035.jpg
    20201231_151035.jpg
    39.9 KB · Views: 99
To avoid these ads, REGISTER NOW!

Gasgt1

Well-known member
Joined
Dec 23, 2013
Messages
996
Location
100 miles SW of Chicago
Finished the chest of drawers this week. Happy with how it turned out. Finished it with arm r seal and buffed it out. 99294915477bb0efefbfe4cbf70c1013.jpgb6a24f5869408ac250d024943d002664.jpg202884bb33e70f6751bc6ab844c12421.jpg35ce94f7a8483f760f6a54d4f6135040.jpg

Sent from my Pixel 3 XL using Tapatalk

An heirloom for sure
Beautiful work! :thumbup:
 

Attachments

  • b6a24f5869408ac250d024943d002664.jpg
    b6a24f5869408ac250d024943d002664.jpg
    144.4 KB · Views: 3
  • 202884bb33e70f6751bc6ab844c12421.jpg
    202884bb33e70f6751bc6ab844c12421.jpg
    168.5 KB · Views: 2
  • 35ce94f7a8483f760f6a54d4f6135040.jpg
    35ce94f7a8483f760f6a54d4f6135040.jpg
    60.9 KB · Views: 2
  • 99294915477bb0efefbfe4cbf70c1013.jpg
    99294915477bb0efefbfe4cbf70c1013.jpg
    151.8 KB · Views: 5

akalian

Well-known member
Joined
Apr 27, 2016
Messages
355
Location
St. George Utah
It machines well, but is very hard. Make sure you have a recently sharpened blade in you saw. Here are some wood hardness's (Janka) for comparison:

1450 Hard Maple
1820 Hickory
2410 Bubinga
2520 Purpleheart
2760 Osage Orange

I like working with Bubinga. I don't think there is any wood that can match the grain and character of Bubinga. I've never had any difficulty working with it, but as said a sharp blade is a must.

Some projects I've made using Bubinga are attached.

.
 

Attachments

  • coffee-table.jpg
    coffee-table.jpg
    156.3 KB · Views: 67
  • Cremation.jpg
    Cremation.jpg
    97.3 KB · Views: 67
  • Bubinga-Game-Board.jpg
    Bubinga-Game-Board.jpg
    150.7 KB · Views: 66
  • bubinga_01.jpg
    bubinga_01.jpg
    54.4 KB · Views: 62
  • bubinga_02.jpg
    bubinga_02.jpg
    75 KB · Views: 64

CRSINMICH

Well-known member
Joined
Aug 15, 2015
Messages
2,397
Location
Southeastern Michigan
Woody: It seems like what you are describing is something like a butler's tray. There are many options for joining the slats and doweling would work as well as many of them. A tray like that would be fairly light duty so joint strength isn't critical but you may as well make it as strong as you can. I wouldn't make one with grooves between the slats like the one in the picture. The grooves would function as crud collectors.

akalian: Those are beautiful projects made even more beautiful by the babinga. Nicely done!
 

turbowoodworker

Well-known member
Joined
Mar 18, 2012
Messages
3,522
Location
Apex NC
Woody, if you are going to copy that design ie no sides like most serving trays have, here are a couple of thoughts.
Slats in the light duty bottom can be edge glued, no need for dowels or any other reinforcement.
The sides which appear to be simple rail and stiles, can be joined with anything from mortise and tenon, dowels, biscuits, etc.
Not sure what tools you have, but consider planing the bottom to 1/2 inch thick for weight.
Personally I would turn the rails and stiles on edge and male low sides, say 1 1/2 inches with a soft round over on the edges.
Depends on your tooling and experience.
Good luck and please share your results.
Rick
 

Gasgt1

Well-known member
Joined
Dec 23, 2013
Messages
996
Location
100 miles SW of Chicago
Looks like it is time for some sort of clamp rack.
I had been using my scaffolding for years but now need it for a real project.
It is not coming back to my shop 😣

2D7F7541-25C0-4152-B65C-3DBCF955FE2D.jpg
 

jshillin

Well-known member
Joined
Nov 9, 2008
Messages
5,593
Location
PA
Couple things I've made over the last few weeks. They aren't anywhere near the level that I see some of you guys making, but I enjoy woodworking when I can find the time.

A simple shoe rack, small mantle clock, a gem holder and an unfinished bar sign.
 

Attachments

  • 20201212_174550.jpg
    20201212_174550.jpg
    148.3 KB · Views: 107
  • 20201219_151337.jpg
    20201219_151337.jpg
    148.4 KB · Views: 103
  • 20201220_180109.jpg
    20201220_180109.jpg
    153.9 KB · Views: 106
  • 20201224_145933.jpg
    20201224_145933.jpg
    152.2 KB · Views: 100

Sevenhills1952

Well-known member
Joined
Aug 30, 2018
Messages
1,750
Location
Virginia
Couple things I've made over the last few weeks. They aren't anywhere near the level that I see some of you guys making, but I enjoy woodworking when I can find the time.


A simple shoe rack, small mantle clock, a gem holder and an unfinished bar sign.
Very nice!

Sent from my SM-S205DL using Tapatalk
 

Woody1320

Well-known member
Joined
Sep 27, 2017
Messages
164
Location
Southeast Michigan
Woody: It seems like what you are describing is something like a butler's tray. There are many options for joining the slats and doweling would work as well as many of them. A tray like that would be fairly light duty so joint strength isn't critical but you may as well make it as strong as you can. I wouldn't make one with grooves between the slats like the one in the picture. The grooves would function as crud collectors.

Woody, if you are going to copy that design ie no sides like most serving trays have, here are a couple of thoughts.
Slats in the light duty bottom can be edge glued, no need for dowels or any other reinforcement.
The sides which appear to be simple rail and stiles, can be joined with anything from mortise and tenon, dowels, biscuits, etc.
Not sure what tools you have, but consider planing the bottom to 1/2 inch thick for weight.
Personally I would turn the rails and stiles on edge and male low sides, say 1 1/2 inches with a soft round over on the edges.
Depends on your tooling and experience.
Good luck and please share your results.
Rick

Guys, I truly appreciate the advice and the words of encouragement. I will definitely post pics once it's done. I have a circular saw, reciprocating saw, hand sander, drill, and an impact driver that get used quite a bit (Ryobi for all but the impact driver, which is Makita). I'll be picking up a Bessey 90 degree clamp for the corners of the "border", which I already know I can make the 45 degree cuts for with my saw. I could just as easily leave two ends shorter and just screw them together, but I want this to look cleaner (plus, I want to prove to myself that I can do that kind of work). I am looking forward to this project, as I want to tackle more projects like this, and I believe this could lead to more wood working in the future. If this tray turns out as clean as I hope, it could mean more projects for family members (and possibly better/more equipment for me LOL).
 

rrich1

Well-known member
Joined
Oct 7, 2015
Messages
793
While not woodworking it is a woodworking tool. Picked up an 8" delta pot belly jointer and redoing it. Big upgrade from my 6" short bed delta jointer. Almost done with cleaning the 6 layers of paint off. I think I will start a dedicated thread in the vintage tool section. dbcb6da6758ab2f3070e64d6254c0806.jpg90dbbe17f08a4586aed7f2f319b39bba.jpgc55fd224e8b15403cb92a2dd7517aff5.jpg18980158c611dd84e636ce850b2ba938.jpga062688dedfc069e513db9fa0318a644.jpgc0be63fa7d9e57772a48676d9eaf7314.jpg

Sent from my Pixel 3 XL using Tapatalk
 

Attachments

  • c55fd224e8b15403cb92a2dd7517aff5.jpg
    c55fd224e8b15403cb92a2dd7517aff5.jpg
    546.8 KB · Views: 8
  • dbcb6da6758ab2f3070e64d6254c0806.jpg
    dbcb6da6758ab2f3070e64d6254c0806.jpg
    610.3 KB · Views: 5
  • 90dbbe17f08a4586aed7f2f319b39bba.jpg
    90dbbe17f08a4586aed7f2f319b39bba.jpg
    592.9 KB · Views: 3
  • c0be63fa7d9e57772a48676d9eaf7314.jpg
    c0be63fa7d9e57772a48676d9eaf7314.jpg
    582.6 KB · Views: 3
  • a062688dedfc069e513db9fa0318a644.jpg
    a062688dedfc069e513db9fa0318a644.jpg
    593.1 KB · Views: 4
  • 18980158c611dd84e636ce850b2ba938.jpg
    18980158c611dd84e636ce850b2ba938.jpg
    563.1 KB · Views: 8

jar944

Well-known member
Joined
Jul 26, 2010
Messages
5,905
Location
Northern VA
Something other than cabinets for a change. My wife bought a wall map awhile back. Apparently she got tired of it sitting in the box, so I got to make a frame.

I dug through my moulding knife collection looking for something picture frame like. Settled on a bolection moulding profile I typically use for wainscoting and some junk poplar I had in the shop. Frame is 40"x60" and 2.5" thick.

View media item 109447
View media item 109448
View media item 109446
 

turbowoodworker

Well-known member
Joined
Mar 18, 2012
Messages
3,522
Location
Apex NC
Man I would love to have one of those Williams and Hussey molders. They are so nice. I had the opportunity to use one at a class once. I bet the knife sets aren’t cheap though.
 

jar944

Well-known member
Joined
Jul 26, 2010
Messages
5,905
Location
Northern VA
Man I would love to have one of those Williams and Hussey molders. They are so nice. I had the opportunity to use one at a class once. I bet the knife sets aren’t cheap though.

They are convenient, and relatively inexpensive all things considered. I picked up the two i have for what was a very reasonable price.
The knives aren't too bad either price wise. I'm paying about $50 per inch of profile if I remember right.
 

MJOPE

Well-known member
Joined
Nov 24, 2019
Messages
197
Location
Tucson, AZ
Couple things I've made over the last few weeks. They aren't anywhere near the level that I see some of you guys making, but I enjoy woodworking.


Nice job getting these completed. Congrats. The key is enjoying the projects...
 
To avoid these ads, REGISTER NOW!

jar944

Well-known member
Joined
Jul 26, 2010
Messages
5,905
Location
Northern VA
j--that looks like the real deal.

Ha yeah It would be considered thr real deal in most circles.

Its a 2000 invicta ti-14b (b designated tilting spindle)
The tilt is 45 degrees back, 5 degrees forward.
7.5 hp 3ph motor
1.25" spindle with 5.25" under the nut
420mm (16.53") max tooling diameter (largest table ring is 420)
Is a feather weight at 1297lbs
 

jar944

Well-known member
Joined
Jul 26, 2010
Messages
5,905
Location
Northern VA
Looks like it's in excellent condition.

Yeah its clean, really clean. All the Blanchard marks are still prominent up next to the spindle where they are usually worn from miles of lumber and a feeder.

The Millwork/ cabinet shop i picked it up from had it for doors but they were buying them cheaper so didn't get much if any use.

And it was relatively cheap for what it is.
 

rrich1

Well-known member
Joined
Oct 7, 2015
Messages
793
Jar-That looks like an excellent machine

Sent from my Pixel 3 XL using Tapatalk
 

jar944

Well-known member
Joined
Jul 26, 2010
Messages
5,905
Location
Northern VA
Thanks. I was happy to finally upgrade the tilting grizzly i was hanging onto. There are three model shapers out there i would still be happy to get if possible, but all are either rare as hens teeth, or more than I am willing to spend (or both)..lol

Unloading machines is always an adventure.

View media item 109546
 

drivesitfar

Well-known member
Joined
Oct 23, 2013
Messages
36,006
Location
Pacific Northwest
Happy NEW YEAR EVERYBODY!!

I picked this up yesterday from a guy who was selling an old metal cabinet and he had this sitting in his office. it's held together with 2 3 inch oak dowels. pretty decent looks like hand carved mortise and tendon work and he said it was the 3rd one he made of this bench out of wood from a maple tree cut down and milled off his property.

it's a bit too wide for the short walls of our entrance to our home, but fits nicely at the end of our queen size bed. he told me he just uses Johnson Paste wax on it that seems to be a decent finish.

I'm wondering if any of you might use something different to keep it preserved and clean?
 

Attachments

  • Jan 13, 2021 custom handmade maple bench Port Angeles 59x18x18.jpg
    Jan 13, 2021 custom handmade maple bench Port Angeles 59x18x18.jpg
    148.5 KB · Views: 82
  • Jan 13, 2021 custom handmade maple bench Port Angeles 59x18x18 1.jpg
    Jan 13, 2021 custom handmade maple bench Port Angeles 59x18x18 1.jpg
    147.6 KB · Views: 70

CRSINMICH

Well-known member
Joined
Aug 15, 2015
Messages
2,397
Location
Southeastern Michigan
drives: That 's a nice piece of furniture. Since you live in a humid climate you might want to seal the wood better. On the other hand, in England (not known for arid conditions) they have been finishing wood pieces with wax for a long time. It must work or they'd have changed by now. I think it has to be renewed from time to time. Keep an eye on it.
 

jar944

Well-known member
Joined
Jul 26, 2010
Messages
5,905
Location
Northern VA
Since its already waxed i would be inclined to just leave it that way. There really is no harm as long as you keep up with annual waxing. If you like the sheen and texture it should be fine especially since its a surface that I wouldn't expect to see a lot of use (like a kitchen or dining table)

Alternatively if you want to go in a different direction you would need to strip the wax off before you could apply a oil or film finish.
 

drivesitfar

Well-known member
Joined
Oct 23, 2013
Messages
36,006
Location
Pacific Northwest
CRS: thanks and great point you make there. since I liked the finish when buying it waxing it every few months or so (maybe annually?) might be the ticket.

Jar: good point and yep I was figuring if might be some sanding and a bit of extra work to change the finish.

ALL: here's our maple bench in pieces (sorry the bed is usually made, but we lost power that morning with 60mph winds here) and I really don't want to take it apart again at the moment.
 

Attachments

  • Jan 13, 2021 custom handmade maple bench Port Angeles 59x18x18 2.jpg
    Jan 13, 2021 custom handmade maple bench Port Angeles 59x18x18 2.jpg
    119.9 KB · Views: 59

jar944

Well-known member
Joined
Jul 26, 2010
Messages
5,905
Location
Northern VA
^^Scary and exciting! Show some pics of them setup in your shop!

I'll have to take some pics when I get in the final position and under power. Mostly exciting, not really scary... well unloading on a driveway that's not level can be interesting..

it's the little shapers that move around when you turn them on that are scary..

I'm at a crossroad where I need to order a rotary phase converter, but have already spent more on vector drives than the converter would cost if I just bought it first :lol_hitti

But I need 5 more drives.. :headscrat
 

drivesitfar

Well-known member
Joined
Oct 23, 2013
Messages
36,006
Location
Pacific Northwest
Jar: since not many have 3 phase power to their shops or garages around here maybe your area is the same so instead of thinking about what you spent instead think that it's a real investment in your real estate. AND sell the convertors to a few guys that don't have so many machines and just want to power up one or two.

I bet having that hanging off an engine hoist was a bit of a nervous moment. like you i'm fond of moving them around with a pallet jack.

nice find!!
 

jar944

Well-known member
Joined
Jul 26, 2010
Messages
5,905
Location
Northern VA
Jar: since not many have 3 phase power to their shops or garages around here maybe your area is the same so instead of thinking about what you spent instead think that it's a real investment in your real estate. AND sell the convertors to a few guys that don't have so many machines and just want to power up one or two.

I bet having that hanging off an engine hoist was a bit of a nervous moment. like you i'm fond of moving them around with a pallet jack.

nice find!!

Possibly selling some of the vfds isn't a bad idea. I will say I'm spoiled with the control they provide. Its really nice being able to dial in the cutterhead speed of the machine. That Its irrelevant on most machines those with multiple speeds via step pulleys or change gears. (Like a shaper)

The variable speed aspect of the vfd mated with a powerfeeder is really a fantastic thing. I could go back to 4 or 8 fixed speeds, but I'd always remember what I'm missing out on.

I actually had to reposition the truck to get a more level spot. The first pick had it listing to the right.. that made me a bit nervous.
 

drivesitfar

Well-known member
Joined
Oct 23, 2013
Messages
36,006
Location
Pacific Northwest
Jar: i'm sure you'll figure it out and maybe save a couple for your favorite machines if you do get more power if that's what you like (if you can afford it).

ALL: so i've been building a fence around our property (again). the last time I built one was about 25 years ago and this one has been in the plans for a while now. I bought all my cedar 6x6's, 2x6's, 2x4's and 1x6 fence boards at a local mill and hauled them home wet and put on big racks to dry (stickered each row) so I didn't have hardly any boards warp or twist.

my question to all you that know much more about wood than i do is this: i'm notching the top 2x6's into the 6x6 posts and i've been leaving about an 1/8-1/4 inch gap for the wood to expand since i'm usually doing my work outside when the sun is shining and it's warm. i'm also planing each board and cutting and routering out the notches. do I need to do this?

here's a few pictures of my new cedar fence and we (my bride and I) really like this PPG (was Sikkens) stain and even though the can says only one coat we like 2 coats best. We've also been brushing on brown Copper Green paint/stain on the ends and tops to maybe help keep them from rotting as quick.
 

Attachments

  • PPG Sikkens SRD transparent butternut stain.jpg
    PPG Sikkens SRD transparent butternut stain.jpg
    78.7 KB · Views: 43
  • close up of how I set top 2x6's into 6x6's.jpg
    close up of how I set top 2x6's into 6x6's.jpg
    149.6 KB · Views: 45
  • close up of how I set top 2x6's into 6x6's 1.jpg
    close up of how I set top 2x6's into 6x6's 1.jpg
    146.3 KB · Views: 47
  • close up view of north side of recycle fence.jpg
    close up view of north side of recycle fence.jpg
    148 KB · Views: 47
  • trimming around bracket bolts with jigsaw.jpg
    trimming around bracket bolts with jigsaw.jpg
    149 KB · Views: 48
  • TOP2X6~2.jpg
    TOP2X6~2.jpg
    139.8 KB · Views: 47
  • finished up this portion of fencing today 1.jpg
    finished up this portion of fencing today 1.jpg
    150.9 KB · Views: 49
To avoid these ads, REGISTER NOW!
Top Bottom