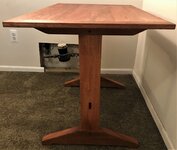
To avoid these ads, REGISTER NOW!

Woodworking 101--Tools and Tips

rlitman

Well-known member
Joined
Oct 18, 2010
Messages
24,591
Location
Long Island
Thanks to both of you for commenting on this. I know BLO is far from the best or even the correct method to keep exterior wood lasting a bit longer than with nothing but it sure works better than nothing on shovel and rake handles.
I think I’ll stop in at rocklers today to see what they might recommend cause I doubt HD or Lowe’s carries a higher quality product.
That's worth a shot. There's always marine grade finishes too. They're expensive, but can often be bought in small quantities.
 
To avoid these ads, REGISTER NOW!

drivesitfar

Well-known member
Joined
Oct 23, 2013
Messages
36,006
Location
Pacific Northwest
thanks PD. do you recall where you bought it from and which brand is better if there is a choice? I think your cell phone meant to auto correct as PNW but I remember you were once up here in the land of Drizzle.

cheers
 

rlitman

Well-known member
Joined
Oct 18, 2010
Messages
24,591
Location
Long Island
Drives, look for a high quality Marine Varnish- Epifanes is what I used when I lived up there in the PRWW.
I've heard good things about Epifanes and have good results with Sikkens stains.

TWW is worth watching. This video specifically has a good take on what to expect from outdoor wood finishes:
Again, you can get away with allowing the finish to reach failure with solid wood, that you must not allow with butcherblock.
 

drivesitfar

Well-known member
Joined
Oct 23, 2013
Messages
36,006
Location
Pacific Northwest
Thanks and I’ll keep looking into this when I’m closer to finishing it fir my bride to use year round. For now I think I’m going to pick up some rockler polyurethane to put on a cost or two to protect it some this summer and should be fairly easy to sand off when I need to remove and keep fir the GOOD STUFF.

thanks again fir the help!!
 

PugetDude

ALLIANCE MEMBER
Joined
Mar 13, 2013
Messages
22,353
Location
Superstition Mountains, AZ
thanks PD. do you recall where you bought it from and which brand is better if there is a choice? I think your cell phone meant to auto correct as PNW but I remember you were once up here in the land of Drizzle.

cheers
I bought it at Edensaw in Port Townsend.
Worth the trip if you like Hardwoods; ask to see the warehouse...
 

drivesitfar

Well-known member
Joined
Oct 23, 2013
Messages
36,006
Location
Pacific Northwest
PD: we need a good reason fir a road trip and we love the food in PT. Thanks.

older sales guy at rockler convinced me to buy this spar varnish that he said is mcclosky’s version of epafane. I need something to protect raw wood now that it’s had a good sanding and this seems like a good product for that. He also gave me some painting varnish tips that completely went over my head cause my wife usually does any painting here. I’ll put on a couple light coats so this bench can be used again starting on Monday or Tuesday. Sound ok for now? It shouldn’t get too beat up or damaged while I’m using it this summer as a workbench and rockler guy mention I could sand this off easier or add to it at end of summer to give to my bride. Thoughts?
 

Attachments

  • 257DA36F-5525-4560-8A20-927718D7A40C.jpeg
    257DA36F-5525-4560-8A20-927718D7A40C.jpeg
    355.4 KB · Views: 148
  • 435B843F-2375-4C2D-AA17-DA1243F25657.jpeg
    435B843F-2375-4C2D-AA17-DA1243F25657.jpeg
    447 KB · Views: 100

Bob Heine

ALLIANCE MEMBER
Joined
Oct 24, 2009
Messages
10,703
Location
Boca Raton, Florida
I was thinking about marine cause I’m sure an old wood boat doesn’t shine year after year for no reason.

thanks RL
Drives, as a former mahogany speedboat owner, my boat stayed shiny because I sanded and re-coated it with marine grade spar varnish every year. Luckily I was mostly using the boat in fresh water in a northern climate.
 

PugetDude

ALLIANCE MEMBER
Joined
Mar 13, 2013
Messages
22,353
Location
Superstition Mountains, AZ
PD: we need a good reason fir a road trip and we love the food in PT. Thanks.

older sales guy at rockler convinced me to buy this spar varnish that he said is mcclosky’s version of epafane. I need something to protect raw wood now that it’s had a good sanding and this seems like a good product for that. He also gave me some painting varnish tips that completely went over my head cause my wife usually does any painting here. I’ll put on a couple light coats so this bench can be used again starting on Monday or Tuesday. Sound ok for now? It shouldn’t get too beat up or damaged while I’m using it this summer as a workbench and rockler guy mention I could sand this off easier or add to it at end of summer to give to my bride. Thoughts?
When you re-do it try this.... my boat-builder neighbor recomended it.


drivesitfar

Well-known member
Joined
Oct 23, 2013
Messages
36,006
Location
Pacific Northwest
Bob: I know if you weren’t a bit under the weather or recently cut you’d probably have embellished a lot more and even posted a few pics of what sounds like an awesome boat. That said thanks for your thoughts and hope you’re feeling better daily.
PD: thanks and looks like come September I’ll be buying that if we haven’t got to port Townsend before then for a road trip day.

all: the bench is in full sun today and it’s about 80 so hopefully my bride will get on a light coat or two of the varnish and hope it’s not too hot while I work on setting fence posts.
 

PugetDude

ALLIANCE MEMBER
Joined
Mar 13, 2013
Messages
22,353
Location
Superstition Mountains, AZ
Bob: I know if you weren’t a bit under the weather or recently cut you’d probably have embellished a lot more and even posted a few pics of what sounds like an awesome boat. That said thanks for your thoughts and hope you’re feeling better daily.
PD: thanks and looks like come September I’ll be buying that if we haven’t got to port Townsend before then for a road trip day.

all: the bench is in full sun today and it’s about 80 so hopefully my bride will get on a light coat or two of the varnish and hope it’s not too hot while I work on setting fence posts.
Better check to see if Edensaw has it in stock before you make the trek.
Check out the Cowboy Burger at Sirens Pub or the Fish and Chips at Doc's Marine Grill.
 

drivesitfar

Well-known member
Joined
Oct 23, 2013
Messages
36,006
Location
Pacific Northwest
Here’s what first coat of Soar marine varnish looks like. My bride did this in about 15 minutes and it was almost dry to touch when she put brush and varnish back. Second coat coming in about an hour or two. BTW don’t shake varnish in can cause causes bubbles and she knew that but I tried to help so she waited a bit before doing first coat. I’m a Newbie as far as this paint stuff.
 

Attachments

  • 079FCE9C-757D-4C9D-8F24-55223E3D8163.jpeg
    079FCE9C-757D-4C9D-8F24-55223E3D8163.jpeg
    389.1 KB · Views: 79
  • E164542F-173D-47D2-8E89-CB31234AF4E3.jpeg
    E164542F-173D-47D2-8E89-CB31234AF4E3.jpeg
    363.1 KB · Views: 69
  • C519B10A-C6F2-4A70-A7CB-EC3D20A0E643.jpeg
    C519B10A-C6F2-4A70-A7CB-EC3D20A0E643.jpeg
    355.4 KB · Views: 84

MJOPE

Well-known member
Joined
Nov 24, 2019
Messages
197
Location
Tucson, AZ
I’ve used that spar varnish before on an Adirondack chair and it worked good, but did require re-coating every couple years. I live in southern AZ so not much moisture to worry about (except past few days 😬)….

The sun did yellow it quite a bit, though…
 

HenryAZ

MEMBER EMERITUS
Joined
Sep 18, 2012
Messages
1,054
Location
South Congress AZ
Anybody use boiled linseed oil on wood outside?
I've never used LO outside, but if you're going to work with LO at all, I would suggest trying polymerized LO. Drying time between coats is about 8 hours, vs 8 days. It is often sold as Danish Oil. I have used Tried and True Danish Oil on several wood items, and it dries to a beautiful sheen that is pretty impervious to soap and water (when I clean it between re-applicaitons).
 

Modern Garage

Well-known member
Joined
Mar 26, 2015
Messages
583
Location
Southern Minnesota
I'm going to jog your memory and look back a few years. There was a short discussion of Stanley No. 77 dowel makers back in 2017, and I came across one in a thrift store with no cutters. Is this just a doorstop (or parts machine) or are cutters available?
And by available I mean for less than the cost of my last car...
Joe
 

drivesitfar

Well-known member
Joined
Oct 23, 2013
Messages
36,006
Location
Pacific Northwest
Henry: thanks for taking the time to give me some more good info. It’s slow going cause milled cedar with all the planing and cuts and staining before I screw our new fence together but managed to get up a few more sections.

I also own a couple old table saws but I rarely if ever use them cause I don’t have a good space tower them up. SO I put a 60 tooth Diablo blade on my worm saw and so the few rips that way and hit with hand power planer if I see saw cut. My bride is putting two coats of PPG stain on everything before I screw it together. More pics in my DIY thread in garage gallery.
 

Attachments

  • AC1485FD-D8C2-4C96-AFF4-FCF617B1F663.jpeg
    AC1485FD-D8C2-4C96-AFF4-FCF617B1F663.jpeg
    586.4 KB · Views: 62
  • 742B1396-A91D-4B7E-A0F7-CFD49693F51E.jpeg
    742B1396-A91D-4B7E-A0F7-CFD49693F51E.jpeg
    579.4 KB · Views: 57
  • 0C741F85-1B5E-48A5-ACE2-A074A176ACD8.jpeg
    0C741F85-1B5E-48A5-ACE2-A074A176ACD8.jpeg
    561.5 KB · Views: 55
  • 857254F0-2767-4227-B3BB-CE6331855A74.jpeg
    857254F0-2767-4227-B3BB-CE6331855A74.jpeg
    395.7 KB · Views: 51
  • 3D0D562E-A8E9-4BB7-8576-2C3B63A20E50.jpeg
    3D0D562E-A8E9-4BB7-8576-2C3B63A20E50.jpeg
    613.2 KB · Views: 80

acer66

Well-known member
Joined
Dec 4, 2010
Messages
4,418
Location
Western North Carolina
I need a basic vise for my drill press which is mainly used for wood working but also for the occasional metal project.

What are you guys using?

Thank you.
 

topcok88

Well-known member
Joined
Jun 3, 2013
Messages
660
This may have been covered elsewhere but I haven’t seen it on GJ. I recently purchased Jet DC-1100C 1-1/2 HP dust collector with a Dust Dog filter for $325 on FB Marketplace. When texting with the seller he mentioned he was selling it because he was upgrading to the new version with a Vortex Cone (Powermatic calls it a Turbo Cone). Curiosity got the best of me and I started searching. Forum posts from years ago mentioned the possibility of ordering the parts for around $20 and somewhere it seemed Jet increased the kits to nearly $100. It appeared many fabricated their own to save a little money but then I found a listing for a kit from an online retailer for $30. A few days later the cone with hardware arrived, I drilled four holes and essentially have a newer Vortex Cone model for $355.

For those who may be unaware - the Vortex Cone/Turbo Cone keeps the bulk dust from being kicked back up into the canister filter and makes it last longer between cleaning and subsequent disposal. Hope someone finds this helpful.
 

Attachments

  • 3B63DF57-5293-47D2-A2FF-17CE18E1F25E.jpeg
    3B63DF57-5293-47D2-A2FF-17CE18E1F25E.jpeg
    340.6 KB · Views: 63
  • 93BB5B96-9DE3-4548-917D-E7B0C1DA3420.jpeg
    93BB5B96-9DE3-4548-917D-E7B0C1DA3420.jpeg
    277.8 KB · Views: 75

drivesitfar

Well-known member
Joined
Oct 23, 2013
Messages
36,006
Location
Pacific Northwest
TopC: great post and let us know how you like it after you use it for a while.

ALL: i'm making slow but steady progress installing a new cedar fence so here's a pic of what we put together this last week. more pics on my DIY thread in garage gallery forum/section if you'd like to see. I bought/buy my cedar from a local cedar mill and plane and cut it and my bride is in charge of the staining before we screw it all together. it's far from perfect, but i'm slowly becoming a WOOD WORKER and not so much a wood butcher.
 

Attachments

  • E8A0F646-CC9E-446B-8368-FCC0C1A9F266.jpeg
    E8A0F646-CC9E-446B-8368-FCC0C1A9F266.jpeg
    406.8 KB · Views: 82
To avoid these ads, REGISTER NOW!

pkpk

Well-known member
Joined
Aug 29, 2020
Messages
64
Location
Midwest
TopC: great post and let us know how you like it after you use it for a while.

ALL: i'm making slow but steady progress installing a new cedar fence so here's a pic of what we put together this last week. more pics on my DIY thread in garage gallery forum/section if you'd like to see. I bought/buy my cedar from a local cedar mill and plane and cut it and my bride is in charge of the staining before we screw it all together. it's far from perfect, but i'm slowly becoming a WOOD WORKER and not so much a wood butcher.
Your fence is looking great! One question, is there a reason you're using a 60-tooth blade on your worm drive saw for ripping? I thought that'd be a high tooth count for that task...

I've spent some time in a buddy's home shop working on an edge-grain cutting board with inlays, made from walnut, maple and cherry. Having a nice table saw (he's got an old Craftsman cast-iron saw with a Vega fence), a powerful router and table and a wide belt sander really helps. It's coming together really nicely, all I have to do is sand then apply oil for a finish. I'll share photos when it's done!

I also recently acquired a used Dewalt DWE 7480 10" portable table saw. Should be an upgrade over my Craftsman aluminum top with crappy fence and no riving knife or guard, which I'll now be selling off. Current living (and money) situation means I can't get a proper saw just yet, so something portable makes sense for me, plus I'm happy to have one with a nice rack and pinion fence. I'll probably modify one of my rolling tables to hold it and give outfeed support.
 

pkpk

Well-known member
Joined
Aug 29, 2020
Messages
64
Location
Midwest
I need a basic vise for my drill press which is mainly used for wood working but also for the occasional metal project.

What are you guys using?

Thank you.
Might be belated advise but I had a little 8" drill press I bought used that came with a non-US 4" vise (maybe Harbor Freight brand?) which worked fine for the little bit of metal drilling I did. I also bought an HF Pittsburgh locking clamp that was good enough for my woodworking projects. So maybe these would work for you:


drivesitfar

Well-known member
Joined
Oct 23, 2013
Messages
36,006
Location
Pacific Northwest
PKPK: i'm using the 60 tooth 7.25 diablo blade on my worm saw because one I had a new one sitting in a drawer and since i'm trying to end up with 2 3.5 inch wide boards out of a rough cedar 2x7 (real dimensions) I didn't want to plane off very much. when I don't stop in the middle of the rip the cut is actually pretty smooth.

All: I made a bit more progress on our new cedar fence so here's a few pictures. also i'm going to be making some 4.5 foot wide gates swinging off off 6x6's and wondering what hinges and latches you might want to suggest I use. i'm willing to spend a bit more so the gate doesn't sag (it will only be made out of 2x4's with a small lattice on top) and the latch doesn't need to lock, but that would be a bonus.
 

pkpk

Well-known member
Joined
Aug 29, 2020
Messages
64
Location
Midwest
PKPK: i'm using the 60 tooth 7.25 diablo blade on my worm saw because one I had a new one sitting in a drawer and since i'm trying to end up with 2 3.5 inch wide boards out of a rough cedar 2x7 (real dimensions) I didn't want to plane off very much. when I don't stop in the middle of the rip the cut is actually pretty smooth.

All: I made a bit more progress on our new cedar fence so here's a few pictures. also i'm going to be making some 4.5 foot wide gates swinging off off 6x6's and wondering what hinges and latches you might want to suggest I use. i'm willing to spend a bit more so the gate doesn't sag (it will only be made out of 2x4's with a small lattice on top) and the latch doesn't need to lock, but that would be a bonus.
Okay, right on - but I think you missed some photos in your post! That's the most I can help there, not sure at all about hinges and latches heh...
 

pkpk

Well-known member
Joined
Aug 29, 2020
Messages
64
Location
Midwest
^Looking real nice!

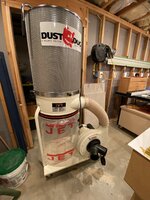
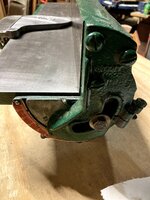
Maybe some of the pros here can help me: yesterday I picked up a little old "Homecraft" 4" jointer for $65. It came with a new set of knives along with the old ones, and no motor but I have a few that might work. Seller was a retired cabinet maker who said he got it from his dad but never really used it (he had bigger machines), and I guess he finally wanted to get rid of it.

There's no model number, and no Delta or Rockwell badge, but it's got the looks and part numbers to match this Delta model from the '50s: http://vintagemachinery.org/pubs/1141/1025.pdf

The total table length is only about 24" so I get this is a limited-capacity jointer, but that's fine by me for a first one when I'm short on space anyway. Plus it just looks to me like a cool little project, getting an old machine running (I'd probably put it on a little benchtop platform like someone did 
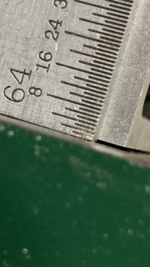
here) and I figure at least it can help me make some small projects like cutting boards. There's no fence-tilt handle, just a bolt and washer, but oh well. The cutter head rotates smoothly. The tables look really flat and both adjust fine. The fence on the infeed side appears extremely close to square to the table, but there seems to be a tiny bit of warp going up and away from the table and toward the outfeed end, up to maybe 1/64th of an inch measured atop a double square (edit: so it's juuuust over 90 degrees). I'd rather not try to adjust the fence if I don't have to so is that close enough to square for smaller jobs?

And my other questions are about the motor. The manual suggests a 1725rpm motor with a 6.5" pulley, to get around 4000rpm at the 2.75" cutter head pulley, but would a 3450rpm motor with a 3" or 3.5" pulley be acceptable? And how much horsepower? I have a few motors in both rpms, from 1/3hp to 1hp, so hopefully one will work and the only thing besides a belt I might need to buy is a pulley.

If anyone has any thoughts, advice etc to share about getting this jointer operational it'd be hugely appreciated! Sharing some photos too.
 

Attachments

  • IMG_8767.jpg
    IMG_8767.jpg
    370.3 KB · Views: 59
  • IMG_8773.jpg
    IMG_8773.jpg
    370.5 KB · Views: 50
  • IMG_8769.jpg
    IMG_8769.jpg
    330.3 KB · Views: 47
  • IMG_8774.jpg
    IMG_8774.jpg
    358.9 KB · Views: 44
  • IMG_8778.PNG
    IMG_8778.PNG
    3.3 MB · Views: 67
Last edited:

HenryAZ

MEMBER EMERITUS
Joined
Sep 18, 2012
Messages
1,054
Location
South Congress AZ
The fence on the infeed side appears extremely close to square to the table, but there seems to be a tiny bit of warp going up and away from the table and toward the outfeed end, up to maybe 1/64th of an inch measured atop a double square (edit: so it's juuuust over 90 degrees). I'd rather not try to adjust the fence if I don't have to so is that close enough to square for smaller jobs?
I would just hold the board as much as possible against the (square) infeed fence, and hold against the bottom of the outfeed fence. A couple of springs would help with that.
 

drivesitfar

Well-known member
Joined
Oct 23, 2013
Messages
36,006
Location
Pacific Northwest
PK: there are several great you tube videos of joiners restorations where you might get done good ideas. I have a bigger 6 inch jet joiner now that really needs a hood spiffing up cause it spends its winters outside under a tarp but it runs and works great. Good luck with yours and keep your eyes open for a bigger stand up model.
 

drivesitfar

Well-known member
Joined
Oct 23, 2013
Messages
36,006
Location
Pacific Northwest
PK: I like those solid small vintage joiners so best of luck finding a spot in your shop to set it up and use it. if you do find a bigger stand up 6 or 8 inch version you'll definitely be happy and maybe if space is an issue buy a new or vintage hand held 3.25 inch planer. i've got a couple old Craftsmans and makitas I pull out when I need to trim up a board's edge and even when i'm trying to get a milled real 6x6 down to just under 6 inches so I can use my dewalt 12.5 inch planer. I've used the hand held 3.25's to clean up cedar 8x8's when I built this mailbox stand. i'm still more of a wood butcher than a woodworker, but I keep learning and trying to get better as fast as I can.
 

Attachments

  • cedar mailbox looks like it's been here for a while just need new driveway now.jpg
    cedar mailbox looks like it's been here for a while just need new driveway now.jpg
    607.6 KB · Views: 60

pkpk

Well-known member
Joined
Aug 29, 2020
Messages
64
Location
Midwest
^Thanks for the input guys! (And that mailbox stand looks great!) Hoping to find time soon to put it together but still gotta figure out the motor/pulley/belt setup, trying to look through options at Tractor Supply Company and Amazon. I think the easiest way to do it is get a smaller pulley to put on a 3450rpm motor; a 3" motor pulley would yield 3764rpm at the 2-3/4" jointer pulley which seems close enough to the suggested 4000rpm for the light use I have in mind.

I'd love to have a 6" or 8" jointer and proper floor-standing machines in general, which sometimes tease me with a really good price on fb marketplace, but that's not in the cards just yet. Plus I'll be pretty happy if I could give new life to this old US-made 4" jointer for maybe a $100 total investment vs $300+ for a new benchtop jointer like a Porter Cable 6". Also considering getting a hand planer as well.

HenryAZ: I'm trying to imagine it but can you say more about what you mean by using springs on the outfeed side?
 

topcok88

Well-known member
Joined
Jun 3, 2013
Messages
660
Also considering getting a hand planer as well.
A power hand planer has actually been more useful than I had imagined. I bought a Festool HL850 (for a project I have yet to make) and I ended up using during casework fitting. Some areas that may need a rabbit to fit around framing to provide a nice straight door way or a little shaved off here and there. It’s great! The dust collection is awesome paired with my Midi and the depth of cut adjustment is so easy to use. Really something I have used more than I thought I would.
 

Attachments

  • 85EE4D99-3B91-4FAA-B3CC-FE292A60AA62.jpeg
    85EE4D99-3B91-4FAA-B3CC-FE292A60AA62.jpeg
    229.3 KB · Views: 60

HenryAZ

MEMBER EMERITUS
Joined
Sep 18, 2012
Messages
1,054
Location
South Congress AZ
HenryAZ: I'm trying to imagine it but can you say more about what you mean by using springs on the outfeed side?
No different than the infeed side. I just clamp a spring (featherboard) to the table so it pushes against the bottom edge of the board. Perhaps we each hold a different idea of what the spring looks like. I made mine from 5/4 or 6/4 x 2" or 3" wide "sticks" (length as needed). Cut the end of the stick on an angle. On the bandsaw, run in some saw cuts on the end of the stick, very close together, so you have 1/16" kerf, then 1/16" wood, about 2"-3" deep, across the end of the stick.

Sometimes pictures explain better:
How to Make Your Own Featherboards.
 
Last edited:

pkpk

Well-known member
Joined
Aug 29, 2020
Messages
64
Location
Midwest
A power hand planer has actually been more useful than I had imagined. I bought a Festool HL850 (for a project I have yet to make) and I ended up using during casework fitting. Some areas that may need a rabbit to fit around framing to provide a nice straight door way or a little shaved off here and there. It’s great! The dust collection is awesome paired with my Midi and the depth of cut adjustment is so easy to use. Really something I have used more than I thought I would.
Noted, thanks for this - but the day I can afford Festool gear is the day I know I truly have my life together, lol!

Does anyone has any thoughts on the cheaper power hand planers like this one from Porter Cable?

No different than the infeed side. I just clamp a spring (featherboard) to the table so it pushes against the bottom edge of the board. Perhaps we each hold a different idea of what the spring looks like. I made mine from 5/4 or 6/4 x 2" or 3" wide "sticks" (length as needed). Cut the end of the stick on an angle. On the bandsaw, run in some saw cuts on the end of the stick, very close together, so you have 1/16" kerf, then 1/16" wood, about 2"-3" deep, across the end of the stick.

Sometimes pictures explain better:
How to Make Your Own Featherboards.
I was thinking you might be talking about a featherboard, makes sense! It'd just be a really small one given the 4" width and I'd have to figure out how to clamp it to the outfeed table, it could be hard to find a good flat surface on the underside for the clamp... or maybe I could use a forstner bit, drill some flat bottom holes into the featherboard and glue in tiny rare earth magnets to stick it to the table.
 

HenryAZ

MEMBER EMERITUS
Joined
Sep 18, 2012
Messages
1,054
Location
South Congress AZ
I was thinking you might be talking about a featherboard, makes sense! It'd just be a really small one given the 4" width and I'd have to figure out how to clamp it to the outfeed table, it could be hard to find a good flat surface on the underside for the clamp.
If the underside has ridges in the casting, taking away any flat spaces, you might be able to span a couple of ridges with a piece of wood, then clamp to that. Or even span the entire 4" underside. I would make the featherboard longer than the needed 4" and just let it stick off the side of the table. That way it would be useful for other applications.
 

CRSINMICH

Well-known member
Joined
Aug 15, 2015
Messages
2,397
Location
Southeastern Michigan
My son and I made this solid mahogany trestle table. It has pinned breadboard ends and pinned uprights. The pins are made of black palm wood. The stretcher has through wedged tenons. After the stock was brought to size, everything was done with hand tools. We even made the dowel plate we used to make the black palm pins.
 

Attachments

  • Trestle with finish (7).JPG
    Trestle with finish (7).JPG
    274.2 KB · Views: 43
  • Trestle with finish (1).JPG
    Trestle with finish (1).JPG
    243.1 KB · Views: 40
  • Trestle with finish (3).JPG
    Trestle with finish (3).JPG
    361.8 KB · Views: 46
Last edited:

CRSINMICH

Well-known member
Joined
Aug 15, 2015
Messages
2,397
Location
Southeastern Michigan
TRESTLE TABLE FINISH
The mahogany trestle table was sanded to 220 before finishing. I used Tried & True Varnish Oil to begin the process.
It's a wipe-on finish which is a combination of polymerized (not boiled) linseed oil and tree resins. It might be worth mentioning again
that BLO (boiled linseed oil) is not boiled. It has chemical dryers added to speed up the drying process. Linseed oil is polymerized
by heating it to over 500 degrees in the absence of oxygen. It's confusing. Anyway, Varnish oil really makes the grain stand out and
it produces a lovely soft luster. It is easy to apply but it does take some time to completely cure. My plan is to apply several coats of
Arm-R-Seal Satin to the top of the top with light sanding between coats. I actually took the time to do a true hand-rubbed finish on a table I built many years ago and I'm trying to reproduce that look with this table but without the hard work. I'm sitting at that table as I type this and even after 30 years the finish is still wonderful.

I tried to take a close-up photo of how Varnish Oil enhanced the grain pattern of the wood but phone cameras are not up to that.
This is the best I could manage. How I dealt with the grain of the woods in the trestle table could be a post of it's own.

Has anyone else done a hand-rubbed finish? What was your process and how did it turn out?
 

Attachments

  • Finish detail (3).JPG
    Finish detail (3).JPG
    481.5 KB · Views: 43
Last edited:

drivesitfar

Well-known member
Joined
Oct 23, 2013
Messages
36,006
Location
Pacific Northwest
CRS: thanks for explaining some of the differences of BLO and regular Linseed oil. I know a few of the guys do make up their own concoction or formula for their work and nice to see and hear how you do yours.

any before and during pics of your table to post? if not thanks for posting the ones you did and nice work!!!


ALL: i've got a nice maple bench (about 3 inches thick and held together with 2 4 inch oak pins) that I was planning on putting another coat of Johnson paste wax on unless some of you might have a better option. thoughts?
 

Attachments

  • Jan 13, 2021 custom handmade maple bench Port Angeles 59x18x18 2.jpg
    Jan 13, 2021 custom handmade maple bench Port Angeles 59x18x18 2.jpg
    387.6 KB · Views: 35
  • Jan 13, 2021 custom handmade maple bench Port Angeles 59x18x18 1.jpg
    Jan 13, 2021 custom handmade maple bench Port Angeles 59x18x18 1.jpg
    256.3 KB · Views: 31
  • Jan 13, 2021 custom handmade maple bench Port Angeles 59x18x18.jpg
    Jan 13, 2021 custom handmade maple bench Port Angeles 59x18x18.jpg
    521.1 KB · Views: 36

CRSINMICH

Well-known member
Joined
Aug 15, 2015
Messages
2,397
Location
Southeastern Michigan
drives: I don't have a photo of the top of the top before finish but here is the same view of the complete table before and after. The difference is way more dramatic in person.
 

Attachments

  • Trestle table (6).JPG
    Trestle table (6).JPG
    240.5 KB · Views: 38
  • Trestle with finish (7).JPG
    Trestle with finish (7).JPG
    274.2 KB · Views: 33

Shiftless

Well-known member
Joined
Mar 9, 2014
Messages
14,516
Location
East Bay SFO
Drives:
As CRS said, the difference is VERY noticeable in person.
I occasionally refinish teak furniture by sanding and then rubbing in multiple coats of danish oil which is not too different from BLO.
The payoff for all the hard work of sanding comes when the first coat of oil gets rubbed in and the surface comes alive with the grain emphasized and a warm glow appearing right before your eyes.
 
Last edited:

CRSINMICH

Well-known member
Joined
Aug 15, 2015
Messages
2,397
Location
Southeastern Michigan
Shift: I think Danish oil is a polymerized oil too. It does indeed produce similar results.

drives: I meant to reply to your question about wax finish earlier. If you've already put wax on that bench then you'll have to keep reapplying it. The old wax will likely prevent the wood from absorbing any new finish evenly which could produce a blotchy result. You might experiment with shellac as a sealer before applying a new finish. If your bench is only used indoors then wax alone should be just fine. The English have used it on furniture for a very long time.
 
To avoid these ads, REGISTER NOW!
Top Bottom