To avoid these ads, REGISTER NOW!

work benches... from scratch

BB767

Well-known member
Joined
Dec 24, 2009
Messages
3,724
Location
Philo, IL
Your bench is absolutely beautiful. Just curious how you attached the legs to bottom.
Thank You

02wrx I didn't include much information on the Barn Bench Build on this thread because it's cover very extensively on the Restored 1930's Auto Shop thread as I mentioned. The link I included earlier is where coverage of the bench build begins. As I look back now, I don't think that question about leg attachment ever came up and it's a good one.

IMG_4719.jpg


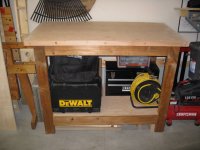
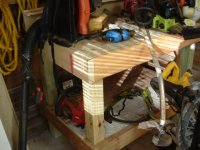
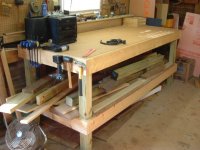
The legs are all laminated hard Maple and are a full 4" X 4". All the legs are secured in their relative positions in multiple ways with stringers across the front, plywood dividers in the center and ...

IMG_5125.jpg


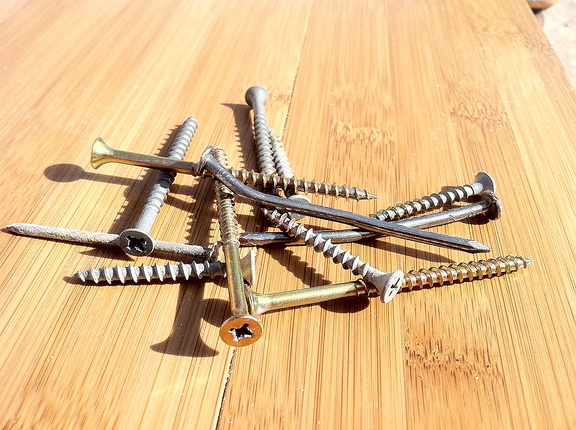
...1/2" maple plywood backing all around the back side seen here. Since the leg material was all solid wood they were screwed to the base platform from the underside of the base into the bottom end of the legs using 2 1/2 " drywall screws, predrilled beforehand and using bees wax on the screw threads. The pattern was 1 in roughly each corner of the leg, slightly toenailed toward the center and 1 in the middle. That was one of the more challenging portions of the build since I was working from the underside of the base platform and the whole bench had to be elevated to do that attachment.

IMG_7530.jpg


By doing it that way if you note this inside view and no leg attachment screws or hardware can be seen leaving a clean look. I hope that answers your question.

Thank you for the kind words and interest in my work.

Thomas from the Restored 1930's Auto Shop

http://www.garagejournal.com/forum/showthread.php?t=51567
 
To avoid these ads, REGISTER NOW!

mroy05

New member
Joined
Feb 20, 2011
Messages
4
Location
New England
I have a single car garage so space is something that always has to be taken into account so I thought WAY out of the box on my work bench.
I have a welding table that sees most of my heavy duty work, but for the smaller work its noce to have a place that's not covered in an oily film.
garage1.jpg


garage2.jpg


In the next week I hope to cut and bend up a new "top" for it as right now its got the embossed back side of the Jeep logo on it and years of abuse etched into it.
The runners are 2x4 and the uprights are 2x6 its screwed into the studs with 18 3" coarse thread drywall screws.
The gate pivots on 2 pieces of 1.5" threaded plumbing pipe (you can see the cap on the left of the 1st photo). Whole bench cost less than 20.00

It's a Jeep Workbench....if you have to ask you wouldn't understand:thumbup:
 

Ric in Richmond

Well-known member
Joined
Oct 17, 2009
Messages
388
Location
Richmond...duh
Wish this had pictures....6'x10' x 2 inches thick steel table!!!!

*SNIP************

This all STEEL work bench / table can be used for many things , welding , fabracation, , or what ever

the size of this bench is 6 Foot wide by 10 foot long it is 2 inches thick, YES that is right 2 inches thick

I called a steel supplier to find the price of the steel plate , he did not have new , he said he had a very good used piece for>>>> $ 4300.oo <<<<<<

this bench weighs 6000 lbs maybe even 6500 lbs

bench has to be moved with a crane or a couple of forklifts

and NO NO NO you can not put it in your pick up truck or on your utility trailer

you could put it in a dump truck , tandem or triaxle or on a tag a long trailer

bench is drilled for a vise

one leg is a tall H beam which HAD a jib crane on it , there is NO jib crane with this bench it is gone

I will have to cut H - Beam for you it is too tall to transport on the road

loading can be arrainged (a guy down the street has a crane)

asking $ 2000.oo or B/O or Swap ???

CALL , Ed @ 862-881-7840 8am > 9pm

located near, newton , stillwater, fredon, blairstown, andover, branchville, sparta, warren county , sussex, morris, stroudsburg,

search words >> Snap on mac craftsman, backhoe bulldozer welder lathe milling machine torch bridgeport atlas skidsteer miller, lincoln, hobart victor smiths purox airco mig tig wire feed
 

Zeppe807

Well-known member
Joined
Dec 25, 2009
Messages
372
Location
Sonoma County, Ca.
So Here is my lightweight welding table I built this weekend. I did not spend any money on the table, and used the materials I had on hand. It is not yet complete, but close.

My table top was a road plate that was unusable as a road plate, so the construction co I work for was going to scrap it, so I grabbed it.

DSCF3385.jpg


The table ended up to be 3.5' X 5.5' & 1" thick. The height is 32" tall. I have 2" x 2" angle frame welded so that I can put a plate on the bottom and to store all my metal working equipment. I plan on having casters that will drop down when I need to move it. I also will add leveling adjusters to the legs.

Joe Zeppe :thumbup:
 
Last edited:

BlockBuster

Member
Joined
Feb 27, 2011
Messages
22
Location
SEMass
Tip of the cap to the 'jeep tailgate bench' from post #745…

I used 1 x 2 rectangular tube, measured and drilled on the floor and then mounted. Its just the right size work surface at 53 1/2" x 13 1/2".

photo-32.jpg


photo-31.jpg
 
Last edited:

rmousir

Well-known member
Joined
Jan 31, 2009
Messages
116
Tip of the cap to the 'jeep tailgate bench' from post #745…

I used 1 x 2 rectangular tube, measured and drilled on the floor and then mounted. Its just the right size work surface at 53 1/2" x 13 1/2".

photo-32.jpg


photo-31.jpg

That is SUPER! Very very clever! I think I will use that some day.
 

Dubbydoo

Well-known member
Joined
Jan 22, 2011
Messages
275
just picked this homemade table up the other day for 200$ its a 6feet by 12feet guy said its 1/4 plate but its more like 3/8s gonna cut it down into 3- 4feet by 6feet tables
weldingtable002.jpg

weldingtable001.jpg
 

metalmagpie

Well-known member
Joined
Nov 1, 2011
Messages
796
Location
Seattle
Seems like I posted this already somewhere .. don't remember .. anyway, I found a guy who once worked on a crew remodeling a Lowe's. They were told to scrap out the metal drawers that used to hold their fasteners back when they still were pretending to be a hardware store. Anyway, I bought 8 of those drawer units from him and knocked together a base and had my woodworking buddy help me with the tops and the other day we got 'em together. About sixteen feet long, plus they have 11" of clearance underneath for storing toolboxes, floor jack, chain saw or other awkward things. Have a look:

twoBenches.jpg
 

BKO 5

Member
Joined
Mar 31, 2012
Messages
16
not much room in my rented garage so i had to make mine small but it does the job

2012-04-03194103_zpsb70fef54.jpg
 

Tricon

Well-known member
Joined
Aug 11, 2012
Messages
97
Location
Southern California
Started work on mine, still have to make some drawers, doors, and I think I'm going to make the top shelf of my storage rack have an 8ft wide door on gas struts. Havent decided yet.

Build my top out of 3/4" ply and 3/4" Melamine. Super solid for what I need it for.

G1.jpg
 

Dubbydoo

Well-known member
Joined
Jan 22, 2011
Messages
275
put my new shop table in removed the rust oiled it down and installed a vice 3/8s plate 6feet by 12feet table not to shabby was thinking about cutting it down but not sure I want to do that now nice fab table http://sphotos-a.**.fbcdn.net/hphotos-ash3/12120_10151398760428833_1405678390_n.jpg
http://sphotos-a.**.fbcdn.net/hphotos-prn1/28780_10151398760373833_312343429_n.jpg
http://sphotos-a.**.fbcdn.net/hphotos-frc1/576482_10151398760278833_627027261_n.jpg
http://sphotos-b.**.fbcdn.net/hphotos-ash4/840_10151398760193833_933660898_n.jpg
 

dmeadow

Well-known member
Joined
Sep 3, 2005
Messages
952
Location
Houston, Texas
Started work on mine, still have to make some drawers, doors, and I think I'm going to make the top shelf of my storage rack have an 8ft wide door on gas struts. Havent decided yet.

Build my top out of 3/4" ply and 3/4" Melamine. Super solid for what I need it for.

G1.jpg

How did you cut the melamine without chipping it up?
 

SpyderGiant

Well-known member
Joined
Dec 4, 2012
Messages
52
Location
Inland Empire SoCal
Heres my bench while I was building it. Its been finished for a while, just trying to clean and reorganize my whole garage before I put up better pics. Made of 2x4s and 4x4s. Top is made of 2 layers of 1/2" plywood and 1 layer of 1/2" MDF.

ae0fps.jpg


293ezo0.jpg


Bench is 11 feet long, 43.5 inches tall, and 24.5 inches deep. I wanted it that tall because I'm 6'8" and measured where I wanted to stand and work. This is the first bench I've ever built and by far the biggest thing I've built. This bench is SOLID and doesn't move.
 
Last edited:
To avoid these ads, REGISTER NOW!

c.schulz

Well-known member
Joined
Jul 22, 2005
Messages
164
Location
mi
put my new shop table in removed the rust oiled it down and installed a vice 3/8s plate 6feet by 12feet table not to shabby was thinking about cutting it down but not sure I want to do that now nice fab table http://sphotos-a.**.fbcdn.net/hphotos-ash3/12120_10151398760428833_1405678390_n.jpg
http://sphotos-a.**.fbcdn.net/hphotos-prn1/28780_10151398760373833_312343429_n.jpg
http://sphotos-a.**.fbcdn.net/hphotos-frc1/576482_10151398760278833_627027261_n.jpg
http://sphotos-b.**.fbcdn.net/hphotos-ash4/840_10151398760193833_933660898_n.jpg

Dont cut it down!!!! You will regret it. It will just turn into more horizontal surfaces to become catch alls. Besides it looks like you have the space to keep it large.

Chris
 

Steevo

Well-known member
Joined
Aug 18, 2009
Messages
8,738
Location
43.49600, -112.04300
I built this bench that my lathe sits on. All 2x6 top framing and blocking for stiffness, and 4x4 legs for solid footing. Adjustable feet for leveling and a 12ga steel top over a 1-1/4" thick melamine commercial workbench top that I salvaged from a used office supply place.

i-7BsRJtJ-M.jpg

IMG_0319-M.jpg

IMG_0320-L.jpg

IMG_0321-M.jpg


Someday, when I get caught up on some other projects, I may build an all-steel bench for the lathe.
 

Tricon

Well-known member
Joined
Aug 11, 2012
Messages
97
Location
Southern California
How did you cut the melamine without chipping it up?


Just used a table saw, I got double sided melamine for $38 per 3/4"- 4x8' sheet, it was cheaper than the ply. One side would chip a little when cut, but the other side was flawless. Worked out great.

96snma said:
Re: work benches... from scratch
Is it hard to clean that floor. ^^^^

Its been a breeze so far. Shop vac cleans it up nicely. Small bonus has been when I drop something like a screw or carb jet, it drops to the floor and stays there, doesnt go bouncing around never to be seen again haha.
 

Koufax6532

New member
Joined
Apr 20, 2009
Messages
1
Here's a couple that I build for my little shop.
 

Attachments

  • IMG_3094.JPG
    IMG_3094.JPG
    79.4 KB · Views: 408
  • 2012 garage table 001.JPG
    2012 garage table 001.JPG
    109.5 KB · Views: 336
  • 2nd table 001.JPG
    2nd table 001.JPG
    102.1 KB · Views: 338
  • 2nd table 010.JPG
    2nd table 010.JPG
    117.6 KB · Views: 361

TRWTOW

Well-known member
Joined
Jul 19, 2008
Messages
213
Location
clio mi
wow some great ideas here :D
i need to build or buy 20 ft of base cabinets heres a pic of the space to fill thats a closet on the left bathroom on right any ideas are welcome. thanks terry
 

Attachments

  • 004.jpg
    004.jpg
    139.4 KB · Views: 568
  • 020.jpg
    020.jpg
    137.1 KB · Views: 466
Last edited:

JasonJ

Well-known member
Joined
Aug 4, 2006
Messages
424
Location
Las Vegas
It's not a work bench but a drinking bench for the patio. :) This was my first wood working project and I am happy with the way it turned out.

First thing I did was draw out a rough sketch on a piece of paper and figure out how much lumber I needed.
i.php


Borrowed saws and a router from friends
i.php


Made sure I had everything else that I may need
i.php


Made my first cut... all fingers are still accounted for.
20121219134654-a76cc998-sm.jpg


Fired up the Chiminea to 'hide' any mistakes. :)
i.php


After some time later and two ****** Mary's.... I have a square.
i.php


The base frame is complete (Layed out the Bamboo panels just for testing)
20121219134710-d934da49-sm.jpg


Framed and skinned
i.php


Installed top of bar... err bench, added shelf and cut Bamboo Flooring to size, and test fitted.
20121219134730-56a990ba-sm.jpg


The entire bar was built around this cooler... I wanted something that sat flush and was tall enough to hold a bottle of wine. The cooler sits on the shelf that was mounted at just the right height so the top of the cooler would be flush.
20121219134746-b23dc3a2-sm.jpg


Routed out a lil finger hole so you can lift the top of the cooler open
20121219134751-d0ebd9ef-sm.jpg


Started using nails in the beginning but I got tired of bending them, I then tried to use 3" screws with out pre-drilling and stripped a few heads. ...lessons learned.
20121219134800-a9f619ad-sm.jpg


Not too bad though, just had to add a few more decorative touches and it was done. At least done enough considering all the ****** Mary's consumed during construction.
20121219134754-d2d46017-sm.jpg
 

peelman

Well-known member
Joined
Jan 13, 2011
Messages
198
Location
Seymour, Indiana
I built this bench that my lathe sits on. All 2x6 top framing and blocking for stiffness, and 4x4 legs for solid footing. Adjustable feet for leveling and a 12ga steel top over a 1-1/4" thick melamine commercial workbench top that I salvaged from a used office supply place.

i-7BsRJtJ-M.jpg


Someday, when I get caught up on some other projects, I may build an all-steel bench for the lathe.

Steevo, What are you using for feet on those 4x4s? I've seen a variety of systems on here, just curious what yours is :)
 

Chevy72pu

Well-known member
Joined
Apr 23, 2012
Messages
304
Location
Sandersville, GA
I built these two from 4 x 4 posts, and 2 x 6's. Put together with 3 inch screws. Tops are MDF inset level with the 2 x 6's on the side. MDF isn't even attached so I can replace it when it becomes damaged. Bottom shelf is OSB. I built the small table with scraps from the large table build.
 

Attachments

  • DSCF0030.JPG
    DSCF0030.JPG
    122.2 KB · Views: 228
  • DSCF0031.JPG
    DSCF0031.JPG
    121.9 KB · Views: 289

Steevo

Well-known member
Joined
Aug 18, 2009
Messages
8,738
Location
43.49600, -112.04300
Last edited:

rslaback

Well-known member
Joined
Jul 24, 2010
Messages
4,061
Location
Westcentral Wisconsin
Just used a table saw, I got double sided melamine for $38 per 3/4"- 4x8' sheet, it was cheaper than the ply. One side would chip a little when cut, but the other side was flawless. Worked out great.

The trick to cleanly cutting melamine is 4 things.

1. Sharp, new blade
2. Use a zero clearance blade insert.
3. Put masking tape on the bottom where the blade will exit (top if using a circular saw)
4. Set the blade in your table saw as high as it can go. You want the teeth of the blade exiting the piece as close to vertical as you can get them. If the blade exits lower as it normally would when the blade is set 1/8-1/4 above the material it tends to want to peel back into the plastic.
 

BB767

Well-known member
Joined
Dec 24, 2009
Messages
3,724
Location
Philo, IL
Thomas where did you source the black metal shelf supports? They appear to be 45 deg - 45 deg - 90 deg shape which is what I'm looking for.

Thanks, Mike K.

Mike, I'm very, very sorry I took so long to get back to you on your question, I just found out you asked. If you haven't looked at the Restored 1930's Auto Shop thread and found the answer about those brackets...

Bracketssm1.jpg


I made them out of 1" square tubing for the two 90 degree pieces and 3/4" tubing for the diagonal support. I then welded end caps to the 1" tubing to give it a finished look.

Bracketsm5.jpg


Here's a close up of another set I made for the old shop. Powder coated them and used polished stainless steel acorn nuts and washers for the hardware that shows. Hope you find that helpful. If you need additional information, just send me a PM and I'll be happy to help as best I can. Thanks for your interest.

Thomas from the Restored 1930's Auto Shop

http://www.garagejournal.com/forum/showthread.php?t=51567
 
Last edited:

MegaManny009

Well-known member
Joined
Nov 11, 2012
Messages
100
I built this bench that my lathe sits on. All 2x6 top framing and blocking for stiffness, and 4x4 legs for solid footing. Adjustable feet for leveling and a 12ga steel top over a 1-1/4" thick melamine commercial workbench top that I salvaged from a used office supply place.

i-7BsRJtJ-M.jpg

IMG_0319-M.jpg

IMG_0320-L.jpg

IMG_0321-M.jpg


Someday, when I get caught up on some other projects, I may build an all-steel bench for the lathe.
u did an awesome job on this, looks really heavy duty
 

donnykooy

Well-known member
Joined
Dec 29, 2012
Messages
87
Location
New Mexico
looks like this bench top is not level or flat...maybe its just the picture but I would get out my level just in case
 

MrKona

Active member
Joined
Dec 29, 2011
Messages
34
Here's my introduction and workbench - My name is Bryan and I've already spent cumulative hours of my life on this website.

The front and rear bench legs are sistered 2x4s. The rear legs are made up partly by the vertical 2x4s screwed to the wall studs onto which the shelves are built. I built the shelves according to the plans here: http://woodgears.ca/shelves/garage.html
This plan worked out well for me because in my limited two garage space, I was able to build shelves all the way up to the ceiling, also my floor isn't level, so by building this homemade bench, I made sure to compensate for this by leveling the horizontal 2x6 in front and supports in back to make the top level, and with the bench rear legs screwed into the wall studs, this bench is solid. Top is two sheets of 3/4" melamine, screwed together. In a few years when the bench top is really nasty, I can replace it.
 

Attachments

  • Workbench 1.JPG
    Workbench 1.JPG
    106.2 KB · Views: 377

72FordGTS

Active member
Joined
Oct 22, 2010
Messages
26
Location
ON, Canada
I used this thread to help design my scratch built workbench. It is 96" wide, 30" deep top, and stands 40" tall. The top is custom made 1/8" stainless, and it has three layers of 5/8" plywood glued and screwed under it. It's a very solid top with no bounce. The remainder is all 2x4's with the legs being sistered. All joints were glued with PL Premium and screwed. It is a very solid work bench. It's finished off with a coat of Behr Floor and Porch slate grey paint.

For my first work bench project, I am happy with the results.

405423013.jpg
 

akdiesel

Well-known member
Joined
Aug 8, 2008
Messages
2,617
Location
Wasilla, AK
I used this thread to help design my scratch built workbench. It is 96" wide, 30" deep top, and stands 40" tall. The top is custom made 1/8" stainless, and it has three layers of 5/8" plywood glued and screwed under it. It's a very solid top with no bounce. The remainder is all 2x4's with the legs being sistered. All joints were glued with PL Premium and screwed. It is a very solid work bench. It's finished off with a coat of Behr Floor and Porch slate grey paint.

For my first work bench project, I am happy with the results.

405423013.jpg

Your bench turned out great. The color of the wood makes look like a steel frame.
 
To avoid these ads, REGISTER NOW!
Top Bottom