You are using an out of date browser. It may not display this or other websites correctly.
You should upgrade or use an alternative browser.
You should upgrade or use an alternative browser.
work benches... from scratch
- Thread starter R6rider
- Start date

hayhauler71
Well-known member


Nice.
Rowdy9
Active member
I built two tables like this. They are old jail beds that I stacked up and welded together and put wheels on. Can roll them sidexside and have one big table

Richard D
Well-known member
I hate to admit those looked familiar...
hayhauler71
Well-known member
Are those homemade braces underneath the bench or store brand?
homemade 2 inch pvc
fredtech
Well-known member
My fold down 10 foot by 3 foot
Wow! This is really nice. Great work.
I'd love more pictures and info. if you can. I may try to make one identical.
ron.harding
Member
this is my bench i finished up yesterday. this thread inspired me to finish it!!
i kinda built the frame before but we moved so i never got to complete it. i still have to put a drawer in it for all my grinding tools and discs but other than that its done.

my helper!!


This is the best photo I have seen on any site dedicated to building things. I used to help my grandfather in the garage. I would have loved to weld when I was that little. This is parenting done right!
Fastbird
Well-known member
Needed this for my basement. Finally got off my duff.


Just a simple design using an uncut 2'x4' ply for the top and notched piece for the shelf, but it's sturdy and gets my wood working tools off the floor and up to a comfortable height for my 6'3" self.


Just a simple design using an uncut 2'x4' ply for the top and notched piece for the shelf, but it's sturdy and gets my wood working tools off the floor and up to a comfortable height for my 6'3" self.
ron.harding
Member
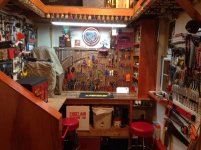
After several months of cleaning, pitching, organizing, and building, I am now at a point where I can contribute to this thread and show you some pictures of the bench I just built in my basement workshop. Before I get to the bench itself, here is the entrance to my basement workshop, through the Scooby-Doo door I built -
View media item 7857View media item 7858
The construction design for the workbench itself was inspired by other benches I saw here in this thread -
View media item 7859
The uprights are mated 2x4's, with one running the entire vertical and the other being stacked along with the horizontals for the shelves -
View media item 7861
I wanted to maximize the storage area underneath, so I put the bottom shelf on the floor. Being in a (dry) basement, I probably should have raised the bottom shelf a few inches off the ground in case there ever is a moisture problem.
I built in drop-downs to keep the saws at the right height -
View media item 7862View media item 7860
In the design, I borrowed Jack Olsen's soffit idea for the sliding doors, and ripped tracks into the 2x4's for the Masonite doors. I also benefited from his advice and made the top tracks deeper so I could lift the doors into the top first and then drop the bottom edges into place.
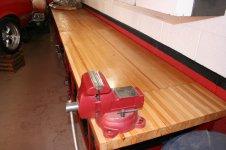
The surface top is a hair or two higher than 40", which I needed to do to be able to roll the old Craftsman table saw under the bench. The bench is 32" deep over the saw, and the long side is 24" deep. I'm 6'1", and I read through other posts here to increase my comfort level about having a bench that high. I gotta say I am 100% thrilled with the height. The work surface consists of a single layer of 3/4" plywood (with extra 2x4" crossmembers underneath) with 1/4" Masonite screwed on top. The edges are higher grade wood (maple, I think). In this shot you can also see the 1/4" steel insert I put into the corner of the top. That came from my Dad's old workbench, in case I need to get aggressive with something. The small rounded anvil is removable too.
View media item 7864
Next up will be a bigger vise for the bench (not pictured) in the opposite corner, and pegboard over the long side of the pictured bench next to the poster from the 2005 Bonneville Speed Week.
For those who are interested, I freehanded the racer on the wall using a picture penned by Gus Maanum for inspiration. Here's an in-progress shot -
View media item 5812
I sketched it in pencil, then painted the cream on the walls (which have blue tone in the pictures here, but are actually a very pale green). Then I painted the black over the pencil.
Your picture is beautiful. I had a vision of Burt Munro and his Indian for my wall. But, I am going to use a projector to get my image up. Then use what little artistic ability I have to make it come to life.
Builder302
Well-known member
My fold down 10 foot by 3 foot
Nice job, clean and simple, I like it
jgbrueck
Member
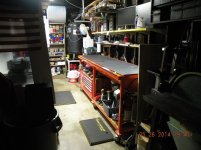
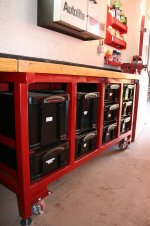
Here's my latest - I scored some bowling alley sections off Craigslist a couple of years ago, been slowly making benches as I have time. Unfortunately they're the pine sections of the lane, not the maple, but...
I've been making them all 6'x28" (so they're not too deep and become giant shelves), and I have 3 lined up against the wall, 1 in the middle of the shop. They're all a little different, but made of bowling lane top, and 2x2 square tubing, painted to match the shop walls. All have wheels and casters, so I can move them when I need, but keep them stable as well.
1) 1st one has just a large shelf underneath
2) 2nd one has a small shelf, and a "cubby" to store my welder underneath and out of the way.
3) 3rd has a large shelf underneath
4) 4th and latest has "shelves" with pull-out plastic bins. I had plastic bins under my previous bench, but they were stacked on top of each other, and inevitably I'd need the bottom one, which mean I had to pull all of them out just to get to the one I need. This bench has angle iron "shelves", so each bin is accessible without pulling the others out.
Thanks,
Jeff
Attachments


75Dually
Well-known member
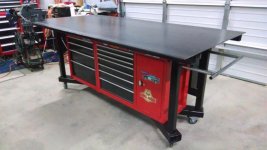
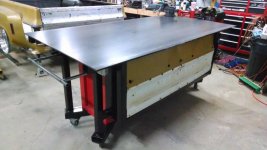
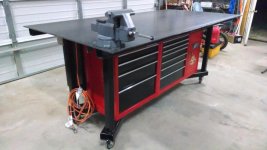
I went through this entire thread the other day and really liked the tables you guys have built. I wanted to add my fabrication table which I just finished tonight to see what you thought. It is really needed in my shop. I am building a 75 crew cab dually hot rod and this is going to help out a ton!
Here is the build thread on the table: http://www.garagejournal.com/forum/showthread.php?t=226906
Here is the build thread on my dually build: http://www.duallyscene.com/forums/projects/dually-project-and-stylin-t7688.html
Here is the build thread on the table: http://www.garagejournal.com/forum/showthread.php?t=226906
Here is the build thread on my dually build: http://www.duallyscene.com/forums/projects/dually-project-and-stylin-t7688.html
Attachments


santagary
Well-known member
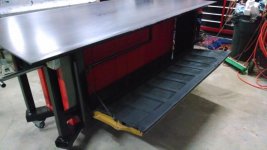
What purpose does the tailgate shelf have? It seems so low although it might serve as a step for the grandkids when in the down position???? Just asking.
santagary
Well-known member
How to they swing and store??? pics please.homemade 2 inch pvc
dbonne
Well-known member
My latest benches have been "scratched" from the tried and true "Steevo" method.
View media item 36813
I am amazed at this thread and all of the diverse creativity amassed here. There is something in each post that I would like to incorporate in a Frankenstein bench from hell if I could!!
View media item 36813
I am amazed at this thread and all of the diverse creativity amassed here. There is something in each post that I would like to incorporate in a Frankenstein bench from hell if I could!!
75Dually
Well-known member
What purpose does the tailgate shelf have? It seems so low although it might serve as a step for the grandkids when in the down position???? Just asking.
As far as purpose goes, not really much functional purpose for the tailgate. It was more of a style point than anything else. I don't want to use it as a shelf or something to stand on. Just wanted something cool on this table instead of the normal boring 4 leg welding table, and that seemed to fit the bill.
I hope more people use this as an idea to bring more style and think outside the box on their builds.
bentpushrod
Active member
Some beautiful benches here. Just finished one myself.


Just built this one today using a solid core door I pulled from a dumpster. I still have another support board to screw in on the back side but pretty much done. I also may be the only person that can build something using a square that doesn't turn out square but hey at least shes level

Chris98006
Well-known member
48windsor
Well-known member
I agree with Brownbag . My workbench . Started out as a 6ft shelf , I cut in half than put a quarter in. steel plate on top . Oh I can beat on it . Weld, grind. and it isnt gonna catch fire
captain14
Well-known member
Some good ideas here. May have to use more than one. Have to mount casters at one end to move around.
Good topic
Good topic
Barnuba
Well-known member
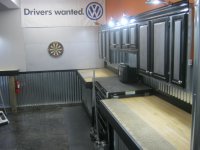
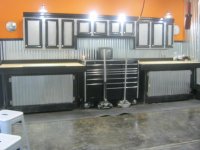
Here are a few shots of my benches. I used 2X6's and 4X6's to frame the bases, bowling lanes for the tops and corrugated metal for the sides and doors.
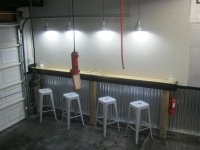
I had some left over bowling lane material that I used to build a bar top with hand hewn beam legs.
I had some left over bowling lane material that I used to build a bar top with hand hewn beam legs.
Attachments


diggerdanh
Member
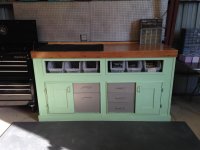
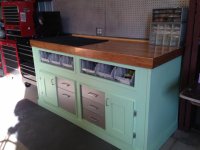
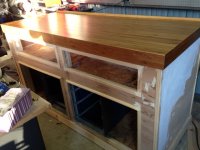
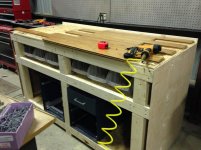
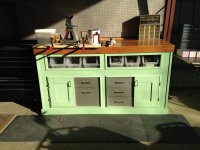
This is the first workbench I've built from scratch. We bought a home last year with a 36x48 pole barn. This and 2 more like it along with my tool boxes will span one of the side walls.
This one will be my primary/light assembly/misc bench. it is 6' long, 30" deep, 40" high. It is made from about 16 2x4s, 2 1/2" sheets of OSB, 5/8" bamboo flooring on top, 2 sheets of 1/8" Luan (sp?) for back-sides-front. The baseboard, backsplash, doors are from 1x4s. The drawers came from an 80's All-Steel desk. The paint is a shade lighter than ideal but should look great after some time, dirt and grease.
Much of the design and finish ideas were lifted from this forum: how to make cabinet doors, using pieces from desks and other dumpster/side of the road/CL finds, how to build a bench with 2x4s, using bamboo flooring for the top, etc.
Thanks for all the inspiration!
Attachments


mroy05
New member
Here's my bench.
That's a cool space.

jjohnson70
Well-known member
Sal49 - that is a nice looking space. What kind of cabinets are you using there?

jjohnson70
Well-known member
Sal - that is awesome. I've got pretty much the same exact panelling in my garage. Are the benches the Performax benches from Menards As well?
peelman
Well-known member
That's a nice custom-order red Masterforce box sitting on the end too ")
The FIB
Well-known member
Looks great Sal, what kind of finish is that on your concrete floor?
rartuin270
Well-known member
Just built myself a new one. I have had a few in the past but I never moved them when I moved. I just bought my first house and I needed somewhere to go through all my garage boxes that were in storage. Eventually I will build some along the walls.


hayhauler71
Well-known member
Just built myself a new one. I have had a few in the past but I never moved them when I moved. I just bought my first house and I needed somewhere to go through all my garage boxes that were in storage. Eventually I will build some along the walls.
looks sweet nice job
Here's my bench.
organised. i like it.
BarquestDan
Well-known member
- Joined
- Feb 11, 2013
- Messages
- 58
Here's the thread outlining the build on this 2x4 only mobile bench.
http://www.garagejournal.com/forum/showthread.php?t=251530


Sent from my iPad using Tapatalk
http://www.garagejournal.com/forum/showthread.php?t=251530
Sent from my iPad using Tapatalk
rartuin270
Well-known member
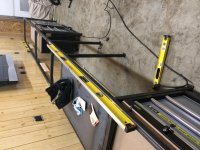
Over the last 2 days I added some flip down wheels on my new bench. They work great but I need to figure out a way to lock them in place because when the casters turn a certain direction they flip back up and drop the table.
These are all pictures of the underside of the bench.


These are all pictures of the underside of the bench.
rdn2blazer
Well-known member
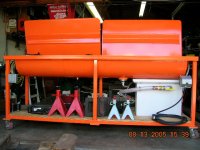
Here's a few pictures of my parts washer I built years ago that also double duties as the work bench for my cnc mill now. Here's a few before and after. The water filled pic is my weld check test. ZERO weld leaks first attempt. Was stoked about that. Had it powder coated bright Orange. Has held up superbly to automotive solvent.