The carpenter who framed my hobby garage, built my workbench. It's so simple, yet perfect...strong, off the floor, top can be replaced easily. It's a simple 2 X 4 frame, attached to the walls and where no wall available on the side, by 2 X 4 angled to the back wall. The top extends about 4 inches over the frame so that items may be clamped to it. I liked it so much, I built one in my daily driver garage which my family seems to feel should only function as storage.


You are using an out of date browser. It may not display this or other websites correctly.
You should upgrade or use an alternative browser.
You should upgrade or use an alternative browser.
work benches... from scratch
- Thread starter R6rider
- Start date


Eds_tls
Well-known member
All done. But not without a little excitement. ha!!
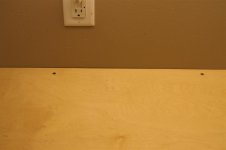
Heres the area that drove me crazy. This was around noon today...

In process.....

I've moved this table dozens of times to clean under it. I guess I moved it one too many. Whoops!!!

Now its a thousand times better. I'm really happy how it turned out. The bench literally doesn't wobble a millimeter. Its absolutly rock solid, (which is exactly what I was trying to do)
Like I mentioned in the other post, I plan on doing a hutch w/ pegboard and getting rid of the one thats there now. That will clean up the cords and the power strip, give me a good full length shelf, and give me a place to mount proper lighting

Heres the area that drove me crazy. This was around noon today...
In process.....
I've moved this table dozens of times to clean under it. I guess I moved it one too many. Whoops!!!
Now its a thousand times better. I'm really happy how it turned out. The bench literally doesn't wobble a millimeter. Its absolutly rock solid, (which is exactly what I was trying to do)
Like I mentioned in the other post, I plan on doing a hutch w/ pegboard and getting rid of the one thats there now. That will clean up the cords and the power strip, give me a good full length shelf, and give me a place to mount proper lighting
Last edited:
BoydS
Well-known member
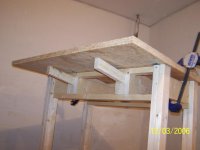
There are some great workbenches shown here, along with great ideas. Here's one I started yesterday, although not completed yet. When complete, it will be 6' x 2' and 33" high. The area above the workbench top and recessed under the girt will contain several bins for small parts. All of the material has been in my barn for years, so it was time to put this stuff to good use. My orignal plan was to use 3/4" plywood for the top, but that may change because I have a salvaged solid core door that is just shy of 2" thick. The area below is framed for a lower shelf.
The back legs are 4x6 treated pine, while the front legs are 4x4 cedar post. Everything else is 2x4's, except for the top front and back braces, which are 2x6's. It's all assembled with with deck screws and lag bolts. This is a very easy build and should last many years with any abuse you want to throw at it.

The back legs are 4x6 treated pine, while the front legs are 4x4 cedar post. Everything else is 2x4's, except for the top front and back braces, which are 2x6's. It's all assembled with with deck screws and lag bolts. This is a very easy build and should last many years with any abuse you want to throw at it.
regguy1
Well-known member
I built this for my lathe. 2x4 legs / plywood sides and bottom screwed to legs / pegboard sliding doors. There are only 4 2x4 legs 2x4 across top and bottom on front and back, no other framing and it's plenty strong to hold a 600 lb machine
Attachments

Last edited:
Earache
Member
Made this little welding table recently out of scrap rectangular tubing that I had lying around the shop...

Bought some locking casters at Wholesale Tool...


Super easy to make when using a 3 axis welding clamp...


Bought some locking casters at Wholesale Tool...
Super easy to make when using a 3 axis welding clamp...
Earache
Member
Made this sales counter frame for my friend's auto body business just last week. Made from 3/4" square steel tubing....
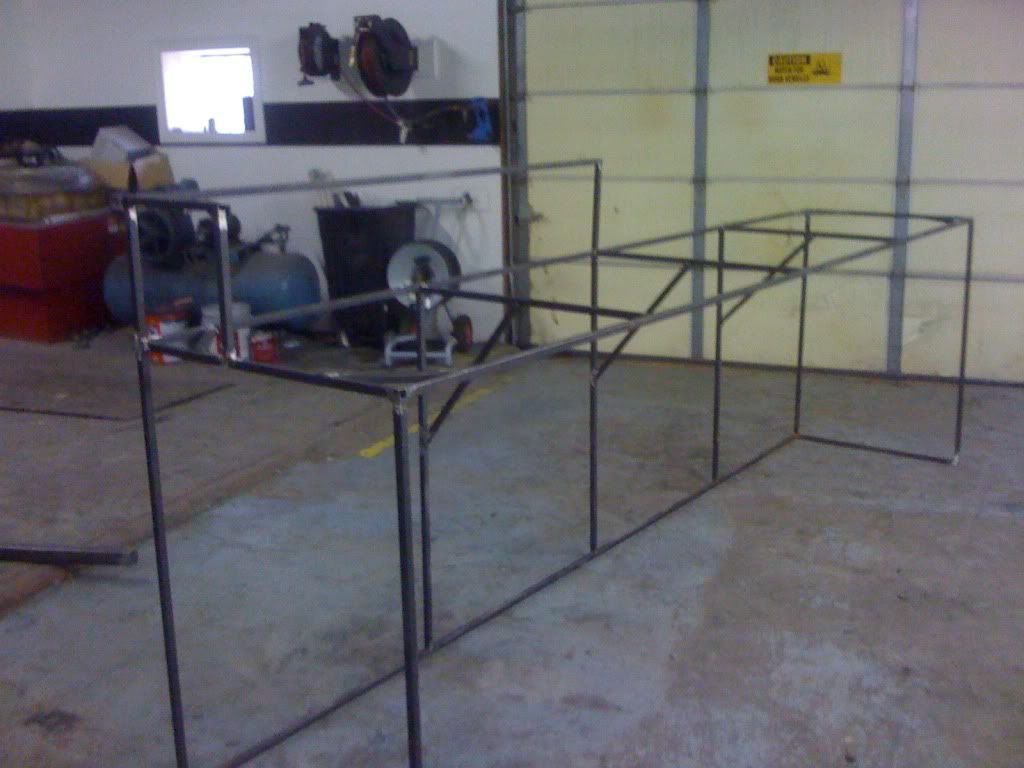
Ground all of the welds down so that the facia and countertop don't have fitment issues...

Hope to get the top and facia on later this week.
Ground all of the welds down so that the facia and countertop don't have fitment issues...
Hope to get the top and facia on later this week.
rickey1013
Well-known member
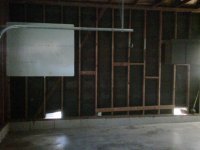
I like the fold down benches in Jacks garage somebody said **** I can't work disorganized I like it. I went a little overkill on my bench and it will stay with the house but it's the first garage I have owned and I wanted it sturdy. A before and after picture of the side wall.
Attachments
Cobra4B
Well-known member
Built a new work area and floating bench at my father's place over the weekend.

krooser
Well-known member
Here's the welding table I built one night when I had a project that needed to be table-built. I've had it 20 years or so and never have taken the time to really finish it. It usually has a big vice on one end and a 6" grinder on the other but I needed the room on my recent bumper building project.

I'm not good at visualizing things that I have not done before. I like Ed's bench, with the notched 4x4s. What I do not understand is what you guys are talking about with not having to notch posts if you double-up 2x4s instead of using 4x4s. What do you guys mean?
Might want to talk to me like I am about 5 here. I can get by while working with wood, but only with a slow pace and a lot of forethought.
Might want to talk to me like I am about 5 here. I can get by while working with wood, but only with a slow pace and a lot of forethought.
If I could snap a picture or draw it out, it'd be simpler. But in this picture imagine if the front legs were a pair of sistered 2x4s instead of one 4x4. You'd have one running the entire length of each leg (on the side of the leg closest to the center of the face of the bench) and then on the other side you'd have two shorter pieces filling in the space not needed by where the crossmembers intersect with the front legs. So long as you connect the two pieces with bolts or 3.5" wood screws, the ability of the leg to bear weight would be essentially the same. As weight compressed down on the leg, it would transfer the load down the 2x4's -- passing through the crossmember pieces where they intersect. Does that make sense?
In the example above, it probably wasn't necessary to notch for the lower crossmembers -- although it makes the bench look better. But the top notching allows the weight carried by the top crossmember to rest right on top of one half of the upright, instead of trying to bend a bolt or screw (if there's no notch and the top beams are attached to the side of the uprights) while the table surface itself is also resting right on top of the upright.
If I were an engineer, I'm sure I could explain it a lot better. But there you go.
If I could snap a picture or draw it out, it'd be simpler. But in this picture imagine if the front legs were a pair of sistered 2x4s instead of one 4x4. You'd have one running the entire length of each leg (on the side of the leg closest to the center of the face of the bench) and then on the other side you'd have two shorter pieces filling in the space not needed by where the crossmembers intersect with the front legs. So long as you connect the two pieces with bolts or 3.5" wood screws, the ability of the leg to bear weight would be essentially the same. As weight compressed down on the leg, it would transfer the load down the 2x4's -- passing through the crossmember pieces where they intersect. Does that make sense?
I think this might be the key component that I am still having trouble visualizing.
It would help if I were not functionally retarded WRT building things from scratch.


I think this might be the key component that I am still having trouble visualizing.
Like this. I drew lines where the 2x4s would lie next to each other, and the dots are where I might put fasteners.

pseudorealityx
Well-known member
But the top notching allows the weight carried by the top crossmember to rest right on top of one half of the upright, instead of trying to bend a bolt or screw (if there's no notch and the top beams are attached to the side of the uprights) while the table surface itself is also resting right on top of the upright.
If I were an engineer, I'm sure I could explain it a lot better. But there you go.
*IF* (and big **IF**) the thing is built far better than I could do it... then the bolts/screws don't really see a sheer load. The friction caused by the tension in the bolt/screw holding the two pieces of wood together is your load bearing surface.
Just like how your wheels stay on your 911. The wheel bolts (or studs) are predominately in tension. The friction between wheel and hub surface is the force/weight bearing surface.
USMCBay
Well-known member


Like this. I drew lines where the 2x4s would lie next to each other, and the dots are where I might put fasteners.
Ok, ok, I can see at least part of it now, up at the top of the legs...no notching needed with 2x4s. Now, on Ede's benchhe also notched the bottoms of the legs to accept the crosspieces. Can this also be avoided with 2x4s? Because, that is what I thought people were talking about at first, the notching at the bottoms of the legs.
pseudorealityx
Well-known member
quick question: as far as force/weight bearing surfaces... how would you measure the weight limit on a bench? or load limit? (besides sitting on it... which is my only way to quarantee anything for 215lbs.)
I'm not sure of the "official" way to do it, but it probably involves a pretty damn big factor of safety. You can determine buckling force and all that jazz, but its all theoretical, and when someone puts some sort of 800 lb odd piece of steel on their bench, starts whacking at it with an air hammer, and 1 of the legs is slightly loose, and the table isn't perfectly level... all that fancy math goes out the window.
bimmer1980
Well-known member
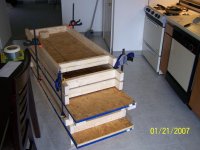
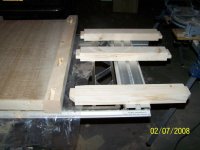
here are a couple of work benches that I built while I was in my apartment (it had a garage under the apartment). These were based off of the EAA plans. They are all the same height and can be configured in a large square or end to end, etc.....
I made them to break down easily for moving. They are now stored in pieces in my basement while I build the new garage.....
I made them to break down easily for moving. They are now stored in pieces in my basement while I build the new garage.....
Attachments
Crizzle
Well-known member
Jack, something like this could also work wrt the sistered 2x4's:

I am building this workbench(in addition to the 5297 other projects I am working on simultaneously), and that is what the plans call for.
Granted you are still notching 2 2x4's instead of a single 4x4.
I am building this workbench(in addition to the 5297 other projects I am working on simultaneously), and that is what the plans call for.
Granted you are still notching 2 2x4's instead of a single 4x4.
bimmer1980
Well-known member
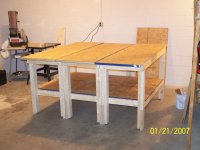
here is another work bench that I built. This one is a bit more robust as the top is a laminate of 3 layers of OSB. That is stout! I integrate a folding table top to maximize work area... I had planned to add some drawers underneath it, but haven't done so yet.....
Attachments


Ok, ok, I can see at least part of it now, up at the top of the legs...no notching needed with 2x4s. Now, on Ede's benchhe also notched the bottoms of the legs to accept the crosspieces. Can this also be avoided with 2x4s? Because, that is what I thought people were talking about at first, the notching at the bottoms of the legs.
Yes, here's what it would look like with that bench:

Best to have the cut 2x4's fit snugly to the crosspiece, so that they transfer the load straight down (does that make sense?).
Last edited:
Yes, here's what it would look like with that bench:
Best to have the cut 2x4's fit snugly to the crosspiece, so that they transfer the load straight down (does that make sense?).
So, the 2x4 pieces at the bottom, under the crosspiece, will just be short pieces, bolted to the longer piece behind them, correct?
bimmer1980
Well-known member
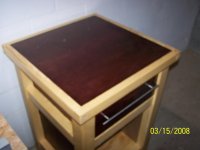
here is another work bench that I build when I was experimenting with mortise and tenion for the first time.... It probably turned out a little too nice for the garage.....
Attachments


bimmer1980
Well-known member
bull-- Basically, you are taking two 2x4 and sandwiching them together to make a 4x4. Now if you take one of the 2x4 and cut it 3.5" shorter, when you put them together, you have a spot for another 2x4 to lap over it--the horizontal stringer or stretcher for a table. In this manner, it is easy to cut a couple of 2x to length and screw them together as compared to taking a circular saw or a router and trying to cut a notch out.


Neither is a particularly good shot, but they just look like benches. I used 2x4's for the legs with 2x6 for the top of the skinny bench, and for the front of the top of the fat one. Lower shelf on the skinny one is framed with 2x4's, and everything is topped with OSB and held together with deck screws. It's held up to my standing on it, dropping a trans on it, etc. I'll get some better pictures.
It's nice to have the skinny bench as the same height as one of the shelves, mostly for aesthetics, but also for moving projects off the bench and onto a shelf for storage. Also, the fat bench is *just* tall enough that I can get a motor on a stand stored underneath it. They are both anchored to the wall for a little extra support, but would be just fine free standing.
crewchief888
Well-known member
not so much a work bench, but it's my bench for my reloading presses and supplies
4x4 post legs
2x4 frame
3/8 plywood shelf
2x8 top
1x12 shelves
legs are bolted to frame top is lag bolted
it's just over 7 ft long and about 30" deep

4x4 post legs
2x4 frame
3/8 plywood shelf
2x8 top
1x12 shelves
legs are bolted to frame top is lag bolted
it's just over 7 ft long and about 30" deep
So, the 2x4 pieces at the bottom, under the crosspiece, will just be short pieces, bolted to the longer piece behind them, correct?
Exactly. ..
I hope to learn how to do that sometime. Very nice!here is another work bench that I build when I was experimenting with mortise and tenion for the first time.... It probably turned out a little too nice for the garage.....
TXST8tj
Well-known member
What grade and/or type of plywood are people here using? I want something that is going to be somewhat smooth on the top without having to go up to a stainable quality plywood.
Has anyone applied any sort of finish or protector to the surface to resist stains and chemicals?
I just disassembled my work bench last night because it was never finished and at the point it was, it was not up to my own standards....I should've known better from the start.
Has anyone applied any sort of finish or protector to the surface to resist stains and chemicals?
I just disassembled my work bench last night because it was never finished and at the point it was, it was not up to my own standards....I should've known better from the start.
What grade and/or type of plywood are people here using? I want something that is going to be somewhat smooth on the top without having to go up to a stainable quality plywood.
Has anyone applied any sort of finish or protector to the surface to resist stains and chemicals?
I just disassembled my work bench last night because it was never finished and at the point it was, it was not up to my own standards....I should've known better from the start.
IIRC, you'll probably want BC. It's what generally used to be called, "good one side"
pseudorealityx
Well-known member
Mine was a piece of sanded 3/4" oak. A 4x8 sheet was ~$40 from HD. Just left it bare. Stains and chemicals will add character. It's a garage workbench, not a piece of furniture.
crewchief888
Well-known member
not so much a work bench, but it's my bench for my reloading presses and supplies
4x4 post legs
2x4 frame
3/8 plywood shelf
2x8 top
1x12 shelves
legs are bolted to frame top is lag bolted
it's just over 7 ft long and about 30" deep
rats forgot to attach the pic
Attachments

evintho
Well-known member
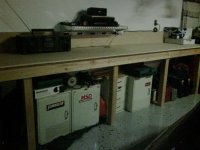
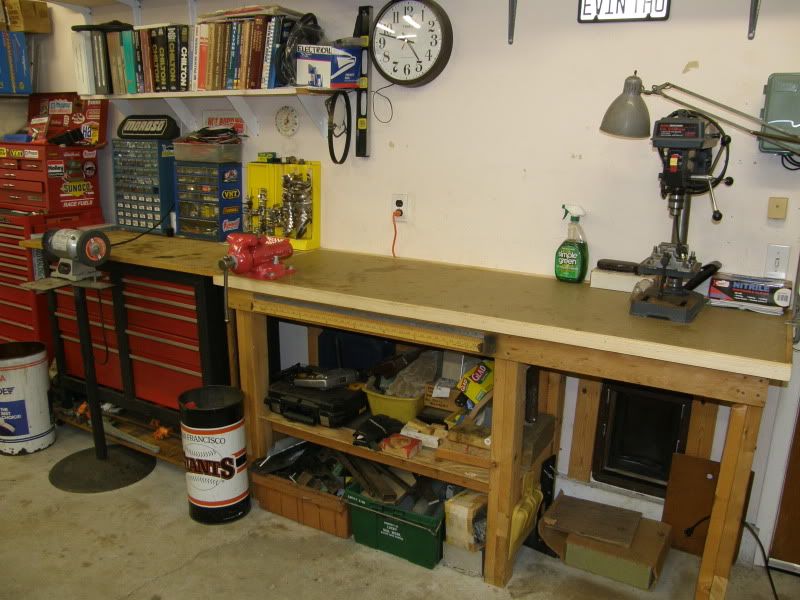
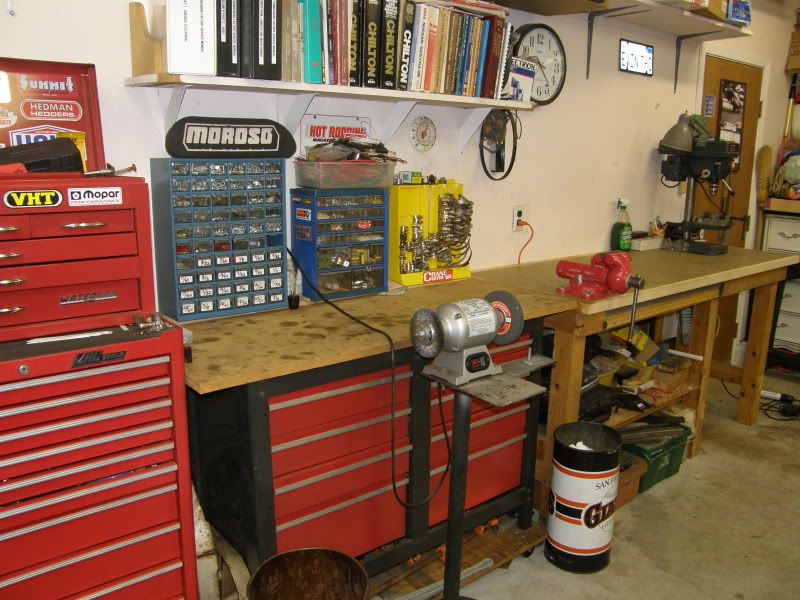
Here's mine. Built it 15 years ago. 2x4's, screws and a piece of hardwood. It's 38" H x 27" W x 75" L. The hardboard is an insert that's screwed to the workbench. When it gets too shabby, I simply remove and replace it with another piece of hardboard. I built it so it'd be level with the worktop on the black and red Craftsman box, thereby giving me an 11 foot long workbench!
I mounted the Craftsman box on a piece of 3/4" plywood and added casters. Then, attached a 1" work surface to the top of the box.
I mounted the Craftsman box on a piece of 3/4" plywood and added casters. Then, attached a 1" work surface to the top of the box.
Eds_tls
Well-known member
For the record, notching the 4x4's was a royal pain in the ****.
If I had to do it again, I would use 2x4's bolted together like everyone has mentioned
If I had to do it again, I would use 2x4's bolted together like everyone has mentioned
Well, I was planning on using 4x4s because I have probably two-dozen or more old ones, ranging in length from 6' to about 12' long in my old barn. My grandfather had them. So, you know, free wood is good, but I also like to avoid hassles!
I appreciate those of you who helped me to understand the whole notching thing...I get it now!
I appreciate those of you who helped me to understand the whole notching thing...I get it now!
TXST8tj
Well-known member
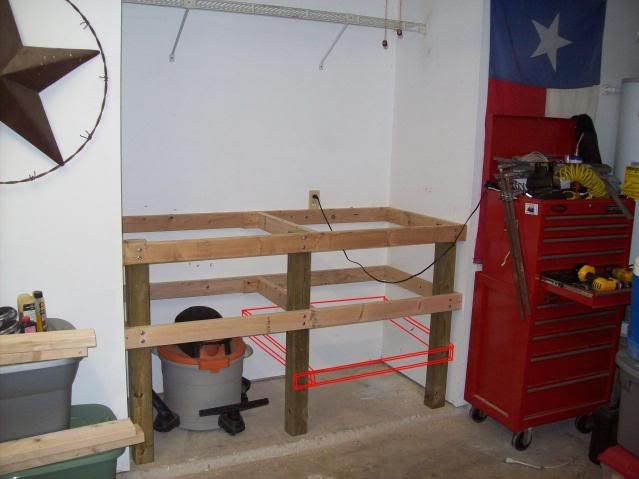
I made some progress rebuilding mine this evening. This getting to be more along the lines of what I should've done originally.
I have it in the alcove deal at the head of the garage. This build is a combo of floating (bolted to the walls) and braced with 4x4 posts at the front.
The left side of it is made to house the shopvac with a short shelf above it.
The right side is set up to just be shelves.
I am going to add one more level of shelves on the right side.
Between the back and side 2x4s being lag bolted to the back and then the front and sides being tied into the 4x4s up front, it is already plenty strong. I still have some more screws to run, but it is taking its basic shape.


The **** wire shelf above the bench will be removed and I will build a built-in cabinet up there with doors to hold my power tools and cases.
The bottom of that shelf will be the perfect place to mount some lights to shine down on the bench.
I will probably also do either some tray storage system on the back wall, or I will peg board it and go from there.
So far, the dimensions are: 31" deep x 71" wide x 44" tall (from the garage floor level). Add at least 3/4" for the top sheet, and another inch to the depth, at the front in the form of an overhang. That overhang will have the top flush with the walls.
I am 6'5", so the height and depth are perfect for me. I am lucky that my size allows me to have a tall and deep work space.
A couple more screws and that last shelf, and it will be ready for its top sheet.
I have it in the alcove deal at the head of the garage. This build is a combo of floating (bolted to the walls) and braced with 4x4 posts at the front.
The left side of it is made to house the shopvac with a short shelf above it.
The right side is set up to just be shelves.
I am going to add one more level of shelves on the right side.
Between the back and side 2x4s being lag bolted to the back and then the front and sides being tied into the 4x4s up front, it is already plenty strong. I still have some more screws to run, but it is taking its basic shape.
The **** wire shelf above the bench will be removed and I will build a built-in cabinet up there with doors to hold my power tools and cases.
The bottom of that shelf will be the perfect place to mount some lights to shine down on the bench.
I will probably also do either some tray storage system on the back wall, or I will peg board it and go from there.
So far, the dimensions are: 31" deep x 71" wide x 44" tall (from the garage floor level). Add at least 3/4" for the top sheet, and another inch to the depth, at the front in the form of an overhang. That overhang will have the top flush with the walls.
I am 6'5", so the height and depth are perfect for me. I am lucky that my size allows me to have a tall and deep work space.
A couple more screws and that last shelf, and it will be ready for its top sheet.
Last edited:
I made this one out of 2x4's and mdf. The top is three layers of 3/4 inch mdf with dog holes drilled for clamps. It has 6 layers of poly with sanding in between each coat. 7 years old and still looks like new. the casters let me take it any where I want. It gets used every day.
