

You are using an out of date browser. It may not display this or other websites correctly.
You should upgrade or use an alternative browser.
You should upgrade or use an alternative browser.
work benches... from scratch
- Thread starter R6rider
- Start date
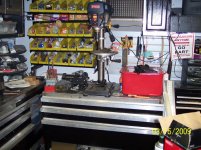

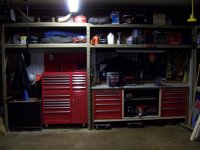
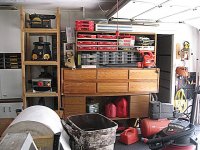
Here is what I did. I found two lower Craftsman rolling chests on Craigslist for $30 each. Removed the casters and built into workbench. Old counter top from grandfather, all screwed together incase I need to modify later. Put pegboard in between cabinets to increase tool storage, added shelf. As for the rest of my setup i find that Gorilla Steel from Menards is great for getting things out of the way.
Attachments

thomask
Well-known member
Here is what I did. I found two lower Craftsman rolling chests on Craigslist for $30 each. Removed the casters and built into workbench. Old counter top from grandfather, all screwed together incase I need to modify later. Put pegboard in between cabinets to increase tool storage, added shelf. As for the rest of my setup i find that Gorilla Steel from Menards is great for getting things out of the way.
zer01
Super job on your custom bench set up you have put together there.
I have some of those craftsman storage cabinets like yours and wish I had a couple more.
Great storage room for a great price.

This is what I've come up with based on the Simpson Strong Tie KWB1 kit. I really wanted a half shelf so I would have the ability to pull up a chair and/or store taller items on one side. But then I added a 12" deep shelf on that side for a little extra storage "just in case". On the full shelf I plan to store my ShopVac and under it store my floorjack and jackstands, oil catch pan, etc. The top would be two layers of 3/4" sheet, the shelves 1/2". Considering adding a couple drawers after I get it built but want to try it on for size first.
The image is pretty big if you click on it.


Bought the wood and went to work this afternoon. 4 hours and very little cussing later it is complete. A little bland, but ready for add-ons. Maybe a drawer and flip-up work surface extension. Top is doubled 23/32" exterior plywood glued and screwed. It's 72x24x42. This is the first work I've done in the garage after adding four 4ft T8 fixtures and it really helped. Wish I had a miter saw and a table saw for this. Cutting 2x4 and 6ft cuts of heavy plywood with a circular is giving my back fits.


mellowdave
Active member
My garage is absolutely trashed since I just got back from Afghanistan, but I will try to get a few pics of my solution, I bought pre fab cabinets from Loews, and used them to build out the wall cabinets, then I took two four drwaer cabinets and reversed them, i.e. one facing each side, and built a countertop for them. I built the countertop from two sheets of 3/4 inch MDF, and finished it with poly. It makes a very heavy top, and its durable as hell, though maybe most importantly, the top cost about 25.00 so if I ever do anything to it that damages it, its nothing to replace. Total size is about 36 x 24 x 30.
I considered a gap between the cabinets to have space underneath it, i.e. like a regular workbench, but in this particular case, I decided against it, in the name of compactness.
Pictures forthcoming soon.
I considered a gap between the cabinets to have space underneath it, i.e. like a regular workbench, but in this particular case, I decided against it, in the name of compactness.
Pictures forthcoming soon.
I like your bench a lot...nice and simple. I am trying to pick a bench from this thread to copy for the section of the basement I am working on now. Yours might be it. How did you like using the Simpson ties...are they worth it? What was your "shopping list" in addition to the Simpson kits you bought?
Bought the wood and went to work this afternoon. 4 hours and very little cussing later it is complete. A little bland, but ready for add-ons. Maybe a drawer and flip-up work surface extension. Top is doubled 23/32" exterior plywood glued and screwed. It's 72x24x42. This is the first work I've done in the garage after adding four 4ft T8 fixtures and it really helped. Wish I had a miter saw and a table saw for this. Cutting 2x4 and 6ft cuts of heavy plywood with a circular is giving my back fits.
autoist
MEMBER EMERITUS
Easiest in the world to build.....series of 2x4's with masonite screwed to each side for the 'separaters' & 'ends'.......stand them where you want support or separator & nail long 2x4's top & about 4" off floor....large piece of masonite screwed to back & 3/4" plywood as top....add shelves where you want them with 2x4 frame & 1/2" plywood....I made them in 8' sections & ran them all around 2 sides of my 20x20 workshop.....took a Saturday to do the entire thing.

fcpjax
New member
Hi,
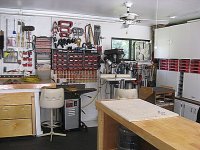
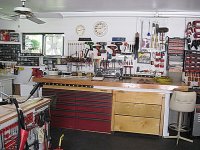
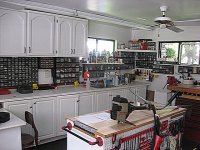
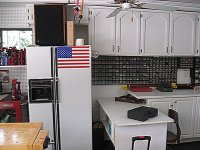
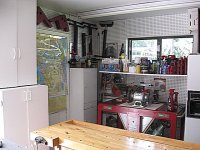
Here is my workshop.
Here is my workshop.
Attachments
-
 Workshop Oct 2009007.JPG126.8 KB · Views: 2,285
 -
 Workshop Oct 2009006.JPG100 KB · Views: 2,565
 -
 Workshop Oct 2009005.JPG126.5 KB · Views: 2,613
 -
 Workshop Oct 2009004.JPG134.2 KB · Views: 2,837
 -
 Workshop Oct 2009003.JPG123.1 KB · Views: 2,803
 -
 Workshop Oct 2009002.JPG109.9 KB · Views: 2,677
 -
 Workshop Oct 2009001.JPG122.5 KB · Views: 2,741
I like your bench a lot...nice and simple. I am trying to pick a bench from this thread to copy for the section of the basement I am working on now. Yours might be it. How did you like using the Simpson ties...are they worth it? What was your "shopping list" in addition to the Simpson kits you bought?
I think the kit is worth it if conventional workbench is your goal. Of course you can monkey with the design as much as you wish. The kit was $35 on sale at Home Depot (the link is in this thread somewhere). It came with all the corner braces and 200 of their awesome screws. Buy whatever grade wood you like. Make all your cuts and assemble. It's like putting together IKEA furniture...
")
Cobra4B
Well-known member
More pics of the ginder/polisher table with the rotating setupHi,
Here is my workshop.

Since you guys probably won't call this one from scratch

(even though I assembled it from all the assorted bits and pieces), i guess I'll have to show you this one:
[

Lane
Lane,
is that drop down bench steel? i like it... can you show more detailed pics of it please?
thanks,
Rich
nmk_61802
Well-known member
More pics of the ginder/polisher table with the rotating setup
I was looking for the same thing. I have a Craftsman version of this table, but it cannot have equipment set so close to the sides as they slide out to rotate the center. This looks like a nicer version, and I have always considered modifying mine in some way.
94legaleagle
Well-known member
- Joined
- May 7, 2009
- Messages
- 294
Lane,
is that drop down bench steel? i like it... can you show more detailed pics of it please?
thanks,
Rich
 your pics are a little dark to see specifics, but I like the looks of what I think it is - an you show pics of how it attaches to the wall and where the support legs store?
 IE: show us how to replicate that in our shop
sjt78
Well-known member
Here is what I did. I found two lower Craftsman rolling chests on Craigslist for $30 each. Removed the casters and built into workbench. Old counter top from grandfather, all screwed together incase I need to modify later. Put pegboard in between cabinets to increase tool storage, added shelf. As for the rest of my setup i find that Gorilla Steel from Menards is great for getting things out of the way.
zer01,
Really like your setup. I keep coming back to look at your pictures. I'm thinking about doing something similar, but retrofitting a 26" bottom tool box into my existing work bench. I'll have to post pics of my workshop...though I can't take claim to making it as I bought the house with a fully built detached 12'x28' workshop. Can you give me more information on this "Gorilla Steel," never heard of it? Thanks.
-Steve
It is actually called Gorilla Rack, I misspoke. I buy it right from Menards, they sell it by the piece. Mine are 24" deep by 96" high by 96" wide. It goes together very easily, it is pretty much like pallet rack steel used in stores and warehouses. I have seen stuff similar to it at Lowes and Home Depot however I have not noticed if they sell it by the piece. Sams club sells shelving units like this as well. It is great, www.gorillarack.com
R6rider, 94legaleagle,
Yes, the fold-down workbench is steel. I used a 24" x 48" piece of 1/4" steel plate as the top, 2 x 2 x 1/4" angle iron for the stiffners, 3 trailer hitch receptacles for a bench grinder, bandsaw stand, vice, etc.
More pics can be found here:
http://rides.webshots.com/album/561705944pOrIJn
Scroll through to the second page for more pics. If you would like more details, let me know and I can get you guys more pics.
Lane
wmonroe
Well-known member
R6rider, 94legaleagle,
Yes, the fold-down workbench is steel. I used a 24" x 48" piece of 1/4" steel plate as the top, 2 x 2 x 1/4" angle iron for the stiffners, 3 trailer hitch receptacles for a bench grinder, bandsaw stand, vice, etc.
More pics can be found here:
http://rides.webshots.com/album/561705944pOrIJn
Scroll through to the second page for more pics. If you would like more details, let me know and I can get you guys more pics.
Lane
The stainless top looks great. Did you make it yourself or buy it pre-made?
94legaleagle
Well-known member
- Joined
- May 7, 2009
- Messages
- 294
Photo
Thanks for the picture link - I LIKE what you did, and I think I'd like to do the same thing, but it appears that an intergal part of your design is that the wall between your two garage doors is not flush / straight, but rather has a "notch" to it onto which you were able to mount the table, and you used the notch to brace the angle leg when the table is down
I have the same type of two doors side by side, and my drill press (variable speed, 17 or 20 inch (can't remember) Rockwell Delta drill press is permanently mounted between my garage doors - BUT, my doors are flush and I don't have the "notch" you do - I LIKE the idea of having a collapsible table to support stuff when drilling long pieces on the drill press - just not sure how I'd do it
Gotta sleep on this one
R6rider, 94legaleagle,
Yes, the fold-down workbench is steel. I used a 24" x 48" piece of 1/4" steel plate as the top, 2 x 2 x 1/4" angle iron for the stiffners, 3 trailer hitch receptacles for a bench grinder, bandsaw stand, vice, etc.
More pics can be found here:
http://rides.webshots.com/album/561705944pOrIJn
Scroll through to the second page for more pics. If you would like more details, let me know and I can get you guys more pics.
Lane
Thanks for the info Lane... i appreciate it.
Thirty years ago, Home Depot used to sell a 6' x 30" x 1-1/4" particle board work bench top and a pair of stamped steel legs. Pictures I don't have as the home computer is not hooked up yet. I bought these and have used them ever since. About five years ago, when a tenant moved out of our rental, they left me a gift of an almost full sheet of 3/4" melamine covered particle board. I used it to rebuild my work bench so it is now a full 8' long. I reused the 1-1/4" thick old top and moved the legs out to 6' apart. The melamine top has a 3" backsplash and I added other particle board on the ends where I didn't have enough of the melamine. The top is now a full 2" thick x 8' lg. x 30" deep. It weighs well over 250 lbs. and it takes at least 3 guys to move it. I added 2x4 supports to the bottom and have a shelf underneath. I added steel leg adjusters so the bench can be leveled.
We moved recently, and I just got it set up in the garage with a full length electrical outlet strip above the backsplash and a framed 4x8 pegboard above the workbench.
Phil
We moved recently, and I just got it set up in the garage with a full length electrical outlet strip above the backsplash and a framed 4x8 pegboard above the workbench.
Phil
Here is what I built about 3 months ago. 96" x 24'' Long side 57" x 24" Short side. (2) 3 inch dry wall screws to every stud.
The work table underneath was my dads since this photo, I pulled the legs off and put new 2x4's with casters.
I will be tearing this out to rebuild it. It's too tall and Ill be making it longer on the 96" side and lowering it on the wall

The work table underneath was my dads since this photo, I pulled the legs off and put new 2x4's with casters.
I will be tearing this out to rebuild it. It's too tall and Ill be making it longer on the 96" side and lowering it on the wall
Last edited:
Keep
Well-known member
Hi,
Here is my workshop.
Pics of the dog. (I see the feeder there)
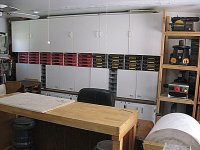
Thats a nice setup. Where did you pick up the little bolt bins?
yhprum
Well-known member
Google EAA workbench plans.
Steve
Steve
On all my benches I use 2X4's to support the top. The 2X4s rest directly under the top shelf - so the screws are not holding all of the top weight.
I also use casters on all of the workbenches - since my garage is a work in progress and I like to be able to move them all around. They all have 3/4 plywood top. The last 2 have cabinet grade plywood, the first is a cheaper 3/4. Not as smooth, but about half the price.
I used a cheaper plywood on this one: Just a basic 8 footer.


Or, add sides and doors..
When (if) I ever finish the garage, I'll build some nice cabinets with bench tops. Possibly modifying the first 2 to put doors on.
I also use casters on all of the workbenches - since my garage is a work in progress and I like to be able to move them all around. They all have 3/4 plywood top. The last 2 have cabinet grade plywood, the first is a cheaper 3/4. Not as smooth, but about half the price.
I used a cheaper plywood on this one: Just a basic 8 footer.
Or, add sides and doors..
When (if) I ever finish the garage, I'll build some nice cabinets with bench tops. Possibly modifying the first 2 to put doors on.
Last edited:
Lots of good ideas here. I've found craigslist is a great source for benches and cabinets at great prices (negotiating price is half the fun) if you don't need something custom. Check the free section too- ya never know what you'll find!
JaysinSpaceman
Well-known member
- Joined
- Jan 1, 2008
- Messages
- 85
Just thought I would add a shot of my bench. It's got 4x4 legs and all the shelves have 2x4 runners (built like many in this thread) and before I moved it to it's current location it had 1200-1500 lbs of engine parts (blocks, heads, cranks, etc...) stored on the shelves. My Dad and I built it nearly 15 years ago and I am sure it will last the rest of my life. Having the back splash to stop small parts from rolling off the back is super nice and the little shelf is a great place to keep the things you need right at hand while working (if you can keep it from collecting junk).

Jaysin
Jaysin
mustangmccance
Well-known member
- Joined
- Sep 8, 2009
- Messages
- 832
I have built many workbenches over the years.
this one is my woodworking bench. I got the designs out of a woodworking magazine. it is made by gluing 2x4's together then framed with 4x4 that have been notched and joined. the bottom is made of 2 2x8's that have a routered groove on the top and bottom and then it has redi rod run through both 4x4's and in the grooves. it has a face vice, a tail vice and it is drilled for bench dogs.


it is great for woodworking.
this bench is the one I built when I re did the ugly corner it is 2x4 frame with 3x4 inch plywood doubled on the top.
<a href="http://s972.photobucket.com/albums/ae205/mustangmccance/?action=view¤t=IMG00028-20091206-1554.jpg" target="_blank"><img src="http://i972.photobucket.com/albums/ae205/mustangmccance/IMG00028-20091206-1554.jpg" border="0" alt="ugly corner renovation"></a>
the one you can just see to the right of this picture is my semi mobile table it is also made with 2 layers of 3/4 inch plywood. it has fixed casters on the back 2 legs and I made a retractible setup on the front. the casters are mounted on a 2x4 that runs the length of the bench and is mounted on hinges. I fold it down and lock it into place with another 2x4 that folds in to lock it. it is very sturdy and when not too much weight is on it easy to move around. when the wheels are folded up it does not move and is very stable. works well for me. I am going to be building a more moble workbench in the near future with locking casters.
<a href="http://s972.photobucket.com/albums/ae205/mustangmccance/?action=view¤t=lounge.jpg" target="_blank"><img src="http://i972.photobucket.com/albums/ae205/mustangmccance/lounge.jpg" border="0" alt="Photobucket"></a>
this one is my woodworking bench. I got the designs out of a woodworking magazine. it is made by gluing 2x4's together then framed with 4x4 that have been notched and joined. the bottom is made of 2 2x8's that have a routered groove on the top and bottom and then it has redi rod run through both 4x4's and in the grooves. it has a face vice, a tail vice and it is drilled for bench dogs.
it is great for woodworking.
this bench is the one I built when I re did the ugly corner it is 2x4 frame with 3x4 inch plywood doubled on the top.
<a href="http://s972.photobucket.com/albums/ae205/mustangmccance/?action=view¤t=IMG00028-20091206-1554.jpg" target="_blank"><img src="http://i972.photobucket.com/albums/ae205/mustangmccance/IMG00028-20091206-1554.jpg" border="0" alt="ugly corner renovation"></a>
the one you can just see to the right of this picture is my semi mobile table it is also made with 2 layers of 3/4 inch plywood. it has fixed casters on the back 2 legs and I made a retractible setup on the front. the casters are mounted on a 2x4 that runs the length of the bench and is mounted on hinges. I fold it down and lock it into place with another 2x4 that folds in to lock it. it is very sturdy and when not too much weight is on it easy to move around. when the wheels are folded up it does not move and is very stable. works well for me. I am going to be building a more moble workbench in the near future with locking casters.
<a href="http://s972.photobucket.com/albums/ae205/mustangmccance/?action=view¤t=lounge.jpg" target="_blank"><img src="http://i972.photobucket.com/albums/ae205/mustangmccance/lounge.jpg" border="0" alt="Photobucket"></a>
rieferman
Well-known member
mustang - cool workbenches. When you say "2x4's glued together" I'm assuming you mean the top of the table is 2x4's stacked side-by-side. So the top is 4 inches (well, 3.5 inches) thick. Do I understand it correctly?
I'm guessing you then planed the surface to remove any inconsistencies and to make it flat. Is that about right?
I'm guessing you then planed the surface to remove any inconsistencies and to make it flat. Is that about right?
mustangmccance
Well-known member
- Joined
- Sep 8, 2009
- Messages
- 832
yes. they are glued with gorilla glue. I used a hand plane and a belt sander to even it out. the tail vise has hardwood "keys"that slide in grooves routered into the other boards. it is great for sanding small pieces of wood, it lets you put the bench dogs below the thickness of the board and you can just sand away. I also put a dog hole in the front face so I can put long boards into the face vice supported by the dog and sand or plane the end pieces. I built it about 8 years ago and it has held up very well.
http://good-times.webshots.com/photo/2789227490101642786ndQxJx?vhost=good-times


and gotta love the wonder dog
http://good-times.webshots.com/photo/2789227490101642786ndQxJx?vhost=good-times
and gotta love the wonder dog
Last edited:
sstruckguy
Well-known member
I'm not sure how I missed this thread, but here is my scratch built bench, that is being published next month:

Before you ask, I don't know why.
After I receive my copy, I'll post which magazine it ends up in
Before you ask, I don't know why.
After I receive my copy, I'll post which magazine it ends up in
thinkracing
Well-known member
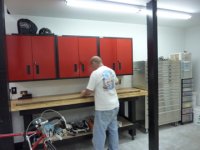
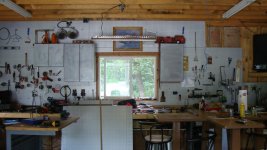
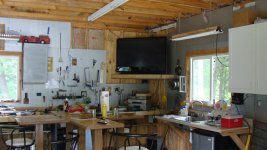
Here's an old picture of a prior garage of mine.
I build all of my benches tall, so I don't have to bend over. I also leave the fronts open so I can roll engines and other items underneath for additional storage. I'll attach a power strip on the front for lots of power access.
Currently, I have four of these. Two with large pegboard backs.
I build all of my benches tall, so I don't have to bend over. I also leave the fronts open so I can roll engines and other items underneath for additional storage. I'll attach a power strip on the front for lots of power access.
Currently, I have four of these. Two with large pegboard backs.
Attachments

Fatbrosracing
Well-known member
- Joined
- Feb 19, 2009
- Messages
- 72
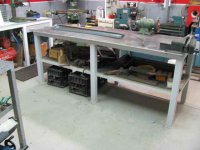
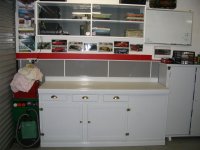
I have 4 work benches. The wooden one ( i inherited ) used to be a kitchen cupboard many years ago, that my grandfather turned into his workbench. When I was younger, I treated it poorly. Some years later, and much wiser I repaired and repainted it. Now it gets used for light, clean work , carbs, dizzys and electrical work. The other 3 are steel and built from scratch. The small mobile one is just so handy, I didn't realize it myself until I built it. I would recommend that every shed have one. The main one in the center is super solid, I can pound on it as much as I like. This time around I took my time and built benches that would be up to the job, not just "make do" light weights. This has proven to be a wise move.
Attachments

Keith1954
Member
brokenknee
Well-known member
Here is what I built about 3 months ago. 96" x 24'' Long side 57" x 24" Short side. (2) 3 inch dry wall screws to every stud.
The work table underneath was my dads since this photo, I pulled the legs off and put new 2x4's with casters.
I will be tearing this out to rebuild it. It's too tall and Ill be making it longer on the 96" side and lowering it on the wall
Don't know why the photo is showing
http://s31.photobucket.com/albums/c360/Martelle/?action=view¤t=NewBench.jpg
Did you copy and paste the img code?
Did you copy and paste the img code?
No I had put it in the IMG tags it wasn't working . So I just pasted the link
Its working now
Last edited:
brokenknee
Well-known member
If you pasted the IMG code, click on preview post in the advanced reply section and the picture should appear. If not, it is possible you did not copy all of the code.
As you could see it worked for me.
As you could see it worked for me.