theundermount
Well-known member
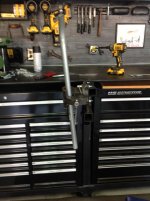
uhhhh? have you read this thread at all?Testing the limits of these low budget boxes! I would definitely make sure the top is resting on steel frame and the box is floating inside the structure!


uhhhh? have you read this thread at all?Testing the limits of these low budget boxes! I would definitely make sure the top is resting on steel frame and the box is floating inside the structure!
uhhhh? have you read this thread at all?


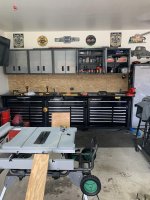
Lucky13, what are the dimensions of your garage?
Is it a 3 or 4 car garage?
And, with 3 cars parked inside, how or where do you pigeon hole all of your 'stuff'?
Love the workbench!
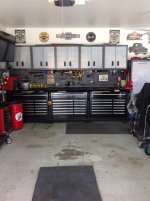
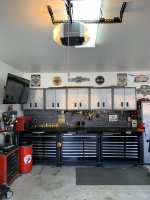
So today I was able to weld the top down in the front.The back is slid into some Unistrut like a C channel that's lag bolted to the wall finally I'm pretty convinced it's not going anywhere. i also took an angle grinder to remove the sharp corner after walking into it once or twice. Tomorrow I'm rolling on three coats of bed liner.
You guys with the welding skills are impressive! I stuck with wood for mine, but similar purpose. 2 HF boxes from Black Friday and 3 sheets of plywood from Menard's produced this nice little upgrade in the corner of my garage that was a disorganized mess before.
Sent from my Pixel 3 using Tapatalk
Sent you a pm...This is fantastic, and similar to what I want to do. You don't have any pictures of the framing process do you? I have been racking my brain about 10 different ways to make the internal frame that the boxes sit on look nice. Any healthier process would be appreciated, because I am going for a similar look as yours.
I don't have good pics,but if you pm me your email address, I can send you a copy of the sketch up plans I have for it. It's primarily made out of 3/4" plywood that's been doubled/tripled up to make half lap joints.I’d also like to get some pics of that framing! I’m about to pull the trigger in the next week or two on the boxes.
Sent from my iPhone using Tapatalk
Lucky,
It look great. As for bed liner, I have had great results with the spray bed liner from Lowe’s for my drawer liners. It does have the anti slip finish but I unload my table saw, miter saw and other large tools in and out of the drawers all the time with peeling or scratching.


I'll be adding to this thread soon. My new house won't be built for 6 months or so but I'm beginning the planning already. Just bought 3 of these rolling tool boxes. I'll get everything organized and on wheels so all I have to do is roll it on the moving van. At least that is the plan. 3 of them isn't near enough to hold all the tools, but I can get quite a few in there.
Most of my tools are wood working so the larger drawers in the Husky ones work better for my needs.
My only rules for the new garage tool bench is that there will be no open shelves and everything on wheels. Everything will be a door or drawer and movable so it can be cleaned around. 20 years in my last workshop showed me that open shelves collect way too much sawdust.
Jeff I looked at those at the depot and they had a really nice matte finish. Good job ! Are those the 26" ? Going to do any top boxes ? I'm gonna add a top/bottom combo on the side of mine I think for added storage. I like the harbor freight 26" for the best capacity bang for the buck
Sent from my iPad using The Garage Journal mobile app
Dang lucky, that’s super cool looking. Nice job!
Awesome work!! and inspiration, hopefully someday.
I'll be adding to this thread soon. My new house won't be built for 6 months or so but I'm beginning the planning already. Just bought 3 of these rolling tool boxes. I'll get everything organized and on wheels so all I have to do is roll it on the moving van. At least that is the plan. 3 of them isn't near enough to hold all the tools, but I can get quite a few in there.
Most of my tools are wood working so the larger drawers in the Husky ones work better for my needs.
My only rules for the new garage tool bench is that there will be no open shelves and everything on wheels. Everything will be a door or drawer and movable so it can be cleaned around. 20 years in my last workshop showed me that open shelves collect way too much sawdust.
Is this what you have in mind? Works good for me (but I might have cleaned the bench before the picture.
Wonderful thread with much inspiration. What do you guys do to protect those pretty wood bench surfaces from dings and chemicals?
Is this what you have in mind? Works good for me (but I might have cleaned the bench before the picture.


![20191023_220203[1].jpg](/forum/data/attachments/785/785783-c62e44e0533a3158c630f0e0a2548f03.jpg)