To avoid these ads, REGISTER NOW!

Below 265 SQ/FT "you should knock it down" single car garage rescue

All workspaces below 265 squarefeet.
To avoid these ads, REGISTER NOW!

kjdhawkhill

Well-known member
Joined
Jan 19, 2015
Messages
822
Location
Flyover state #4
Gym floor as shop floor! Paint me jealous-as-heck-green. Great job and I hope it holds up well for you. I've got a 6 year old working on her dribbling on the concrete in our basement, and the garage would be a really neat place to put in some gym floor.

And get that uncle in there for "consulting" as previously indicated.
 
OP
O

old_smokey

Well-known member
Joined
May 16, 2018
Messages
410
Location
Manitoba
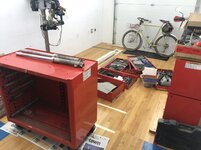
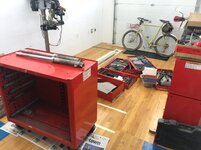
Picked up some cleaning supplies and grease to restore the tool box. I hauled it home in pieces last night, along with most of my tools, two XT500s in boxes, and it’s all spread out across the floor.

07cf413c769f384ae3b06e27ce53bd1a.jpg

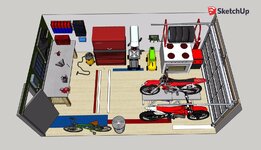
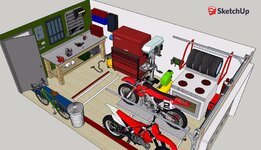
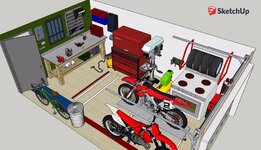
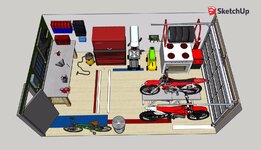
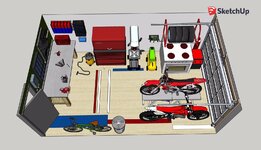
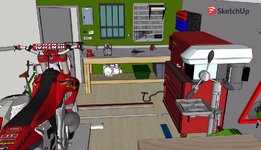
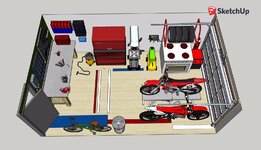
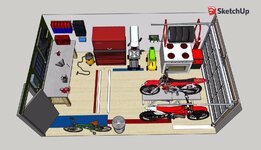
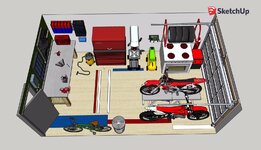
In the mean time I gave myself a crash course on SketchUp. After a couple YouTube videos and some fumbling around I was able to mock-up the floor plan:

1a686bb886502eb916a5c68d1b7d3e28.jpg

9c040278f8fcd24b0f5da4d8c6e0d779.jpg

28e521d506e0fedb74a58a69d9d705e7.jpg

b8e7a3bd1fef5051d49d3aaba7e467f3.jpg

Gonna be squishy in there!

Today I placed an order for 1/8 thick cold rolled steel for the workbench top. I have about 1.5 weeks to get the base built up first.


Sent from my iPhone using Tapatalk
 

Attachments

  • b8e7a3bd1fef5051d49d3aaba7e467f3.jpg
    b8e7a3bd1fef5051d49d3aaba7e467f3.jpg
    523.9 KB · Views: 1
  • 28e521d506e0fedb74a58a69d9d705e7.jpg
    28e521d506e0fedb74a58a69d9d705e7.jpg
    593.8 KB · Views: 1
  • 9c040278f8fcd24b0f5da4d8c6e0d779.jpg
    9c040278f8fcd24b0f5da4d8c6e0d779.jpg
    461.6 KB · Views: 1
  • 1a686bb886502eb916a5c68d1b7d3e28.jpg
    1a686bb886502eb916a5c68d1b7d3e28.jpg
    420.4 KB · Views: 2
  • 07cf413c769f384ae3b06e27ce53bd1a.jpg
    07cf413c769f384ae3b06e27ce53bd1a.jpg
    425 KB · Views: 2

C.L S2000

Well-known member
Joined
May 3, 2017
Messages
181
Location
LB, CA
Picked up some cleaning supplies and grease to restore the tool box. I hauled it home in pieces last night, along with most of my tools, two XT500s in boxes, and it’s all spread out across the floor.

07cf413c769f384ae3b06e27ce53bd1a.jpg

In the mean time I gave myself a crash course on SketchUp. After a couple YouTube videos and some fumbling around I was able to mock-up the floor plan:

1a686bb886502eb916a5c68d1b7d3e28.jpg

9c040278f8fcd24b0f5da4d8c6e0d779.jpg

28e521d506e0fedb74a58a69d9d705e7.jpg

b8e7a3bd1fef5051d49d3aaba7e467f3.jpg

Gonna be squishy in there!

Today I placed an order for 1/8 thick cold rolled steel for the workbench top. I have about 1.5 weeks to get the base built up first.


Sent from my iPhone using Tapatalk


Can I ask how much that was for the 1/8" bench topper ?? im thinking of doing the same thing...
 

Attachments

  • 07cf413c769f384ae3b06e27ce53bd1a.jpg
    07cf413c769f384ae3b06e27ce53bd1a.jpg
    229.9 KB · Views: 2
  • 9c040278f8fcd24b0f5da4d8c6e0d779.jpg
    9c040278f8fcd24b0f5da4d8c6e0d779.jpg
    249.5 KB · Views: 2
  • 28e521d506e0fedb74a58a69d9d705e7.jpg
    28e521d506e0fedb74a58a69d9d705e7.jpg
    333.5 KB · Views: 2
  • b8e7a3bd1fef5051d49d3aaba7e467f3.jpg
    b8e7a3bd1fef5051d49d3aaba7e467f3.jpg
    301.6 KB · Views: 2
  • 1a686bb886502eb916a5c68d1b7d3e28.jpg
    1a686bb886502eb916a5c68d1b7d3e28.jpg
    238.2 KB · Views: 2

driftpin

Well-known member
Joined
Dec 22, 2016
Messages
11,332
Location
Miami-Dade/Broward Co. Florida
Picked up some cleaning supplies and grease to restore the tool box. I hauled it home in pieces last night, along with most of my tools, two XT500s in boxes, and it’s all spread out across the floor.

07cf413c769f384ae3b06e27ce53bd1a.jpg

In the mean time I gave myself a crash course on SketchUp. After a couple YouTube videos and some fumbling around I was able to mock-up the floor plan:

1a686bb886502eb916a5c68d1b7d3e28.jpg

9c040278f8fcd24b0f5da4d8c6e0d779.jpg

28e521d506e0fedb74a58a69d9d705e7.jpg

b8e7a3bd1fef5051d49d3aaba7e467f3.jpg

Gonna be squishy in there!

Today I placed an order for 1/8 thick cold rolled steel for the workbench top. I have about 1.5 weeks to get the base built up first.

How-thick is your benchtop now? I suggest a minimum of 1-1/2" and securing the bench back legs to the wall securely. Also 1-1/2" or more, w/fender washers for the fasteners, to widen the bearing area.
 

Attachments

  • 28e521d506e0fedb74a58a69d9d705e7.jpg
    28e521d506e0fedb74a58a69d9d705e7.jpg
    333.5 KB · Views: 2
  • 07cf413c769f384ae3b06e27ce53bd1a.jpg
    07cf413c769f384ae3b06e27ce53bd1a.jpg
    229.9 KB · Views: 2
  • 1a686bb886502eb916a5c68d1b7d3e28.jpg
    1a686bb886502eb916a5c68d1b7d3e28.jpg
    238.2 KB · Views: 2
  • 9c040278f8fcd24b0f5da4d8c6e0d779.jpg
    9c040278f8fcd24b0f5da4d8c6e0d779.jpg
    249.5 KB · Views: 2
  • b8e7a3bd1fef5051d49d3aaba7e467f3.jpg
    b8e7a3bd1fef5051d49d3aaba7e467f3.jpg
    301.6 KB · Views: 2
OP
O

old_smokey

Well-known member
Joined
May 16, 2018
Messages
410
Location
Manitoba
$175 for 10 gauge 1/8” hot rolled steel, $260 for 16 gauge stainless steel. I don’t have the final quote for cold rolled 10 gauge.

$100 extra bucks for bending a 3” backsplash and 1.5” lip at the front regardless of which metal is used.

That’s for 90” wide, 30” deep, 3” backsplash, 1.5” front overhang.

Regarding the bench itself, I haven’t built it yet. But my plan was to make the top out of two pieces of 3/4” plywood with the steel on top. So that’s 1.5” of wood and 1/8 steel. Sound ok?

https://youtu.be/7BTtqT07GZY


Hope the link above works. I spent an hour replacing the slides in my uncle milt’s old snap on box, assembling the whole thing and starting to fill it up. It’s HEAVY! I can see the floor flex a little bit as I roll it!


Sent from my iPhone using Tapatalk
 
Last edited:
OP
O

old_smokey

Well-known member
Joined
May 16, 2018
Messages
410
Location
Manitoba
I have a bunch actually, but I’ll be doing mostly small engine work in here. All that oil and chemicals would ruin the wood right away. I think a steel surface will be best for my purposes.

Maybe some shelving or something though...


Sent from my iPhone using Tapatalk
 
OP
O

old_smokey

Well-known member
Joined
May 16, 2018
Messages
410
Location
Manitoba
Thanks!

So no dice on cold-rolled 11 gauge anymore. 14 gauge is the thickest they could get it in, so I went with hot rolled 11 gauge. Including the bending job and tax it's $290 CAD for those asking. Now I need to get on the base construction!
 

driftpin

Well-known member
Joined
Dec 22, 2016
Messages
11,332
Location
Miami-Dade/Broward Co. Florida
I did what you're proposing, I ripped a 4x8 ft 3/4" ply. sheet, & glued/screwed it together. I capped it w/a single piece of 3/16" steel, which must be cheaper here. I ended-up w/a 2 ft x 8 ft workbench surface, & got some 1/8" by 1-1/2" wide strap to screw to the front of the wood, butted to the steel top. My bench frame had a steel backsplash that the steel benchtop butts-up to. I countersunk the flathead machine screws holding the steel tabletop in place. I need to clean it off, I have maybe 5 projects spread-across it now. I mounted my cordless chargers on the wall on Geartrack-style wall brackets, which I use for frequently used screwdrivers and wrenches too. Saves diving into drawers, & it's easy to see what's off the wall being used.
 
OP
O

old_smokey

Well-known member
Joined
May 16, 2018
Messages
410
Location
Manitoba
I did what you're proposing, I ripped a 4x8 ft 3/4" ply. sheet, & glued/screwed it together. I capped it w/a single piece of 3/16" steel, which must be cheaper here. I ended-up w/a 2 ft x 8 ft workbench surface, & got some 1/8" by 1-1/2" wide strap to screw to the front of the wood, butted to the steel top. My bench frame had a steel backsplash that the steel benchtop butts-up to. I countersunk the flathead machine screws holding the steel tabletop in place. I need to clean it off, I have maybe 5 projects spread-across it now. I mounted my cordless chargers on the wall on Geartrack-style wall brackets, which I use for frequently used screwdrivers and wrenches too. Saves diving into drawers, & it's easy to see what's off the wall being used.

Nice! How has it worked out, particularly how has the steel held up? I was thinking of building up the top with a sheet of 3/4 plywood, then 3/4 MDF as it's flat and harder than plywood, and then glue the 1/8" steel to the MDF.

Figured I'd bolt the bench to the walls so that it doesn't move when using a vise, assuming it ends up being an issue.

I discovered that because the wood floor is so thick, the top of my backsplash will actually cover up the lower half of one 4-outlet plug, as well as the lower edge of the window. I might cut out the backsplash to provide access. I would still have about 3/4" of backsplash which would prevent spills from pouring into the plugs. Cutting out around the window bars would let me push the bench up against the wall. Not sure, I'll have to make that decision once the bench is built and in place.


Last night I did a bit of fine tuning on the overhead door. I ground some high spots down on the new concrete footing, installed the weather stripping along the bottom edge of the door and the outside faces, and also tweaking the track positions as it was binding badly when almost open. Now the door is smooth as glass, and no light is visible around the edges from outside. That should eliminate drafts and keep my warm air inside much better.

I also installed some thin adhesive weather stripping along the man-door. That was a very loose fit before. Bright light escaped around both sides and the top. Now the door has a tight fit and no more drafts or light escape.

Tonight I'll pickup lumber for the bench, and also start working on the door transition ramps.
 
OP
O

old_smokey

Well-known member
Joined
May 16, 2018
Messages
410
Location
Manitoba
You have a stove, or it looks like to me, in your Sketchup. Storage or powder Coating?


Sure do. I was offered a stove by a friend for free and thought it’d be quite useful in a shop. For example, I’m rebuilding an xt500 engine right now which has quite a few blind bearings in the cases. Heating the cases will make it much easier to remove and replace. It will also be great for curing the engine paint prior to running. I’d like to try cerakoting at some point as well. Plus who knows, maybe an apple pie or two along the way


Sent from my iPhone using Tapatalk
 

Lwel9226

Well-known member
Joined
Jun 7, 2014
Messages
764
Location
So Oregon
I discovered that because the wood floor is so thick, the top of my backsplash will actually cover up the lower half of one 4-outlet plug, as well as the lower edge of the window. I might cut out the backsplash to provide access. I would still have about 3/4" of backsplash which would prevent spills from pouring into the plugs. Cutting out around the window bars would let me push the bench up against the wall. Not sure, I'll have to make that decision once the bench is built and in place.


Build your bench 2in.shorter.... :headscrat :)

Good save on the garage.... :thumbup: :thumbup: :bowdown:


LynnW
 

dfiler2

Well-known member
Joined
Dec 15, 2014
Messages
2,859
Location
NW Minnesota
So glad to see this moving along, your floor looks great, actually everything looks great!

I'm about 15 miles south of the Manitoba border, I think we're considered "Southern Canadians".
 
Last edited:
OP
O

old_smokey

Well-known member
Joined
May 16, 2018
Messages
410
Location
Manitoba
So glad to see this moving along, your floor looks great, actually everything looks great!

I'm about 15 miles south of the Manitoba border, I think we're considered "Southern Canadians".

Hah! Thanks for the kind words, I appreciate it.

Regarding the bench height, that would work technically, but 36" is already annoyingly low for me. I've been using a 36" bench the last few years and really wish it was 1-2" taller actually. The work surface on my toolbox is 40" and it's marvellous for standing work. No biggie, I'll figure something out.

For the surface, I've decided on a sheet of 3/4" plywood, 1/2" plywood, and 1/4" hardboard. That gives me the 1.5" thickness I need, followed with the 1/8" steel. The hardboard will give a flat and hard surface under the steel for support, without being super heavy like 3/4" MDF would have been. Everything will be glued together with contact cement. Picking it up tonight and building the base tomorrow :bounce:
 

IowaMercMan

Well-known member
Joined
Aug 10, 2010
Messages
58
Location
Hiawatha, IA
"you should knock it down" single car garage rescue

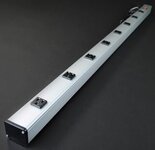
About the height of you bench top- get a power strip, something like this photo. Screw it to the front of your bench. You will appreciate not having cords in the way, all over your working surface. And then you only have one thing to plug into the wall (run that one cord under the bench top,then up to the receptacle). Should work just dandy for you.

2866f58ce9725466dd413de424a29f31.jpg

Walt
 
Last edited:
OP
O

old_smokey

Well-known member
Joined
May 16, 2018
Messages
410
Location
Manitoba
Good idea! Thanks!

Started the workbench this weekend. I finished the frame, but am waiting until I have the steel top in hand before cutting the plywood and hardboard for the top. I’m not sure how accurate it will be compared to my drawing.

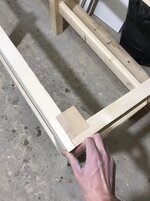
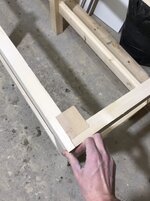
I spent some quality time with the dado blade today. The bench and together nicely and was a really fun project actually. It feels rock solid.

d693b39badb36df07e0af96dad1bfc9a.jpg

a599bea7a040f34c8d0d734129242e8b.jpg

382a111c8b704dae2bd9b346cdeebbda.jpg

7fa5082cd06097e6313ab06470ba9f20.jpg

8c27615ac40e623f49d5295189285e3a.jpg

46f35ecbad5161af19d1c6a9da222f0a.jpg

Tomorrow I’ll cut some 1/2” ply for the lower shelf, which will be recessed into the frame for a nice flush finish.


Sent from my iPhone using Tapatalk
 

Attachments

  • 8c27615ac40e623f49d5295189285e3a.jpg
    8c27615ac40e623f49d5295189285e3a.jpg
    462.8 KB · Views: 1
  • 7fa5082cd06097e6313ab06470ba9f20.jpg
    7fa5082cd06097e6313ab06470ba9f20.jpg
    374.9 KB · Views: 1
  • 382a111c8b704dae2bd9b346cdeebbda.jpg
    382a111c8b704dae2bd9b346cdeebbda.jpg
    545.3 KB · Views: 1
  • a599bea7a040f34c8d0d734129242e8b.jpg
    a599bea7a040f34c8d0d734129242e8b.jpg
    275.6 KB · Views: 1
  • d693b39badb36df07e0af96dad1bfc9a.jpg
    d693b39badb36df07e0af96dad1bfc9a.jpg
    607.2 KB · Views: 1
  • 46f35ecbad5161af19d1c6a9da222f0a.jpg
    46f35ecbad5161af19d1c6a9da222f0a.jpg
    287.9 KB · Views: 1
To avoid these ads, REGISTER NOW!
OP
O

old_smokey

Well-known member
Joined
May 16, 2018
Messages
410
Location
Manitoba
Slower progress this past week after I tweaked my back doing who knows what. Back in action now though and I’ve made a few strides.

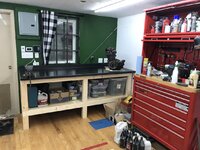
On Monday I put down two coats of a dark green paint along the bench wall. I tried to get as close to British racing green as I could. I think it ended up a bit too bright still, but oh well. Still makes the room feel less sterile.

Next I picked up my steel bench top and cut the underlaying plywood. I have a layer of 1/2”, then 3/4”, then 1/8” hardboard. I meant to use 1/4” hardboard but had a brain fart at the store and didn’t realize it till I had cut it.

ae8d1c3c510b7ed4b5cb1159750937e4.jpg

I glued the two sheets of plywood together last night. Tonight I’ll use contact cement to adhere the hardboard to the steel, as well as to the 3/4” ply. Then I can move the finished bench against the green wall.

Since the bench backsplash covers one set of plugs and also interferes a bit with the window crank, I thought I’d position it 3” away from the wall, then build a little shelf behind the backsplash to take up the space. That would give me a spot to put spray cans and other tools, while also providing clearance for power and the window crank.

Today I ordered two 16x32" black Wall Control panels to cover up that section of the green wall where the cable cuts across. It’s all coming together!


Sent from my iPhone using Tapatalk
 

Attachments

  • ae8d1c3c510b7ed4b5cb1159750937e4.jpg
    ae8d1c3c510b7ed4b5cb1159750937e4.jpg
    312.3 KB · Views: 1
Last edited:
OP
O

old_smokey

Well-known member
Joined
May 16, 2018
Messages
410
Location
Manitoba
2 liters of contact cement later and the table is done!

d71705723107ee3b0b2a352cc617a2d1.jpg

I gave it a wipe down with WD40 and will let that dry overnight. It feels SOLID. Very happy with this addition!

26bda039044ae4e248ea76a9811985fb.jpg


Sent from my iPhone using Tapatalk
 

Attachments

  • 26bda039044ae4e248ea76a9811985fb.jpg
    26bda039044ae4e248ea76a9811985fb.jpg
    198.5 KB · Views: 1
  • d71705723107ee3b0b2a352cc617a2d1.jpg
    d71705723107ee3b0b2a352cc617a2d1.jpg
    319.7 KB · Views: 1

dchance

Well-known member
Joined
Oct 3, 2016
Messages
614
Location
OKC
You have made great progress. That floor is a very good idea. It will be warmer than a concrete floor and in your weather that is good. The bench turned out very well.

Your save of this building is really good.

Dwight
 
OP
O

old_smokey

Well-known member
Joined
May 16, 2018
Messages
410
Location
Manitoba
You have made great progress. That floor is a very good idea. It will be warmer than a concrete floor and in your weather that is good. The bench turned out very well.

Your save of this building is really good.

Dwight

Thank you!

It snowed 4" last night and we've had a few -15C days as winter starts to creep in. I used an infrared temperature gun to compare the temp of the little bit of exposed concrete I still have to cover, and the wood. -2C on the concrete, +10C on the top of the wood floor :beer:

This weekend I'll wrap up the transitions from the wood to each door, and seal all along the perimeter of the wood floor with either expanding foam or foam tubes. That'll make the floor truly insulated. Sure is nice to have. Last night while finishing the bench, we were in t-shirts inside while a blizzard raged outside. My KWH meter says it cost me about 55 cents to keep it at 15C for about half the day.
 
OP
O

old_smokey

Well-known member
Joined
May 16, 2018
Messages
410
Location
Manitoba
Re: "you should knock it down" single car garage rescue

Spent an hour in the shop tonight to install the wall control panels. I had to hunt for 1/4” pegboard hooks but finally found em at Canadian tire. However they’ll need to be zip tied or somehow fastened to the board as they fall out too easily with a tool. The wall control hooks looks great and I’ll get some in the future, just not now ($$).

I also found a pile of Ernst socket rails at princess auto for $5, so I brought a pile home. A lot of my sockets are on those crappy chrome rails. The plating is going south, making it difficult to remove the sockets. So this was a nice update.

Before:
5f964c9ae9bc4e9021664ed366d3b403.jpg

After:
041dab5bcd9beee442074fcce66dfbc7.jpg

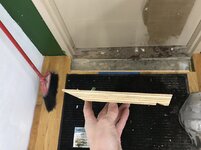
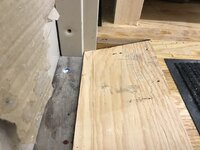
Oh and I forgot to even update last week, when I put in some ramps to transition at the doors. It’d 3/4” plywood. I’m going to glue some ribbed rubber mat to them for grip and moisture management, then lay a thin strip of aluminum over the joint at the hardwood. That’s next weeks job

8960750baa1a9d651282e4bc1e711ea0.jpg

e454b8fbd45a61ab156363b7bb3e417f.jpg

efc9803b11564b30958533f7689ba1b7.jpg

e75df5d8f38b3d280c861b1c9163126b.jpg


Sent from my iPhone using Tapatalk
 

Attachments

  • 041dab5bcd9beee442074fcce66dfbc7.jpg
    041dab5bcd9beee442074fcce66dfbc7.jpg
    364.7 KB · Views: 2
  • 5f964c9ae9bc4e9021664ed366d3b403.jpg
    5f964c9ae9bc4e9021664ed366d3b403.jpg
    425.5 KB · Views: 1
  • e454b8fbd45a61ab156363b7bb3e417f.jpg
    e454b8fbd45a61ab156363b7bb3e417f.jpg
    301 KB · Views: 1
  • 8960750baa1a9d651282e4bc1e711ea0.jpg
    8960750baa1a9d651282e4bc1e711ea0.jpg
    231.1 KB · Views: 1
  • efc9803b11564b30958533f7689ba1b7.jpg
    efc9803b11564b30958533f7689ba1b7.jpg
    261.2 KB · Views: 1
  • e75df5d8f38b3d280c861b1c9163126b.jpg
    e75df5d8f38b3d280c861b1c9163126b.jpg
    229.7 KB · Views: 1
OP
O

old_smokey

Well-known member
Joined
May 16, 2018
Messages
410
Location
Manitoba
Re: "you should knock it down" single car garage rescue

A bit of fun in the garage over the past few days.

First I picked up a nice collapsible motorcycle lift from princess auto. It’s made in Canada and appears to be quite nicely made. It lifts via a foot pump or pneumatic hookup, but my little compressor isn’t really up to the task.

1384ffd01e61623f11242f1e0937b989.jpg

The whole thing folds up and stores vertically against the wall when not in use. Great for a small shop like mine!

Next I brought the stove back in and tested it. This will be great for heating up engine blocks and other expansion uses. On the floor is my ultrasonic cleaner, one of the best tools I’ve picked up in a long time

7ee59c91f70a71718b37dd094b3e5611.jpg

Last project is restoring my #4 Record vise. I pulled it apart and found the nut is damaged, though still useable. I wonder if I could find a replacement anywhere...

f27a92ca10d93ccb586fb2002c54ce70.jpg

8731fcd3b89c8ed91fe4ceaedb3b27a9.jpg

And just because I find it oddly calming, I spent some time organizing the socket drawer. Left side is done, right side still has some old pitted Mac socket rails that have to go. The plastic Ernst rails are so much easier to use.

aeb2fe2cd7b8355f3a499d3755b0a5ad.jpg

4beb979ab5df1da666c00295f9f42998.jpg

Real mixed bag of my uncles old Snap-On stuff and my stanley, SK, mastecraft maximum, and westward bits.


Sent from my iPhone using Tapatalk
 

Attachments

  • 4beb979ab5df1da666c00295f9f42998.jpg
    4beb979ab5df1da666c00295f9f42998.jpg
    458.9 KB · Views: 1
  • aeb2fe2cd7b8355f3a499d3755b0a5ad.jpg
    aeb2fe2cd7b8355f3a499d3755b0a5ad.jpg
    384.7 KB · Views: 1
  • 8731fcd3b89c8ed91fe4ceaedb3b27a9.jpg
    8731fcd3b89c8ed91fe4ceaedb3b27a9.jpg
    366.1 KB · Views: 1
  • f27a92ca10d93ccb586fb2002c54ce70.jpg
    f27a92ca10d93ccb586fb2002c54ce70.jpg
    395.9 KB · Views: 1
  • 7ee59c91f70a71718b37dd094b3e5611.jpg
    7ee59c91f70a71718b37dd094b3e5611.jpg
    298 KB · Views: 1
  • 1384ffd01e61623f11242f1e0937b989.jpg
    1384ffd01e61623f11242f1e0937b989.jpg
    255.7 KB · Views: 2

jvitez

Well-known member
Joined
Nov 30, 2009
Messages
2,429
Location
Big Sky Country, Canada
Been following your build from the beginning, fellow prairie Canuck. Awesome job! You've turned a sow's ear into a silk purse, well, maybe a leather motorcycle saddlebag....... :)

How do you keep your steel workbench top from rusting? You said you coated it in WD40 when you first installed it. Do you just sand off any rust and give it a blast of WD40 from time to time?
 
OP
O

old_smokey

Well-known member
Joined
May 16, 2018
Messages
410
Location
Manitoba
Been following your build from the beginning, fellow prairie Canuck. Awesome job! You've turned a sow's ear into a silk purse, well, maybe a leather motorcycle saddlebag....... :)

How do you keep your steel workbench top from rusting? You said you coated it in WD40 when you first installed it. Do you just sand off any rust and give it a blast of WD40 from time to time?

Haha thanks, great analogy.

Regarding the steel top, I've had it a couple weeks now and there isn't a spot of rust. I gave it a heavy coat of WD40 when I got it, then wiped it dry. It is also hot-rolled steel, which has a layer of mill-scale on it. Apparently that is a pretty effective rust-inhibitor.

When I do eventually get a bit of rust, I'll just grab a scotch brite pad and scrub it off, then squirt WD40 on it again.

I saw a great comparison of rust inhibitors on YouTube somewhere. A guy tested around 50+ different brands. WD40 makes a "Specialist" line which includes a corrosion inhibitor product, it outperformed every other brand by a landslide. If I can ever find that locally I'll use it on all my tools.

I have heard of people using different waxes and such, but I'm worried about it rubbing off on everything. With the WD40 I don't seem to have anything ending up on my hands or whatever I'm working on.
 

Zippercat

Well-known member
Joined
Jul 13, 2013
Messages
828
Location
TN
I saw a great comparison of rust inhibitors on YouTube somewhere. A guy tested around 50+ different brands. WD40 makes a "Specialist" line which includes a corrosion inhibitor product, it outperformed every other brand by a landslide. If I can ever find that locally I'll use it on all my tools.

Might want to reconsider the WD 40 Specialist. Questions and Reviews reveal it is sticky and collects bugs and dirt.


https://www.amazon.com/dp/B07H8W5RC7/?tag=atomicindus08-20
 
OP
O

old_smokey

Well-known member
Joined
May 16, 2018
Messages
410
Location
Manitoba
well it's been several weeks since i've posted and thought i'd share an update. overall the garage has been great, but not without it's hiccups.

on the positive side, the heater is more than capable of creating a warm and comfortable workspace. I keep the resting temperature at 5C so nothing freezes, but raise it to 15-20C when working.

The workbench is fantastic. the steel top shows no signs of rusting and has been a real treat when working on engines.

The floor is holding up great so far. I try to keep water off the wood as much as possible, but snow eventually finds it's way in and melts. Nothing concerning yet.

The one snag is the man-door binding. The weather has dipped to -20 to -30C as we get into the depths of winter. With that cold, the ground has heaved a bit under the mandoor, causing it to shift a lot more than anticipated. The dead bolt used to slide straight into the plate on the frame, but last night I had to cut the hole an additional 1/8" at the bottom so the bolt could close. I also had to grind about 1/8" off the bottom edge below (corner opposite the hinges) as it was binding on the kick plate enough that I couldn't close the door anymore.

I've tried to minimize binding using the cable I left on the mandoor wall, but it isn't enough to help. Looks like I'll just have to tweak the door frame and/or cut the door down a little bit so it 'floats' a little in the frame, then take up the gaps with thicker weather stripping.

When the weather warms up to around-5c, the building settles back and the door swings freely. Ahh well, I knew this would be a potential problem, just gotta figure the best way to live with it.
 
OP
O

old_smokey

Well-known member
Joined
May 16, 2018
Messages
410
Location
Manitoba
Re: "you should knock it down" single car garage rescue

Took some time to address the door today. The gap was a good 1/4” at the bottom, letting a ton of cold air in.

I picked up some thick weather stripping and applied it to the inside of the door. At the same time I loosened up the door frame/jam and was able to tap the frame a little more square, reducing my gap by maybe 30-40%. The door is pretty much weather right now.

It still binds heavily along the bottom though. I have some ideas to make the entire frame “float” a bit in the wall, but that’s a summer project. It’s been around -30 to -40C pre-windchill for the last two weeks!

I also added a big exterior handle, and a smaller interior one, so it’s not so difficult to open the sticky door. Prior to this all I had was the deadbolt, which meant really pulling hard on the key. I was a matter of time till I snapped it.

0439ddc0b0fd72c3d0ae0b31e257da23.jpg

e014e565ae5bfcff21243f88c45df3fe.jpg

2797511bed6eb52674a1b7f2dfb8bae7.jpg

Otherwise the shop has been great. I’ve been making slow but steady progress on my XT500 rebuild, and just spending time putting around in general. It’s so nice to have a space all my own.

My friend Brian came by to check out the space and sent me this nice photo

125526bd5dd3ff377c45cc0573690563.jpg


Sent from my iPhone using Tapatalk
 

Attachments

  • 125526bd5dd3ff377c45cc0573690563.jpg
    125526bd5dd3ff377c45cc0573690563.jpg
    422.7 KB · Views: 2
  • 2797511bed6eb52674a1b7f2dfb8bae7.jpg
    2797511bed6eb52674a1b7f2dfb8bae7.jpg
    182.8 KB · Views: 1
  • e014e565ae5bfcff21243f88c45df3fe.jpg
    e014e565ae5bfcff21243f88c45df3fe.jpg
    295.9 KB · Views: 1
  • 0439ddc0b0fd72c3d0ae0b31e257da23.jpg
    0439ddc0b0fd72c3d0ae0b31e257da23.jpg
    365.8 KB · Views: 1
OP
O

old_smokey

Well-known member
Joined
May 16, 2018
Messages
410
Location
Manitoba
Re: "you should knock it down" single car garage rescue

Thank you for the kind words, I’m quite happy with it. I need to figure out a better way of storing materials and parts in here as I’m already almost out of room. Some shelves and cabinets are needed soon.

It’s been several weeks since I stripped the paint off the Record vise. It hasn’t shown any signs of rusting whatsoever, so I’ve decided to leave it bare. I cleaned and greased it, had a friend straighten the handle in his press, assembled and think it looks quite cool:

4e3c9f412e871dd52ce264e86604ba3c.jpg

Now I need to mount it. I was thinking using bolts threaded into T-nuts, since the vise sits basically right above the table frame. I can’t simply put a nut and bolt on.


Sent from my iPhone using Tapatalk
 

Attachments

  • 4e3c9f412e871dd52ce264e86604ba3c.jpg
    4e3c9f412e871dd52ce264e86604ba3c.jpg
    287.8 KB · Views: 1

Growlertdi

Well-known member
Joined
May 17, 2016
Messages
410
Location
Millersport, Ohio
Make sure you mount it so it hangs over the edge, wouldn't want to limit yourself on grabbing things that hang lower than your tabletop.

speaking of your workbench, I am super impressed with how you built your workbench.
8c27615ac40e623f49d5295189285e3a.jpg

I know its just 2x4s but you made it like it was made from super nice furniture grade hardwoods. Every time I scroll past the series of photos where you built it I am impressed all over again.
 

Attachments

  • 8c27615ac40e623f49d5295189285e3a.jpg
    8c27615ac40e623f49d5295189285e3a.jpg
    248.4 KB · Views: 2
Last edited:
To avoid these ads, REGISTER NOW!
Top Bottom