To avoid these ads, REGISTER NOW!

ZMotorsports Shop Projects 2.0

OP
Z

zmotorsports

ALLIANCE MEMBER
Joined
Oct 20, 2009
Messages
21,477
Location
Northern Utah
Last night before ripping the front end of the 2002 Silverado apart I wanted to get all of the parts opened up and laid out to inspect and make sure I have everything. I do this on most large projects to be certain I don't get a vehicle torn down and inoperable only to find out something is missing or damaged and needs to be sourced.

Not only does Cognito produce nice high quality components but they package them very well for shipping too.
gm1.jpg

Fox 2.0 IFP shocks for all the way around.
gm2.jpg

Cognito now offers very nice heavy duty tie-rods vs. just using sleeves. The sleeves work well and for most people are more than adequate but these are nice heavy duty tie rods. When we did my son's they did not offer heavy duty tie rods so we used sleeves on his. When I built my 2006 2500 Duramax I used an RCD suspension system but FabTech heavy duty tie rods as they were about the only ones offering them at the time. That was 13+ years ago however.
gm3.jpg

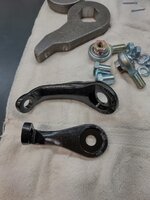
I also noticed that the Cognito steering center link kit is different than the ones I've used in the past. The new ones are cast brackets whereas the previous brackets were formed steel and welded. It's nice to see companies continue to refine and tweak products as they see fit to improve them.
gm4.jpg

Now to tear the front end apart and get to work installing these components. I also ordered the Banks stainless steel exhaust system for this truck yesterday but I'm told it is 2-3 weeks out so I will have to have him bring it back after the exhaust arrives.
 
To avoid these ads, REGISTER NOW!

Jarhead0408

Well-known member
Joined
Apr 1, 2012
Messages
5,784
Location
Who knows?
First off, thank you very much for following along and for the vote of confidence. Sorry to hear about your windshield as rock chips in glass ****! I was fortunate my first windshield lasted over about 115k miles before one got it bad enough to crack beyond repair. I did have quite a few small chips that I was able to repair in all those miles and about ten years though so I shouldn't complain. When I had my windshield replaced last year I waffled on the Gorilla glass but in the end opted just to replace it with a good aftermarket windshield. I didn't even go back to the OEM with the little Jeep easter egg around the perimeter and so far I've been pleased.

Good for you setting up your Jeep to flat-tow. I think you will be happy with the choice and I hope it opens up the options for you as much as it has for us when traveling. I've hauled the Jeep and Harley in our enclosed trailer for many years as well and flat-towing is just so simple, quick and convenient that even though I miss my race trailer, I don't think I could go back. My wife and I were even talking the other night that our first long trip when we retire is a 3+ month long road trip to Alaska in the coach and she asked if the Jeep would be ok for that. I said hell yeah, that is what we built it for and we tow it everywhere else so why wouldn't we tow it to Alaska. That will probably be a 10k-12k mile trip but shouldn't be any different than a bunch of 1k-3k mile trips.

As for towing and braking setups I have had a few over the past 25+ years and over 200k miles now. My first towbar I fabricated in-house and made it to fold up on the front of the vehicle. That was with our first motorhome and our first Jeep, a 1991 Jeep Cherokee (XJ). We towed that for about 2-3 years before we sold it and upgraded to the 1996 Grand Cherokee (ZJ) in which I bought a Roadmaster Stowmaster towbar setup. This was the one that required a mounting plate for the front and the towbar folded down parallet to the front bumper. However, it stuck out about 10 inches in front of the bumper so when we started doing some off-road trails I would usually remove it and store it in the coach's storage compartment. I did not use an auxiliary braking system on the XJ but seeing as how the ZJ was heavier I wanted some supplemental braking capabilities seeing as how we travel in the western U.S. and over many mountain passes. I bought one of those box style that push against the seat and the brake pedal. Although it worked as advertised, I hated it. I hated the inconvenience of it and hated the bulkiness of it. We only used this setup for about 2 years and I had grown tired of it quickly.

Here is our second coach, first diesel pusher, and our 1996 Jeep ZJ during a road trip. This was with the factory front bumper and Roadmaster Stowmaster towbar setup. Not seen is the box style braking system on the driver's floorboard.
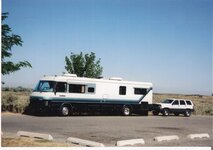
beaverjeep.jpg

After the second year and during the winter off-season I sold both the Roadmaster Stowmaster towbar as well as the Brake Buddy braking system. I fabricated a custom front bumper for the ZJ to allow a better approach angle as well as incorporate tow points into the bumper for flat-towing. I had also purchased another Roadmaster towbar but this was the Sterling aluminum towbar that mounted to the coach and the arms connected directly to the Jeep's front bumper. I also splurged and purchased the U.S. Gear's Unified Braking System. This was an electronic braking system that was tied in with the coach's signal but used the Jeep's braking system and an aux. vacuum pump to pull a vacuum on the OE brake booster. It then used an electrical linear actuator to pull a cable that connected to the back of the brake pedal and proportionately braked the Jeep in relation to the coach. The linear actuator mounted under the driver's seat and was completely out of the way and out of sight.

I absolutely LOVED this setup. Both the bumper and supplemental braking system were clean and un-cluttered whether it was in use or daily driving. No need to remove the towbar when we traveled for off-roading because the towbar was mounted to the coach and when we returned home or just disconnected to go sight-seeing we didn't need to remove anything from the Jeep and store it, simply disconnect and go.

I carried that exact same setup over to our next Jeep and next coach over the following 15 years or so. I ran that exact setup in our current coach and current Jeep up until about 3 years ago when I did the LS swap. With our current 2011 Jeep Wrangler I built a custom towbar crossmember for the front of the Jeep to connect the Roadmaster towbar to and kept it low and back so as not to encroach into my approach angle for off-roading. I like this setup so much that when I started seeing some slight wear in the arms of the towbar I opted to rebuild it vs. replacing it, even after all those years and miles of use. At the time of reconfiguring our current Jeep when I added the LS engine I knew it had gained some weight over the years and was pushing the limits of the Sterling 6k pound towbar even though it gave no signs of any issues. I sold the Roadmaster Sterling towbar and the U.S. Gear Unified Braking System to a fellow Jeep club member who had just purchased his first motorhome and was looking for a setup to flat-tow his 2004 Jeep TJ.

At this point I purchased another Roadmaster towbar, the Nighthawk 8k pound setup. The first year I towed the Jeep without a supplemental braking system because I could not make up my mind on which one to go with even after much research. IT was at this time I kicked myself for selling the U.S. Gear Unified Braking System as they had quit manufacturing it by now. I sold it because it had a small vacuum pump that mounted in the engine bay and I wanted to clean up the engine bay and didn't want that pump. After deciding on a supplemental braking system I discovered that I still have to mount items in the engine bay so I should have just kept the Unified Braking System.

I now have the Demco Air Force-One braking system that uses the coach's air brake system to provide proportional braking to the Jeep. It work great but does require air brakes on the tow vehicle.

Here is our current setup as of last year.
Bryce8.JPG

We have friends who have the Roadmaster as well as Demco and Blue Ox towbars. I have seen on a couple of RV forums over the past couple of years about some Blue Ox failures, some quite devastating. I'm not certain as to the exact cause of these failures but it still gives me pause to recommend them. I do like the quick release front connection points of the Blue Ox setup however.

I have absolutely nothing bad to say about the Roadmaster towbars in all of the miles I have used them and don't have enough personal experience with the Demco to say one way or the other.

As for supplemental braking systems I have used the Brake Buddy, Unified Braking System, Air Force-One and have installed a couple of the M&G setups in other Jeeps. I really like the M&G setup and the Air Force-One but they require air brakes on the tow vehicle which won't work for your setup. You could use a Brake Buddy style if you are ok with the box in the front floorboard area of the Jeep but then storing it when you get to your destination is a PITA. Personally, I would see if you could find a used U.S. Gear Unified Braking System somewhere as that was probably the best system I have ever ran.

Other than that I don't have much personal experience with some of the newer ones out currently.

Sorry for lengthy history of our setup but hope some of it was helpful to assist you in making a decision based off what I liked and didn't like about each.
Mike,

I know I’m not the one who originally requested the information, but you’ve still provided value as we’ve got a 1999 Cherokee (XJ) that we hope to use on trips as well. So thanks again; you’ve given me a lot to consider.
 
OP
Z

zmotorsports

ALLIANCE MEMBER
Joined
Oct 20, 2009
Messages
21,477
Location
Northern Utah
Mike,

I know I’m not the one who originally requested the information, but you’ve still provided value as we’ve got a 1999 Cherokee (XJ) that we hope to use on trips as well. So thanks again; you’ve given me a lot to consider.

You're welcome. The XJ is a good platform for off-road exploring as they are very capable rigs. Best of luck and thanks for following along.
 
OP
Z

zmotorsports

ALLIANCE MEMBER
Joined
Oct 20, 2009
Messages
21,477
Location
Northern Utah
Made a little progress on the GM 2500 last night but only had about an hour and a half to work.

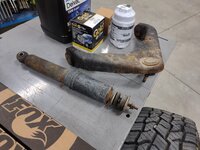
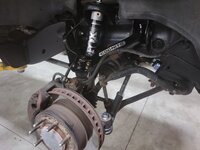
Passenger's side shock and upper control arm removed. Good timing as I detected some play from the upper ball joint when I raised the truck up the other night and was giving it a check. Also picked up oil and filters for a service while it's on the lift.
gm5.jpg

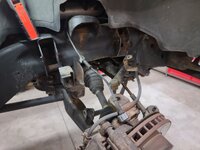
I'll give the front framerail a splash of paint before adding the new components but overall not too bad for a 20-year old truck with 180k miles.
gm6.jpg

New upper control arm assembled with bushings and ball joint. Sorry about the blurry picture.


gm7.jpg

As I was closing up for the evening I had to get a shot of the mountains at sunset. Although these mountains lie to my east when we get these beautiful sunsets they sure light up the west side of the mountain with some amazing colors. The picture doesn't do it justice as they had an almost purple hue to them last night. Too bad it looks totally different this morning with the couple inches of snow we received over night. 🤬
sunset.jpg

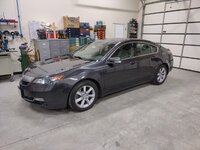
Before closing up shop I pulled the wife's car into the shop to check it over.
tl1.jpg

tl2.jpg


Unfortunately she just called to tell me an aggregate truck pulled out in front of her on the way to work this morning and now I have another rock chip to fix tonight. Just what I wanted to hear.

Thanks for looking.
 

Mark_17

Well-known member
Joined
Jun 27, 2018
Messages
755
Location
NJ
You probably know this already, but if you ever need to strip that gross wax coating these trucks got from the factory, a hot water pressure washer will clean it off in 1 pass.

I did that to my old truck when I did a motor swap. Any part of the frame that still had the coating and no rust, looked factory new underneath.
 
OP
Z

zmotorsports

ALLIANCE MEMBER
Joined
Oct 20, 2009
Messages
21,477
Location
Northern Utah
You probably know this already, but if you ever need to strip that gross wax coating these trucks got from the factory, a hot water pressure washer will clean it off in 1 pass.

I did that to my old truck when I did a motor swap. Any part of the frame that still had the coating and no rust, looked factory new underneath.

Yes, heated pressure washer works great. I did my 2006 Duramax when I purchased it back in 2009 before I painted the chassis and lifted the truck. I actually want to pull my bed and repaint it again this spring. My son is itching to paint his as well so I am not looking forward to either of those.

I am not getting paid to go that deep into this particular truck however, so I am just touching up the areas with some black textured paint and reassembly. Thanks for the reply however.
 

SilverJimmy

Well-known member
Joined
Apr 14, 2012
Messages
1,688
Location
Prescott/Flagstaff, AZ
Mike,

Thank you for your response, no apologies needed. Like everything you do, it’s the details that are the most delightful! You have given me a bunch to chew on in regards to getting my Jeep ready for flat towing. My wife and I have been invited on a trip to Southern Colorado this fall and our base camp will be in Durango and exploring from there. I haven’t been in that area since 1997 when I was driving my new 1998 International cab & chassis Snap-On truck over Wolf Creek Pass on the way home from Wisconsin. Good that the only thing in it was my dumb ***, that’s one step hill! Really looking forward to this trip and taking our Jeep! I’m thinking that I’ll get the Roadmaster Sterling All Terrain 8K as it appears the main difference between it and the Nighthawk are the LED light strips, am I missing something? I have also looked at the Rock Jock mount plate since I’m not the master fabricator that you are. You said you made your own to get better approach angle, since this one is made by a major offroad supplier do you know how this one compares to your setup? Could you post a picture or two of yours, I’m betting it would be very informative to all. I still need to do more research on the braking stuff (just read the installation manual for the Demco SBS Stay-In-Play) and also the wiring interfaces that are out there, seems like I saw something from FMCA at SEMA last November for wiring, they had a huge display of all things Jeep but was very Gladiator focused. Alaska is a future destination of ours too. My parents towed their 24’ camp trailer behind a F250 all the way to Wasilla back in 2009, hopefully the Al-Can Highway is better now, their trailer was completely rattled apart!
Thanks again and look forward to your insights!
Sterling
 
OP
Z

zmotorsports

ALLIANCE MEMBER
Joined
Oct 20, 2009
Messages
21,477
Location
Northern Utah
Mike,

Thank you for your response, no apologies needed. Like everything you do, it’s the details that are the most delightful! You have given me a bunch to chew on in regards to getting my Jeep ready for flat towing. My wife and I have been invited on a trip to Southern Colorado this fall and our base camp will be in Durango and exploring from there. I haven’t been in that area since 1997 when I was driving my new 1998 International cab & chassis Snap-On truck over Wolf Creek Pass on the way home from Wisconsin. Good that the only thing in it was my dumb ***, that’s one step hill! Really looking forward to this trip and taking our Jeep! I’m thinking that I’ll get the Roadmaster Sterling All Terrain 8K as it appears the main difference between it and the Nighthawk are the LED light strips, am I missing something? I have also looked at the Rock Jock mount plate since I’m not the master fabricator that you are. You said you made your own to get better approach angle, since this one is made by a major offroad supplier do you know how this one compares to your setup? Could you post a picture or two of yours, I’m betting it would be very informative to all. I still need to do more research on the braking stuff (just read the installation manual for the Demco SBS Stay-In-Play) and also the wiring interfaces that are out there, seems like I saw something from FMCA at SEMA last November for wiring, they had a huge display of all things Jeep but was very Gladiator focused. Alaska is a future destination of ours too. My parents towed their 24’ camp trailer behind a F250 all the way to Wasilla back in 2009, hopefully the Al-Can Highway is better now, their trailer was completely rattled apart!
Thanks again and look forward to your insights!
Sterling


I am glad the information was helpful.

If you will be in Durango, I highly recommend you take Highway 550 north to Silverton, it's only about 45-miles. This is the area that the wife and I spend a week each August and wheel all around the San Juan mountains. We base camp out of Ouray but are bouncing between Ouray and Silverton daily via the back roads and trails. This area is rich with mines and many of the remnants of them are still visible today and the scenery is simply breathtaking.

We have friends who have done the Alaska trip multiple times over the past several decades and they said the roads are nothing like they were 20-30 plus years ago. I had asked about taking a nice coach up there and they settled my anxiety and now I am just plain excited for the trip. They went in 2018 and said there were only a couple areas during the entire trip where construction caused them to have to slow down. My wife and I continually talk about immediately after retiring we are pointing the coach to Alaska and taking off for at least a 3-month road trip to kick off our retirement.


***On edit, I overlooked your question about the Sterling and the Nighthawk towbars. I believe in the current form the main difference between the Sterling and the Nighthawk is in fact the LED lights integrated into the bars, they are both 8k pound setups. I had the early version of the Sterling which was only a 6k pound version so when my Jeep gained a few pounds over the years I opted to err on the side of caution and that is when I sold my Sterling. I contemplated between the new 8k pound version of the Sterling and the newer Nighthawk and ended up going with the Nighthawk for one reason. With a large RV I think some people assume when the coach goes past or they clear the rear of the coach they are free to move over behind it. I have seen on a few occasions when a car behind us has swerved like they were moving over behind us only to realize the Jeep was there. I wouldn't say this is common but I have noticed it on more than one occasion over the years. When I was waffling between the two options this is the main reason I chose the Nighthawk. We don't travel at night as often as we used to but we will on occasion when we are trying to knock down miles to get to a rally or gathering. I just thought it would be an extra level of safety to indicate to passing traffic that there is in fact a vehicle being towed by the coach.

As for the function of the Nighthawk I have been pleased with it and it performs as advertised for the four years we have had it now. I wouldn't hesitate to purchase the newer Sterling either.
 
Last edited:

SilverJimmy

Well-known member
Joined
Apr 14, 2012
Messages
1,688
Location
Prescott/Flagstaff, AZ
Mike,

That makes perfect sense, and with your Jeep being black I can see inattentive modern drivers who are busy texting or what the hell else they are doing trying to dive behind your rig! It infuriates me that the use of a turn signal is now a suggestion and not required of drivers. I’ve watched drivers do the lane fade right in front of highway patrol officers and nothing happens. Nobody pays attention anymore! Thankfully everything in my rig is bright glowing white, there should be no doubt my Jeep is directly behind my truck/camper. What is your opinion on full width mud flaps on the main rig? My camper overhangs the rear of the truck about 36” and I had to utilize a hitch extension for towing. I’m concerned that road debris will get kicked up and blast the front of my Jeep. Sorry, just thinking about any and all situations that might come up. I think I’m going to also keep my eye out for any Jeep’s I see being towed thru town, we get a bunch on their way to Moab and the Grand Canyon so I should get a chance to check out a few and see their setups.
Thanks again,
Sterling
 
OP
Z

zmotorsports

ALLIANCE MEMBER
Joined
Oct 20, 2009
Messages
21,477
Location
Northern Utah
Mike,

That makes perfect sense, and with your Jeep being black I can see inattentive modern drivers who are busy texting or what the hell else they are doing trying to dive behind your rig! It infuriates me that the use of a turn signal is now a suggestion and not required of drivers. I’ve watched drivers do the lane fade right in front of highway patrol officers and nothing happens. Nobody pays attention anymore! Thankfully everything in my rig is bright glowing white, there should be no doubt my Jeep is directly behind my truck/camper. What is your opinion on full width mud flaps on the main rig? My camper overhangs the rear of the truck about 36” and I had to utilize a hitch extension for towing. I’m concerned that road debris will get kicked up and blast the front of my Jeep. Sorry, just thinking about any and all situations that might come up. I think I’m going to also keep my eye out for any Jeep’s I see being towed thru town, we get a bunch on their way to Moab and the Grand Canyon so I should get a chance to check out a few and see their setups.
Thanks again,
Sterling

Sterling, on many threads on an RV forum that I frequent people are taking off their rear full-width flaps because they think they are causing damage, and maybe they are if they aren't at the proper height but I don't think that is the source. My experience with full-width flaps has been favorable but it has taken some adjustments.

I installed a full-width broom style on our first coach and it worked well but also had mudflaps behind each drive set of tires. When we purchased our second coach (first diesel pusher) I installed a full-width flap just ahead of the rear bumper in addition to the individual semi truck size mudflaps behind each drive set of tires. Our current coach came equipped with the full-width flap with the optional "Monaco" polished stainless steel emblem along the bottom. I LOVE the looks of it but I did have to raise it up very slightly. I have found on non-tag axle coaches about 6 inches off the ground if the distance between the drive axle and the flap is much over 3'. On our tag axle coach it does not fall subject to road undulations as much as a non-tag axle coach so I have found if I keep my rear flap about 4" above ground it doesn't contact the road as it doesn't porpoise nearly as much as our previous non-tag axle coaches.

That being said, our first couple of Jeeps after well over a 100k of flat towed miles didn't experience any damage by means of rock chips. My current Jeep however, started experiencing rocks up on the hood and cowling of the Jeep during a day's travel shortly after purchasing. As the Jeep changed over the years I noticed them starting to get worse and even to the point of rock chips on the back of the coach and as we were preparing to have our coach painted, I was hell bent on figuring out why I was experiencing rock chips more over the previous couple of years. I purchased a netting to go over the tow bar called a Tow Defender, made by Roadmaster, and thought it would resolve the issue. It didn't really have any effect on the rocks on the hood and cowl of the Jeep after installing the Tow Defender.

During one of our annual trips to Ouray, CO in 2015 we came across some road construction around the Utah/Colorado border in which by the time we got to Grand Junction, CO I had a LOT of rocks up on the cowl and along the fenders of our Jeep Wrangler. I was pissed as well as befuddled on why this was happening and actually getting worse even after installing the netting over our towbar the year before. During that trip on the trails one day after a rain storm as the wife and I were driving up the mountain side I noticed a few rocks getting flung forward of the Jeep and that's when the light bulb came on. I realized at that moment that it was NOT the coach throwing the rocks back onto the Jeep, it was in fact the Jeep's large tires throwing rocks forward which were bouncing off the coach and coming back onto the Jeep. This explained why the Tow Defender netting had no effect as the rocks were not coming up from under the coach. The rocks were actually being thrown from the aggressive off-road tires and the rocks were mainly being thrown through the void between the front bumper and the OEM fenders. This explained why this Jeep in particular was causing the damage whereas we experienced none of our this with our previous Jeeps as they all had either OEM front bumpers or on the two I had built they were high and tightly fabricated and mounted to the front end. This Jeep had a large void between the bumper and fenders plus larger and more aggressive tires that I had on our previous Jeeps.

After arriving back to camp I took some measurements and ran to the local Ace Hardware store in Ouray, CO and bought some 1" PVC piping, glue and some screen door mesh. At camp I fabricated a hideous guard for the front of the Jeep. On the drive home I stopped several times to inspect and noted there were absolutely no rocks up on the Jeep even driving through road construction.

Upon arriving home I decided to fabricate some rock guards that could easily be installed/removed on the Jeep for where we were flat-towing it. The next years full season of traveling netted no further rock chips to neither the coach nor the Jeep, just in time to have the coach painted in early 2017. Since then with over 35k miles of flat towing on the Jeep and no rock chips to our new paint job on the coach.


Here is my current tow setup that I have been using since late 2015 to prevent rock chips to both the coach and the Jeep. It is easily connected and disconnected when traveling although somewhat ugly appearing when installed, but it works.
towsetup1.jpg

Bracket that I fabricated to bolt to the back of the bumper and to the frame of the Jeep in which to mount the 1.250" square tubing to accept the 1" square tube of the rock guards.
rock guard brackets1.jpg

Brackets fabricated, bead blasted, painted and bolted in place. They have a 1/4" hole drilled to accept a quick release pin which holds the rock guards into the brackets for quick installation/removal.
rock guard brackets3.jpg

Rockguard1.JPG

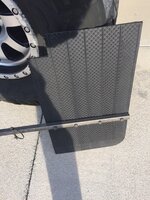
I used a 24"x 24" semi-truck mudflap in which I cut in half and notched to clearance the front fender and bumper.
Rockguard2.JPG

Rock guard installed and pinned in place.
Rockguard3.JPG

Rockguard4.JPG

towsetup2.jpg
 

bigdave_185

Well-known member
Joined
Feb 14, 2021
Messages
443
Location
Utah
I have been meaning to ask ya why you don’t have a aluminum trailer for towing the jeep? Why put the extra wear on the vehicle?
 
OP
Z

zmotorsports

ALLIANCE MEMBER
Joined
Oct 20, 2009
Messages
21,477
Location
Northern Utah
I have been meaning to ask ya why you don’t have a aluminum trailer for towing the jeep? Why put the extra wear on the vehicle?

It's pretty much a trade-off Dave as far as wear and expense. Wear and tear on a trailer plus licensing vs. the Jeep.

I've done both over the past 25+ years of RV'ing although it was in our enclosed race trailer that we hauled around. We used the enclosed trailer for hauling the race car as well as sand toys around but when we got out of racing we kept the trailer to haul the Jeep and Harley. Even though I LOVED hauling the Jeep and Harley around in the trailer, loved the looks of the trailer behind the coach, having my rolling workshop with me when traveling and especially having the contents arrive spotless when we got to our destination, flat-towing is just so freakin' easy and convenient compared to a trailer. They each have their pro's and con's however, even with an open trailer. With a trailer you can back up if needed whereas when flat-towing you do not have that option. You also need to have room at the campground when you arrive for the trailer at your site and we found this was limiting us in our campground/RV park selection as well as site availability, many just don't have 75+ foot sites to keep coach and trailer at and then have room to park the Jeep. I also hated to have to disconnect the trailer to park it in an overflow area then move to the site. Then in the morning do the reverse before leaving.

In the 200k plus miles we've traveled towing Jeeps I have had to disconnect to get out of a situation exactly twice. Once because I made a wrong turn into a cul-de-sac in Grand Junction as I missed the campground entrance and second was in Winnemucca, NV when a tanker delivering fuel pulled in and blocked my escape from the fuel station. Other than that it just takes paying attention to exits and turns to avoid having to disconnect the toad.

Probably the biggest reason we quite hauling the trailer and sold it is that when the wife and I travel we like to stop at various places, especially new ones to us, and see things we haven't seen before. The turning point for us was in 2016 when we went to an RV rally at Big Bend National Park in southern Texas. We were preparing to leave and I was getting ready to load the bike and the Jeep in the trailer a couple nights before we were to leave. I had researched places to ride the Harley around the area we were staying in Texas but then last minute opted to leave the bike and just take the Jeep when the wife and I decided to deviate from our initial route and detour through Carlsbad, NM on the way to Texas and Roswell, NM on the way home as we thought both would be cool to see.

Had we been hauling the Jeep in or even on an open trailer I wouldn't have taken the time to unload it for a quick stopover then load it back up to leave the next morning. This way we didn't have to be so particular on where we stopped for the night as far as campgrounds. Although pull-through sites are nice we don't necessarily require them now as disconnecting the Jeep takes all of about a minute and reconnecting it back up to the coach takes about two minutes. This allows us to park the coach in the campground, disconnect the Jeep and go sightseeing or to dinner then come back and either hook up before we go to bed or in the morning before we leave, depending on the campground.

Even during a travel day we have the option to quickly disconnect for sightseeing if the opportunity arises. Several years ago we were traveling through Washington and we cam across the turn off for Mount St. Helens visitor's center. We had never been there but the road was narrow and winding and limited to oversize vehicles as per the signage. No problem, we were flat towing the Jeep so we found a local hardware store and parked the coach, disconnected the Jeep, went to the visitor's center and spent a couple of hours exploring then went back, hooked up to the coach and carried on our way. Had we been trailering the Jeep we would not have seen that beautiful area of Washington.

I have flat towed a total of 4 Jeeps now over the past 25+ years or RV'ing (and nearly a quarter of a million miles) and it is just so easy and convenient to flat-tow that I don't think I will ever go back to a trailer again just to haul the Jeep. Wear is negligible on the Jeep and I really haven't seen any additional wear on any of our Jeeps in the past couple hundred thousand miles causing me to incur more maintenance.

Sorry, kind of a long answer but there are a lot of variables and this question comes up a lot on the RV forums I belong to.
 
OP
Z

zmotorsports

ALLIANCE MEMBER
Joined
Oct 20, 2009
Messages
21,477
Location
Northern Utah
Mike, wanted to compliment you on your tenacity to find the root cause. Most folks just can't get there. AMHIK!

Thank you. Not knowing why something is happening is kind of my weakness. That and I didn't want to destroy a new paint job with rock chips so I was hell bent on finding out why the rocks kept getting flung up onto the Jeep and the back of the coach. Even now when I explain to people who are having similar issues on RV forums they are not very easy to convince and just keep incurring chips and say it is the rear flap on the coach.
 
OP
Z

zmotorsports

ALLIANCE MEMBER
Joined
Oct 20, 2009
Messages
21,477
Location
Northern Utah
The FASS system showed up on Monday night for the 2002 Duramax that I'm working on.
FASS.jpg

As for the Banks Monster exhaust system, I ordered it last Thursday and was told 2-3 weeks due to a part of the kit being on backorder. I received a call yesterday late morning saying the Banks kit arrived so I ran and picked it up after work. I was shocked that it arrived already. I opted not to tell the owner that the exhaust had arrived as he thinks he will have to bring it back in a few weeks to have the exhaust installed. He will be surprised when he sees that it is completely done when he picks it up.
banks.jpg

After unloading the exhaust system from the truck into the shop I had to snap a couple pictures of my 2006 seeing as how I don't drive it that much. Here she is with the mountains in the background. We had a skiff of snow yesterday morning that hadn't quite melted off yet.
dmax1.jpg

dmax2.jpg
 
OP
Z

zmotorsports

ALLIANCE MEMBER
Joined
Oct 20, 2009
Messages
21,477
Location
Northern Utah
After removing the OEM upper control arm and shock I touched up the paint a little before reassembly began.

gm1.jpg

While the paint was drying I removed the OEM keys from the torsion bars. Using a special C-clamp the tension must be removed from the torsion bars. Then remove the bolt and saddle for the adjustment.
gm2.jpg

Then tap the torsion bar forward and allow the key to drop out. Watch the toes.
gm3.jpg

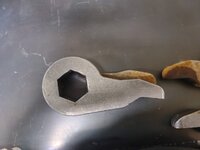
Here are the new keys in relation to the OEM keys.
gm4.jpg

gm5.jpg

New keys installed. I also apply some anti-seize where the hex on the torsion bars meet the keys as well as the lower control arms.
gm6.jpg

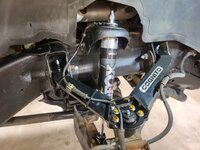
New Cognito upper A-arms installed and the knuckle reconnected. I set the adjustments roughly in the middle but he will have to take it for a full alignment when completed.
gm7.jpg

Shock installed and the passenger's side is now complete.
gm8.jpg

Both sides completed and truck lowered back down before closing up for the night. I still have to preload the torsion bars as I run out of time last night.
gm9.jpg

Thanks for looking.
 
To avoid these ads, REGISTER NOW!

Seagoon

Well-known member
Joined
Jan 23, 2014
Messages
859
Location
Scunthorpe. UK.
The FASS system showed up on Monday night for the 2002 Duramax that I'm working on.
FASS.jpg

As for the Banks Monster exhaust system, I ordered it last Thursday and was told 2-3 weeks due to a part of the kit being on backorder. I received a call yesterday late morning saying the Banks kit arrived so I ran and picked it up after work. I was shocked that it arrived already. I opted not to tell the owner that the exhaust had arrived as he thinks he will have to bring it back in a few weeks to have the exhaust installed. He will be surprised when he sees that it is completely done when he picks it up.
banks.jpg

After unloading the exhaust system from the truck into the shop I had to snap a couple pictures of my 2006 seeing as how I don't drive it that much. Here she is with the mountains in the background. We had a skiff of snow yesterday morning that hadn't quite melted off yet.
dmax1.jpg

dmax2.jpg
Just a casual thought says that it would make more sense to use the pickup for work to keep the mileage down on the Jeep, but I am sure you have a much better reason for doing it the way you do.
 
OP
Z

zmotorsports

ALLIANCE MEMBER
Joined
Oct 20, 2009
Messages
21,477
Location
Northern Utah
Just a casual thought says that it would make more sense to use the pickup for work to keep the mileage down on the Jeep, but I am sure you have a much better reason for doing it the way you do.

Using the truck as my daily driver would probably make more sense but I get more smiles per mile in the Jeep.
 
OP
Z

zmotorsports

ALLIANCE MEMBER
Joined
Oct 20, 2009
Messages
21,477
Location
Northern Utah
Yeah, that makes perfect sense to me (y)

I have recently been thinking that maybe this year when we have nice weather I'll drive the truck more. Like today, it is absolutely beautiful outside so I drove the truck, or the "cloud" as my co-workers call it. It has more brightwork on it so I try to keep it out of the weather more so than the Jeep.
 

Snapped-off

Well-known member
Joined
Feb 22, 2012
Messages
4,817
Location
Indiana
Which torsion bar clamp do you have? It looks like the OTC. I'm considering the Astro clamp, but I probably won't be touching my suspension this year.
 

PugetDude

ALLIANCE MEMBER
Joined
Mar 13, 2013
Messages
22,481
Location
Superstition Mountains, AZ
First off, thank you very much for following along and for the vote of confidence. Sorry to hear about your windshield as rock chips in glass ****! I was fortunate my first windshield lasted over about 115k miles before one got it bad enough to crack beyond repair. I did have quite a few small chips that I was able to repair in all those miles and about ten years though so I shouldn't complain. When I had my windshield replaced last year I waffled on the Gorilla glass but in the end opted just to replace it with a good aftermarket windshield. I didn't even go back to the OEM with the little Jeep easter egg around the perimeter and so far I've been pleased.

Good for you setting up your Jeep to flat-tow. I think you will be happy with the choice and I hope it opens up the options for you as much as it has for us when traveling. I've hauled the Jeep and Harley in our enclosed trailer for many years as well and flat-towing is just so simple, quick and convenient that even though I miss my race trailer, I don't think I could go back. My wife and I were even talking the other night that our first long trip when we retire is a 3+ month long road trip to Alaska in the coach and she asked if the Jeep would be ok for that. I said hell yeah, that is what we built it for and we tow it everywhere else so why wouldn't we tow it to Alaska. That will probably be a 10k-12k mile trip but shouldn't be any different than a bunch of 1k-3k mile trips.

As for towing and braking setups I have had a few over the past 25+ years and over 200k miles now. My first towbar I fabricated in-house and made it to fold up on the front of the vehicle. That was with our first motorhome and our first Jeep, a 1991 Jeep Cherokee (XJ). We towed that for about 2-3 years before we sold it and upgraded to the 1996 Grand Cherokee (ZJ) in which I bought a Roadmaster Stowmaster towbar setup. This was the one that required a mounting plate for the front and the towbar folded down parallet to the front bumper. However, it stuck out about 10 inches in front of the bumper so when we started doing some off-road trails I would usually remove it and store it in the coach's storage compartment. I did not use an auxiliary braking system on the XJ but seeing as how the ZJ was heavier I wanted some supplemental braking capabilities seeing as how we travel in the western U.S. and over many mountain passes. I bought one of those box style that push against the seat and the brake pedal. Although it worked as advertised, I hated it. I hated the inconvenience of it and hated the bulkiness of it. We only used this setup for about 2 years and I had grown tired of it quickly.

Here is our second coach, first diesel pusher, and our 1996 Jeep ZJ during a road trip. This was with the factory front bumper and Roadmaster Stowmaster towbar setup. Not seen is the box style braking system on the driver's floorboard.
beaverjeep.jpg

After the second year and during the winter off-season I sold both the Roadmaster Stowmaster towbar as well as the Brake Buddy braking system. I fabricated a custom front bumper for the ZJ to allow a better approach angle as well as incorporate tow points into the bumper for flat-towing. I had also purchased another Roadmaster towbar but this was the Sterling aluminum towbar that mounted to the coach and the arms connected directly to the Jeep's front bumper. I also splurged and purchased the U.S. Gear's Unified Braking System. This was an electronic braking system that was tied in with the coach's signal but used the Jeep's braking system and an aux. vacuum pump to pull a vacuum on the OE brake booster. It then used an electrical linear actuator to pull a cable that connected to the back of the brake pedal and proportionately braked the Jeep in relation to the coach. The linear actuator mounted under the driver's seat and was completely out of the way and out of sight.

I absolutely LOVED this setup. Both the bumper and supplemental braking system were clean and un-cluttered whether it was in use or daily driving. No need to remove the towbar when we traveled for off-roading because the towbar was mounted to the coach and when we returned home or just disconnected to go sight-seeing we didn't need to remove anything from the Jeep and store it, simply disconnect and go.

I carried that exact same setup over to our next Jeep and next coach over the following 15 years or so. I ran that exact setup in our current coach and current Jeep up until about 3 years ago when I did the LS swap. With our current 2011 Jeep Wrangler I built a custom towbar crossmember for the front of the Jeep to connect the Roadmaster towbar to and kept it low and back so as not to encroach into my approach angle for off-roading. I like this setup so much that when I started seeing some slight wear in the arms of the towbar I opted to rebuild it vs. replacing it, even after all those years and miles of use. At the time of reconfiguring our current Jeep when I added the LS engine I knew it had gained some weight over the years and was pushing the limits of the Sterling 6k pound towbar even though it gave no signs of any issues. I sold the Roadmaster Sterling towbar and the U.S. Gear Unified Braking System to a fellow Jeep club member who had just purchased his first motorhome and was looking for a setup to flat-tow his 2004 Jeep TJ.

At this point I purchased another Roadmaster towbar, the Nighthawk 8k pound setup. The first year I towed the Jeep without a supplemental braking system because I could not make up my mind on which one to go with even after much research. IT was at this time I kicked myself for selling the U.S. Gear Unified Braking System as they had quit manufacturing it by now. I sold it because it had a small vacuum pump that mounted in the engine bay and I wanted to clean up the engine bay and didn't want that pump. After deciding on a supplemental braking system I discovered that I still have to mount items in the engine bay so I should have just kept the Unified Braking System.

I now have the Demco Air Force-One braking system that uses the coach's air brake system to provide proportional braking to the Jeep. It work great but does require air brakes on the tow vehicle.

Here is our current setup as of last year.
Bryce8.JPG

We have friends who have the Roadmaster as well as Demco and Blue Ox towbars. I have seen on a couple of RV forums over the past couple of years about some Blue Ox failures, some quite devastating. I'm not certain as to the exact cause of these failures but it still gives me pause to recommend them. I do like the quick release front connection points of the Blue Ox setup however.

I have absolutely nothing bad to say about the Roadmaster towbars in all of the miles I have used them and don't have enough personal experience with the Demco to say one way or the other.

As for supplemental braking systems I have used the Brake Buddy, Unified Braking System, Air Force-One and have installed a couple of the M&G setups in other Jeeps. I really like the M&G setup and the Air Force-One but they require air brakes on the tow vehicle which won't work for your setup. You could use a Brake Buddy style if you are ok with the box in the front floorboard area of the Jeep but then storing it when you get to your destination is a PITA. Personally, I would see if you could find a used U.S. Gear Unified Braking System somewhere as that was probably the best system I have ever ran.

Other than that I don't have much personal experience with some of the newer ones out currently.

Sorry for lengthy history of our setup but hope some of it was helpful to assist you in making a decision based off what I liked and didn't like about each.

I just put a Roadmaster Sterling tow bar and Invisibrake on my new motorhome and 2010 Jeep. The Invisibrake sounds like the US Gear unified system, controller and cylinder mount under the driver seat; cable runs under the carpet to a small pulley that pulls on the brake pedal. Invisible during normal driving, nothing to hook up inside the toad.
Great company; great products. Detailed installation manual. Had to call them once, (I missed a small but important step…) talked to a real person in Vancouver Washington who was friendly, knowledgeable and actually answered the phone; solved my issue in less than a minute. Refreshing change of pace compared to my motorhome electrical issues….
 
OP
Z

zmotorsports

ALLIANCE MEMBER
Joined
Oct 20, 2009
Messages
21,477
Location
Northern Utah
I just put a Roadmaster Sterling tow bar and Invisibrake on my new motorhome and 2010 Jeep. The Invisibrake sounds like the US Gear unified system, controller and cylinder mount under the driver seat; cable runs under the carpet to a small pulley that pulls on the brake pedal. Invisible during normal driving, nothing to hook up inside the toad.
Great company; great products. Detailed installation manual. Had to call them once, (I missed a small but important step…) talked to a real person in Vancouver Washington who was friendly, knowledgeable and actually answered the phone; solved my issue in less than a minute. Refreshing change of pace compared to my motorhome electrical issues….

Good to know. I am not familiar with the Invisibrake. I have heard of it but do not have any personal experience with it. Thanks for the information.
 
OP
Z

zmotorsports

ALLIANCE MEMBER
Joined
Oct 20, 2009
Messages
21,477
Location
Northern Utah
I finished up the front end and steering last night on the 2002 Duramax 2500HD.

For the Cognito steering upgrades the idler and pitman arm nuts need to be removed as well as the joint where they connect to the center link.
gm1.jpg

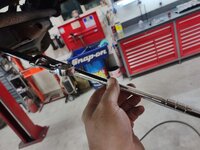
An old mechanic's trick for gaining leverage on a combination wrench is to loop the box end of the open end of the wrench to be used on the fastener. That works great unless you are actually using the open end and need more leverage. I saw one of these wrench extenders a while back and thought it may come in handy. Last night it sure did.
we1.jpg

Wrench extender looped on to the combination wrench.
we2.jpg

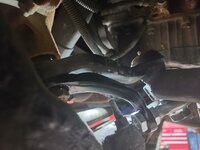
Pitman arm nut and washer being removed.
gm2.jpg

The nut at the bottom of the idler is too tight against the crossmember so the two idler bolts must be removed to move the idler upwards slightly and gain access to remove the nut.
gm3.jpg

Idler bracket being mocked up and loosely installing the rod end which will fit over the stud on the center link idler joint.
gm4.jpg

Idler side completed. Loctite used on the machined nut and torqued to 85 ft/lbs to complete installation. Then the idler can be reinstalled fully into its frame mount.
gm5.jpg

Same thing on the pitman arm side. Rod end nut torqued to 85 ft/lbs and the pitman arm nut torqued to 184 ft/lbs.
gm6.jpg

Lastly tighten up the jamb nuts at the rod ends.
gm7.jpg

After completing the center link upgrades I installed the new heavy duty tie rods and torqued them in place.
gm8.jpg

While I was installing the steering components I was draining the engine oil. After completing the steering and buttoning up the front end I replaced engine oil filter and was replacing the Allison transmission's spin-on filter when I noticed the transmission fluid was quite dark. I text the owner pictures of the oil as well as the hideous wiring mess at the rear trailer plug connector and upsold the redoing of the entire trailer wiring and bracket assembly as well as a transmission pan drop and filter/fluid change.

I got quite a bit of the FASS system started as well last night. I was hoping to finish it up tomorrow but looks like I will be going with my son to pick up a tonneau cover for this truck tomorrow so we'll have a bit of a drive. Oh well, at least I'll get to spend some time with him in the truck while driving.
 
OP
Z

zmotorsports

ALLIANCE MEMBER
Joined
Oct 20, 2009
Messages
21,477
Location
Northern Utah
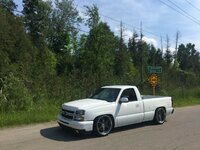
That is a Sharp truck. Hard to believe that it is 20 years old!!! He must have been watching you as he grew up!

Thanks. Yeah, he is taking really good care of it, especially with 280k miles on it. He keeps waffling on doing a bunch of custom work to it but I just keep telling him that it looks better leaving it OE and building it where it counts (and can't be seen for that matter). I told him I think it will get better looking each year the older it gets especially if he leaves it unadulterated and keeps it in pristine condition.
 

MrPink

Well-known member
Joined
Feb 16, 2021
Messages
1,178
Location
Bridgeport,MI
Can i get your insight on something? I am buying a GMT900 2011 Suburban with the LC9 5.3L. It has 132k on it. I will be doing the DOD delete in the spring(it is too cold to do anything). Is there anything else that I have to worry about that you know of? I know that the 6L80's are hit-and-miss with issues.
 

stockerwithalocker

Well-known member
Joined
Dec 26, 2015
Messages
78
Location
So Cal
Mike,

it’s hard to see on my phone but do they not supply a safety washer to put between the rod end and nut? It also looks like there are just a few threads of engagement on the nut. Not questioning your work, but it seems concerning they supplied the kit like that.

Btw i appreciate you taking time to document all the work you do as well as providing tips and tricks, and tools you use.
 

lugnut71

Well-known member
Joined
Feb 14, 2013
Messages
1,898
Location
Wyoming
If you zoom in you can see the lock washer , also the nut goes completely Thru the heim joint with threads the full length
 
To avoid these ads, REGISTER NOW!
Top Bottom