To avoid these ads, REGISTER NOW!

ZMotorsports Shop Projects 2.0

OP
Z

zmotorsports

ALLIANCE MEMBER
Joined
Oct 20, 2009
Messages
21,496
Location
Northern Utah
Thank you Mike! I’ve never had the reason for replacing the crush washer explained before! I have always just inspected the washer and then reinstalled it and torqued the drain plug to spec. Now, I GET IT! More stuff to buy, thanks again!

Think of it like this Sterling, when tightening a drain plug into a cast aluminum pan, or worse plastic/composite, the washer's role is twofold. First to seal and secondly to provide some cushion or "crush". When a new washer is used, that "crush" is designed into the washer in terms of density or material composition. Once that washer gets used several times, that cushion or crush is gone and now it is a solid spacer, so when tightening a drain plug using an already compressed washer, there is no give so the threads are what will give. It will start out a little, then a little more and finally the threads are pulled out of the component. Washers/gaskets are much cheaper than damaged threads.

Also, not all of these need to be purchased from the dealerships at higher costs. For example, I purchased a few from my local Honda/Acura dealer for the wife's car in order to obtain proper part #'s and/or examples or sizes, then I watch for them on sale through various vendors once I get down to only a few on hand and reorder in quantities of 10 or 20 and I'm good for a while.
 
Last edited:
To avoid these ads, REGISTER NOW!

ntsqd

Well-known member
Joined
Jan 22, 2005
Messages
1,003
Location
Lower left coast
I've been known to anneal copper crush washers when I can't get another one. Either in time, or at all. (One of the past projects that I was employed on used crush washers by the 100's and they were all unique sizes that were custom made. But the guy who ordered them only ordered enough for one assembly and this was an R&D project where it got torn down and reassembled sometimes 3 or 4 times a day!)

Annealing them does restore their ability to seal, but eventually they're so used up that there's nothing that you can do except replace it/them.
 
OP
Z

zmotorsports

ALLIANCE MEMBER
Joined
Oct 20, 2009
Messages
21,496
Location
Northern Utah
I used the same method Mike. I also use a torque wrench on drain plugs, as I always seem to feel the need to go a little more than, "goodntight".

20251107_112342.jpg

Good point on the torque wrench and I guess I just assumed I mentioned it and had to go back and read it over. I'm assuming if people have followed along on my thread much at all, then a torque wrench on drain plugs is a common sight here as I am a huge advocate for the proper torque on drain plugs.
 

PugetDude

ALLIANCE MEMBER
Joined
Mar 13, 2013
Messages
22,490
Location
Superstition Mountains, AZ
How did they find you? Repair work from Illinois sent to Utah. That is high praise, considering that America’s engine and racing heartland is in their backyard (Dayton, Ohio and Indianapolis, Indiana).

Well done, Mike.

I see the repair you had to make on something like this and I think to myself, how does an owner manage to f**k something like this up??
FedEx adds a layer of anonymity to the out of state owner.
 

Chipm

Well-known member
Joined
Mar 10, 2020
Messages
446
Location
Georgia
Good point on the torque wrench and I guess I just assumed I mentioned it and had to go back and read it over. I'm assuming if people have followed along on my thread much at all, then a torque wrench on drain plugs is a common sight here as I am a huge advocate for the proper torque on drain plugs.
I use a torque range on every drain plug also. In a lot of shops, there is a mentality that if you have to use a torque wrench, you must not be a very good mechanic. My point of view is that a torque wrench is the correct way to do it, and it is a whole lot easier than the 14 hours it takes to change an oil pan on a newer BMW.
 
OP
Z

zmotorsports

ALLIANCE MEMBER
Joined
Oct 20, 2009
Messages
21,496
Location
Northern Utah
I use a torque range on every drain plug also. In a lot of shops, there is a mentality that if you have to use a torque wrench, you must not be a very good mechanic. My point of view is that a torque wrench is the correct way to do it, and it is a whole lot easier than the 14 hours it takes to change an oil pan on a newer BMW.

I completely agree and do NOT understand the mentality or mindset of those that use that excuse. I have a ****-ton of torque wrenches and all serve a different yet similar purpose, just various ranges and sizes. Hell, I used to get harassed because I bought a torque wrench screwdriver when I started working on Holley carburetors heavily.

Does every fastener have a "desired" or "preferred" torque value? Yes, determined by size and application, that's why they make universal torque charts based on size, thread and bolt grade. Does every fastener on a vehicle need to be torqued "exactly" to that specific torque value? No, there are less consequential or important fasteners than can be "estimated" or "by feel". However, those do in fact require the knowledge of someone who knows the difference and roughly what that supposed to be. I work with a guy that breaks so many Snap-on ratches as well as bolts because he has not learned in all his years where a bolts elestic range is nor the limits of most ratchets for that matter. :rolleyes:

I do however feel a very good mechanic knows where those lines are drawn, ie. where to use a torque wrench and where one can get close by feel and where to obtain those torque values. A very good mechanic also knows where to make sure a torque wrench is used and the consequences if not.

When talking with someone and I hear comments such as them informing me that either they don't need a torque wrench or their high-level mechanic buddy can get within a pound or two with his "calibrated" arm or elbow, I immediately discount that person as a reliable source for much of any information. Can a person get close without using a torque wrench? Ab-so-freak-in lutely. Can they get consistently close to within a pound or two over say 6+ fasteners? I have to ask, why even risk it? If a person is a true professional in their field, part of that professionalism is using the appropriate tools to perform certain jobs. I have to ask, why not use a torque wrench and remove all doubt? There are enough things that can fail or cause a failure that we cannot control, why roll the dice or gamble on the one thing we can control?

Just my .02.
 

rd65

Well-known member
Joined
Sep 29, 2017
Messages
2,852
Location
Granite Falls, WA
I worked with a guy (he was the small tool tech) that had fooled our supervisor, and then our new supervisor, into thinking that he was a mechanic in some previous life. I was chatting with him one day and noticed that we had Stihl special tools. It appeared that he didnt know what that term meant as he said, "Ya, I guess they are kind of special" with a little giggle at the end. That was all I needed to know.
 

PhantomEB

Well-known member
Joined
Feb 6, 2006
Messages
6,858
Location
Medicine Hat, AB, Canuckistan
By far one of my favorite thread to read is this one.

Mike is a true inspiration to me to push myself to get to.

Lot of times I so wish I hadnt gone so big with the 72 bronco. Woulda been fine on 37s with the 44/9. Especially now I wish to do more FSRs with my brother who only has 35” Destination MTs on his Tundra.

Mike, you are getting me to pushing the PAID OFF 2012 Ram 3500 back to everything working and ready to haul the toys, I want to make it the vehicle the wife says let’s take the truck, it’s got the best stereo system!
 
OP
Z

zmotorsports

ALLIANCE MEMBER
Joined
Oct 20, 2009
Messages
21,496
Location
Northern Utah
By far one of my favorite thread to read is this one.

Mike is a true inspiration to me to push myself to get to.

Lot of times I so wish I hadnt gone so big with the 72 bronco. Woulda been fine on 37s with the 44/9. Especially now I wish to do more FSRs with my brother who only has 35” Destination MTs on his Tundra.

Mike, you are getting me to pushing the PAID OFF 2012 Ram 3500 back to everything working and ready to haul the toys, I want to make it the vehicle the wife says let’s take the truck, it’s got the best stereo system!

@PhantomEB , Thank you. I am pleased to hear you are getting some value out of my thread. Funny you mention that you wish you hadn't gone so big on the Bronco. My wife's nephew just bought a 2018 Jeep Wrangler last week and came by the shop yesterday and asked if I would give him the basic rundown as well if the wife and I would be willing to take him and his new wife off-road to show them the ropes. I told him it didn't take much to convince me to go off-road, but when he started talking about bigger tires, lift, etc. I asked him to slow down and just drive it for a while and take it off-road as he would be amazed at what it will do in stock trim. Then, and only then, IF he feels like he wants to do more technical trails I could assist him in selecting the components and products that would work well together and asked that he not fall into the Jeep trap of getting a catalog and just ordering away. I hope he can leave it as is for a bit because I see all too often people go too big too soon and really miss out on the opportunity to learn their vehicle's capabilities and handling characteristics before they start throwing parts at them.

I then told him that as I've gotten a bit older, the wife and I have done less technical trails and more fire roads or forest service type of trails mainly to just enjoy the scenery, outdoors and wildlife. He said that's mainly what he wants to do, and he can do that with his Jeep in stock trim.

Personally, I enjoy the exchange of information, knowledge and life experiences from fellow members who have all contributed, not just to my thread, across the board. There is such a great wealth of knowledge on this forum.
 

ntsqd

Well-known member
Joined
Jan 22, 2005
Messages
1,003
Location
Lower left coast
I've mentioned it before, but I suspect that those who don't think that they need a torque wrench should participate in the exercise that my High School Auto Shop Instructor had us watch. He picked the Varsity Senior Line-backer in the class to "torque" an SBC cylinder head's head-bolts as consistently the same torque as he could. Then he broke each loose with a beam type torque wrench with one of the class observing and calling out the break-away torque and another writing each one on the board. I'll suggest that a more experienced mechanic might get them closer than he did, but his widely varied. It was a great learning experience.
 
OP
Z

zmotorsports

ALLIANCE MEMBER
Joined
Oct 20, 2009
Messages
21,496
Location
Northern Utah
Hope everyone had a great weekend. The weather was spectacular here along the Wasatch Front all weekend.

Friday afternoon I completed the welding on the engine case, then the owner of the 2008 Shelby stopped by and picked up his car.

I prefaced the welding process by heating up the case slightly.
case21.jpg

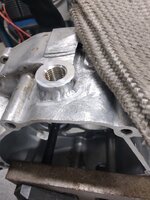
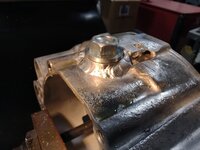
Then started on the thinnest part of the weld. As the heat built up, it would aid in welding the thicker area, without having the thin area where the case halves meet become distorted or warped. Planning out your welding is key on components such as these that have varying thicknesses. The downside about welding cast aluminum is getting the toes to wet in properly as the impurities start bubbling up and out of the casting. Once the impurities bubble up, the best thing to do is stop and wire brush them away. Don't try to push through or you'll just move them around in the molten material and cause more headache.
case22.jpg

I had just finished up the welding and had the angle plate and case bolted back down to the mill table to touch up the gasket surface of the bung when the owner of the Shelby arrived, so this is where I stopped for the night and locked up the shop.

Saturday morning after breaking bread with my son and grandson, I finished up the engine case repair.
case23.jpg

case24.jpg

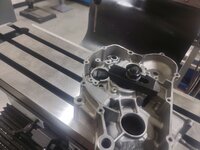
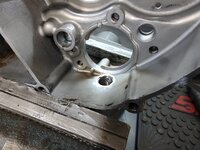
With the gasket sealing area touched up, I broke the setup down and clamped the engine case directly to the mill table to drill a small hole at the bottom of the case. This was a window in the original drain plug hole, but I chose to remove less thread than the original and just drill a .187" hole for drainage. I used a small wiggler to locate where the hole was to be drilled.
case25.jpg

I touched off with a small spot drill, then followed with a .187" drill bit.
case26.jpg

This will allow the last amount to drain from the engine case and yet still seal with the plug and gasket.
case27.jpg

The bung stood just a little bit proud on the inside of the case, so I used a small rotary burr to knock it down so as to not interfere with the bearing installation.
case28.jpg


Ready to box back up and ship back to the owner.
case30.jpg


case31.jpg


More to follow.
 

Jgaz

Well-known member
Joined
Dec 16, 2016
Messages
1,716
Location
AZ
Mike, I really like your lathe bench it turned out really nice.

Thanks for all the detail on the case Crain plug repair. I’ve never seen a hold down like the one you used on your welding table. Always something new to learn.
 
To avoid these ads, REGISTER NOW!

Grant Gunderson

Well-known member
Joined
May 17, 2013
Messages
2,332
Location
Bellingham, WA
case1.jpg

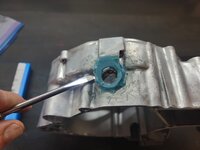
Not sure what this stuff is, I don't recognize it. I see JB Weld all too often on these and as good as JB Weld is, it is still a temporary fix the vast majority of the time.
case2.jpg

This has almost a plastic texture and is somewhat pliable.
case3.jpg

With all of the epoxy removed I can begin the actual repair. Also looks like the owner has been at it with a grinder at some point.
Does anyone actually know what this stuff is? I’ve come across it a few times being used as a thread sealant in air pumps.
 
OP
Z

zmotorsports

ALLIANCE MEMBER
Joined
Oct 20, 2009
Messages
21,496
Location
Northern Utah
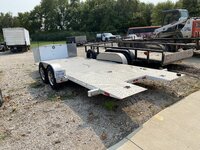
That trailer is awesome Mike, very nice!

Any details? I like the tilt and the built-in dovetail/ramps

Does this mean that in CY26 vacations may not be all off-road related and some involve the Camaro?

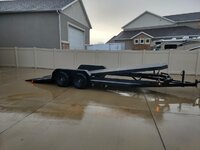
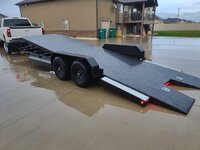
Thanks Mike. To be honest, I wasn't planning on buying a trailer as I was fully planning on building a trailer later this winter so it would be ready for paint come springtime, however, I stumbled across this one that had "nearly" everything I wanted in a trailer and I snagged it for less than I was planning on spending on materials and parts, so it was almost a no brainer.

One of the inspirations for my trailer build was the Eliminator series from 102 Ironworks out of Oklahoma. I really liked their tilt design and split tail deck for loading low nose cars. I have only seen about 4 of this style of trailer out here in northern Utah over the past several years so they are rare. However, they don't build a 12k pound capacity trailer, the ones that I have seen have all been 7k pound capacity trailers. They build a 7k, 10.4k pound and then jump to a 14k pound but I didn't want slipper springs nor 8-lug wheels so I really wanted to stick to dual 6k pound axles.

When I stumbled across this one on FB MP, I really didn't think it was a 12k pound trailer because I knew they didn't build one. The trailer was manufactured in Oklahoma and the gentleman had it custom built as he and his family were moving out west here and it appears to be a clone of the one similar to what I was looking to design mine after. Evidently, the trailer has only made about 4 trips back and forth between Utah and OK. He needed to sell this one as he also just bought an enclosed trailer so he was eager to move this one as the HOA doesn't allow trailers in their neighborhood, so he was motivated to sell.
 
OP
Z

zmotorsports

ALLIANCE MEMBER
Joined
Oct 20, 2009
Messages
21,496
Location
Northern Utah
I do have a couple of mods to make to it so it will do what I want, but for the most part the meat and potatoes of the trailer are pretty nice.

It is a 22' tilt deck with dual 6k pound axles. I am going to make the fenders removable and would like to mount a winch to the front as well as add brakes to the other axle as it only has brakes on one axle. This is one of the bargaining chips I used because when I was messaging the gentleman, I specifically asked him about the axle and if BOTH had brakes and he replied that they were in fact 6k pound axles and both had brakes. However, when I got there and tilted the trailer back, I noted that one was an idler. I don't think he was being dishonest, because when I commented that only one axle had brakes, he looked genuinely shocked. I think when he custom ordered the trailer he may have just assumed it would have dual braking axles, but many trailer manufacturer's only put brakes on one axle in a tandem setup, unless specified otherwise. I used that as a means to negotiate a bit but it's not a big deal to add brakes to the other axle.
 
OP
Z

zmotorsports

ALLIANCE MEMBER
Joined
Oct 20, 2009
Messages
21,496
Location
Northern Utah
Glad you found what you were looking for in a trailer, I'm just kind of bummed I won't be able to watch you fab one from scratch. I can watch you work all day Mike! :lol:

Thank you. I really wasn't looking all that hard because I didn't think I would find anything close to what I was looking for and definitely not anywhere near the price point I was able to find this one. I will be doing some mods however.

But that really helped my winter schedule a ton. ;)
 

Swanny1953

ALLIANCE MEMBER
Joined
Jul 28, 2010
Messages
1,082
Location
Lucas, TX
Great find on the trailer, Mike! Although, like others, I was looking forward to you documenting your own build!!!
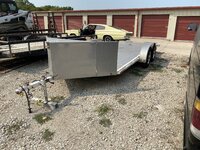
It’s somewhat similar to mine, a 2011 JimGlo tilt bed trailer, although yours has a greater capacity. I have had all of the Corvettes other than the 2023 on this at one time or another, including bringing the ‘69 home from Nashville, the ‘13 home from the dealer in Tulsa and the ‘19 ZR1 home from the Houston dealership (in honesty, I did have to build the approach angle up a little for this one). If you’re only half as happy with yours as I have been with this one, you'll have made a great purchase!!!
IMG_5433.jpegIMG_5432.jpegIMG_3987.jpeg
 
To avoid these ads, REGISTER NOW!
Top Bottom