To avoid these ads, REGISTER NOW!

ZMotorsports Shop Projects 2.0

OP
Z

zmotorsports

ALLIANCE MEMBER
Joined
Oct 20, 2009
Messages
21,477
Location
Northern Utah
Cool story Mike. Always nice bumping into old Iron!!!

Thanks Pat. Yes, it was awesome seeing a couple of cars that I built 20 years ago in another life that still looked amazing and just at home at a car show today as they did all those years ago. We jokingly reminisced about the debate we had over the door hinges and handles and how I convinced him to shave them. It was a great flashback into a previous life and I was happy I ended up going to the show.

Thanks for stopping by and checking in Pat.
 
To avoid these ads, REGISTER NOW!
OP
Z

zmotorsports

ALLIANCE MEMBER
Joined
Oct 20, 2009
Messages
21,477
Location
Northern Utah
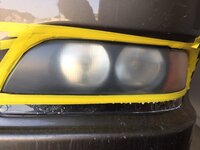
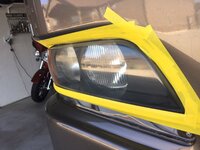
Last night I gave the headlights on our coach a bit of a "tune-up". I hadn't really touched them since early 2015 when I sanded and polished them prior to a long trip to Texas where I knew we would driving in the dark. The driver's side was looking a bit fogged and the passenger's side wasn't far behind but not quite as bad. The headlight housings that Monaco used on this vintage of Dynasty were from a BMW E's series and manufactured by Hella. There are aftermarket replacements available from various vendors on eBay but I wanted to keep the OEM housings if at all possible and they turned out great, so they're keepers. Also, now that it resides indoors when not in use they should last longer before I have to hit them again. Before anyone asks, no I have no plans on clearing them.

I forgot to get a before picture of the driver's side but this was just after hitting it with 800-grit sandpaper and giving it a rinse.
coach1.JPG

Here is the passenger's side prior to beginning the process. Not too bad but just slightly fogging. No need to hit this with the 800-grit.
coach2.JPG

On the passenger's side I went straight to the 1000-grit wet Trizac sanding discs.
coach3.JPG

Just after the cleaner and polish was applied using foam polishing pads on my small 3" air polisher.
coach4.JPG

You can even see the manufacturing codes in the inner housing.
coach5.JPG

After the front end was wiped down with some Meguiar's Final Inspection and given a good cleaning.
coach6.JPG

coach7.JPG


Thanks for looking.
 

duc916

Well-known member
Joined
Apr 18, 2013
Messages
284
Mike,
Do you put anything on the headlight housings after you polish them? I've seen some products from 3M that are supposed to help with sun damage after cleaning.
 
OP
Z

zmotorsports

ALLIANCE MEMBER
Joined
Oct 20, 2009
Messages
21,477
Location
Northern Utah
Mike,
Do you put anything on the headlight housings after you polish them? I've seen some products from 3M that are supposed to help with sun damage after cleaning.

Generally I just polish them after sanding but in rare occasions I will use automotive clearcoat after sanding as it does help with UV protection. However, I like to be able to touch the lenses up when needed with just running some polish over them. Also the clear clear can rock chip and then moisture gets under the clear and it can be a bigger deal to remove the clear later on so I prefer to just polish them on occasion. I have not used any of the film protectors.
 

bigdave_185

Well-known member
Joined
Feb 14, 2021
Messages
443
Location
Utah
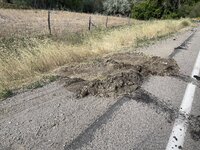
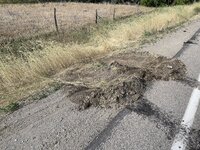
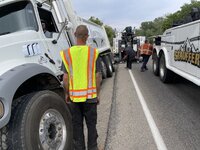
They usually remove it looking something like this with a $2k bill for two wreckers and some really pissed off people who could go home in rush hour traffic

they pull the vehicle directly sideways if
Possible and then drive the vehicle forward in this case
 

Attachments

  • E821AA01-5B0D-489C-A761-9AE635AB52CD.jpeg
    E821AA01-5B0D-489C-A761-9AE635AB52CD.jpeg
    454.4 KB · Views: 181
  • 6C4091F4-D8A1-48B8-B771-90B7E1ECB0BA.jpeg
    6C4091F4-D8A1-48B8-B771-90B7E1ECB0BA.jpeg
    911.5 KB · Views: 176
  • 54995C46-0DD3-48CE-B733-ABD14EE01B6F.jpeg
    54995C46-0DD3-48CE-B733-ABD14EE01B6F.jpeg
    937.5 KB · Views: 170
  • C1DE061F-F32F-4C3B-9994-035D716C8BA9.jpeg
    C1DE061F-F32F-4C3B-9994-035D716C8BA9.jpeg
    456.6 KB · Views: 168
  • 12DCF9FE-5675-459D-BEA7-F1DF0DF64D8D.jpeg
    12DCF9FE-5675-459D-BEA7-F1DF0DF64D8D.jpeg
    524.8 KB · Views: 175
OP
Z

zmotorsports

ALLIANCE MEMBER
Joined
Oct 20, 2009
Messages
21,477
Location
Northern Utah
The wife and I just returned from a week in Spearfish, South Dakota wheeling with some of our FMCA 4-Wheeler friends. We love the Black Hills area and to be off-road in them it is even more special. We left on a Friday afternoon and made it far as Rawlins, WY where we stayed overnight before heading into the gathering on Saturday. We didn't feel like cooking after a 5 hour drive so we googled Mexican food and got a hit of a 4.5 star restaurant. However, restaurant may be a bit overstated and we almost turned around when we saw it but we decided to give it a try. WOW, the food was amazing and the owners were awesome people. There was limited seating inside and a few tables outside but the food and service was outstanding.


Hooked up and ready to head out.
sd1.JPG

Small Mexican restaurant in Rawlins, WY that was absolutely fantastic. Small being the key word here.
sd2.JPG

As we were leaving dinner and heading back to camp we stopped at a stop sign on Cedar Street when a buck walked right in front of the Jeep, not 5' from my front bumper and in absolutely NO hurry. I couldn't grab my phone fast enough but ended up snapping a picture of his back side as we was still meandering down the sidewalk in no hurry. Even funnier was when we first saw him he was right in front of Buck's Sports Bar. That would have made an even better picture.
sd3.JPG

Our spot for the night in Rawlins, WY. Nothing fancy but a place to lay our heads and watch some television before the 7 hour drive on Saturday.
sd4.JPG

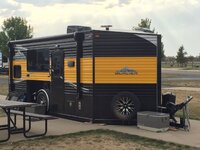
As we pulled in to our camp spot in Spearfish, SD I noticed this slammed trailer. When the wife and I went for a walk I had to stop and inquire about it. Turns out these are ice fishing shacks on wheels. The axles and tongue fold upwards allowing the body of the trailer to sit flat on the ground. It has holes in the floor for ice fishing and according to the owners it sleeps up to seven people. I'm assuming these 7 people have to be very close.
sd5.JPG

On Monday it was predicted to have rain all day so the wife and I took off for a pavement day and hit one of our favorite state parks, Custer State Park. I think much of the rain stayed more north for the day as we had intermittent rain is all but quite overcast. Didn't hit the heavy rain until about 50 miles from camp on the way back later in the afternoon.

We saw this herd of big horn sheep just outside of the Game Lodge on the west side of the wildlife loop in Custer State Park.
sd6.JPG

sd7.JPG

sd8.JPG

More pictures to follow.......
 
Last edited:
OP
Z

zmotorsports

ALLIANCE MEMBER
Joined
Oct 20, 2009
Messages
21,477
Location
Northern Utah
Continuing on.

While we were in Custer State Park they were preparing for the buffalo round-up which would take place three days later. We saw quite a large herd.
sd9.JPG

sd10.JPG

Slightly past the herd of bison, we saw the burro's as they were assuming their behavior of stopping vehicles and taking turns soliciting snacks.
sd11.JPG

sd12.JPG

Another funny story. One evening we went to a Mexican restaurant in Spearfish for dinner with our friends and while we were eating a gentleman and his wife recognized our Jeep and parked next to us. Upon getting ready to leave my wife and I were introduced to him and his wife and it turns out I had exchanged messages with him on a few occasions through my YouTube channel pertaining to his Monaco coach and his LS powered Jeep. It was awesome to meet them in person and funny what a small world it is. They are from Las Vegas and just happened to be in South Dakota on vacation when he recognized my Jeep at the restaurant.
sd13.JPG

During our many trail miles we saw several logging operations going on and actually had to wait on the trail more than once for logging trucks to move out of the way so we could get by. I figured they were working and I was on vacation so it was no big deal to stop and wait for 10-15 minutes for them to finish what they were doing and let us pass. While we were stopped near one spot I had to snap a picture of this large claw. The tires on this thing were as large as the semi-tractor parked next to it. Seeing them cut and strip trees was interesting to watch.
sd14.JPG


Thanks for looking. Sorry I didn't get any pictures of the Jeep on obstacles as there wasn't time for the wife to jump out and grab pictures this trip. Besides, it appears that the way the Jeep is now setup she is less nervous about various obstacles and is perfectly content riding through most of them vs. in the past when she would volunteer to jump out to take a picture but what I know she really meant was that she didn't feel safe or comfortable in the Jeep while going over said obstacle. ;)
 
Last edited:

OutlawDrifter

Well-known member
Joined
Jan 20, 2015
Messages
3,901
Location
KS
Looks like a great trip Mike! They recently had some big fires south of there around Crawford, NE.

Custer State Park is a fun place to visit, lots of wildlife and panoramic views!

Those log skidders are pretty wild pieces of equipment. I ran a smaller one that had a two stroke Detroit for a couple of days.
 

4 FN 27

ALLIANCE MEMBER
Joined
Oct 19, 2015
Messages
4,635
Location
Minnesnowta
Mike did you see any Prairie Dogs?

I was up nordth this weekend and we saw lots of Ice Fishing Trailers heading both north and south. Very popular here. Stayed in one on Milacs Lake a few years back. Pretty nice...almost as nice as a Motorhome.
 
OP
Z

zmotorsports

ALLIANCE MEMBER
Joined
Oct 20, 2009
Messages
21,477
Location
Northern Utah
Those ice fishing trailers are super common in Minnesota. Gives people a great way to ice fish in the winter and camp in the summer.

Mike did you see any Prairie Dogs?

I was up nordth this weekend and we saw lots of Ice Fishing Trailers heading both north and south. Very popular here. Stayed in one on Milacs Lake a few years back. Pretty nice...almost as nice as a Motorhome.

This was the first one of these ice fishing trailers. We passed three of them and I commented to the wife they looked odd and why the large gap around the tire/wheel assembly. Then we pulled into the campground and saw the one sitting on the ground and the axles all of a sudden made sense but didn't know why you'd want a trailer sitting on the ground. It wasn't until we went for a walk that evening that I found out the reasoning. I'm never going to stay in one so I will have to take your work on how nice they are Pat. Not my cup of tee but interesting none the less.

As for prairie dogs, we saw a lot of them in Custer State Park but not too many outside of the park. Ran across quite a few wild turkeys and deer out on the trails however.
 
OP
Z

zmotorsports

ALLIANCE MEMBER
Joined
Oct 20, 2009
Messages
21,477
Location
Northern Utah
Saturday we drove the full 650 miles from South Dakota to home but got home kind of late to wash the coach. We left the campground right @ 7am when quiet hours were over and pulled in our driveway exactly @ 6pm. Stopped one time around Independence Rock for lunch and once for fuel in Rock Springs, WY. Other than that just motored on home and everything ran great.

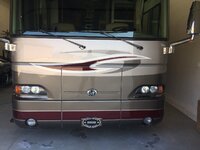
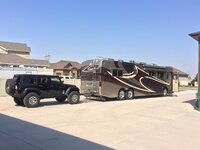
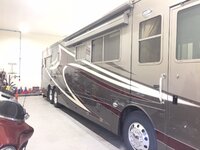
Sunday morning I snapped this picture as the sun was coming up. Coach actually looks pretty clean here but it had some water spots on it due to a couple of rain storms we had while camped in Spearfish. Also had a LOT of bugs on the front end that needed to be cleaned off so opted to give the entire coach a bath.
coach1.JPG

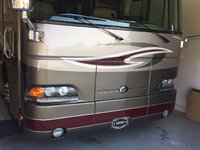
I even went one step further yesterday and took a chamois to the entire coach after rinsing.
coach2.JPG

coach3.JPG

coach4.JPG

coach5.JPG

Backed into the RV bay and put to sleep for a few weeks until we can use her again.
coach6.JPG


Thanks for looking.
 
OP
Z

zmotorsports

ALLIANCE MEMBER
Joined
Oct 20, 2009
Messages
21,477
Location
Northern Utah
Also thought I'd give a short update on my Jeep's suspension since I "tweaked" my rear travel about a month ago.

Last year when we ran Camp 5 trail in South Dakota, I tried a different line than the other people on the run that day. The easy line was far left as you come up out of the river bed, mediocre line is just a few feet right of the easy line and the hard line was right up the middle. I tried the hard line last year and got turtled on the second boulder. I was moving through it quite well until my frame made contact with the second boulder and it unloaded my rear axle so the tires weren't gripping anything. I tried bumping it and working the front steering while both front and rear axles were locked but just couldn't progress any further. I was able to back off of the obstacle and then took the mediocre line and crawled right through it unlocked.

This year as I was tail-gunning for the group I again headed for the hard line and the wife asked if I thought this year would be any different? I told her we'd find out after getting about an inch more suspension travel in the rear. Well, that inch made a difference. As I climbed up the second boulder the front flexed well over it and as I come done slowly I barely made contact with my right frame rail which is right where I got high centered last year but this time I barely scraped it and the Jeep continued moving forward through the obstacle. Next thing I knew the right rear tire was climbing the boulder and we were up and over it and emerging from the river bed.

I just looked at the wife and grinned like an idiot. That small amount of rear suspension travel that I was able to gain made a difference by letting the axle droop out just enough to clear and keep traction on the rear tires moving the Jeep forward. Also with the stiffer rear coil springs and the good amount of anti-squat I have in my Jeep as I 2-footed the pedals and advance forward it kept the rear from squatting down and actually lifted slightly which also helped get over the boulder.

To say I am pleased with how the Jeep handled is a huge understatement. Bring on the next trip...... :bounce:
 
Last edited:

Mr.zippy

Well-known member
Joined
Apr 27, 2020
Messages
2,221
Location
Wyoming
Thanks for the details of the trip Mike.........sounds like a good time was had by all!
Something about an old school chamois that is comfortable and just plain works......on those big wash jobs!
 

Jayman17

Well-known member
Joined
Feb 6, 2017
Messages
3,820
Location
Seattle, Wa
Mike, I read your shop thread awhile ago and had to check out the last few pages of this thread too. Thanks for posting photos from your travels, really interesting seeing where you go.
If you ever upgrade your motor home whoever buys it will be very lucky, you really keep it in nice shape! Sounds like you are still enjoying your home and shop too. :beer:

Jay
 
OP
Z

zmotorsports

ALLIANCE MEMBER
Joined
Oct 20, 2009
Messages
21,477
Location
Northern Utah
Mike, I read your shop thread awhile ago and had to check out the last few pages of this thread too. Thanks for posting photos from your travels, really interesting seeing where you go.
If you ever upgrade your motor home whoever buys it will be very lucky, you really keep it in nice shape! Sounds like you are still enjoying your home and shop too. :beer:

Jay

Thanks Jay. I sure hope whomever buys it really appreciates it and what it took to keep it in proper condition. I see so many people lately buying coaches of this same vintage that need so much work to bring them back. I can't believe people own something like this and don't take care of it and then when they sell it expect top dollar. What's even more unbelievable is that they actually get top dollar for something they didn't take care of. I actually quit following some of the Monaco threads and forums because people are buying these beat up coaches, paying top dollar and then ask for help to bring them back because they didn't realize what they bought. Meanwhile the previous owners who neglected them are laughing all the way to the bank.

I plan on upgrading/upsizing coaches in the future and just hope someone will appreciate (and pay accordingly) for our pristine coach.

Thanks for following along.
 

customh

Well-known member
Joined
Feb 18, 2013
Messages
562
Location
East Bethel, MN
My favorite quote: "grinned like an idiot" We all know the feeling and all to often you only get to grin like an idiot at yourself in the rearview. Fun to share the moment with the wife. (even though all she sees is a grinning idiot) Glad to hear the Jeep setup is still evolving in a positive direction.

My brother in law does some ice fishing and has plans to acquire one of those someday. Generally referred to as Ice Castles around here as they are one of the more well known brand names. Nice to know folks with them and stop in on the lake when you're out for a rip on the snowmobiles. Hopefully they offer some smoked fish or a venison snack stick... maybe a beer and on down the trail you go.
 
OP
Z

zmotorsports

ALLIANCE MEMBER
Joined
Oct 20, 2009
Messages
21,477
Location
Northern Utah
As some may have guessed, I'm a bit OCD about squeaks and rattles and despise both in my vehicles. I have had the Mac's Black Box in my Jeep for 6+ years now as my wife bought it for me for Father's Day in 2015. It is an awesome toolbox and keeps all my tools secure and locked away but also allows very easy access and has a top slide that serves as a work bench when the drawer is open. I have thoroughly enjoyed having this box in the Jeep and Lord knows I have it loaded heavy with tools and gear. I am certain I have at least met and probably exceeded the weight capacity of the drawer and it has taken it.

I think I have shown pictures before about how full the drawer is. Most of my tools are in soft-sided bags to allow easy access to what I happen to need and just as importantly to keep the tools quiet and rattle free in the drawer. Things like the handle to my bottle jack and torque wrenches that are not in soft-sided bags get wrapped in towels to protect them and keep them quiet as well.

One of the first indications that I had the toolbox loaded heavy was the locking latch had broken on me twice. Mac's was great about replacing them under warranty but I wanted something more "stout". One of the first posts in this 2.0 thread shows how I machined a steel latch pin to replace the OE aluminum one. I had machined a couple for friends that were experiencing the same issue and none have failed thus far. Next about three years ago I was having issues with the rivets and screws that hold the drawer slides coming loose which I am certain was due to the weight I had in it. To correct the issue I made some phenolic glide blocks that I secured up inside the front edge of the enclosure in which the box glides up onto the last inch plus as it closes. These blocks support the weight at the front of the box while closed and that weight isn't sitting on the drawer slides.

Well fast forward to this past year and I have had a couple of "creaks" in the rear that I have been unable to locate until last month. I kept rearranging the toolbox and re-wrapping things in towels thinking that something was rubbing against something else. During the trip to Afton, WY in July and having a pavement day going into Teton NP it drove me up a wall. I determined it was the front face of the drawer (rearmost part) just inside the rear tailgate that had sagged slightly and was resting on the bottom of the enclosure and thus creating the creaking noise as the metal to metal contact. Upon arriving home I again removed everything from the drawer and including the drawer to "tighten" up the rivets holding the drawer slides to the drawer. They weren't too loose so I figured things had just worn a bit creating enough clearance that the drawer now rested against the bottom of the enclosure. To test my theory I taped a couple of small .125" thick pieces of aluminum to the bottom of the drawer enclosure which created a step for the drawer to park on. It worked so well I had almost forgot about it. During the Ouray, CO trip as well as the Spearfish, SD wheeling trips it was quiet and squeak free the entire time.

Last night I decided to fabricate a more permanent solution. I cut some pieces of .125" aluminum 1.25" x 3" in which I also put a slight bend on the front .250" edge to create a "ramp". I then cut two more pieces in which would serve as the mounting flange to rivet them to the box's enclosure. I then welded the two pieces together, bead blasted and painted them a semi-gloss trim black and riveted them in place. They are barely detectable when I open the rear tailgate but have been working perfectly.

These two pieces in combination with the front two glide blocks now create a solid ledge for the drawer to sit on when in the closed position so the weight of the drawer and its contents are not sitting on the drawer slides while bouncing down the road or trail. Within the last inch plus of the drawer's travel it glides up onto these four blocks (2-front/2-rear) and therefore have a solid resting place.


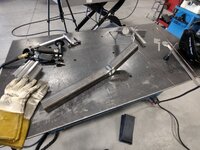
Here is the preliminary markings on the aluminum after taking some measurements of the drawer's face and leading ledge. The dotted line will be the point where I put it in the brake and create the leading angle.
macs1.JPG

Laying out the spacing for mounting holes which will receive stainless steel rivets.
macs2.jpg

Holes drilled and parts ready to weld together.
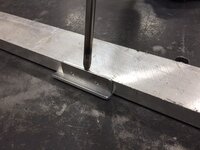
macs3.JPG


I will have to get the final pictures as I must have forgotten to take any more after this point. I must say however, that the modification is a success and it is quiet and squeak free once again. Looking back I should have done this from day one to prevent wear to the drawer slides but knowing what I know now when I finally do need to replace them they won't have all of this weight sitting on them while going down the road.

While the paint was drying on the parts I took about a half an hour and winterized my sprinkler system by blowing it out with compressed air. Wouldn't you know it as soon as I drug the three air hoses out and started to pressurize the system the rain started. :tantrum2:
 
To avoid these ads, REGISTER NOW!

IndyGarage

Well-known member
Joined
Apr 29, 2010
Messages
9,761
Location
Indy
Funny - I was in S. Dakota in the same area at the same time. Then drove through Rawlins on the way out of Yellowstone back to Colorado. Weather was perfect for about 7 days straight.
 
OP
Z

zmotorsports

ALLIANCE MEMBER
Joined
Oct 20, 2009
Messages
21,477
Location
Northern Utah
Here are a couple of the finished pics of the Mac's Black Box glides at the face of the drawer. The squeaks are definitely gone now.
wed1.JPG

wed2.JPG


I had a local guy drop off some bungs or tube adapters last night that he needed a small amount turned off of them. Quick little jobs like this are gravy and I welcome them.
wed4.JPG

wed5.JPG

wed6.jpg

Thanks for looking.
 
OP
Z

zmotorsports

ALLIANCE MEMBER
Joined
Oct 20, 2009
Messages
21,477
Location
Northern Utah
Last week was pretty much a ****-show with trying to get a new phone as both mine and my wife's old iPhone 6S's were developing some issues with outdated software. Several apps that she liked to use were failing to work due to requiring a newer version of the iOS operating system and my work email was giving me fits, so we finally decided to bite the bullet and buy new phones. As some of you who have followed my thread for a while know, we are NOT ones who buy something simply to be buying something. We also do not have to have the latest and greatest technology on the market so when we buy something such as phones, we keep them for a long time. Our iPhone 6S's were purchased back in spring of 2015 when I took a promotion and was informed that I needed a cell phone for work. We kept getting told by co-workers and my wife's brother to buy the Apple iPhone's as they were cutting edge and "all of the techy people use Apple so they must be the best". Well fast forward to late 2021 and the operating system was so outdated that things were beginning to fail to function properly.

We opted to go Android this time so we wouldn't be up against a proprietary operating system again. When our new phones came in last week and were trading them in for our credit the young man helping us was amazed as he removed both of our cameras from their cases. He even called a co-worker of his over to look at them as they were in like new condition. That's when I told him had the phones continued to do their job we would be putting new batteries in them and continue to use them.

After all that I had also ordered some new tires for the wife's Acura TL as well as planned on doing brakes and installing new O2 sensors. The car just turned over 140k miles and being proactive I purchased all new OE O2 sensors. I also noticed when I drove it last a couple of weeks ago that the brake pedal had some slight pulsing. I checked my notes and determined that the rotors had been turned for the last time during the previous brake job so I purchased new rotors and pads. The plan was to do all of the work on Saturday, I'd drop off the old tires first thing in the morning and then work on the O2 sensors and brakes while they were mounting and balancing tires.

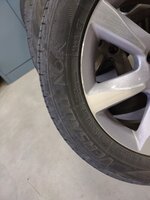
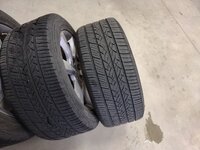
Of course wouldn't you know it, when I wanted to replace the tires I discovered that the ones I had and wanted to buy again were discontinued. :tantrum2: I actually had documented this early on in this thread in October of 2017 when I installed these Toyo Versado Noir tires which were considered a Grand Touring tire. They have been a phenomenal tire in wet or dry roads and even snow covered roads where they really shined. The car handled great with these tires and wife felt completely comfortable and safe with the tires that were on it. The tires my local tire shop was trying to convince me to buy didn't tickle my fancy as I didn't care for the tread pattern as it appeared to be more of a performance tire vs. an all season touring tire. I wanted something that would wear well and especially handle the wet and winter roads here in Northern Utah. After some research I ended up ordering some Continental PureContact LS tires in the correct size. They arrived early Friday morning so after the phone call from my tire shop stating they were in, I had my Saturday work planned and scheduled a mount balance (off the car) for Saturday morning.

The Toyo's wore amazingly. Here they are with still between 5/32" and 6/32" of tread remaining with 74,689 miles on them. Had this been coming out of winter and going into spring I probably would have continued to run these tires for another 5-7 thousand miles. However, seeing as how old man winter is knocking on our door, I wanted to put new shoes on the wife's car.
car1.jpg

car2.jpg

car3.jpg

car4.jpg

car5.jpg

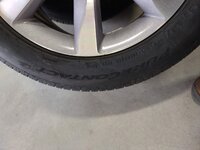
Here are the new Continental PureContact LS Grand Touring tire that I purchased. They have a similar look and feel and I like the evacuation path but this tire uses an asymmetrical pattern. I also really like the sidewall protection that these tires give even compared to the Toyo's.
car6.jpg

car7.jpg

car8.jpg

Moving on to the O2 sensors, here are the downstream sensors during the replacement process. Old vs. new laid out.
car9.jpg

car10.jpg


Stay tuned for more pictures.
 
OP
Z

zmotorsports

ALLIANCE MEMBER
Joined
Oct 20, 2009
Messages
21,477
Location
Northern Utah
Continuing on....

Downstream O2 sensors replaced.
car11.jpg

car12.jpg


Under hood work completed and the engine cover cleaned and reinstalled.
car13.jpg

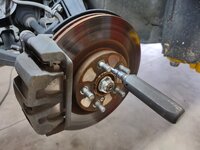
Moving on to the brakes. Used my impact screwdriver to remove the two rotor retaining screws on each rotor.
car15.jpg

Screws easily came out due to a dab of anti-seize during last brake job.
car16.jpg

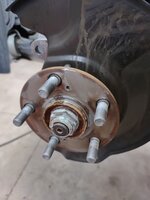
Here you can see it doesn't take much anti-seize to keep the rotor from sticking to the hub.
car17.jpg

This is the small amount of anti-seize that I apply. A little dab on the center of the hub and then smear a little around on the hub flange with my finger to aid in removal next time.
car18.jpg

Brake caliper brackets cleaned, new anti-rattle clips installed with brake caliper grease applied. I also remove the caliper guide pins and apply a small amount of grease to aid in their movement and prevent seizing.
car19.jpg


car20.jpg

New brake pads and rotors installed. I missed the one stationary section with the anti-rattle liquid and had to remove, clean and reapply.
car21.jpg

Afterwards I test drove the car, seated the new brakes then vacuumed it out and cleaned the inside of the windows and her car should be ready for winter. It's close on a LOF service but should be good for another week or two before I perform that service.

Thanks for looking.
 
OP
Z

zmotorsports

ALLIANCE MEMBER
Joined
Oct 20, 2009
Messages
21,477
Location
Northern Utah
Also, while working in the shop on Saturday we finally received some much needed rain here in Northern Utah. This has been one of the driest summers on record and so far the first part of October has been nice and wet. The lawn has been loving this moisture we've been receiving and I even enjoyed working in the shop during the steady rain between Friday and Saturday.
car14.jpg
 
OP
Z

zmotorsports

ALLIANCE MEMBER
Joined
Oct 20, 2009
Messages
21,477
Location
Northern Utah
I didn't get anything done in the shop last night after work as we had a break in the weather on both Sunday and Monday so I thought I had better mow my lawns. This is the most moisture we've had since about April~ish and my lawns are loving it. Too bad they're about to go dormant for the winter. Our mountains even got a bit of snow with Saturdays storm and as cold as it got last night with the storm coming in from the north I would bet we have more this morning.
house1.jpg

house2.jpg

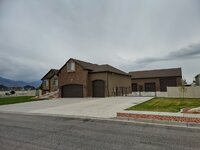
And while I was mowing my lawns the neighbors were having their garage doors installed. I think for the most part the outside of theirs is done and after talking with them last night it sounds like they just have racking and heater to install inside and it's done.
house3.jpg
 
Last edited:

ronjon1190

Well-known member
Joined
Apr 1, 2015
Messages
121
Location
East Haddam CT
Hi Mike, I am reading through this thread little by little on breaks at work, and I am only to October of 2020, but I wanted to drop a note, to say thank you. I recently had a heater hose quick disconnect break on my 2005 GMC. What a mess. Thanks to your thread, I knew exactly what I needed to complete the repair, and exactly what tool I needed to acquire (coolant system vacuum) to make the job easy and get it done correctly. So Thanks again, and I look forward to catching up on your projects this past year!
 
OP
Z

zmotorsports

ALLIANCE MEMBER
Joined
Oct 20, 2009
Messages
21,477
Location
Northern Utah
Hi Mike, I am reading through this thread little by little on breaks at work, and I am only to October of 2020, but I wanted to drop a note, to say thank you. I recently had a heater hose quick disconnect break on my 2005 GMC. What a mess. Thanks to your thread, I knew exactly what I needed to complete the repair, and exactly what tool I needed to acquire (coolant system vacuum) to make the job easy and get it done correctly. So Thanks again, and I look forward to catching up on your projects this past year!

Thank you for the comments and I appreciate you taking the time to read through my projects thread. Glad to hear something in here is helpful.
 
OP
Z

zmotorsports

ALLIANCE MEMBER
Joined
Oct 20, 2009
Messages
21,477
Location
Northern Utah
I racked the Jeep on Saturday to give her a good once over before the next trip and after looking the undercarriage over I decided to finally fabricate myself a hitch stinger to prevent any rear glass damage. I've seen two Jeeps this year catch the rear tire after coming off a ledge and shattering the back glass and I feel as though I've pushed my luck as I have kissed my bumper twice now over the past couple of trips. I refuse to hit the trails without a spare so I figured I'd better be safe than sorry.
sting1.jpg

sting2.jpg

I dug through my metal stock and found a piece of 2"x 1/4" wall receiver tubing about 20" long that would work perfectly.

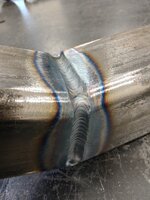
After determining I needed a 25-degree bend to clear the bottom of the 37" spare tire I took a pie cut out and put it in the press to form the angle vs. cutting and welding all four sides. Here is the first root pass on the top of the stinger.

sting3.jpg

Before welding I ground a chamfer on the three sides leaving about 1/8" land in the tubing wall. I knew I could get full penetration into 1/8" and you can see how the root pass sunk just a little as I was feeding the keyhole of the root pass.
sting4.jpg

sting5.jpg


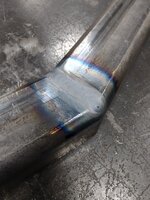
I followed by a weave pass using 3/32" filler rod to ensure a good deposit of metal to bring the weld profile slightly proud of the parent material which would allow it to be removed and metal finished.
sting6.jpg

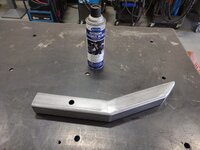
Metal finished and ready for paint.
sting7.jpg


Paint dried the next morning.
sting8.jpg

Test fit.
sting9.jpg

Clears the spare as it swings open by about 1/4" yet still provides plenty of protection to prevent catching the spare on a ledge.
sting10.jpg

Thanks for looking.
 

OutlawDrifter

Well-known member
Joined
Jan 20, 2015
Messages
3,901
Location
KS
Mike, c'mon man....you're supposed to leave it installed so you can acquire bruises from it :LOL:

Nice clean execution, definitely worth the effort over replacing the back glass. Be careful, you may receive a few orders for them next time you're out on the trail!
 
OP
Z

zmotorsports

ALLIANCE MEMBER
Joined
Oct 20, 2009
Messages
21,477
Location
Northern Utah
Thanks Marc. I've seen them on the trails, not sure who makes and sells them but they're just a stick of tubing cut and welded, open on each end. I wanted mine a bit more "custom" with the angle at the end, capped to prevent getting dirt and **** in it and the weld metal finished so it looks like it was formed. Probably took me three times longer to build but it's different.

I also ordered my new tires last week while I was working on the wife's car but was told they're 3-5 weeks out. Don't think they'll make it for this trip but hope to have them on before the November trip.
 

Bigblue&Goldie

Well-known member
Joined
Mar 12, 2009
Messages
10,734
Location
AZ
That's a great, simple solution that I've never seen before. I know we did a big waterfall obstacle in Moab in my dad's JK and we ended up removing our spare after watching 2 guys bend up their tailgates from hanging on their tire. We had a good swingout bumper carrier, but these Jeeps are so heavy it will bend those as well.

On a separate note, I had asked you a while back about the Gladiators and I finally got to ride in one this weekend. A guy on my team brought his out to Barstow when we were shock tuning, so he took me for a spin. I was super impressed with his setup in the desert
We were smashing good size whoops at 45mph that a Raptor or TRX wouldn't have done nearly as well. The steering was actually rather impressive. I think the wheelbase would be an issue in the rocks, but his primary use is desert and overlanding.

-Rock Krawler links/springs
-37" BFG's
-Fox 2.5" shocks with clickers
-Fox hydraulic bumps
-Curry rear swaybar
-Manual transmission

He beats on it hard and he said it's held up great. He had to put a new front axle housing in due to cracking the original, but it was definitely on him. He also blown the Fox bumps a couple of times, but Fox keeps reaealing them under warranty. He was all too willing to jump it, but I declined the offer.....
 

Attachments

  • 20211017_113023.jpg
    20211017_113023.jpg
    311.1 KB · Views: 74
  • 20211017_113034.jpg
    20211017_113034.jpg
    295.5 KB · Views: 72
  • 20211017_113207.jpg
    20211017_113207.jpg
    313.7 KB · Views: 68
  • 20211017_113215.jpg
    20211017_113215.jpg
    368.8 KB · Views: 71
OP
Z

zmotorsports

ALLIANCE MEMBER
Joined
Oct 20, 2009
Messages
21,477
Location
Northern Utah
I agree about these heavy JK's being able to bend or damage even a heavy duty swing away tire carrier Ryan. I've seen a couple have issues now so glad I have a Plan B that I can put into play when we run trails with large drop offs. Just another option that I put in play to keep my Jeep clean and in good condition for the long run.

As for the Gladiator's (JT's), I think with their longer wheelbase adding to their stability, they would be perfect for higher speeds such as bombing through the desert. Is your friend's JT a Mojave edition? I know they come factory with 35's and full compliment of Fox 2.5 reservoir shocks and bumps and seem to be more geared for higher speeds. As for wheeling with them in the tight stuff, I have not wheeled with many as they have a big *** on them and tend to get hung up between breakover angle and departure limitations.

Looks like some nice components on your friend's rig.
 

Bigblue&Goldie

Well-known member
Joined
Mar 12, 2009
Messages
10,734
Location
AZ
It's definitely not a Mojave, but I'm not sure what it's trim package is? The interior was pretty basic. This one he drilled/welded the rear bumps into the frame. He wants to try 3" shocks on it, but we keep trying to tell him it's not a trophy truck and to leave it.

I do have another friend that has a Mojave, and he's super happy with it, but I haven't wheeled with him.
 
OP
Z

zmotorsports

ALLIANCE MEMBER
Joined
Oct 20, 2009
Messages
21,477
Location
Northern Utah
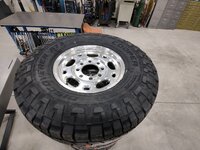
Didn't get much done in the shop last night other than cleaning up a bit and wiped benches and toolbox down. I did however, go with my son to pick up his freshly mounted winter tires for his 2002 Duramax. He is getting ready to swap over to his winter wheels & tires and seeing as how the tires were getting pretty worn he decided to do some research and purchase new ones.

He went with the Cooper Discoverer AT3 XLT in a 10-ply 285/75R-16 mounted on his OEM wheels.
tire1.jpg

tire2.jpg


I think he is going to try and get them on his truck this weekend. These should work well and look a little more proportional that the pizza cutters he's been running over the past several years during the winter. These tires have gotten good reviews so they should perform well for him and last quite a while, especially where he only runs them about 5 months of the year.
 

OutlawDrifter

Well-known member
Joined
Jan 20, 2015
Messages
3,901
Location
KS
Mike, I'd like to know how they do for a noise level if you don't mind.

The 'burb will need new tires before next Summer's travels, I'm satisfied with the Yokahama Geolander G015's, but have been considering a few other options as well. The Toyos I put on my Tacoma are NOISY, even for an A/T!
 
OP
Z

zmotorsports

ALLIANCE MEMBER
Joined
Oct 20, 2009
Messages
21,477
Location
Northern Utah
Mike, I'd like to know how they do for a noise level if you don't mind.

The 'burb will need new tires before next Summer's travels, I'm satisfied with the Yokahama Geolander G015's, but have been considering a few other options as well. The Toyos I put on my Tacoma are NOISY, even for an A/T!

I will report back after he gets them installed Marc. They look very similar as far as lug size and center section to my Nitto Terra Grappler G2's and mine are quiet as can be. The Cooper's appear to have a bit more siping however, so they may perform just a bit better on slick roads.
 
To avoid these ads, REGISTER NOW!
Top Bottom