To avoid these ads, REGISTER NOW!

ZMotorsports Shop Projects 2.0

OP
Z

zmotorsports

ALLIANCE MEMBER
Joined
Oct 20, 2009
Messages
21,469
Location
Northern Utah
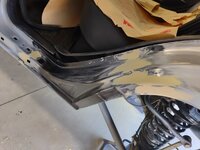
Up until this point we only thought we had a rust issue on the driver's rear dog leg/rocker area but there was a small rust spot on the passenger's rear rocker that had gotten my attention the week earlier that didn't look very good. First order of business on Saturday morning was to knock the paint off of that area and see it it was just some surface rust or something worse. YEP! It was something worse.

We shifted gears and began a plan to address this area while we were already cutting metal and planning on doing some painting, otherwise, we would be doing this spot very soon.

Marked out past the rust and into good sheet metal. There were three spots that I went through with the pick end of my body hammer after removing the OEM paint and primer.
rust1.jpg

Bent up a patch panel and worked on getting the correct curvature based on trial and error.
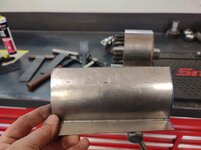
rust2.jpg

Continued to sneak up on the proper radius as well as the fitment trimming a little at a time.
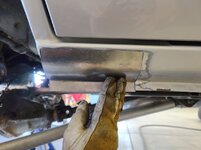
rust3.jpg

rust4.jpg

I can live with that fitment. Now just have to get some Metal Prep on the interior panel to treat the rust then apply some SPI Epoxy Primer to the inner panel as well as the back side of the repair patch so it can cure.
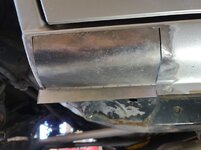
rust5.jpg

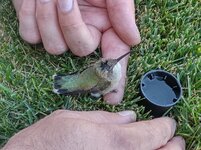
While my son was cleaning the remainder of the rocker panels in preparation for scuffing he noticed that we had a little friend in our shop. There was a humming bird flying around the shop and we were concerned he was getting tired as he couldn't find his way out. Those two large garage doors were something I guess he couldn't find. My wife mentioned she had some lunch for us so we turned out the lights and turned the fans off in the shop hoping he would find his way out of the shop.

When we returned to the shop he was still there so we went back to work and before long he had gotten struck by one of the ceiling fans and knocked him to the ground. I had my welding gloves on so I carefully scooped him up and could see he was still breathing so I took him outside to the grass where there was some shade just outside of the shop. I had my son get some water for him as he was still breathing but definitely stunned. My son grabbed a lid from an aerosol can and put some water in it and began nursing him back. My son has always had a special way with animals and within a few minutes of my son dipping his finger into the water and allowing the humming bird to drink the droplets from his finger he had come around enough that he was sitting up on my son's hand and drinking some water. Then within a few more minutes he took off and flew away. It was really a cool moment watching my son helping this small bird and then when he flew away he hovered over my son for a few short seconds about eye level and then flew away.
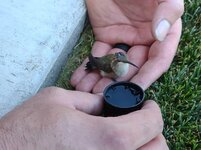
bird1.jpg

bird2.jpg

bird3.jpg

Then it was back to work on the WJ. We made a small section to fill in where we left off on Wednesday evening before out detour with his power steering gearbox.
rust6.jpg

After getting the small patches basic shape we tack welded it into place. Once one set of tack welds were done, I knocked them down with a 1/16" wide grinding disk so they were just barely proud of the parent material and laid another tack weld about 50% on top of the previous one. The trick here to to be absolutely certain that you are using enough voltage and wire speed to get full penetration. This will require a little testing before hand to ensure you have the correct settings on the welder. You should have a nice dimple on the back side depicting full penetration. Then when you knock the weld down you don't have to worry that your panel will not be fully welded and result in cracks in the repair area. If you hit it with enough heat and enough wire speed you should get good penetration without blowing a hole in the panel. I also like to try and hit the previous spot weld dead in the middle between the two panels to ensure I am splitting the heat between both the new panel and the original panel. If you try and focus the wire to one side or the other you are actually overheating the one where the wire makes contact. One other thing I do is snip the wire at a slight angle between each tack. This cuts that little bit of a ball off the end of the wire which takes more current to melt, but also eliminates that little bit of silicone from the end which is an insulator and makes it harder for the arc to start at the next tack weld. By having a small angle on the end of the wire it requires less current to begin the arc then stay on the trigger barely long enough for the tack weld to get to the desired size, nothing longer or you will blow a hole through the panel.
rust11.jpg

More pictures to follow.....
 
To avoid these ads, REGISTER NOW!
OP
Z

zmotorsports

ALLIANCE MEMBER
Joined
Oct 20, 2009
Messages
21,469
Location
Northern Utah
Continuing on.

Then it is a matter of knocking those tack welds down and repeating until the entire joint is welded. Don't try to weld a continuous bead or multiple beads as you will surely blow through in short order. When grinding and using a 1/16" wide by 3" disc on a die grinder I like to turn the wheel so it is cutting at an angle to the joint to avoid cutting grooves into the joint or taking more thickness away from the parent materials. Once the weld is ground to slightly above the parent material stop and move on. These will be later addressed with a 2" or 3" Roloc disc on a die grinder to smooth flat.
rust12.jpg

Final step before hitting with some 80-grit on a DA sander.
rust13.jpg

After the previous section was welded in place I brushed some more SPI Epoxy Primer to the underside of the previous patch panel and moved on to bending and fabricating the last small section. Then once I was happy with the fitment I brushed SPI Epoxy Primer to the backside and let sit until cured.

Yesterday late morning I went back out into the shop to begin welding the last two sections in after allowing the epoxy primer to cure for a couple of days. Here magnets are holding the small panel in place to allow me to tack weld the panel in place.
rust14.jpg

The the process of tack weld, grind, tack weld, grind and then metal finish begins all over again.
rust15.jpg

Metal finished welds and ready for epoxy primer.
rust16.jpg

Moving over the passenger's rocker where I epoxy primed the area on Saturday I began prepping this piece for welding.
rust17.jpg

Inner panel with the cured SPI Epoxy Primer.
rust18.jpg

Holes punched in the lower flange for spot welds and the panel fit in place for the last time. I am very pleased with the fitment of this panel.
rust19.jpg

Then the tack weld and grind process began on this panel until it was fully welded and metal finished.
rust20.jpg

Last step was running over it with 80-grit on a DA sander and then primed with epoxy primer so it can cure and we can then begin with some body work. The nice thing is that there will be very, very little filler required with this process. Basically a skim coat to fill in some imperfections and a couple small low spots.
rust21.jpg


That is where we are currently.

Thanks for looking.
 

bggrnchvy

Well-known member
Joined
Nov 14, 2011
Messages
590
Location
Pleasant Hill, CA
While my son was cleaning the remainder of the rocker panels in preparation for scuffing he noticed that we had a little friend in our shop. There was a humming bird flying around the shop and we were concerned he was getting tired as he couldn't find his way out. Those two large garage doors were something I guess he couldn't find. My wife mentioned she had some lunch for us so we turned out the lights and turned the fans off in the shop hoping he would find his way out of the shop.

When we returned to the shop he was still there so we went back to work and before long he had gotten struck by one of the ceiling fans and knocked him to the ground. I had my welding gloves on so I carefully scooped him up and could see he was still breathing so I took him outside to the grass where there was some shade just outside of the shop. I had my son get some water for him as he was still breathing but definitely stunned. My son grabbed a lid from an aerosol can and put some water in it and began nursing him back. My son has always had a special way with animals and within a few minutes of my son dipping his finger into the water and allowing the humming bird to drink the droplets from his finger he had come around enough that he was sitting up on my son's hand and drinking some water. Then within a few more minutes he took off and flew away. It was really a cool moment watching my son helping this small bird and then when he flew away he hovered over my son for a few short seconds about eye level and then flew away.
bird1.jpg

bird2.jpg

bird3.jpg
I must get 3-4 hummingbirds flying in a year. They come in through the big opening, but then they see the skylights and they cannot be deterred from thinking it's the only way out.

At one point I went on the roof and covered the skylights with towels and that convinced them to leave. My new go to is wait until dusk, turn off the lights, leave the big door open, and then they see the sunlight/fixture lighting out the big doors and go back out the way they come in.
 
OP
Z

zmotorsports

ALLIANCE MEMBER
Joined
Oct 20, 2009
Messages
21,469
Location
Northern Utah
I was able to get the body work done last night but didn't have time to get it masked or primer shot on it.

There really wasn't much body work to do other than a few low spots and feathering of the joints. Here I applied a skim coat of 3M Platinum filler and sanded with 80-grit. I did have a small spot that needed a second application but then finished it off with 120-grit.
mud1.jpg

Same on the passenger's side rocker, just a skim coat of filler followed by 80-grit and ending with 120-grit. This area covered perfectly with one light coat and blended out nicely.
mud3.jpg

Next I moved to some catalyzed 3M Glazing Putty and sanded with 180-grit then just breathed over it lightly with some 220-grit in preparation for primer.
mud4.jpg

mud5.jpg

Making sure the door gap is consistent and smooth transition into the quarter.
mud6.jpg

The 104-degree heat yesterday afternoon made working time with the body filler difficult so I was mixing up very small amounts and applying to one area at a time to avoid waste.

Next will be to mask the areas and shoot some SPI 2k primer/surfacer on these two areas.

Thanks for looking.
 
OP
Z

zmotorsports

ALLIANCE MEMBER
Joined
Oct 20, 2009
Messages
21,469
Location
Northern Utah
Big milestone on the rust repair yesterday as we were able to get the areas in primer.

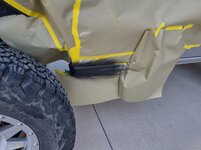
Masked and wiped down while the SPI Epoxy Primer was in its 30-minute induction period. Masking paper is folded back to create a soft edge for the epoxy primer as well as the 2k primer surfacer.
prime1.jpg

prime2.jpg

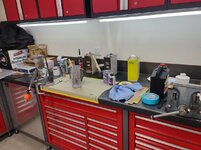
Mixing station, again.
prime3.jpg

SPI Epoxy Primer dusted on to cover the bare metal of the sand throughs.
prime4.jpg

prime5.jpg

Next was the SPI 2K Primer. I put 2 fairly wet coats on about 2 hours after the epoxy primer. Although in our 107-degree heat yesterday I am almost certain I could have shot it sooner.
prime6.jpg

prime7.jpg

Pushed back in the shop for the night.
prime8.jpg


Yesterday afternoon was one of the hottest days of the year and I think we broke a couple more records with the heat here in Northern Utah. It was so hot that the 2K primer actually started going to a gelatinous state much sooner in the gun than I expected so I had to hurry and get it out of my gun and clean it before I ruined a perfectly good primer gun. I had actually planned on shooting 3 coats but I was only able to get 2 wet coats of primer surfacer on the Jeep. Luckily I think the small amount of body work I had was close enough that I think that may be enough, otherwise I may have to shoot another coat tonight but we'll see how it sands.

I was also able to stop by the paint supply store and pick up a pint of the silver paint in PPG DBC. I also picked up a can of 3M's Cavity Wax and wand to spray in the rockers after the paint is done. Holy ****, it seems like every time I purchase paint it has taken another 7-10% price increase. Now wonder I got out of doing paint and body work.

The supply house that I purchase my paint and body supplies at was recently sold, at least as recent as when I purchased the couple of quarts for my son's 2002 Duramax several months back. When I called to order the paint and a few supplies and gave the young lady m my account number she said it was incorrect and it should have more digits. I explained that it was the same account number that I have had for 35 years and even when I worked there in the mid to late 80's but she explained they were recently sold. Huh, I guess nothing lasts forever. It was a family owned business dating back into the late 20's and is a fifth generation auto parts, body shop supply and glass company. I enjoyed working for the owners back in the 80's and it felt like a tight group. It was a great job for a high school kid but I needed a career as I was getting married and couldn't live off of $3.75/hour peddling auto parts and mixing paint. It will be interesting to see if it changes to be more corporate like the larger company that bought them or stay the way it is. I am betting there will be changes.... :unsure:

Thanks for looking.
 
Last edited:

SilverJimmy

Well-known member
Joined
Apr 14, 2012
Messages
1,685
Location
Prescott/Flagstaff, AZ
Wanted to thank you for pointing out that I should keep tabs on my local NAPA for their annual LOF sale. Picked this up yesterday….
069728DE-F71E-4C15-A0CE-4C1D76BBFD27.jpeg
House brand oil made by Valvoline for $0.99 a quart! $105.00 for 8 cases and I’m going back today for 10W30 and filters @ 40% off! I’ll be set for my fleet till the end of gasoline! LOL!
Thanks again!
 
OP
Z

zmotorsports

ALLIANCE MEMBER
Joined
Oct 20, 2009
Messages
21,469
Location
Northern Utah
Wanted to thank you for pointing out that I should keep tabs on my local NAPA for their annual LOF sale. Picked this up yesterday….
069728DE-F71E-4C15-A0CE-4C1D76BBFD27.jpeg
House brand oil made by Valvoline for $0.99 a quart! $105.00 for 8 cases and I’m going back today for 10W30 and filters @ 40% off! I’ll be set for my fleet till the end of gasoline! LOL!
Thanks again!

Nice haul. Definitely saved some money with that purchase. Happy to have helped.
 

Bigblue&Goldie

Well-known member
Joined
Mar 12, 2009
Messages
10,730
Location
AZ
Wanted to thank you for pointing out that I should keep tabs on my local NAPA for their annual LOF sale. Picked this up yesterday….
069728DE-F71E-4C15-A0CE-4C1D76BBFD27.jpeg
House brand oil made by Valvoline for $0.99 a quart! $105.00 for 8 cases and I’m going back today for 10W30 and filters @ 40% off! I’ll be set for my fleet till the end of gasoline! LOL!
Thanks again!

Nice, I love the Flagstaff Napa!
 

lugnut71

Well-known member
Joined
Feb 14, 2013
Messages
1,898
Location
Wyoming
is the oil sale in certain regions, My store couldnt tell me anything about the house brand on sale
 
OP
Z

zmotorsports

ALLIANCE MEMBER
Joined
Oct 20, 2009
Messages
21,469
Location
Northern Utah
Mike, sorry I've missed the show, been under a dash board for what seems like a week.. I'll read through tonight and add some comments....

I would appreciate that Robert. It's probably too late for me to do anything different now that everything is welded in place but I would sure like to hear your thoughts on what I've done thus far as well as about the epoxy vs. weld through debate.

Thank you.
 

MP&C

Well-known member
Joined
Oct 21, 2009
Messages
4,405
Location
Leonardtown, MD
Mike, I'll add my thoughts in blue text just to be able to comment to the pictures you posted. Sorry I'm late for the party...


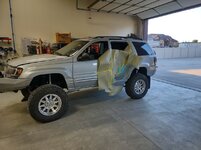
Well, with my son's WJ running well after a week long test of wheeling in the San Juan's a couple of weeks ago it was time to turn to some cosmetic work.

Now keep in mind this won't be as precise as what Robert (MP&C) would do but I think it is turning out about as close to OEM as I can get it.

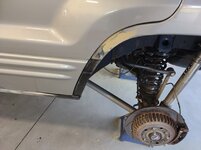
When my son purchased the Jeep three years ago it was stock and relatively clean but we did notice a small amount of rust starting on the left rear wheel arch/door jamb area. My son removed the body trim and found a buildup of dirt and debris causing the area to hold moisture so he cleaned it as well as checked the other areas around the Jeep with the same removable body panels.

We knew we would have to address this once we got the mechanical aspects of the Jeep ironed out so we pulled it into the shop Friday night and started cutting. I was fortunate that we were able to find a rust panel for the outer skin of the dog leg which we originally thought would be all it needed.

However, once I started tapping with the body hammer we quickly discovered it was more than just the outer panel. Here any discoloration in the paint is a guarantee of rust coming through from the back side. I find this a good place to check structural soundness of the metal using an ice pick, just as if you are breaking apart a block of ice, but not so hard you are leaving dents. If the metal holds the ice pick, it will hold paint. As to where to cut the outer dogleg, I would START about an inch from the rust and cut there. Depending on the condition of the inner panel, more trimming of the outer may be needed. IE: in this case, once opened you notice the inner needs to be installed first. So I would cut the outer about an inch farther than the inner to allow plenty of room to dress welds and epoxy prime above the weld seam. IF the inner can be welded in after the outer, I would make the cut for the inner larger in this case, to allow room for planishing welds to help remove weld deformity. As that is not an option in this case, the outer is cut larger.
rust1.jpg

The new rust repair dog leg replacement panel.
rust2.jpg

Area marked for cutting and spot welds drilled to separate the inner and outer panels.
rust3.jpg

Pulling the outer panel away from the inner panels and foam.
rust4.jpg

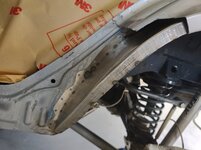
Outer panel removed and the inner panel's damage revealed.
rust5.jpg

Not much remaining of the inner panel so a new plan was devised.
rust6.jpg

Continue drilling spot welds and remove the inner wheel well panel.
rust7.jpg

Once that panel was removed we found good solid metal once again.
rust8.jpg

Other than a very small piece at the lower edge which was an easy fix. Small rust area was cut out, POR 15 Metal Prep was sprayed all around the area to treat the last remaining surface rust and the piece cut out according to the template.
rust9.jpg

Some UPOL #2 weld through coating applied after washing the Metal Prep off and drying. I prefer sandblasting such areas and SPI epoxy direct to the abraded metal. Any "weld through" coatings I have tried were a bit "misleading" in that description as the weld was still contaminated by any paint left in the plug weld hole. Perhaps it was just the brands I used, but the paint needed to be removed from the weld area (just as I do for epoxy) in order to eliminate/minimize the weld contamination (ballooning). Chemically, I would think a two part (epoxy) paint would be more stable than anything coming out of a spray can. A restoration publication I read many years ago actually conducted a study between weld through and epoxy primer and found the epoxy to be better at long term protection against future rust. So my **** retentive nature has me using epoxy and clean out bits in the plug weld holes. Lastly, most metal prep solutions have some sort of acid in them. Some epoxies don't play nice with them, not sure about weld through's.. But I would seek guidance from the manufacturer of the paint going on top of said conversion coating if there is an adequate cleaning/neutralizing process or ?? Companies like Ospho, etc, like hiding disclaimers far away (different page) from their bold proclamations of "works with all paints". So I find the paint manufacture will give the straight skinny on compatibility more so than the conversion coating companies.. Not saying what you did was wrong, I've just had a paint job go south after a year at car shows because the owner applied Ospho left in deep pits that he said to paint over top of because his buddy did it all the time...... Well the Ospho residue (acid) is reactivated by sunlight and starts outgassing, which creates tiny circles in the paint job where the paint is now lifting from the chemical reaction outgassing, and the epoxy did not play nice with acids.... For where this is located out of direct sunlight I don't think I would lose sleep over it. I'm just a burnt me once, not again kind of guy..
rust10.jpg


More to follow.....
 
To avoid these ads, REGISTER NOW!

MP&C

Well-known member
Joined
Oct 21, 2009
Messages
4,405
Location
Leonardtown, MD
Last part of the inner panel fabrication.

Now to close up the lower corner of the inner panel. The original was a stamped piece which was a bit more rounded but we just closed the end in with a small filler piece after making a cardboard template and transferring it to sheet metal.
rust30.jpg
This is a rather complex piece due to this corner, otherwise you may have been able to use the tipping die for both flanges. Well done.
Filler piece being fine tuned to fit.
rust31.jpg

A little grinding and a little bending and it fits pretty good. For your weld along the left (inner) flange, sometimes the weld does not play nice with paint adhesion. where the opposite side (outside corner) is easier to dress away the hard outer scale, the inside weld is more of a challenge. Here I'll use media blasting to abrade the surface, providing good bite for paint adhesion while removing any hard scale at the surface. With a removed part like this, it's easy to throw in a blast cabinet to clean that up..
rust32.jpg
....

That is as far as we got on Saturday afternoon.

Thanks for looking.
 
Last edited:

MP&C

Well-known member
Joined
Oct 21, 2009
Messages
4,405
Location
Leonardtown, MD
To further help with the explanation above, here are a few pictures of the process.

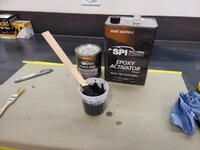
Mixing up a small amount of SPI Epoxy Primer and let it sit for its 30-minute induction period while I walked around the lawn with the walk-behind mower last night.
spi1.jpg

The inner edges of the panels prepped to receive the epoxy primer. I used a clean & strip wheel to remove the e-coat on the new part and just rough up the new panel enough to create a good bite for the epoxy primer. I've seen mixed results with the e-coat. Both mine and pictures that others have shown, there were "prep issues" not addressed prior to e-coat being applied. Most everyone I know now strips to bare metal to ensure the panel doesn't have flash rust under the paint.
spi2.jpg

..........

In hindsight, I should have used some gray epoxy primer but I forgot I had some left over until after I had already mixed up some black primer. Oh well, I doubt anyone will see the color mix-match.:lol:
 

MP&C

Well-known member
Joined
Oct 21, 2009
Messages
4,405
Location
Leonardtown, MD
More progress on the rust repair on my son's WJ.

Before test fitting the outer panel I applied some urethane seam sealer to the joint both inside and in the wheelwell. Well done in taking the steps for preventing a reoccurrence. I'll also flood an area after welding the inner/outer panels together (providing access is available) to seal the panels together and prevent any seepage between.
rust50.jpg

.........

Double checking the door gaps to ensure everything is properly placed and aligned. Important step here that is often overlooked. Whether a repair job or a full on restoration, doors should be used to check gaps prior to final welding.
rust54.jpg

.......

Overview of the panel replacement.
rust59.jpg

All that is left is to fabricate a small patch panel for the wheel arch, then apply another coat of SPI Epoxy Primer to bare steel and then I can proceed with a little glazing putty, primer and prep for paint.

Thanks for looking.
 
OP
Z

zmotorsports

ALLIANCE MEMBER
Joined
Oct 20, 2009
Messages
21,469
Location
Northern Utah
Thank you very much for taking the time to read through and respond Robert. MUCH appreciated my friend.

Last question, what are your thoughts on a cavity wax? In the past I have used the 3M 8852 Cavity Wax with a long wand to reach inside areas such as rocker panels and frame boxes on unibody vehicles to coat the areas that are inaccessible after welding back together. My thinking is that the cavity wax should do a decent job of coating those small areas where the epoxy primer may have burned off during the welding process but to be honest, I have no real world experience after the fact. I have applied the cavity wax in "hopes" that it coats the areas well enough to prevent future corrosion issues but for a show car/restoration I really have had no issues. This WJ is a daily driver so I am being much more paranoid about any reoccurrence of rust down the road and probably why I am trying to take as many precautions as possible.

Thank you.
 

MP&C

Well-known member
Joined
Oct 21, 2009
Messages
4,405
Location
Leonardtown, MD
Up until this point we only thought we had a rust issue on the driver's rear dog leg/rocker area but there was a small rust spot on the passenger's rear rocker that had gotten my attention the week earlier that didn't look very good. First order of business on Saturday morning was to knock the paint off of that area and see it it was just some surface rust or something worse. YEP! It was something worse.

We shifted gears and began a plan to address this area while we were already cutting metal and planning on doing some painting, otherwise, we would be doing this spot very soon.

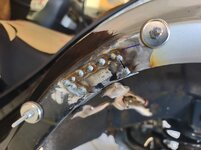
Marked out past the rust and into good sheet metal. There were three spots that I went through with the pick end of my body hammer after removing the OEM paint and primer. Note that all of the rust holes have a dark grey circle around them. Now look at the dark grey circles scattered about that do not have holes. These are tell-tale signs of a deep pit on the back side, ready to break through. Check the part removed and see what the back side looks like in those areas...
rust1.jpg

.........

After getting the small patches basic shape we tack welded it into place. Once one set of tack welds were done, I knocked them down with a 1/16" wide grinding disk so they were just barely proud of the parent material and laid another tack weld about 50% on top of the previous one. The trick here to to be absolutely certain that you are using enough voltage and wire speed to get full penetration. This will require a little testing before hand to ensure you have the correct settings on the welder. You should have a nice dimple on the back side depicting full penetration. Then when you knock the weld down you don't have to worry that your panel will not be fully welded and result in cracks in the repair area. If you hit it with enough heat and enough wire speed you should get good penetration without blowing a hole in the panel. I also like to try and hit the previous spot weld dead in the middle between the two panels to ensure I am splitting the heat between both the new panel and the original panel. If you try and focus the wire to one side or the other you are actually overheating the one where the wire makes contact. One other thing I do is snip the wire at a slight angle between each tack. This cuts that little bit of a ball off the end of the wire which takes more current to melt, but also eliminates that little bit of silicone from the end which is an insulator and makes it harder for the arc to start at the next tack weld. By having a small angle on the end of the wire it requires less current to begin the arc then stay on the trigger barely long enough for the tack weld to get to the desired size, nothing longer or you will blow a hole through the panel. Well written..
rust11.jpg
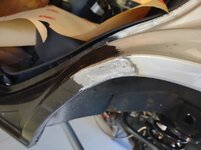
This is a difficult part in that it has a compound curve that is a reverse (like a potato chip). I know you are going to be using some filler, and that's not a bad thing, so take this as food for thought for making a more accurate part the next time. With two folded flanges so close together, a seam right down the middle will better keep welding shrinking/distortion more balanced. Too close to an edge and that edge will tend to shrink and pull the flange inwards. This linked post shows a good example of that where too much welding of a vertical seam pulled the adjacent flange inward, distorting the fender gap.. https://www.garagejournal.com/forum/threads/welding-in-patch-panels.53534/page-3#post-935825 Having your seam in the middle will help balance out the welding effects and gives a slight bit more width to the flange to better help prevent shrinking pull. Now as to shape, the flange hanging down needs a slight amount of shrinking to better follow the curve of the panel. This action will tend to pull the entire panel along for the ride, however the upper area needs to be stretched to flare outwards and upwards. If a part like this is simply bent without the shrinking of the flange, and stretching the upper portion, it tends to stay flat, or introduces a slight low in a crowned area. The upper area can be stretched by simply laying on a shot bag and hammering with a crowned body hammer. This to stretch open the area, just like opening up your fingers on your hand. SO more stretch the farther you get from the flange. Then a slight amount of shrinking of the flange until it matches the radius of the adjacent panel.
More pictures to follow.....
 

MP&C

Well-known member
Joined
Oct 21, 2009
Messages
4,405
Location
Leonardtown, MD
Continuing on.

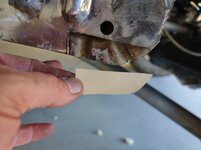
Then it is a matter of knocking those tack welds down and repeating until the entire joint is welded. Don't try to weld a continuous bead or multiple beads as you will surely blow through in short order. When grinding and using a 1/16" wide by 3" disc on a die grinder I like to turn the wheel so it is cutting at an angle to the joint to avoid cutting grooves into the joint or taking more thickness away from the parent materials. Once the weld is ground to slightly above the parent material stop and move on. These will be later addressed with a 2" or 3" Roloc disc on a die grinder to smooth flat.
rust12.jpg

Final step before hitting with some 80-grit on a DA sander.
rust13.jpg

After the previous section was welded in place I brushed some more SPI Epoxy Primer to the underside of the previous patch panel and moved on to bending and fabricating the last small section. Then once I was happy with the fitment I brushed SPI Epoxy Primer to the backside and let sit until cured.

Yesterday late morning I went back out into the shop to begin welding the last two sections in after allowing the epoxy primer to cure for a couple of days. Here magnets are holding the small panel in place to allow me to tack weld the panel in place.
rust14.jpg

The the process of tack weld, grind, tack weld, grind and then metal finish begins all over again.
rust15.jpg

Metal finished welds and ready for epoxy primer.
rust16.jpg

Moving over the passenger's rocker where I epoxy primed the area on Saturday I began prepping this piece for welding.
rust17.jpg

Inner panel with the cured SPI Epoxy Primer.
rust18.jpg

Holes punched in the lower flange for spot welds and the panel fit in place for the last time. I am very pleased with the fitment of this panel.
rust19.jpg

Then the tack weld and grind process began on this panel until it was fully welded and metal finished.
rust20.jpg

Last step was running over it with 80-grit on a DA sander and then primed with epoxy primer so it can cure and we can then begin with some body work. The nice thing is that there will be very, very little filler required with this process. Basically a skim coat to fill in some imperfections and a couple small low spots.
rust21.jpg


That is where we are currently.

Thanks for looking.

Looking good.. If you're ever in the area and are looking for some side work.....;)
 

MP&C

Well-known member
Joined
Oct 21, 2009
Messages
4,405
Location
Leonardtown, MD
Thank you very much for taking the time to read through and respond Robert. MUCH appreciated my friend.

Last question, what are your thoughts on a cavity wax? In the past I have used the 3M 8852 Cavity Wax with a long wand to reach inside areas such as rocker panels and frame boxes on unibody vehicles to coat the areas that are inaccessible after welding back together. My thinking is that the cavity wax should do a decent job of coating those small areas where the epoxy primer may have burned off during the welding process but to be honest, I have no real world experience after the fact. I have applied the cavity wax in "hopes" that it coats the areas well enough to prevent future corrosion issues but for a show car/restoration I really have had no issues. This WJ is a daily driver so I am being much more paranoid about any reoccurrence of rust down the road and probably why I am trying to take as many precautions as possible.

Thank you.

Cavity wax does a good job, especially in those hard to reach areas. I have not used it to date because I have been able to get into all those type areas with modified tools (36" long paint roller, cut down in width to fit inside rocker) My only cautionary note would be to insure it doesn't build up enough to block off drain holes, which will send water elsewhere. It appears the rust started on the drivers side from someone mudding and not getting into the crevice to clean it out.

You've done more thorough a job than most all of the body shops in your area would have, well done sir!
 
OP
Z

zmotorsports

ALLIANCE MEMBER
Joined
Oct 20, 2009
Messages
21,469
Location
Northern Utah
This is a difficult part in that it has a compound curve that is a reverse (like a potato chip). I know you are going to be using some filler, and that's not a bad thing, so take this as food for thought for making a more accurate part the next time. With two folded flanges so close together, a seam right down the middle will better keep welding shrinking/distortion more balanced. Too close to an edge and that edge will tend to shrink and pull the flange inwards. This linked post shows a good example of that where too much welding of a vertical seam pulled the adjacent flange inward, distorting the fender gap.. https://www.garagejournal.com/forum/threads/welding-in-patch-panels.53534/page-3#post-935825 Having your seam in the middle will help balance out the welding effects and gives a slight bit more width to the flange to better help prevent shrinking pull. Now as to shape, the flange hanging down needs a slight amount of shrinking to better follow the curve of the panel. This action will tend to pull the entire panel along for the ride, however the upper area needs to be stretched to flare outwards and upwards. If a part like this is simply bent without the shrinking of the flange, and stretching the upper portion, it tends to stay flat, or introduces a slight low in a crowned area. The upper area can be stretched by simply laying on a shot bag and hammering with a crowned body hammer. This to stretch open the area, just like opening up your fingers on your hand. SO more stretch the farther you get from the flange. Then a slight amount of shrinking of the flange until it matches the radius of the adjacent panel.
More pictures to follow.....

Mike,
rust11.jpg


This is a difficult part in that it has a compound curve that is a reverse (like a potato chip). I know you are going to be using some filler, and that's not a bad thing, so take this as food for thought for making a more accurate part the next time. With two folded flanges so close together, a seam right down the middle will better keep welding shrinking/distortion more balanced. Too close to an edge and that edge will tend to shrink and pull the flange inwards. This linked post shows a good example of that where too much welding of a vertical seam pulled the adjacent flange inward, distorting the fender gap.. https://www.garagejournal.com/forum/threads/welding-in-patch-panels.53534/page-3#post-935825 Having your seam in the middle will help balance out the welding effects and gives a slight bit more width to the flange to better help prevent shrinking pull. Now as to shape, the flange hanging down needs a slight amount of shrinking to better follow the curve of the panel. This action will tend to pull the entire panel along for the ride, however the upper area needs to be stretched to flare outwards and upwards. If a part like this is simply bent without the shrinking of the flange, and stretching the upper portion, it tends to stay flat, or introduces a slight low in a crowned area. The upper area can be stretched by simply laying on a shot bag and hammering with a crowned body hammer. This to stretch open the area, just like opening up your fingers on your hand. SO more stretch the farther you get from the flange. Then a slight amount of shrinking of the flange until it matches the radius of the adjacent panel.
More pictures to follow.....

Robert, thank you for that description. Originally I had made a cardboard template of this area and tried to make it from one piece of sheet metal. However, as you pointed out, it was next to impossible having multiple bends and reverse bends. My thought then was to make it out of two pieces and it was twofold. First I would allow me to make the panel fit better by doing a small amount of shaping after the first panel was welded in place.

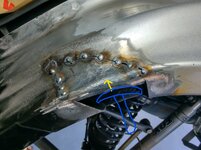
Here is a marked up picture showing how I got some curvature back into the lip area. I had a curved T-handle with a corresponding radius in which I placed behind the panel's lip and struck with a hammer driving the peak of the lip upward and thus added a bit more crown to more closely match the door's curvature. This worked well and required very, very little filler, mainly just to fill in a few dings from the strike marks.
Inkedrust11_LI.jpg


The other reason I made this patch panel in two pieces was so that I could get behind the upper panel and brush some epoxy primer to the underside for corrosion protection. Probably not ideal but that was my thinking.

As to the reasoning you mentioned making the cut down the middle, that makes sense now. I chose to move off the radiused bend thinking I could use my tank roll and put a small radius on the patch panel and then I used my 3/8" T bar and hammer formed the remainder over it. I then thought it would create less of a weak area if I welded it on the flat part of the wheel arch vs. the center but I may have been mistaken based on your suggestion.

I will keep that in mind for next time.

Thank you.
 
OP
Z

zmotorsports

ALLIANCE MEMBER
Joined
Oct 20, 2009
Messages
21,469
Location
Northern Utah
Cavity wax does a good job, especially in those hard to reach areas. I have not used it to date because I have been able to get into all those type areas with modified tools (36" long paint roller, cut down in width to fit inside rocker) My only cautionary note would be to insure it doesn't build up enough to block off drain holes, which will send water elsewhere. It appears the rust started on the drivers side from someone mudding and not getting into the crevice to clean it out.

You've done more thorough a job than most all of the body shops in your area would have, well done sir!

Thank you for your time Robert. I greatly appreciate ALL of the feedback you have given.

It's been a while since I have done a repair such as this and I feel my skillset has grown from the last time I did any rust repair which was probably 10+ years ago. I'm always trying to learn and expand my knowledge and improve my skillset so I am grateful for your help.

I hope this repair lasts a long, long time as I see my son keeping his Jeep for many more years and I don't want to have to do these areas again.
 

MP&C

Well-known member
Joined
Oct 21, 2009
Messages
4,405
Location
Leonardtown, MD
............ I may have been mistaken based on your suggestion.
One thing I've been told and it still rings true today, there's many different ways to town, each with a different challenge.

We would do well to learn from some of the great coachbuilders, this is a picture of an early BMW fender (wing, in UK speak, mudguard in Australia) that was built from flat sheet by David Gardiner in England.

DGwings.jpg


Note that each weld that runs along the length is located for a specific reason. The weld down through the reverse curve (just left of "stretch") is located in the center of the radius as it transitions from fender to the "flat". In the center so that it has a balanced effect on either side. If it shrinks, it does so equally so that a mere planish of the weld corrects the shrink. Had the center crease not been there, the weld would be located to either side of the center "low crown area" of the fender, in the middle of the radius as it transitions from the low crown to the sides (like the weld near the wheel opening, just out of view). Note all of these would be in a higher crown area, one that does better at managing the distortion than that of a low crown, or better put, where there are equal forces to either side in managing the effects from welding. With this fender having a crease down the center, the weld to the right of the crease is located approximately centered between the crease and the high crown area of that section, because the crease and high crown act in a similar fashion. All of these welds are gas welding using OA. None have been planished at this point. But yet look at how WELD LOCATION has controlled deformity. This is why you've heard me stress that weld location is the first priority over worrying about how big or small a patch panel may be. Its all about realizing the effects shrinking has and locating the welds so that you have some control over things and not just along for the ride. So I wouldn't say you were mistaken, many different ways to get to town. We're just working on finding the best route (myself included)...
 
Last edited:

MP&C

Well-known member
Joined
Oct 21, 2009
Messages
4,405
Location
Leonardtown, MD
Robert, thank you for that description. Originally I had made a cardboard template of this area and tried to make it from one piece of sheet metal. However, as you pointed out, it was next to impossible having multiple bends and reverse bends. My thought then was to make it out of two pieces and it was twofold. First I would allow me to make the panel fit better by doing a small amount of shaping after the first panel was welded in place.

Here is a marked up picture showing how I got some curvature back into the lip area. I had a curved T-handle with a corresponding radius in which I placed behind the panel's lip and struck with a hammer driving the peak of the lip upward and thus added a bit more crown to more closely match the door's curvature. This worked well and required very, very little filler, mainly just to fill in a few dings from the strike marks.
Inkedrust11_LI.jpg


The other reason I made this patch panel in two pieces was so that I could get behind the upper panel and brush some epoxy primer to the underside for corrosion protection. Probably not ideal but that was my thinking.

As to the reasoning you mentioned making the cut down the middle, that makes sense now. I chose to move off the radiused bend thinking I could use my tank roll and put a small radius on the patch panel and then I used my 3/8" T bar and hammer formed the remainder over it. I then thought it would create less of a weak area if I welded it on the flat part of the wheel arch vs. the center but I may have been mistaken based on your suggestion.

I will keep that in mind for next time.

Thank you.


Mike, regular paper such as that from a brown paper bag works well at making a paper pattern. If it lays flat, you need a flat piece of metal. If you need to cut slits for the paper to open up and lay flat to the panel, then the metal in that area on your patch needs to open up (stretch) to match the panel. If you need to make folds in the paper for it to lay tight and flat to the panel, then shrinking is in order for that area of your patch.
 
OP
Z

zmotorsports

ALLIANCE MEMBER
Joined
Oct 20, 2009
Messages
21,469
Location
Northern Utah
It was a very busy, but productive weekend around the "Z" estate. I went to bed exhausted yet relieved last night as it was an emotional and stressful couple of days.

Friday afternoon I was able to get my lawns edged, trimmed and mowed. Other than one area in the back lawn where the grubs damaged the grass, my yard is looking very good despite the water restrictions in place this year. I guess the fine tuning of the nozzles in the sprinkler heads over the past couple of years has paid off.

Front yard. With the cooldown in temps this past weekend from the northern winds it also brought the smoke from Idaho's fires which layered the Wasatch Front with a haze so our mountains were not very visible this past weekend. The temps were sure nice though.
yard1_9_2022.jpg

Side yard looking good but the tree still isn't growing much, not like the ones in the back yard anyways.
yard2_9_2022.jpg

Back yard looking very good other then the one spot where the grubs got into the grass. After spraying them it will take some time to recover. It is doubtful it will be this season unfortunately.:mad:
yard3_9_2022.jpg


After mowing the lawns and my wife still not home from work I went about doing the final wet sanding on my son's WJ in an attempt to paint it Saturday morning.
wj1.jpg

wj2.jpg

At that point I called it a night. My son was planning on coming over early Saturday morning and we were going to push the Jeep outside, bag it and paint the couple of areas in which we repaired.

However, that all changed with the winds on Saturday morning. They weren't severe but bad enough that I didn't want to risk painting his Jeep.

That actually worked out for the better based on the scenario that followed. Starting on Thursday I started communicating with a gentleman about our 2010 HD Ultra Classic CVO that was for sale. This gentleman seemed pretty interested at first after messaging back and forth answering questions, but then things cooled Thursday and I wasn't sure how genuinely interested he was, especially when I told him I was a little flexible but not very because I knew what the bike was and I wasn't in the situation where I "had" to sell it. I thought at that point maybe I scared him off. On Thursday I had messaged him my phone number in case he had any further questions but didn't hear anything else from him, that is until mid-day on Friday.

Friday he called me a few times asking more questions about overall condition and mechanical integrity of the bike. He informed me that he lived in New Mexico and was very interested in the bike. I'm not gonna lie, at first I thought this was a scam or just a tire kicker but the more I talked with the gentleman the more I liked him and could tell he was very interested but also very unsure due to the distance he was from us and the uncertainty over the condition of the bike based solely on pictures and my word. He told me he had an 04 Ultra Classic as well as a 2014 Rushmore edition but had always wanted this particular year and color of CVO so he is very interested. On the third telephone call we came to agreement on a price and I gave him my word that I wouldn't sell it until he arrived on Saturday. This verbal agreement was contingent on a test ride and whether or not the bike was in as good of condition as I had represented it. I explained that he doesn't know me and I don't know him but I take my integrity seriously and he would not be disappointed in the bike. He told me he and his wife were hooking up the trailer and heading my way and would arrive sometime mid-afternoon on Saturday.

He continued to text me giving me updates on their location throughout Friday evening when he said they may stop somewhere for the night as they were tired and hadn't planned on driving 650 miles that day. Saturday morning at 8am I got a text from him while I was sitting on the deck enjoying my morning coffee and cussing at the wind. He stated that they were only a couple of hours from us and had just had breakfast and heading our way and needed my exact address.

Sure enough, he pulled up to the house just a few minutes after 10 am and we commenced the inspection, test ride and transaction.

He fell in love with the bike as did his wife immediately. He kept saying how much nicer it was than he expected for a 12-year old bike with 42k miles on it. Overall they were good people to deal with and he loaded it up in his enclosed trailer and by around noon he was driving off with a new bike.

A couple of pictures that I snapped after his test ride with it out in the sun.
bikegone2.jpg

bikegone1.jpg


It was kind of a bittersweet feeling. I was sad to see it go knowing I will probably never own another bike, especially one as nice as that one yet I was glad to see it sold. They seemed like good people and I am pleased to see it go to a new stable where I feel it will be well cared for.

After they left the breeze was still blowing hard enough that I didn't feel comfortable painting the Jeep so we just bagged it and finished masking it then called it a day.
wj3.jpg

At that point it was early afternoon and my son wanted to get his yard work done so I sent him home and figured we would try again for Sunday morning after breakfast to shoot the sealer, color and clear on the Jeep.

Thanks for looking.
 
OP
Z

zmotorsports

ALLIANCE MEMBER
Joined
Oct 20, 2009
Messages
21,469
Location
Northern Utah
Sunday morning after meeting the kids for breakfast we came home, pushed the Jeep outside, finished masking the tires/wheels and commenced the painting process.

Nearly ready for a light coat of sealer.
wj4.jpg

My son putting the last touches on bagging the tires/wheels.
wj5.jpg

After the sealer was allowed to flash for about an hour, it got tacked then a medium wet coat of clear base to provide a wet bed for the heavy metallic urethane base color. This is after about 3 coats of silver base. I had focused the base color on the sealed areas first then slightly extending out to about a couple of inches of the vertical transition in the doorjamb where I applied another coat of clear base to allow the blend area to transition. The last coat of color was mixed 50/50 with the clear base to produce a very transparent color coat for the blend area right at the curved area where the door jamb goes vertical and the wheel opening directly below it. The color blended BEAUTIFULLY.
wj6.jpg

wj7.jpg

This is after the second coat of clear and the blending solvent was applied at the open blend area. It's hard to see in the picture but the finish is smooth as glass after applying the blending solvent to the blend areas.
wj8a.jpg

wj9.jpg

wj10.jpg

wj11.jpg

Same exact process here but he open blend was completed about 2 inches from the backmasked paper at the leading part of the rocker panel.
wj12.jpg

I think this was some of the most extensive back masking I had ever done on a spot repair but the goal is to make it as seamless and undetectable as possible. That and the fact that I don't do paint and body work enough to really be all that good at it, I just don't trust anyone else to do it the way I want it done, nor pay for it.;)

More pictures to follow....
 
OP
Z

zmotorsports

ALLIANCE MEMBER
Joined
Oct 20, 2009
Messages
21,469
Location
Northern Utah
With the weather being so nice and no wind on Sunday after completing the paint work, we let it sit outside for about an hour while we cleaned up the guns, disposed of the mixing cups and put all of the paint and body supplies away and out of the shop.

Here it is pushed back into the shop.
wj13.jpg

The finish is glass smooth and the blend is about as spot on as a person can hope for. This will require very, very little polishing afterwards. Basically just hit the areas where I wet sanded with 800-grit for the clear blend with some 2000 then I can breath over it with a light polish and that should be all it requires.
wj14.jpg

The area where the rocker turns up to the "B" pillar won't require any polishing at all as it is nearly perfect without any scratches showing.
wj15.jpg

The passenger's side rocker will also require very, very little polishing at the front blend area, if any.
wj16.jpg

I finally have my shop cleaned with no boxes full of paint and body supplies stacked around. The shop hasn't been free of paint and body supplies in months so it was nice to get the shop back to normal condition.
shop.jpg


All that remains after unmasking is a little polish work on a couple of the areas then some cavity wax sprayed into the rockers and we can put the door back on. Then my son can commence on the cleaning part of the process while I try and clean the shop out. It is going to need a good sweeping as well as blowing the entire thing out with compressed air.

Thanks for looking.
 

lilscorpion

Well-known member
Joined
Mar 15, 2010
Messages
3,600
Location
Colorado
Mike,

Every time you post up body work your post rekindles am interest in a skill I’ve failed to learn over the years. you truly make it look effortless. Just like that, the WJ gets a new lease on life thanks to you.
 
OP
Z

zmotorsports

ALLIANCE MEMBER
Joined
Oct 20, 2009
Messages
21,469
Location
Northern Utah
Mike,

Every time you post up body work your post rekindles am interest in a skill I’ve failed to learn over the years. you truly make it look effortless. Just like that, the WJ gets a new lease on life thanks to you.

Thanks for the comments Matt. Trust me paint & body work is NOT something I enjoy doing these days. However, I simply don't trust anyone else to do the work the way I feel it should be done, and that's not saying I know what I'm doing either. :lol:
 
To avoid these ads, REGISTER NOW!
Top Bottom