Hi All,
Sorry for the delay with this. I think the vast majority of internet forum posts just end abruptly and I promised I wouldn't be
that guy. So I took pictures throughout the process and wanted to post for reference since this exact question seems to come up on every single site this cabinet is sold. Home Depot's delivery took forever but since getting all the materials, I've done 2 out of the 3 intended. The second attempt was much faster so it's not much of a learning curve after doing it once for anyone attempting.
As for my thoughts on all this and why I chose what I did, I was thinking:
- A recessed plywood base would be very strong. But ultimately I'd need to remove 2 lips on the base's C channels to get the wood support in there and flush side to side/front to back.
- A plywood base built to stand below the cabinet base would work, but would also make the cabinet taller and potentially wider if I also trimmed out the base. And unless using spacer blocks between the plywood and steel base, would transfer all the weight to the thin C channels. So if using spacers, I figured why not go with my current setup?
- If I removed the rivnuts and mounted the casters directly to the steel, all the weight would rest on 4 points. That's how the cabinet works out of the box with the leveling feet, but the steel is pretty thin and unlock the stock setup, casters imply the need to move this thing around.
So ultimately, i went with:
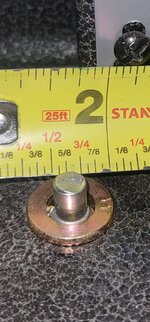
A couple important things: The 2" bolts were all that were in stock at the time. I ended up having to take a dremel to every single one, (which is why this process really took so long) to shorten them. I initially was going to mount with the bolt head under the base, pointing up, so I didn't care so much about the length. But after getting into the thick of it, I decided to have the bolts pointing down and needed to remove around a 1/4" to allow the casters to spin freely. I'm not sure how much I removed, but it was a good bit on the bolts going to the locking casters.
As for the casters, they're nothing short of amazing. And eBay had several auctions for open box for like $10 less. Buying 3 sets, that was a significant incentive to go that route. But these babies are so smooth AND heavy with each set weighing in around 20lbs. Add the hardware and wood, and the base is immediately very bottom-heavy, (insert joke about the girls I like here)
If I were doing this from scratch again, I'd actually get some sort of steel mounting plate to rest on the top of the steel base. I put blue threadlock on all bolts and torqued each one to 13ft/lbs and the force created imperfections in the steel from the top of the base. So with all that said, my struggles to finished cabinets below.

Measuring the recessed bottom of the steel base:


Cutting the wood to length and some dry-fitting, (note the second long piece of wood need to be about 1/4" shorter in order to angle it in the recess:


Who doesn't like pocket holes? Assembling most of the base but the side panels require bolts/nuts so the final cross supports can't be installed until assembling the actual cabinets:

Drilling mounting holes for each caster from above and dry-fitting, (note I used the hole where the rivnuts were. I used one of those step bits to 3/8" to break through the steel and finished through the wood with a standard 3/8" bit. Pretty tedious.

Starting the actual assembly. Note the final two cross members are missing. I needed to chisel just a bit to accommodate the nuts securing the side panels. Then I threw in the final pieces to the wood base.


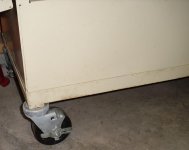
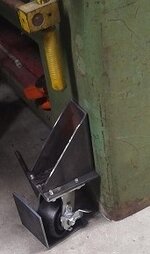
Time for the casters. And like a dummy, you'll notice they're not the same in these photos. Don't be like me and put the casters on randomly. I wanted the locking ones in the front and threw them on wrong in my first go.


Moment of truth. They really look made for this cabinet and move so easily. Almost too easily. I'm a clean floor away from putting numbers and sponsor stickers on each and having a race!

The rest is just customizing. First foam liner and placing some supplies.


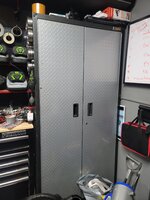
And the emblem. This is silly. I get it. I grew up with Craftsman, (99% of my collection is old USA stuff) and for a homeowner like me, they've never once failed me. So if I had a chance to throw a little bling on there, why not?


And all done!
 So...
So... I just wanted to follow up with how this turned out. I think you guys had a lot of good insight and if I hadn't removed the rivnuts, I may have approached this differently. I sincerely don't think my path is the only solution here. I'm super happy with how it turned out, but whether it's the plywood option or even the 2x4s with a router, anything added to support these things are likely a huge improvement on the thin steel. So saying all that -
THANK YOU! 


 )
)