Well I will go ahead and embrass myself.Thanks, guys! Yes, I am very lucky to have several fiber options (I do live in a metro area), but most of all lucky to have a locally-based ISP (not one of the huge corporations like Comcast). They have great customer service, local phone support, and reasonably-priced Gigabit speeds. I keep most things hardwired in my home, so real world speeds are usually 950 Mbps + for most devices.
My work is in video editing and I often have to transfer large bits of data to and from our office when I’m working from home, so the speed is important for that.
What I don’t have is good cell service. Despite having a major cell provider (Verizon) the radius around my neighborhood block is a complete dead zone, so I rely on WiFi calling. This previously made taking a call, looking something up on YouTube, etc very annoying in the garage. Now it should be much better!
Screenshot_20230812_161256_Speedtest by bjohnson388, on Flickr
Screenshot_20230813_071359_Speedtest by bjohnson388, on FlickrNick, I upgraded to fiber last year (I think) and it's a big improvement. I ran a Cat 7 cable the 100 feet from the house to the shed/workshop because I didn't get a decent wifi signal anywhere in my yard. Just ran AT&T's speed test. Not sure it's accurate but it sure looks good.
Well I will go ahead and embrass myself.
This first speed is in my office which is about 40 ft away from router. The second speed is out in the garage in the 3rd bay.
My last house had very heavy tree coverage. Even living in a suburb just outside the freeway ring gave me basically zero cell coverage in that house. This was before Verizon finally incorporated Wifi Calling. At that time I picked up one of Verizon's ( Samsung unit) pico cell towers that you put in your home. It hard wired to my home internet and worked great. Now that wifi calling is a thing on verizon you probably don't need one of those units but you do have that as an option for your garage if you are finding your wifi isn't enough out there.What I don’t have is good cell service. Despite having a major cell provider (Verizon) the radius around my neighborhood block is a complete dead zone, so I rely on WiFi calling. This previously made taking a call, looking something up on YouTube, etc very annoying in the garage. Now it should be much better!

Mazda Repairs
They told me one of the brake pad backing plates was "bent and rubbing on the rotor". I'm not sure how this is even possible. They did give me a service report measuring the pads and stuff — obviously not needed to take apart for the work I wanted done with the ball joints and control arms. They just took apart my brake job to tell me the pads were brand new, and somehow bent or dropped or disassembled the pad shims.
This is turning into a rant, but it makes you wonder what else they screwed up. And doing the brake job myself at least I knew what I did... now I'm left wondering if they touched anything else they shouldn't have.
But... it's all back together and running great now. No squeaks, no clunks. It's at 116k miles, so I figure once I get the brake fluid flushed, and possibly spark plugs done, it should hopefully be refreshed for the next chunk of miles other than standard maintenance stuff!
My last house had very heavy tree coverage. Even living in a suburb just outside the freeway ring gave me basically zero cell coverage in that house. This was before Verizon finally incorporated Wifi Calling. At that time I picked up one of Verizon's ( Samsung unit) pico cell towers that you put in your home. It hard wired to my home internet and worked great. Now that wifi calling is a thing on verizon you probably don't need one of those units but you do have that as an option for your garage if you are finding your wifi isn't enough out there.


My shop is in a constant state of evolution; not at a constant pace though... more like slow and slower. I think you'll be very happy if you do reorg the back wall. Also, having an old TV in the garage that I use as a second monitor for my computer has been great. It also allows me to also stream TV (or any source) to it. Having the game on while 'tinkering', or watching a 'how to' right there in the shop has also been great.
Re: Pros vs DIY: we all have priorities and we usually juggle those with time and money. There are a few things I'm capable of, but I hire out anyway. Money is a renewable resource. Time is not. No explanations needed.
Sometimes the best tool for the job, is a credit card. Been there, done that, it's OK!! Don't sweat it.
Also FYI, they measure your pad thickness without removing the pads. Usually using a tool like this:
https://www.amazon.com/dp/B00OJG327E/?tag=atomicindus08-20
Also also, if I had to guess, perhaps it was your rotor backing plate that was rubbing, and not necessarily the brake pad backing plate. I can see how they could accidentally bend that pretty easily while replacing the control arm. They're so thin, and right in the area where they would be working. One little tap is all it takes (been there done that)
I never have a shop do any work, but I had the local shop replace the drivers side axle on my wife's car Monday. I've been ignoring the blown out cv boot for a year or more and it was already there for a wheel stud replacement (costco said they cross threaded it during the tire installation) I had no desire to crawl under the car to replace it.
That *****! Also, for me at least, the stress of mechanical problems on the family vehicle is real. Sometimes you have to leave it to the shop, and when you feel let down by shop, there’s a deep betrayal at play.
I would wager that your pads and rotors were measured without disassembling anything - that’s the typical method, at least. And, as someone else stated, 99% certain that the shop was referring to the brake rotor heat shield, which is prone to be bent during control arm / ball joint work, and is 1) east to bend back and 2) not worth replacing if bent, since it’s just always sort of flimsy. I think you might have missed what was going on in both cases.
Your thread is great. I do cringe at some of the popular threads (I can think of 3 off hand) that have uncharitable views of workers. Interestingly, I see it across a range of suspected incomes, from the overextended suburbanite, to the tech millionaire, to the son of a billionaire cosplaying as a craftsman…). Personally not my style. I’d be just as frustrated as you are about the shop sending your car back with the noise - pretty ridiculous, if you ask me - but, I do enjoy life more when I afford even those who fail me some respect.
As much as I hate seeing a big tree removed, I understand... it's just a matter of time before they start to fail. I'd be surprised if that beast isn't hollow in the middle.
Any plans on saving a few choice pieces and having them milled for future woodworking projects?
I think an equal concern would be the root system with a tree that big so close to your home’s foundation.
You’re right to take it. Perhaps you can find some decent remains for a unique project.
Nick,
Over here if you had a tree that large that close to a house you’d struggle to get a mortgage, any tree closer than 5mtrs/16ft is deemed too close and will have to be looked at.
Root damage to the foundations is a big worry,
we’ve had three taken down, two were ruining the drive and the largest was starting to cause problems with the house.
I do think you’ll appreciate the light though.
Steve![]()
Understand not wanting to take the tree....but it is the wrong type of tree to have that close to the house. Enjoy it before it is gone, they are massive trees for sure. I had a huge one looming over my last house as well. So much debris in my gutters/ roof every year I don't miss that.
You could rent a small boom lift from HD to do that job more safely. Better than a ladder......I can't wait to be done with the mess every spring and fall. I can't easily reach the gutters on our upper roof safely. They do have leaf guards but I'm sure they are all clogged and need a major clean out. That's something I intend to get down once the beast is gone.

You could rent a small boom lift from HD to do that job more safely. Better than a ladder.
YMMV
![]()


Thanks guys, this actually makes me feel a bit better that it's the right choice.
It might be hollow. One arborist said that out of the group.
I've long thought I would save some wood from it, I'm just not sure how. I know I don't want (and my wife doesn't want) a huge log laying around in our yard for a year or more. Hauling away everything is part of the removal service. I could ask them to leave a piece, but I don't even know how to select the right chunk, or have a plan of what I would use it for.
I've also read that people don't like to mill urban trees because of high likelihood of metal fragments that could ruin their blade.
There's a place called Wood From The Hood that reclaims urban trees in Minneapolis, but I haven't contact them to see how it works. I wish I'd had more time to consider this possibility, but they are supposed to be scheduling the crane now, and the tree is coming down sooner than later.
So yes, I've thought about it, but don't really have my act together on how to make it happen other then just asking them to leave a giant log in my backyard.
Thanks guys. I try not to think about the root structure or it would keep me up at night.![]()
As far as light, I actually really enjoy the shade it provides, and the dappled light through the back windows in the mornings. The canopy is so high, it provides great shade for the high noon sun, but still lets the morning low angle sun through.
The kitchen (in the back of our house) was an addition, so the tree was not originally that close to the house. And of course it's gotten huge over 80 years or so.
I can't wait to be done with the mess every spring and fall. I can't easily reach the gutters on our upper roof safely. They do have leaf guards but I'm sure they are all clogged and need a major clean out. That's something I intend to get down once the beast is gone.


2 yr old giggles are worth a lot...well done!
And as much as it ***** to take a big ole tree like that out....given the situation I agree it sounds like it's time to go and that's way to big and way to risky, both financially and personal injury risk to try and DIY it. It's a painful bill I'm sure...but once you get used to the new scenery you're going to like it and sleep better at night
Nice catch on the air bag light! It's nice when things are simple.
Like your Mazda, our Highlander was riding like a bag of hammers. I ended up doing the lower control arms and ball joints in my shop, but spent a solid $800 CAD on OEM parts. The issue you had with a brake rotor shield rubbing (and making a nasty racket) is a common one as it's light metal and easy to bend when you're working in that area. On the plus side, it takes about 30 seconds to fix by just bending it back![]()


Nice job. I've modeled some lineloc style fittings.Drill Press Dust Collection
A little 3D printed project I've been working on in the background. I've had this Loc Line tubing in my Amazon wishlist for ages. For whatever reason I never pulled the trigger, and then recently came across this flexible tubing model on Printables. As well as this adapter for a drill press column.
I started printing the components.
I hadn't used the printer for a bit, but everything surprisingly went fine.
Side note, I used Cura's tree supports for the first time, and they were awesome!
Me being the dummy I am sometimes, I totally overlooked that the adapter piece might not be the same diameter as my drill press column. And it indeed was not. So, 10 hours of printing and plastic wasted.
And now I had to modify it to work with my drill press. Fortunately the uploader provided STEP files. This lets me get the model into Fusion 360 easily, but doesn't have any "model history" or parametric design. Meaning it just imports as a single object.
I am not a CAD person. For those who are, I'm sure this is laughably easy, but for me it is not. I needed to figure out how to widen the adapter for my larger drill press diameter. Complicating it, the two sides of the adapter have different diameter "inputs", one for the flexible tubing, and the other side is a tapered 35mm input for a vac hose. To top it off, the original model was 40.8mm ID for the flexible tubing side, even though the flexible tubing model was 40mm OD. Which meant a lose fit I needed to fix.
I won't detail everything, but fortunately the model "origin" was in the middle of the model. It must have been mirrored when created or something. So I set up a construction plane based on that, and extruded and moved each half outwards by 10mm. And then drew a new circle for my drill press column diameter, cut that through the existing model, and fixed up the chamfers.
And then reprint.
I was pretty excited to see it came out the right size, and fit my drill press.
Now to do the second piece, the other half of the ring that clamps it on the column. (If you look at the Printables link at the beginning of the post this will make more sense).
I had a STEP file for this, but I felt like it would be easier to model from scratch to match the new size of the other part. I took some measurements of the existing model, and the bolt hole spacing of my new model, and went to town.
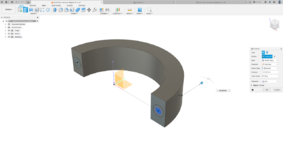
Yeah, I know, it's not super complicated. But I was still pretty pleased with myself for figuring it out.
Parts lined up:
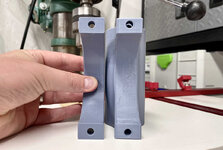
And attached with some M6 bolts and nuts.
I printed 12 of the flexible joints. They were a really tight fit at first, but have since loosened up a lot, maybe even too much.
My 35mm Festool hose fits in the back side of the adapter nice and snug.
Using the CT vac, I can plug the drill press into that, and it will auto turn on the suction when the drill press is turned on.
Doing a few tests, it collected 99% of dust with the 3/8" brad point bit pictured above.
With a 1" Forstner... about 50%. So still lots of chips. But better than nothing. A little disappointed in that, but for smaller holes it should work nicely.
And can sort of be moved out of the way when not needed.
While it is somewhat effective, I'd say this project was mostly for fun. And for what it's worth it took me about 40 hrs including printing time and time futzing around with Fusion 360 and fitments.
![]()
Nice job. I've modeled some lineloc style fittings.
Just never got to printing them.


Gutter Improvements
...
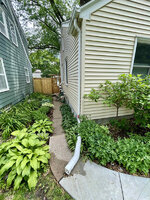
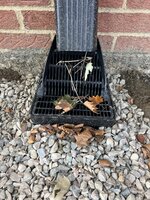
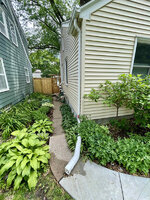
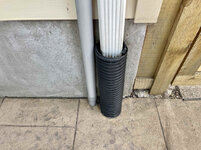
I was thinking about getting a pop up emitter and making the exit more proper, and then getting an inline filter and clean out for the downspout, but after reading more about underground downspouts in my climate, I've realized they are not a great solution due to freezing.
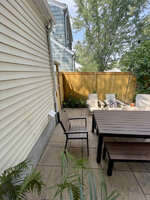
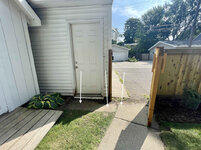
I can't really dig up the patio and make any changes, either.
So now I'm left wondering if I move forward with that plan, but also try to come up with some sort of not-underground diversion for winter? I'm not really sure how to do that because of the constraints.
...
If anyone has any ideas or specific pieces of hardware, I'm all ears!


Have you considered installing a rain garden in that area?

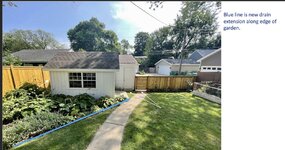
Perhaps it's an optical illusion, but the slope to the right of the 'buried downspout exit' looks like a decent drop. Can you extend the exit farther to the right in your last pic? Steeper slopes don't freeze as easily as lesser gradients. Effectively keeping the water running farther away. I know you've got shed and garage to navigate, but could you run down the fenceline behind or even along the edging of the garden to some convenient daylight?


Hi Nick ,
I’m surprised that your rain water from the roof just empties out onto the garden. I would like to see the down pipes enter into something like Trapps suggested , which in turn is the start of 4” soil pipe that is trenched away from the house say 20’ and into a 3ftx3ft x 3ft hole (soak away) with crushed concrete at the bottom with gravel on top and finished with the lawn put back over the top, it’ll also help to drain the garden.
My dad used to make me dig these when we used to build extensions many years ago, whatever mess you made it’ll soon return to as it was, and as has been said, just get the water as far away from the foundations as possible.
Good luck , I know you’ll sort it.
Steve![]()
Another idea.
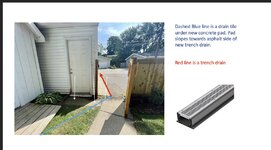
You don't have to tear up the whole garden, just enough to connect to the edge. It would be a small cement pad, sloped to keep water flowing to drive and new trench drain. Drain from garden connects to new trench drain. Trench drain also helps protect garage and gives clear path to alley.
Nick, how about this for a wacky idea for the pipe under the concrete?
![]()
Our house has downspouts that drain into underground corrugated pipe just like yours, and would freeze up and and cause issues in the spring. My solution was to fish a heat trace wire (they are usually installed on roofs near the gutters to prevent ice dams) through the pipe and when the spring thaw comes just plug it in every once in a while to met the ice. Works like a charm.