To avoid these ads, REGISTER NOW!

ZMotorsports Shop Projects 2.0

LXCam

ALLIANCE MEMBER
Joined
Apr 23, 2013
Messages
19,211
Location
AZ
Cam, yes, the 2023 travel season has come to a close for the wife and I. Going into the holiday season we don't have much time to use from work as it our company's busiest time of year and many blackout dates for vacations. Can't wait until retirement so we can join our friends as this is the FMCA 4-Wheelers club's busiest time of year for Jeep gatherings and rallies and we have never been able to attend any of them between November and March.

The RV bay is 20' wide. Gives me plenty of room to open slides, work on the coach and still not encroach into the stored equipment along the wall that is shared with the shop. If you were just using it for storage I think 16' would be adequate although we have some friends who have one 14' wide and they say it works fine for them, just seems a bit tight for me though.
So now we gotta wait 6 months before we see some more outings.......booooo ;)

The reason I asked about the width was we're looking at a new place that has a three car and a RV garage (both attached). The sad part is it's 16'7" X ~59' clear with an 18ft lid. It's also on a 1 acre lot so the only issue with building a correctly sized shop is dictated by my wallet. Which if we do this my wallet is going to be bleeding (take that back - hemorrhaging) for a while so doing another building right off the bat ain't happening.

I can make it work for now but it'll never work for a long term solution for me. If I were to stick with a converted RV garage for a shop I really want a 24ft width and no less then 20ft. I made 18ft work for a few years and that wasn't fun but was doable for the wrench area.
 
To avoid these ads, REGISTER NOW!

Jgaz

Well-known member
Joined
Dec 16, 2016
Messages
1,713
Location
AZ
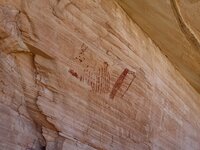
The next day we took off into an area we had not explored at all before as I had read about some pictographs on someone's hiking blog a while back. I plugged the GPS coordinates of the pictorgraphs into GAIA and then worked backwards trying to link the closest trails to the pictorgraph's location.

The day started off Highway 6 about 15 miles north of I-70 at the Green River Cutoff trail. This is a direct road across the northern most part of the Swell and takes you to the Wedge, which is known as the "Little Grand Canyon". We have been to the Wedge a couple of times accessing it via a couple different trails but never from this direction. The goal of the day was to find the pictorgraphs, then head to the Wedge for lunch and then leave to the north of the Wedge and take a new to us trail down the east side of the Swell and return to I-70 about 40 miles west of Green River. This would be a long day so we left earlier than usual.

Here we are just pulled off Highway 6 to air down.swell21.jpg

swell22.jpg

We eventually found the pictographs but it was a long search. Two of the trails in which I had previous marked using GAIA had been closed off using boulders and fencing so we had to locate alternative routes to the pictorgraphs. We ended up accessing them via very, very faint two-tracks that look like they haven't been used in quite some time.

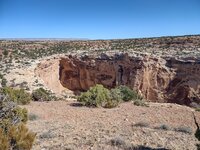
The wife was getting anxious as we were about 25 miles off the main trail and I was basically trying to feel my way around a canyon by any trail we could find. The wife was ready to turn around and head back to the main trail and continue our plans for lunch but I was hell bent on finding the pictographs as it was a mission now.

We did finally locate them but it wasn't an easy route to access. I can see why they were on a hiking blog and not an off-road blog. :rolleyes:
swell23.jpg

swell24.jpg

swell25.jpg

We then tried to pick an easier route back to the main trail but kept getting ridge locked and having to turn and backtrack. We eventually picked out way back to the Green River Cutoff trail and blasted down the road to the Wedge. Although we were slightly behind schedule we made good time and had a nice lunch spot. The Wedge Recreation area was actually quite busy as we saw the first other people in a couple of days of being on the trails.

Our lunch spot overlooking the Wedge.
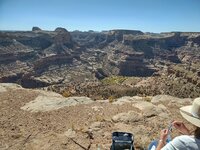
swell26.jpg

swell27.jpg

After leaving the Wedge we realized that we didn't have time to go the route I had originally mapped out, so we decided to head back by way of Buckhorn Wash Road. After realizing that Buckhorn Wash was a freakin' highway with all of the traffic and it being so dusty because they hadn't seen any rain in several weeks, I wanted to get off the main trail and find something more "remote" to have to ourselves. After playing with the GAIA app on my tablet I found a trail that somewhat paralleled Buckhorn Wash but on the other side of the ridge down in a wash. As we went through a gated area in the wash we came across this old mine that still had some components remaining.
swell28.jpg

We returned to town just about dusk and decided on dinner. We try to spread the love between a couple of our favorite places to eat. I was craving a steak and the wife wanted her teriyaki chicken.
swell29.jpg

This was from the night before's dinner from our other favorite place to eat where I ordered their pork chops. I seem to get these each trip as I have not found pork chops this delicious anywhere else.
swell30.jpg


More pictures to follow..
I love searching for pictographs. The ones you posted above are unite similar to several panels ive found in the Grand Gulch area.

Thanks for sharing
 
OP
Z

zmotorsports

ALLIANCE MEMBER
Joined
Oct 20, 2009
Messages
21,477
Location
Northern Utah
So now we gotta wait 6 months before we see some more outings.......booooo ;)

The reason I asked about the width was we're looking at a new place that has a three car and a RV garage (both attached). The sad part is it's 16'7" X ~59' clear with an 18ft lid. It's also on a 1 acre lot so the only issue with building a correctly sized shop is dictated by my wallet. Which if we do this my wallet is going to be bleeding (take that back - hemorrhaging) for a while so doing another building right off the bat ain't happening.

I can make it work for now but it'll never work for a long term solution for me. If I were to stick with a converted RV garage for a shop I really want a 24ft width and no less then 20ft. I made 18ft work for a few years and that wasn't fun but was doable for the wrench area.

I know what you mean about the wallet bleeding after purchasing a new home. Although my shop was planned from the get-go after the new home purchase it still was unpleasant to see the balance drop as quickly as it did. :oops:

I'm also I did as much planning before breaking ground as I had a lot of people telling me to keep the full 50'x60' open with the coach parked inside. They said it would be better to have the fully open shop and can use the space as needed but I kept sticking to my guns about keeping the coach in a clean environment. Sooooo glad I listened to my inner voice as once I wash the coach and back her into the RV bay I know it will remain clean until she's comes out next trip. Plus it gives me another 100' of wall space for equipment having that divider wall between the shop and RV bay.

As for the next 6-months, yeah, I'm a grumpy ******* between now and about late March. Maybe the grandson will help me become a better version of myself this year as I'm usually not the funnest person to be around when I'm out of my RV travel window. :unsure:
 
OP
Z

zmotorsports

ALLIANCE MEMBER
Joined
Oct 20, 2009
Messages
21,477
Location
Northern Utah
I love searching for pictographs. The ones you posted above are unite similar to several panels ive found in the Grand Gulch area.

Thanks for sharing

Thanks for posting that latest batch of photos, I really enjoy seeing the incredible places you go. Glad you had fun!

Thanks guys. Glad you enjoyed the pictures from the vacation. The wife and I have truly been blessed by the places we've been able to see and visit. Hopefully there'll be many more on the horizon to experience yet.
 

MadeByMiller

Well-known member
Joined
Dec 29, 2018
Messages
1,230
Location
Rapid City, SD
Cool trip! The launch site looks like it was fun to explore. I found this video explaining the building on rails, aka the TCEE. The missile subassemblies were put together in that building which was climate controlled. They actually assembled them onto the launch tower inside the building, while the tower was laid down. Just prior to launch, they would roll the building back out of the way and lift the launch tower out of the horizontal position and into the launch angle. Pretty neat, that YouTube channel has a whole playlist about the site if you're interested.
 
OP
Z

zmotorsports

ALLIANCE MEMBER
Joined
Oct 20, 2009
Messages
21,477
Location
Northern Utah
Cool trip! The launch site looks like it was fun to explore. I found this video explaining the building on rails, aka the TCEE. The missile subassemblies were put together in that building which was climate controlled. They actually assembled them onto the launch tower inside the building, while the tower was laid down. Just prior to launch, they would roll the building back out of the way and lift the launch tower out of the horizontal position and into the launch angle. Pretty neat, that YouTube channel has a whole playlist about the site if you're interested.

Awesome.

Thanks for the link, I'll have to check that out. The way you describe it was pretty much how I "guessed" it took place as I was walking through it with the wife. I was trying to determine the reasoning for various parts and why things were the way they were and was just spit-balling it.
 

Just Fishing

Well-known member
Joined
Dec 21, 2020
Messages
57
Location
Utah
Those images make me miss my Jeep.
I haven't been able to drive it for about a month now.

Dealing with state farm has been an absolute nightmare, I came very close to just telling them to go f off and then call my insurance company to deal with it instead. o_O
 
OP
Z

zmotorsports

ALLIANCE MEMBER
Joined
Oct 20, 2009
Messages
21,477
Location
Northern Utah
Oh I get it Mike. I hate that stuff.

My last Dually I bought I told the sales guy no tire snot when it comes in…I got to watch them remove it. I was lucky they didn’t “silicone” the engine compartment.

Yeah, I don't get it Pat. They slather that **** on and think it helps to sell cars. I can't believe people actually think it looks cool. :rolleyes:
 
OP
Z

zmotorsports

ALLIANCE MEMBER
Joined
Oct 20, 2009
Messages
21,477
Location
Northern Utah
Those images make me miss my Jeep.
I haven't been able to drive it for about a month now.

Dealing with state farm has been an absolute nightmare, I came very close to just telling them to go f off and then call my insurance company to deal with it instead. o_O

Sorry to hear that Chris. Dealing with insurance companies is one of the least fun activities there is. Like trying to get blood from a turnip.
 
Last edited:
OP
Z

zmotorsports

ALLIANCE MEMBER
Joined
Oct 20, 2009
Messages
21,477
Location
Northern Utah
Last night was a mixed bag of projects. Nothing major just a bunch of little projects around the property and in the shop.

The Jeep was absolutely filthy from the dust in central Utah, so I stopped to wash it on the way home, then wiped it down upon arriving home.

We are supposed to get a hard freeze at the end of the week and into the weekend with temps expected in the mid-20's so I figured I had better blow my sprinkler system out. Of course, I found a valve was wasn't holding so I had to take that apart and clean it before I could continue to blow out the system.

Once the sprinkler was blown out and the filter cleaned and put to bed for the winter, I covered the A/C unit so the property is pretty much ready for winter other than hopefully a few more mows before the white stuff starts falling.

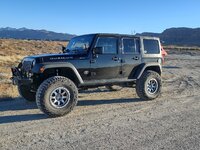
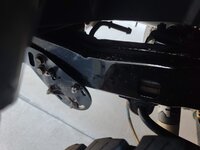
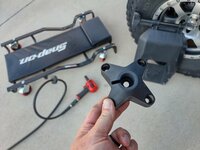
I then turned my attention to the Jeep. I did a stupid thing a couple of weeks ago. :rolleyes: Before our trip to the Swell, I wanted to flex my Jeep out at work on the loading ramp like I have done in the past to test other suspension mods, but this was just to check to see if anything jumped out at me pertaining to binding or interferences. As some will remember I installed the Teraflex Transit Flaps a few years ago to keep law enforcement in our area happy and cover my rear tires. The Teraflex rock guards work well to keep me legal and yet are quickly and easily removed when going off-road and leave nothing but the small mounting block attached to the frame rail just behind the axle. A couple of years ago I broke one of the mounting blocks when I backed into a hard snow pile. Well, I broke another one a couple of weeks ago when I backed up the loading ramp and forgot to remove them. 🤬

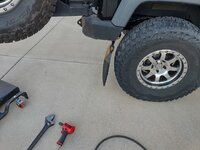
While the wife and I were in the Swell last week the new one arrived so last night I replaced the broken one so I could be legal again.

Broken mounting block with rock guard still attached.
jeep1.jpg

Frame mounted bracket with some pieces remaining around the bolts.
jeep2.jpg

New mounting block ready to swap in.
jeep3.jpg

New mounting block installed on the bracket.
jeep4.jpg

And completed.
jeep5.jpg


Next I turned my attention to getting the dust from the engine bay and interior. It wasn't terrible but still needed a good blow out with air and vacuum job.
jeep6.jpg

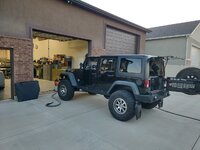
I also removed my Bestop Sunrider front top and reinstalled the OEM Freedom Tops as it's that time of year.
jeep7.jpg

Thanks for looking.
 
To avoid these ads, REGISTER NOW!

Jgaz

Well-known member
Joined
Dec 16, 2016
Messages
1,713
Location
AZ
On the subject of not making your shop one large space:
Your last picture of the Jeep after the top swap shows all the “stuff” that is along the RV bay.
Where would all of that go? I’m sure there’s “stuff” on the opposite side of that wall.

Wall space is king. Even in a shop your size
 
OP
Z

zmotorsports

ALLIANCE MEMBER
Joined
Oct 20, 2009
Messages
21,477
Location
Northern Utah
On the subject of not making your shop one large space:
Your last picture of the Jeep after the top swap shows all the “stuff” that is along the RV bay.
Where would all of that go? I’m sure there’s “stuff” on the opposite side of that wall.

Wall space is king. Even in a shop your size


Agreed. Thank you.

When I was discussing with my contractor prior to breaking ground, he was telling me that it would keep the cost down to keep it open I expressed my reasoning for having that divider wall and it was pretty much twofold.

First and foremost was to keep the coach in a cleaner environment than an open shop and secondly, to have both sides of the divider wall for lining with equipment on the shop side and storage in the RV/storage bay.

I feel there are other reasons as well but those were the two biggies behind my decision.
 

Just Fishing

Well-known member
Joined
Dec 21, 2020
Messages
57
Location
Utah
Sorry to heat that Chris. Dealing with insurance companies is one of the least fun activities there is. Like trying to get blood from a turnip.

Both a pita and a godsend for me at this point. :cautious:
The day before I was headed down to the Manti to go pick up a new toy that's made of about 3,000lbs of aluminum :whistle:, the jeep got hit while prepping it for the wife to use while myself and my father-in-law were down checking this thing out.

Wife used the: "maybe this is a sign to not get it",
me: "then the Tahoe would have gotten hit?" :D


I decided the body damage is something I could live with, if it got hit on the driver side, I probably would have let them re-paint it.
more $$ for other projects and the gash in the side will always be there and linked directly to the new "project".

I still need you to look over suspension one day, but for now I'm just throwing an alignment at it.
The jeep is probably about to get some new 35in tires since I refuse to buy a new 31in tire. ;)

I also have something else for you that you may or may not want to do, but it's something I can bring up with you later. :beer:
 
OP
Z

zmotorsports

ALLIANCE MEMBER
Joined
Oct 20, 2009
Messages
21,477
Location
Northern Utah
Both a pita and a godsend for me at this point. :cautious:
The day before I was headed down to the Manti to go pick up a new toy that's made of about 3,000lbs of aluminum :whistle:, the jeep got hit while prepping it for the wife to use while myself and my father-in-law were down checking this thing out.

Wife used the: "maybe this is a sign to not get it",
me: "then the Tahoe would have gotten hit?" :D


I decided the body damage is something I could live with, if it got hit on the driver side, I probably would have let them re-paint it.
more $$ for other projects and the gash in the side will always be there and linked directly to the new "project".

I still need you to look over suspension one day, but for now I'm just throwing an alignment at it.
The jeep is probably about to get some new 35in tires since I refuse to buy a new 31in tire. ;)

I also have something else for you that you may or may not want to do, but it's something I can bring up with you later. :beer:


Sounds good.

Might be a bit as I have two side jobs promised out yet to complete and a bunch of personal maintenance items that have been stacking up for a while that need to be done.
 
OP
Z

zmotorsports

ALLIANCE MEMBER
Joined
Oct 20, 2009
Messages
21,477
Location
Northern Utah
With a hard freeze upon us here in Northern Utah this week some time was spent getting the property ready for winter.

Blew the sprinkler system out earlier in the week then went with my son and DIL to look at a new car for his family another night.

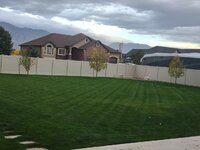
I then hurried and ran around the lawns while I still had some daylight, barely.

The trees just started dropping their leaves this past weekend.
fall1.jpg

Leaves mulched up and ready for the last half of them to fall this week, then rinse and repeat.
fall2.jpg

I then went into the shop and fired up the overhead gas furnace for the first time of the season to ensure there we no issues. It's kind of a sad day each year when I can no longer work with the shop doors open. I really look forward to that first day in spring when I can work with the shop doors wide open. :cool:

I had gotten a call from my local NAPA rep last week just before we left for vacation to inform me that NAPA was sponsoring their filter sale again this year. They used to have the sale each fall and each spring but 3 years ago when filters all of a sudden became hard to acquire they suspended their sales. I was glad to hear they were having it again this year as I was getting low and I hated having to pay full-price over the past few years. Plus I am getting ready to service the coach and generator this fall and those few filters are quite expensive so saving approx. 30% on them was worth the wait.

I still had a few remaining from recent purchases and also noted I have a few from my DIL's Subaru that I now need to return and stocked up on the filters for their new ride.

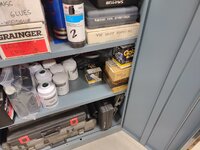
I had also slowly over the past few years had my filters migrate to a couple of shelves in the cupboard so I thought I'd take a few minutes and see if I could move some fluids around and get the filters on one or two shelves.
filters1.jpg

filters2.jpg

The filter haul lined up so I could see what I wanted where.
filters3.jpg

Much better.
filters4.jpg


Thanks for looking.
 
OP
Z

zmotorsports

ALLIANCE MEMBER
Joined
Oct 20, 2009
Messages
21,477
Location
Northern Utah
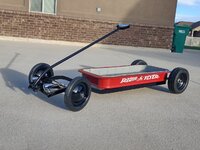
I then realized that I still had some time before the wife arrived home from work so I jumped back on my grandson's Radio Flyer project.

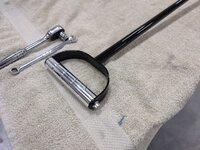
I chucked up the hand grip in the lathe and ran some polish around it.
rf431.jpg

Then installed it on the handle.
rf432.jpg

While the aluminum polish was out I gave the same treatment to the tie rods.
rf433.jpg

Chucked up the steering pivot shoulder bolt and knocked the knurls off.
rf434.jpg

Ran a reamer by hand through the pivot hole to carefully remove the paint mil thickness buildup.
rf435.jpg

And did the same thing to the steering pivot place so the shoulder bold would drop right in.
rf436.jpg

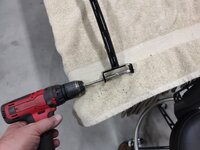
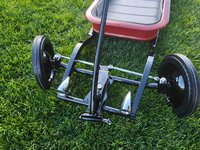
Bolted the steering plate in place and ran a .250" reamer through the handle pivot tube.
rf437.jpg

As well as ran the reamer through the pivot points to ensure the quick release pin slides in nice and smooth.
rf438.jpg


That was as far as I got last night before cleaning up for the night.

I have some maintenance on the wife's car to perform over the weekend then I should be able to finish up the Radio Flyer project.

Thanks for looking.
 

Ohmthis

Well-known member
Joined
Jan 20, 2013
Messages
3,021
Location
Outside of Louisville KY
With a hard freeze upon us here in Northern Utah this week some time was spent getting the property ready for winter.

Blew the sprinkler system out earlier in the week then went with my son and DIL to look at a new car for his family another night.

I then hurried and ran around the lawns while I still had some daylight, barely.

The trees just started dropping their leaves this past weekend.
fall1.jpg

Leaves mulched up and ready for the last half of them to fall this week, then rinse and repeat.
fall2.jpg

I then went into the shop and fired up the overhead gas furnace for the first time of the season to ensure there we no issues. It's kind of a sad day each year when I can no longer work with the shop doors open. I really look forward to that first day in spring when I can work with the shop doors wide open. :cool:

I had gotten a call from my local NAPA rep last week just before we left for vacation to inform me that NAPA was sponsoring their filter sale again this year. They used to have the sale each fall and each spring but 3 years ago when filters all of a sudden became hard to acquire they suspended their sales. I was glad to hear they were having it again this year as I was getting low and I hated having to pay full-price over the past few years. Plus I am getting ready to service the coach and generator this fall and those few filters are quite expensive so saving approx. 30% on them was worth the wait.

I still had a few remaining from recent purchases and also noted I have a few from my DIL's Subaru that I now need to return and stocked up on the filters for their new ride.

I had also slowly over the past few years had my filters migrate to a couple of shelves in the cupboard so I thought I'd take a few minutes and see if I could move some fluids around and get the filters on one or two shelves.
filters1.jpg

filters2.jpg

The filter haul lined up so I could see what I wanted where.
filters3.jpg

Much better.
filters4.jpg


Thanks for looking.
When filters were rarer than hens teeth, I’d buy everyone I could get (sometimes only 3 in stock) for my trucks. Good stash you have there.
 

JCQuick

Well-known member
Joined
Nov 29, 2008
Messages
4,933
Location
Apopka Fla.
I have to say i kind of laughed a little at the "VW Shift Fork Jig" we call them trans jigs here and i'm use to the solid aluminium ones that were made by crown. and I know you know they do help with more than just setting the forks .

PS if you ever want to part with it holler:)
 

bigdave_185

Well-known member
Joined
Feb 14, 2021
Messages
443
Location
Utah
Fine polish job you got !

I’m just pumped I have heat in the garage to turn on. Boy does that make winters so much better for car washing, car repairs, snow removal is a million times easier, melt n squeegee out the door to create a nice ice rink for the ups man
 
OP
Z

zmotorsports

ALLIANCE MEMBER
Joined
Oct 20, 2009
Messages
21,477
Location
Northern Utah
When filters were rarer than hens teeth, I’d buy everyone I could get (sometimes only 3 in stock) for my trucks. Good stash you have there.

I completely agree. Over the past few years I bought a couple at a time because I was awaiting another filter sale to really save a few bucks because I can't sleep at night if I don't have at least one spare and oil for a service for each vehicle. The filter sale they offer saves quite a lot so it's worth it to stock up.
 
OP
Z

zmotorsports

ALLIANCE MEMBER
Joined
Oct 20, 2009
Messages
21,477
Location
Northern Utah
I have to say i kind of laughed a little at the "VW Shift Fork Jig" we call them trans jigs here and i'm use to the solid aluminium ones that were made by crown. and I know you know they do help with more than just setting the forks .

PS if you ever want to part with it holler:)

Yeah, that shift fixture/jig was used quite heavily back in the day. I'm not even sure if they still make them or not but sorry, I won't be selling. I hate selling tools once acquired. I have a metric ****-ton of snowmobile tools and doubt I'll ever work on another one of those in my lifetime. :dunno:
 
OP
Z

zmotorsports

ALLIANCE MEMBER
Joined
Oct 20, 2009
Messages
21,477
Location
Northern Utah
Fine polish job you got !

I’m just pumped I have heat in the garage to turn on. Boy does that make winters so much better for car washing, car repairs, snow removal is a million times easier, melt n squeegee out the door to create a nice ice rink for the ups man

Thanks Dave.


As for shop heat, it was nice walking out there Saturday morning and just having to bump it a bit and have a nice warm shop all day. As much as I love working in the shop with the doors open sometimes it's nice to close the doors, shut the world out and just enjoy my happy place for a few hours.
 

OutlawDrifter

Well-known member
Joined
Jan 20, 2015
Messages
3,903
Location
KS
...sometimes it's nice to close the doors, shut the world out and just enjoy my happy place for a few hours.

There's a reason there are no windows facing the road in my shop, or a window in the man door. That keeps the, "saw you were in here, whatcha' doin'?" folk out. Seems they always have a better idea on how to use your time, tools, and equipment :ROFLMAO:
 
OP
Z

zmotorsports

ALLIANCE MEMBER
Joined
Oct 20, 2009
Messages
21,477
Location
Northern Utah
Friday night after work while waiting for the wife to get home and pull her car into the shop for some maintenance work, I thought I'd knock out the last few items on the Radio Flyer project.

I chucked up the last few stainless steel socket head capscrews in the lathe and turned the knurls off. These bolts are for the tie rods.
rf448.jpg

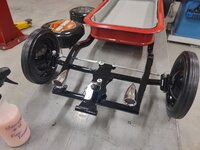
Installed and adjusted the tie rods as well as installed the chrome "King Bee" headlights.
rf449.jpg

I then gave everything a wipe down with Final Inspection and installed the handle before snapping a few pictures and lowering it down off the lift table.
rf450.jpg

More pictures of the finished wagon to follow.
 
OP
Z

zmotorsports

ALLIANCE MEMBER
Joined
Oct 20, 2009
Messages
21,477
Location
Northern Utah
There's a reason there are no windows facing the road in my shop, or a window in the man door. That keeps the, "saw you were in here, whatcha' doin'?" folk out. Seems they always have a better idea on how to use your time, tools, and equipment :ROFLMAO:


Agreed Marc. I only have two windows in my shop and they face the back yard and the mountains to the east so I can see them from the shop when working. Nothing facing the street, although technically, when I have the lights on in the shop people can see the lights from the street but in this house I haven't been bothered when I haven't wanted to. Now in the summer months with the doors wide open, that's a different story. :rolleyes:
 
OP
Z

zmotorsports

ALLIANCE MEMBER
Joined
Oct 20, 2009
Messages
21,477
Location
Northern Utah
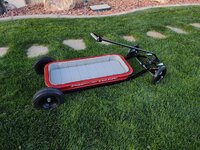
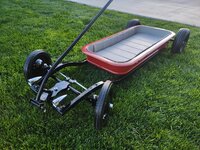
While I still had some daylight remaining I took it outside for a spin around the yard.

Completed pictures of my grandson's Radio Flyer Wagon project.

rf451.jpg

rf452.jpg

rf453.jpg

rf454.jpg

rf455.jpg

rf456.jpg

rf457.jpg

rf458.jpg

rf459.jpg

rf460.jpg


Thanks for looking and for continuing to follow along on this fun project. I hope my grandson enjoys it and cherishes it as I had a fun time building it as well as I hope his parents are happy with it and are proud to pull it around.
 
OP
Z

zmotorsports

ALLIANCE MEMBER
Joined
Oct 20, 2009
Messages
21,477
Location
Northern Utah
After snapping pictures of the wagon Friday night I commenced giving the shop a thorough cleaning and sweeping around all of the machining and fabrication equipment in particular.

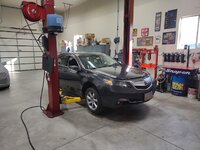
I pulled the wife's Acura TL in the shop Friday night when she got home from work and then Saturday morning I commenced some preventive maintenance items.

I had charged up the cameras Friday night before closing up the shop and had every intention of doing a video on the valve adjustment procedures to be performed on the wife's car. However, when I walked out into the shop Saturday morning with my mug of coffee ready to tackle the day's work ahead of me I said "F**K IT". I wasn't in the mood to record the process so I just cranked up the radio and enjoyed the day to myself working in the shop doing what I do.

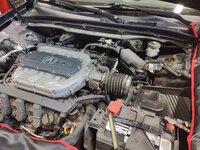
Car racked and ready.
valves1.jpg

valves2.jpg

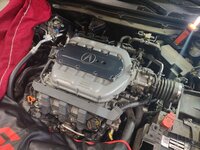
Engine covers removed, rear tower strut bar removed for better access to the rear bank and air filter and ductwork removed.
valves3.jpg

Upper intake plenum removed and lower manifold taped off to avoid an oops.
valves4.jpg

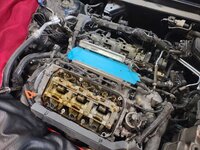
Valve covers removed and ready to begin the valve adjustment procedure.
valves6.jpg

I was very impressed with the inside of the engine and how clean everything was. Testament to good service intervals.
valves7.jpg

Small peep hole plug removed on the front bank's timing cover to expose the timing markings. The firing order is identified on the front cam sprocket and the engine is turned over until the cam marking aligns with the notch in the timing cover. Then the valves on that cylinder can be adjusted.
valves8.jpg

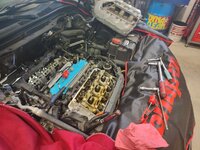
Moving through the adjustment process and torquing the jam nuts to spec as I go. Valve spec's were .008" for intake and .011" for exhaust valves. I like to keep a feeler gauge for each valve ready as well as a torque wrench set and loaded for each jam nut if the torque spec's are different, which in this case they were. Intake valve jam nuts were 14 ft/lbs. and exhaust were 10 ft/lbs.
valves9.jpg

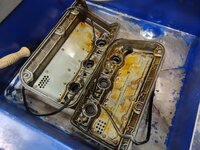
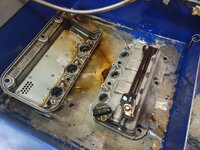
Once the valves were adjusted it was time to move on to cleaning and then reassembly. Valve covers were cleaned in the solvent tank.
valves10.jpg

New Fel-Pro gaskets at the ready.
valves5.jpg

Stay tuned for more pictures of the valve adjustment process....
 
OP
Z

zmotorsports

ALLIANCE MEMBER
Joined
Oct 20, 2009
Messages
21,477
Location
Northern Utah
With the valve covers cleaned it was time to remove and replace the spark plug tube seals. Carefully remove the old ones avoiding damage to the bores and then I like to apply a small amount of lube to the new ones to avoid tearing them during installation.
valves11.jpg

Also, I like to drive directly on the bore itself rather than spread the load of driving the new seals in over the length of the valve cover. Less chance of breaking or damaging the valve cover this way. I use a receiver driver that is sized enough to accept the bore and hold it off the workbench enough to clear any obstructions. In this case it was the threaded studs I was trying to avoid damaging.
valves12.jpg

The receiver is just taller than the studs. Next I can drive the new seals down into the bore while the receiver is firmly seated on the workbench.
valves13.jpg

Next is to prep the valve cover bolts with new grommets. Removing the old ones can be difficult as they are generally less pliable than the new ones due to all of the heat cycles they've experienced.
valves14.jpg

Valve covers reinstalled and torqued to spec. Also, look to see where, if any, sealant is applied from the OEM. This is usually at an intersection between front timing covers and block or other modular components but the important thing to note is that if sealant was used from the factory, make sure to apply a small amount during reassembly to avoid any possible leaks.
valves15.jpg

Ignition coils reinstalled and all wiring looms laid back in place.
valves16.jpg

New upper intake plenum gasket is installed and ready to accept the upper intake.
valves17.jpg

Upper intake plenum installed and torqued to spec.
valves18.jpg

Upper cover installed with new gasket and fasteners torqued to spec.
valves19.jpg

Few more pictures to follow...
 
To avoid these ads, REGISTER NOW!
Top Bottom